Zen Tutorial
This chapter describes how to create some simple web pages using Zen. The chapter is organized as a step-by-step tutorial. Topics include:
This chapter offers a foundation for topics found later in this book and in subsequent books on Zen. For a more complete hands-on experience, also try the Zen QuickStart Tutorial, which is available from the Documentation home page.
Hello World
The following steps display “Hello world!” on a Zen page:
-
Start Studio.
-
Choose File > Change Namespace or F4.
-
Choose the SAMPLES namespace.
-
Choose File > New or Ctrl-N or the
 icon.
icon. -
Click the Zen tab.
-
Click the Zen Page icon.
-
Click OK.
-
For Package Name choose ZENDemo.
-
In the Class Name field, type:
hello
-
For Application Name choose ZENDemo.Application.
-
Click Next.
-
Click Finish.
-
Place the cursor at the start of this line and click to move the insertion point there:
</page>
-
Press Enter.
-
Move the cursor up to the blank line and click to move the insertion point there.
-
Type a left angle bracket (<) to display a context-sensitive list of XML elements.
-
Click button.
-
Press Enter.
-
Type a space to display a context-sensitive list of XML attributes.
-
Click caption.
-
Press Enter.
-
Type:
Hello world!"/>
-
Choose Build > Compile or Ctrl-F7 or the
 icon.
icon. -
Choose View > Web Page or the
 icon.
icon. Your simple new Zen page displays “Hello world!” on the face of a button.
-
Also try steps 13–24 with:
<calendar align="right"/>
<colorPicker/>
<text value="Hello world!"/>
If you encounter difficulties during this exercise, review “The Zen Demo” and “Supported Browsers” in the chapter “Introducing Zen.” These sections provide useful background information for getting started with Zen.
Creating a Zen Application
A Zen application class extends %ZEN.applicationOpens in a new tab to provide application-wide styling behavior. In this exercise you create a Zen new application class, as follows:
-
Start Studio.
-
Choose File > Change Namespace or F4.
-
Choose the SAMPLES namespace.
-
Choose File > New or Ctrl-N or the
icon. -
Select the Zen tab.
-
Click the Zen Application icon.
-
Click OK.
The Zen Application Wizard presents the fields shown in the following table. For this exercise, enter the values shown in the right-hand column of the table.
Field Meaning Value to Enter Package Name The package that contains the new application class. MyApp Class Name The class name of the new application class. MyNewApp Application Name The logical name of the application. My New Zen Application Description Any text that you want to use to describe the application. This is my first new Zen application. Click Finish.
-
The Zen Application Wizard creates and displays a skeletal application class. It includes some predefined class parameters and an XData Style block as follows:
/// This is my first new Zen application. Class MyApp.MyNewApp Extends %ZEN.application { /// This is the name of this application. Parameter APPLICATIONNAME = "My New Zen Application"; /// This is the URL of the main starting page of this application. Parameter HOMEPAGE = ""; /// This Style block contains application-wide CSS style definitions. XData Style { <style type="text/css"> </style> } } -
Choose Build > Compile or Ctrl-F7 or the
icon.
Creating a Zen Page
A Zen page class extends %ZEN.Component.pageOpens in a new tab to define the contents and behavior of a web page. In this exercise you create a new Zen page class in several steps.
Step 1: New Page Wizard
Create the new class as follows:
-
Start Studio.
-
Choose File > Change Namespace or F4.
-
Choose the SAMPLES namespace.
-
Choose File > New or Ctrl-N or the
icon. -
Select the Zen tab.
-
Click the Zen Page icon.
-
Click OK.
The Zen Page Wizard presents the fields shown in the following table. For this exercise, enter the values shown in the right-hand column of the table.
Field Meaning Value to Enter Package Name The package that contains the page class. MyApp Class Name The page class name. MyNewPage Application The package and class name of the application that this page belongs to. MyApp.MyNewApp Page Name The logical name of this page within its application. My Home Page Domain The domain this page uses for localization of caption text. For this exercise, leave the Domain field empty. Description Any text that you want to use to describe the page. My very first Zen page class. Page type Regular page, or subclass of a template page class. For this exercise, leave the Page type field with its default selection of Page. Click Next.
-
The wizard prompts you to select an initial page layout, for example:
-
Column 2 — two columns, plus space for a title along the top
-
Title Page — space for a title along the top
-
Default — no predefined layout
For this exercise, click Title Page. Then click Finish.
-
-
The New Page Wizard creates and displays a skeletal Zen page with predefined class parameters and the XML blocks XData Style and XData Contents, as follows:
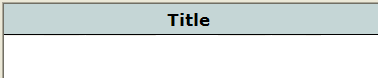
Class MyApp.MyNewPage Extends %ZEN.Component.page
{

  /// Class name of application this page belongs to.
  Parameter APPLICATION = "MyApp.MyNewApp";

  /// Displayed name of this page.
  Parameter PAGENAME = "My Home Page";

  /// Domain used for localization.
  Parameter DOMAIN = "";

  /// This Style block contains page-specific CSS style definitions.
  XData Style
  {
    <style type="text/css">
    /* style for title bar */
    #title {
      background: #C5D6D6;
      color: black;
      font-family: Verdana;
      font-size: 1.5em;
      font-weight: bold;
      padding: 5px;
      border-bottom: 1px solid black;
      text-align: center;
      }
    </style>
  }

  /// This XML block defines the contents of this page.
  XData Contents [XMLNamespace="http://www.intersystems.com/zen"]
  {
    <page xmlns="http://www.intersystems.com/zen" title="">
      <html id="title">Title</html>
      <vgroup width="100%">
        <!-- put page contents here -->
      </vgroup>
    </page>
  }
}
The XML blocks in this page class work together as follows:
-
XData Style defines a style rule called #title that defines a background color, padding, borders, and font characteristics for HTML output.
-
XData Contents provides an XMLNamespace keyword. The value http://www.intersystems.com/zen enables the Studio Assist type-ahead feature for built-in Zen components. You have already used this feature if you followed the instructions in the “Hello World” section of the “Zen Tutorial.”
-
XData Contents uses the <page> element to define a page object.
-
XData Contents uses the <html> element to define a simple HTML excerpt for display in the browser. The id value title creates the connection between the html object and the #title rule from XData Style. The html object formats a string of text, Title. The resulting output functions as a simple title bar for the page.
-
XData Contents provides an empty <vgroup>. Later exercises add components here.
-
-
Choose Build > Compile or Ctrl-F7 or the
icon. -
Choose View > Web Page or the
icon. Your new Zen page displays as follows:
If you encounter difficulties when displaying any Zen page from Studio, you can display the page by opening a browser session and entering a URI in this format:
http://localhost:57772/csp/samples/MyApp.MyNewPage.clsOpens in a new tab
Where:
-
57772 is the web server port number assigned to Caché
-
samples is the namespace that contains the Zen page class (all-lowercase)
-
MyApp.MyNewPage is the Zen page package and class name (case-sensitive)
Step 2: XData Contents Block
In this exercise you modify the <page> element to add a simple button to the page. You can do this by typing text into the XData Contents block, or by using templates to generate a <button> element with the correct syntax. This exercise uses both techniques:
-
In Studio, open the page class.
-
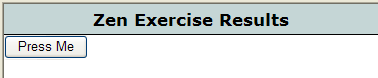
Select the text Title within the <html> element. Replace Title with a meaningful string, for example:
Zen Exercise Results
-
Remove this line just after the <vgroup> element:
<!-- put page contents here -->
Place the cursor between <vgroup> and </vgroup> and click to move the insertion point there.
-
Choose Tools > Templates > Templates or press Ctrl-T to display the Studio Templates dialog.
-
Choose Zen Element Wizard.
-
Click OK to display the Zen Element Wizard dialog.
-
In the drop-down list of XML elements, choose button. Click Next. Add properties as follows:
-
In the caption row, click Edit. Enter a string value and click OK. For example:
Press Me
-
In the id row, click Edit. Enter a string value and click OK. For example:
myButton
-
-
Click Finish. The XData Contents block now looks like this:
XData Contents [XMLNamespace="http://www.intersystems.com/zen"]
{
  <page xmlns="http://www.intersystems.com/zen" title="">
    <html id="title">Zen Exercise Results</html>
    <vgroup width="100%">
      <button id="myButton" caption="Press Me"/>
    </vgroup>
  </page>
}
New additions to this XData Contents block accomplish the following:
-
Define a button object as a child of the vgroup object. This places the button at the top left-hand corner of the display, under the title. The button is an instance of the %ZEN.Component.buttonOpens in a new tab class.
-
The id value myButton provides a way to find and manipulate the button object programmatically.
-
The caption value Press Me indicates the text that is displayed on the button when the page appears.
-
At present, if you click this button it does nothing.
-
-
Choose Build > Compile or Ctrl-F7 or the
icon. -
Choose View > Web Page or the
icon. Your new Zen page displays as follows:
Step 3: Client-Side Method
In this exercise, you add a JavaScript client-side method to your Zen page class and invoke it each time the user clicks the <button>, as follows:
-
In Studio, open the page class.
-
Type an onclick attribute into your <button> definition as follows:
onclick="zenPage.btnClick();"
The XData Contents block now looks like this:
XData Contents [XMLNamespace="http://www.intersystems.com/zen"]
{
  <page xmlns="http://www.intersystems.com/zen" title="">
    <html id="title">Zen Exercise Results</html>
    <vgroup width="100%">
      <button id="myButton" caption="Press Me" onclick="zenPage.btnClick();"/>
    </vgroup>
  </page>
}
The value of the onclick attribute is a JavaScript expression that executes a method called btnClick on an object called zenPage. zenPage is the JavaScript variable that represents the page object on the client side. The btnClick method is available on the client side only if you define it in your Zen page class as a client-side method. The next step explains how to do this.
-
Place the cursor just below the closing curly brace of the XData Contents block, but above the closing curly brace of the page class. Click to move the insertion point there.
-
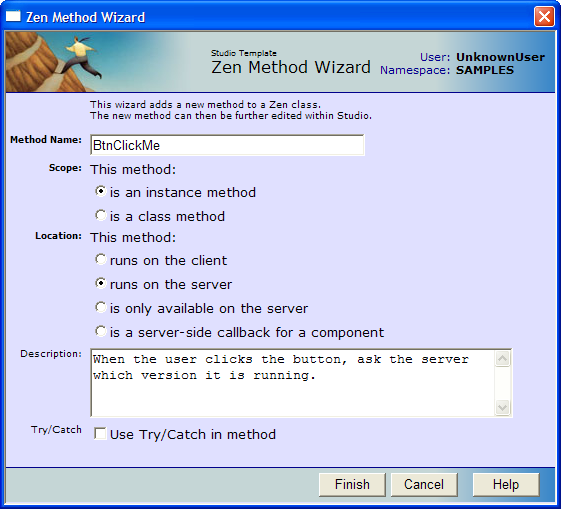
Choose Tools > Templates > Templates or press Ctrl-T to display the Studio Template dialog. Choose Zen Method Wizard. Click OK to display the following dialog:
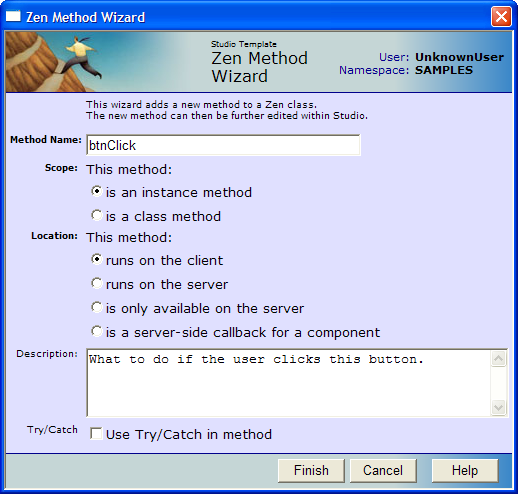
Edit the dialog as follows:
-
Enter the name btnClick
-
Choose is an instance method
-
Choose runs on the client
-
Enter a description.
-
Clear the Try/Catch check box.
-
Click Finish. Your new method appears in the page class as follows:
ClientMethod btnClick() [Language = javascript] { // TODO: implement alert('Client Method'); } -
-
Change the code within curly braces so the method now looks like this:
ClientMethod btnClick() [Language = javascript] { alert('Hello, World!'); } -
Choose Build > Compile or Ctrl-F7 or the
icon. -
Choose View > Web Page or the
icon. -
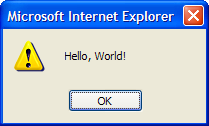
Click the “Press Me” button to display your JavaScript alert message:
-
Click OK to close the popup.
Some important things to notice about the btnClick method:
-
Its Language keyword is set to JavaScript. This means that the implementation of this method uses JavaScript. Studio syntax-colors and validates this method as JavaScript.
-
When this class is compiled, the btnClick method is not be available as a callable method on the server. It is available as an instance method of the zenPage object on the client.
-
The class compiler resolves inheritance. This means that you can define JavaScript methods within a super class and they are automatically be available to any subclasses. While this is possible to accomplish in traditional JavaScript, it is also very tedious and error-prone. A lot of the power of Zen comes from this ability to support inheritance on both the server and client.
-
The body of this method uses the standard JavaScript alert method to display a message on the client.
-
At runtime, this method runs in the client (browser) environment.
-
The method is defined in the same logical unit (that is, the class) as the page definition that references it. This makes pages easy to develop and maintain.
Step 4: Viewing the HTML Output
While viewing your Zen page in the browser, use the View Source option to look at the HTML served by the Zen page. You can see that the Zen page consists of the following elements, from top to bottom:
-
A standard HTML header
-
A set of included elements such as pre-generated JavaScript (for library components) and CSS (stylesheet) files.
-
HTML needed to display any components that generate HTML (such as the button component).
-
Some generated JavaScript utility code (for error detection, timeout management, encrypted server calls, etc.)
-
JavaScript class definitions for any user-defined classes used on this page (such as the page object itself).
-
JavaScript code to create any client-side objects defined by the page. This is a client-side version of the same objects defined in the page’s XData Contents block.
-
If needed, additional JavaScript code to finalize the client-side object model.
Step 5: Server-Side Method
In this exercise, you make a simple modification in your new Zen page. This modification demonstrates the ability to invoke server logic from within a client page, as follows:
-
In Studio, open the page class.
-
Using techniques from the previous exercises in this chapter, add a new button inside the XData Contents block. Give the new button the attribute values listed in the following table.
Attribute Value to Enter id myButtonToo caption No, Me! onclick zenPage.BtnClickMe(); Your XData Contents block should now resemble this one:
XData Contents [XMLNamespace="http://www.intersystems.com/zen"] { <page xmlns="http://www.intersystems.com/zen" title=""> <html id="title">Zen Exercise Results</html> <vgroup width="100%"> <button id="myButton" caption="Press Me" onclick="zenPage.btnClick();"/> <button caption="No, Me!" id="myButtonToo" onclick="zenPage.BtnClickMe();"/> </vgroup> </page> } -
Position the cursor just below the closing curly brace of the XData Contents block, but above the closing curly brace of the page class. Click to move the insertion point there.
-
Choose Tools > Templates > Templates or press Ctrl-T to display the Studio Template dialog. Choose Zen Method Wizard. Click OK to display the following dialog:
Edit the dialog as follows:
-
Enter the name BtnClickMe
-
Choose is an instance method
-
Choose runs on the server
-
Enter a description.
-
Clear the Try/Catch check box.
-
Click Finish. Your new method appears in the page class as follows:
Method BtnClickMe() [ZenMethod] { // TODO: implement &js<alert('Server Method');> Quit } -
-
Change the code within curly braces so the method now looks like this:
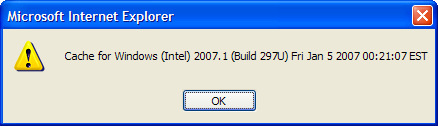
Method BtnClickMe() [ZenMethod]
{
    Set msg = $ZVERSION
    &js<alert('#(msg)#');>
    Quit
}
Now the ObjectScript method BtnClickMe executes the ObjectScript $ZVERSION or $ZV utility, which produces a text string that describes the Caché version that you are running.
-
Choose Build > Compile or Ctrl-F7 or the
icon. -
Choose View > Web Page or the
icon to display your new Zen page as follows: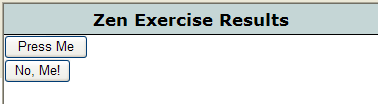
-
Click the “No, Me!” button. The following popup message appears:
-
Click OK to close the popup.
-
Use the View Source option of your browser to look at the HTML.
Some important things to notice about the BtnClickMe method:
-
It is defined as an instance method.
-
It omits the Language keyword. This means that this method uses the default server scripting language, which is ObjectScript. The possible scripting languages are ObjectScript, Caché Basic, or Caché MVBasic.
-
It executes on the server but (as further notes explain) it also sends a hyperevent to the client.
-
It uses the ZenMethod keyword. The ZenMethod keyword means that this is a server-side method that can be called from the client. Even when this method is called from within the client (browser) environment, it is still executed on the server.
-
The method assigns the value of the $ZVERSION utility to the variable msg, then sends msg to the client so that the user can see the value in a JavaScript alert popup. The statement:
&js< alert('#(msg)#'); >
is an example of embedded JavaScript syntax. While executing your BtnClickMe method on the server, Zen finds the snippet of JavaScript code between &js< and > and sends this snippet to the client for execution.
Note:This behavior is provided by the CSP hyperevent mechanism. For details, see the section “Server-Side Methods” in the “Tag-based Development with CSP” chapter of Using Caché Server Pages (CSP).
-
Within the embedded JavaScript, the syntax:
#(msg)#
is the convention for transferring the value of the variable msg from ObjectScript code executing on the server to embedded JavaScript executing on the client. For details, see the section “Zen Runtime Expressions” in the “Zen Pages” chapter of Developing Zen Applications.
-
The client-side zenPage object can invoke your server-side BtnClickMe method.
Because you defined BtnClickMe as an instance method, the server needs the current client-side object’s complete state to be able to execute the method.
When zenPage invokes your server-side method, the client-side implementation of BtnClickMe gathers up any argument and object context information available on the client side, serializes the entire page object and sends it through to the server, then invokes the server-side method, all using the CSP session-encrypted hyperevent mechanism.
-
BtnClickMe does not return a value. This is intentional. When you use CSP hyperevents, a method with no return value automatically runs asynchronously (does not wait for a response). This way, the user interface does not appear to “freeze” as it would if it had to wait for a method to return a value.
The “&js< ... >” should ONLY be used when working in Synchronous mode and interacting with ClassMethods where no DOM synchronization is happening.
In an instance method, if you are modifying elements in the DOM, this code is returned by the hyperevent, bundled into a function and executed in the browser immediately on return; then the DOM is updated, overwriting any and all changes made by the function. If you are calling Asynchronously, there is also a risk that these functions may not execute in the order you expect them to.
Zen Naming Conventions
Zen programs are case-sensitive. If you are not experienced with case-sensitive programming, case might be your biggest adjustment in using Zen. Remember that a is not the same as A.
The following naming conventions apply throughout the Zen code. These conventions use case to distinguish between different categories of method or property. myMethodName and MyMethodName are not the same name.
| Convention | Example |
|---|---|
| Client-side methods are defined using the Language=JavaScript key phrase, and are written in JavaScript. They can be called from the client and, when called, run on the client. These names start with a lowercase letter and use an initial capital letter for each successive word (in-word capitalization). The same is true of client-only properties. | myMethodName |
| Zen methods are defined using the keyword ZenMethod. They can be called from the client, but are executed on the server. These methods are written in ObjectScript, Caché Basic, or Caché MVBasic, but they may include embedded JavaScript that calls back to the client. Their names start with an uppercase letter, use in-word capitalization, and cannot start with the % character. | MyMethodName |
| Server-side methods use no special keyword. They are written in ObjectScript, Caché Basic, or Caché MVBasic. They are available to be called from code that is executing on the server and, when called, they run on the server. These method names start with the % character. Server-only properties use this naming convention too. | %MyMethodName |
| Typically, Zen class names start with lowercase and use in-word capitalization, similar to the conventions for client-side methods and properties. The exceptions to this rule include some of the server-only utility classes, which begin with an uppercase letter. | tablePane |
| Attribute and property names start with lowercase and use in-word capitalization, except for event handlers and callbacks. | filterOp |
| Attributes that identify event handlers for components follow the JavaScript convention of all-lowercase. | onmousedown |
| Attributes that identify server-side callbacks for components start with On (capital letter O) and use in-word capitalization. | OnCreateDataSet |
Zen offers many built-in variables, as described in the “Zen Pages” chapter of Developing Zen Applications. The most important of these are the two variables that represent the Zen page object on the client and server sides. These two variables conform to Zen naming conventions for client and server identifiers, as follows:
-
In JavaScript code that runs on the client side, the page object is zenPage
-
In ObjectScript, Caché Basic, or Caché MVBasic code that runs on the server side, the page object is %page
InterSystems strongly recommends that you do not create any classes in a package called ZEN.Component using any combination of uppercase and lowercase characters. Creating a package called ZEN.Component breaks the Zen framework for generating client-side code.
Zen Sample Applications
If you are an experienced Caché user, you are already familiar with the SAMPLES namespace. In particular, the sample application Cinema is a favorite with users learning about Caché Server Pages (CSP). Zen offers a large number of sample pages, organized into packages in the SAMPLES namespace. If you have a new Caché installation, you must first run the ZENDemo home page. Loading this page silently generates data records for the SAMPLES namespace. You only need to do this once per Caché installation.
Enter the following URI in the browser:
http://localhost:57772/csp/samples/ZENDemo.Home.clsOpens in a new tab
Where 57772 is the web server port number that you have assigned to Caché.
Now you can view the Zen sample code at any time by following these steps:
-
Start Studio.
-
Choose File > Change Namespace or F4.
-
Choose the SAMPLES namespace.
-
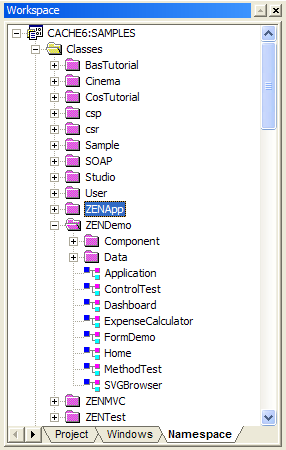
In the Workspace window, choose the Namespace tab and open the Classes category.
Packages ZENApp, ZENDemo, ZENMVC, and ZENTest are available for you to explore. You can also examine any of the other Caché samples, including the Cinema application near the top of the list.
Zen Wizards
Zen supplies a rich set of application programming wizards that you can run from within Studio. The exercises in this chapter use several of them. For a complete list and description of the available options, see the chapter “Zen Wizards.”
There is also a Studio tutorial that uses Zen wizards to create the user interface for a simple application. See the chapter “Building a Simple Application with Studio” in the book Using Studio.