Using PMML Models in Caché
This article discusses how to use Caché PMML (Predictive Modelling Markup Language) runtime support. It discusses the following topics:
Background
PMML (Predictive Modelling Markup Language) is an XML-based standard that expresses analytics models. It provides a way for applications to define statistical and data mining models so that they can be easily reused and shared. The standard is particularly helpful because the analytics tools used to generate models (tools such as PMML:R, KNIME, SAS, and SPSS) are very different in architecture from the tools used in a Caché or Ensemble production environment.
In a typical scenario, data scientists use an analytical tool to produce a data mining model based on large amounts of historical data, which is then exported to PMML. The model can then be deployed in a runtime environment and executed on incoming observations, predicting values for the model’s target metrics.
For more information, see http://www.dmg.org/Opens in a new tab.
Caché Support for PMML
Caché provides runtime support for PMML 4.1Opens in a new tab and 4.2Opens in a new tab as follows:
-
You can place an existing PMML definition into a specialized Caché class definition, a subclass of %DeepSee.PMML.DefinitionOpens in a new tab.
When that class is compiled, the system generates the code needed to execute the model or models described in it.
-
Caché provides an API for executing the models, based on the data input that you provide.
-
Caché provides a sample test page that uses the API.
Supported Models
Caché supports PMML 4.1Opens in a new tab and 4.2Opens in a new tab and the following PMML models:
-
Naive Bayes models (http://www.dmg.org/v4-1/NaiveBayes.htmlOpens in a new tab)
-
Regression models (http://www.dmg.org/v4-1/Regression.htmlOpens in a new tab)
-
General regression models, except probit link function and contrast matrices (http://www.dmg.org/v4-1/GeneralRegression.htmlOpens in a new tab)
-
Tree models, except nested models (http://www.dmg.org/v4-1/TreeModel.htmlOpens in a new tab)
-
Text models, basic support (http://www.dmg.org/v4-1/Text.htmlOpens in a new tab)
-
Support Vector Machine (SVM) models (http://www.dmg.org/v4-1/SupportVectorMachine.htmlOpens in a new tab)
-
Clustering models (http://www.dmg.org/v4-1/ClusteringModel.htmlOpens in a new tab)
-
RuleSet models (http://www.dmg.org/v4-1/RuleSet.htmlOpens in a new tab)
-
NeuralNetwork models (http://www.dmg.org/v4-1/NeuralNetwork.htmlOpens in a new tab)
Caché also supports the <MiningModel> element, which provides “Model Segmentation” — the process of combining the output of multiple models for a more balanced prediction. See http://www.dmg.org/v4-1/MultipleModels.htmlOpens in a new tab. Note that Caché does not support the “Model Composition” approach, which is deprecated.
The Iris Sample
The SAMPLES namespace provides a sample that you can use to become better acquainted with PMML.
This sample includes a copy of the Iris dataset, a well-known sample used in predictive analytics. The Iris dataset provides measurements for the petal and sepal measurements for approximately 50 flowers in three different species of irises. These measurements are strongly predictive of the iris species.
To set up this sample, use the following command:
d ##class(DataMining.IrisDataset).load()
This step creates the records in DataMining.IrisDatasetOpens in a new tab.
Then you can use the PMML models in the DataMining.PMML.IrisOpens in a new tab class. This class contains a PMML definition that includes the following models:
-
A tree model that predicts the iris species, based on petal and sepal measurements
-
A general regression model that predicts the sepal length, based on the sepal width, petal measurements, and species
Creating a Class to Contain PMML Models
To create a class that contains PMML models:
-
Access the PMML model testing page (described later in this article).
-
Click New.
-
For Class name, type a fully qualified class name.
-
For PMML file, click Browse and select a PMML file..
-
Click Import.
Or use Studio and create a subclass of %DeepSee.PMML.DefinitionOpens in a new tab. In this class, create an XData block named PMML, and paste a PMML definition into that XData block. For this XData block, set XMLNamespace keyword as follows:
XMLNamespace = "http://www.intersystems.com/deepsee/pmml"
For an example, see DataMining.PMML.IrisOpens in a new tab in the SAMPLES namespace. The following shows a partial extract:
Class DataMining.PMML.Iris Extends %DeepSee.PMML.Definition
{

XData PMML [ XMLNamespace = "http://www.intersystems.com/deepsee/pmml" ]
{
<PMML version="4.1">
<Header>
<Timestamp>03/07/2013 11:54:41</Timestamp>
</Header>
<DataDictionary numberOfFields="5">
<Extension name="isc:datasource">
<X-SQLDataSource name="Analysis dataset">
<X-FieldMap fieldName="PetalLength" spec="PetalLength" />
<X-FieldMap fieldName="PetalWidth" spec="PetalWidth" />
<X-FieldMap fieldName="SepalLength" spec="SepalLength" />
<X-FieldMap fieldName="SepalWidth" spec="SepalWidth" />
<X-FieldMap fieldName="Species" spec="Species" />
<X-SQL>SELECT PetalLength, PetalWidth, SepalLength, SepalWidth, UPPER(Species) Species
FROM DataMining.IrisDataset</X-SQL>
</X-SQLDataSource>
</Extension>
<DataField name="PetalLength" displayName="PetalLength" optype="continuous" dataType="double" />
<DataField name="PetalWidth" displayName="PetalWidth" optype="continuous" dataType="double" />
<DataField name="SepalLength" displayName="SepalLength" optype="continuous" dataType="double" />
<DataField name="SepalWidth" displayName="SepalWidth" optype="continuous" dataType="double" />
<DataField name="Species" displayName="Species" optype="categorical" dataType="string">
<Value value="IRIS-SETOSA" property="valid" />
<Value value="IRIS-VERSICOLOR" property="valid" />
<Value value="IRIS-VIRGINICA" property="valid" />
</DataField>
</DataDictionary>

...
For information on setting up and using this sample, see “The Iris Sample,” earlier in this article.
Supported Data Dictionary Extensions
InterSystems supports two kinds of <Extension> elements in the <DataDictionary> element:
-
<X-SQLDataSource> defines a data source in terms of an SQL query. This element defines a mapping from the SQL fields to the data fields in the PMML definition.
For an example, see DataMining.PMML.IrisOpens in a new tab in the SAMPLES namespace
-
<X-DeepSeeDataSource> defines a mapping from the measures and dimensions of a given cube to the data fields in the PMML definition.
Generated Classes
When you compile your PMML class (PackageName.ClassName), the system generates following classes:
-
PackageName.ClassName.Data represents the data needed to execute the models. This class corresponds to the <DataDictionary> element of the PMML definition.
-
PackageName.ClassName.ModelName represents a model.
This class provides methods to execute the model.
-
PackageName.ClassName.ModelName.Input represents the input for the given model.
-
PackageName.ClassName.ModelName.Output represents the output for the given model.
Caché uses these classes to execute the model or models.
Test Pages for Executing PMML Models
Caché provides test pages that you can use to execute PMML models for batches of records or for single input records. To access this pages:
-
Open the Management Portal.
-
Switch to the appropriate namespace.
-
Click DeepSee > Tools > PMML Model Tester.
Sample Model Testing Page
The system then displays a page like the following (partially shown):
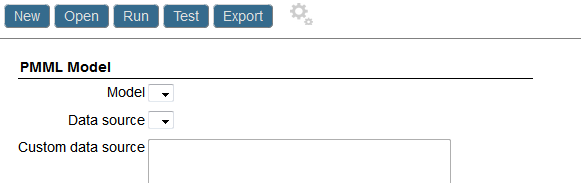
To use this page:
-
Click Open, select a model class, and then click OK.
-
Click a model from the Model drop-down list.
-
Click an option from the Data source drop-down list. Options include:
-
Analysis dataset — Selects the source data on which the model was developed.
-
Cube mapping — Selects the <X-DeepSeeDataSource> element in the model, if any. See “Supported Data Dictionary Extensions,” earlier in this article.
-
Custom data source (SQL) — Enables you to enter an SQL query that provides a set of records.
-
-
If you selected Custom data source (SQL), type an SQL SELECT query into Custom data source.
-
Click Run.
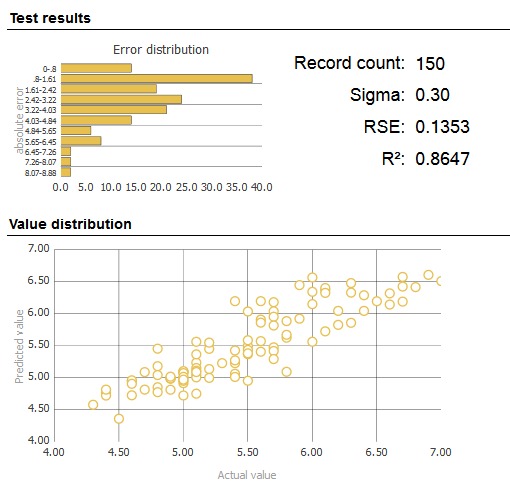
Caché iterates through the records and then displays a summary of the results. The details depend upon the model. The following shows an example:
Test Page for a Single Input Record
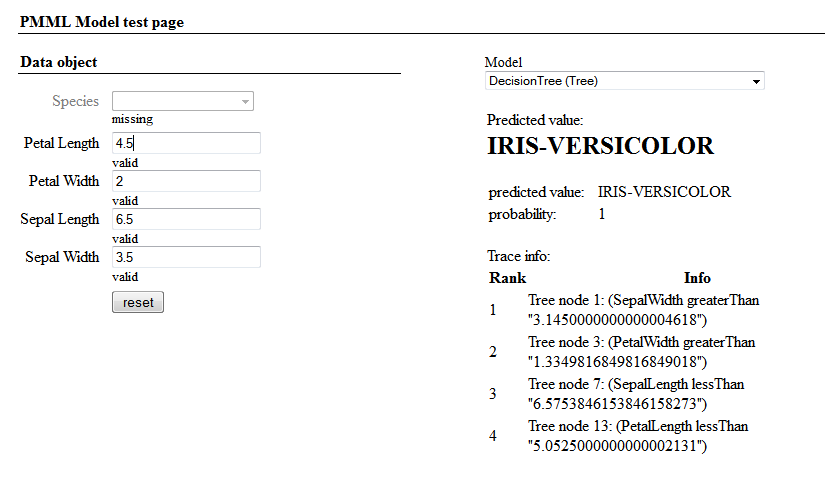
You can also test the model with a single input record. To do so, press Test, which displays a dialog box like the following:

The fields listed in Data object correspond to the data fields in your PMML definition.
To use this page, select a model from the Model drop-down list. The model determines which fields are input fields and which are output fields. Then enter values into the input fields. When you have entered all the input values, the page displays the predicted value for the output field for the given model. For example:
To access a nearly identical page, open your PMML model class in Studio and then press F5 (or click View > Web Page). The system then displays a page like the one shown here, but that also has the link Go to batch test page, which accesses the main PMML model testing page.
Executing PMML Models Programmatically
Caché also provides a direct API that you can use to execute PMML models.
Executing a Model with a Single Input Record
To run a predictive model for a single record:
-
Create an instance of the generated class PackageName.ClassName.ModelName. This class defines methods you can use to execute the model.
-
Create an instance of the generated class PackageName.ClassName.Data and set its properties. The purpose of this instance is to contain the input values.
-
Invoke the %ExecuteModel() method of the model instance.
Method %ExecuteModel(ByRef pData As %DeepSee.PMML.Data,
                     Output pOutput As %DeepSee.PMML.ModelOutput) as %Status
For pData, use the data object that you created in step 2.
This method returns, as an output argument, an instance of %DeepSee.PMML.ModelOutputOpens in a new tab that contains the output of the model. Specifically, this is an instance of the generated class PackageName.ClassName.ModelName.Output for the given model.
-
To see the details for the output, use ZWRITE. The pOutput object includes one property for each <OutputField> in the <Output> element of the model definition. If there is no <Output> element, pOutput includes a single field named after the predicted <MiningField> element.
Or , if you specified <X-DeepSeeDataSource> in your PMML definition, use %ExecuteModelDeepSee(). See the class reference.
Executing a Model with a Batch of Input Records
To run a predictive model with a batch of input records, use the %RunModel(), %RunModelFromResultSet, or %RunModelFromSQL methods in %DeepSee.PMML.UtilsOpens in a new tab. These methods store the resulting predictions in the %DeepSee_PMML_Utils.TempResult table.
Options for Using PMML in DeepSee
This section discusses some additional options:
Calling the Model from a DeepSee Pivot Table
You can invoke a PMML model from a DeepSee pivot table. To do so, define a calculated member that uses the %KPI function to invoke the %DeepSee.PlugIn.PMMLOpens in a new tab plugin. Use the following syntax:
%KPI("%DeepSee.PMML",fieldName,series,"PMML",modelClassName,parmName1,parmValue1,parmName2,parmValue2,"%CONTEXT")
Where:
-
fieldName is the quoted name of an output field of a Caché PMML model class.
-
series is the optional number of a series (row) in the plugin. Specify 1 or omit this argument.
-
modelClassName is the quoted name of a Caché PMML model class.
-
parmName1, parmName2, and so on are optional quoted names of parameters of the %DeepSee.PlugIn.PMMLOpens in a new tab plugin. Note that parameter names are case-sensitive. The %DeepSee.PlugIn.PMMLOpens in a new tab plugin provides the following parameters:
-
"%cube" — Specifies the cube on which this KPI is executed.
-
"ModelName" — Specifies the name of the model to execute. If specified, this must be a model in the given model class. If left blank, the first model in the class will be executed.
-
"aggregate" — Specifies how to aggregate the predicted values over different facts. The available values are "average" (the default), "sum", "max", "min", "maxFreqValue", "maxProbValue", "minFreqValue" and "minProbValue".
Note that not all aggregations might make sense for each output field.
-
"NullValues" — Specifies whether or not to include null predictions when aggregating results. Available values are "ignore" (the default) and "count".
The order in which you list the parameters does not affect the results.
You can specify up to 16 parameters and their values.
-
-
parmValue1, parmValue2, and so on are the corresponding values of the named filters.
The special %CONTEXT parameter to cause the plugin to consider the context of query, which is otherwise ignored. For details, see the reference for the %KPI function in the DeepSee MDX Reference.
For example, use the following syntax to get the average value for the output field MyField for a PMML model class named Test.MyModel, which contains only a single model:
%KPI("%DeepSee.PMML", "MyField",,"PMML","Test.MyModel","aggregate","average","%CONTEXT")
Including PMML Predictions in a DeepSee Listing
To include record-level predictions in a DeepSee listing, you can use the $$$PMML token in the listing query. This token takes the PMML definition class name and the model name as its primary parameters. As an optional third argument, you can pass the name of the predicted feature you wish to include in the query (this argument defaults to "predictedValue").
The following shows the definition of a listing query that uses this token:
UserID, TotalWagered, PercentLost "Lost %" , $$$PMML[MyPMML.Poker,PercentLost] "Predicted Loss %"
Exporting Batch Results to a DeepSee Cube
After you run a predictive model with a batch of input records, you can export the results to a DeepSee cube. This option enables you to visualize the results in a different way. The cube contains two levels: ActualValue and PredictedValue.
To export the results to a cube, use the PMML test page and click Export. Caché prompts you for the following information:
-
Export — Select data only or classes and data
-
Result class name — Specify the name of the persistent class to which the results are written. This is used as the source class for the cube.
-
Link to source class — Specify the class that contains the source records. The result class includes a property named Record that points to this class.
-
Drop data — Select this if you want to empty the result class (Result class name) before performing the export. Or clear this if you want to append the newly exported data to the end of the result class table.
-
Cube name — Specify the logical name of the cube.
-
Cube class name — Specify the class name of the cube.
-
Overwrite classes — Select this if you have performed this export earlier and now want to overwrite the classes with new data and definitions.
The system then displays the Build Cube dialog box, where you can build the given cube. Click either Build or Cancel. You can also later access this cube via the DeepSee Architect and build it there.
After you build the cube, use the DeepSee Analyzer to examine it. The following shows an example. The ActualValue level is used as rows and the PredictedValue levels is used as columns:
