Configuring the Web Server and CSP Gateway
Configuring the Web Server and CSP Gateway
This section discusses how to set up a web server and the CSP Gateway to provide access to a CSP application installed on a remote Caché server. The instructions refer to the web server as Machine W and to the computer running Caché as Machine C. The setup includes the following procedures:
Install the CSP Gateway on the Web Server Machine
Install the CSP Gateway on the web server machine, Machine W, where IIS or Apache is running. See the section “Web Server (CSP) Gateway Installation” in the Caché Installation Guide if you need more detailed information. During the installation process, follow these instructions:
-
In the Setup Type dialog box, select Web Server and select Next.
-
Review the installation name, type, and destination directory and, if correct, select Install.
This creates the CSP directory structure on Machine W and creates virtual directory references for the /CSP and /CSP/Bin files.
Configure the CSP Gateway
Next, adjust the CSP Gateway Configuration on Machine W. Although the CSP Gateway configuration information is stored in the csp.ini file, always use the Caché Server Pages Web Gateway Management application to update the configuration:
-
Navigate to the CSP Web Gateway Management home page by pointing a browser to:
http://localhost/csp/bin/Systems/Module.cxwOpens in a new tab
(Bookmarking this URI is helpful). This link is for your external web server, not the Private Web Server supplied with Caché.
Note that the link above is correct if you are on the same system that the web server is running on using port 80. If are trying to access the CSP Web Gateway Management home page on one system (local system) from another system (remote system), you will be denied access by default. You can access the home page from a remote system in one of two ways: 1) Connect to the home page on the local system and set the System Manager field (under Default Parameters) to the IP address of the remote system. or 2) Edit the csp.ini file on the local system and add the line: System_Manager=remote-system-ip-address
-
Select Server Access in the left-hand menu. The Caché installation configures a LOCAL server to connect to the Caché instance on the local machine, Machine W.
-
Create a new server to represent the Caché instance running on the remote machine, Machine C:
-
Select Add Server.
-
Enter a name for the server (Machine C for example).
-
Enter the TCP/IP Address and TCP/IP Port of the remote Caché server on Machine C.
-
Modify the Connection Security settings to match the level of authentication expected by Machine C for CSP Gateway connections. See the CSP Gateway and Security section in this guide for details.
-
Select Save Configuration.
-
-
Select Application Access in the left-hand menu to associate the path to the CSP application on the remote Caché server, Machine C, with the server configuration previously created for Machine C. The default paths are predefined for / and /csp.
-
Create a new application path to represent the CSP application running on the remote machine, Machine C. You can either copy an existing configuration (such as /csp) or select Add Application to manually create a new path configuration. The path you create for the application must match that defined for the application in the Caché instance on Machine C.
For example, the default path to the Management Portal is /csp/sys. If you are creating a new application choose your own path name. For example: /myapp or /csp/myapp. Having created the new path, modify the Default Server parameter for the path such that it takes the value of the Caché server configuration that you previously set up for Machine C.
-
Finally, save the new path configuration.
If Serving Static Files from the Web Server
If you are planning to serve static files from the web server, create directories on Machine W to represent your application path. These directories exist solely to hold static content such as image files. You do not have to place any CSP files here; they reside on Machine C.
Under the directory install-dir\CSP on Machine W, create \Samples and \User directories. Also create directories to represent other paths which may contain static components referenced in CSP pages. The example in the previous section, requires you to create a directory for \myapp.
Configure Web Server Paths
The application paths in the previous steps correspond to requests for CSP pages in the equivalent locations. For example:
http://domain.com/myapp/login.csp
http://domain.com/csp/myapp/login.csp
http://domain.com/csp/sys/login.csp
Inheritance is applied in a hierarchical fashion. Consider the following request:
http://domain.com/csp/newapp/login.csp
The application path configuration for /csp/newapp is used if it exists. If not, the configuration defined for /csp is used instead.
The CSP Gateway installation procedures configure the hosting web server to recognize the /csp virtual path. Typically, these same settings also apply to directories placed under /csp (/csp/myapp, for example).
If you create a new path (such as in the first example, /myapp), you must configure the web server to recognize this new virtual path. These procedures are different depending on the web server you use. Follow the procedures in the section that applies to your web server:
Add Virtual Directories to IIS
The installation procedure for the CSP Gateway configures the virtual directory /csp for CSP applications. If all of your applications are under this virtual directory (for example, /csp/myapp) and you are not using virtual hosts, you do not need to add virtual directories. The instructions in this section apply specifically to the IIS (Internet Information Services) versions 6 and 7 web server.
Set up the application path resembling /myapp in the previous examples with properties similar to the /csp virtual directory which is automatically created for you during the CSP Gateway installation.
-
Navigate to the Internet Information Services management dialog box, which is likely accessible from the Administrative Tools menu of the Windows Control Panel.
-
Expand the folders and right-click Default Web Site.
-
Point to New and select Virtual Directory to create a new directory record with the following values:
Alias: myapp Directory: C:\cache-install-dir\csp\myapp Access Permissions: Select the Execute check box (on IIS 6 only) -
Either select Save and Apply all changes, or if you are using the wizard, select Finish.
On IIS 6, you can check as follows: Right-click the virtual directory name under Default Web Site and select Properties. It looks similar to the following figure:
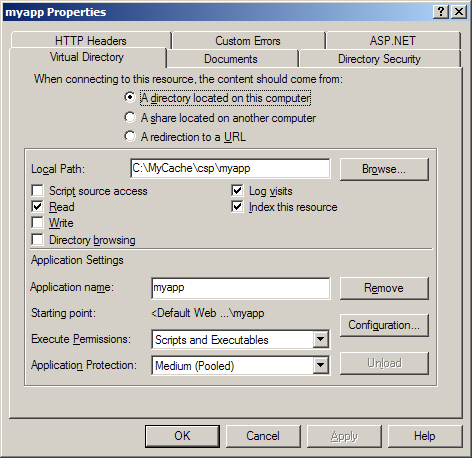
Restart IIS to apply the changes.
Add Aliases to Apache Configurations
If you are using an Apache web server to control a remote Caché server and your application path is altered from the /csp default, you must manually add a corresponding alias to the Apache configuration file pointing to the local CSP directory.
For example, to remotely serve the CSP applications on the Caché instance cache-install-dir on Machine C from the application path defined on the web server, /myapp/csp, add the following alias line to the httpd.conf file on Machine W:
Alias /myapp/csp "C:/cache-install-dir/CSP"
Restart the Apache web server to apply the changes.