CSP Architecture
This chapter covers the following topics:
-
The main “CSP components”.
-
“web server Configuration” for using CSP with supported web servers (see “Supported Web Servers” in the online InterSystems Supported PlatformsOpens in a new tab document for this release).
-
“CSP Gateway Configuration” to communicate with a Caché server.
For more information on installing and configuring the CSP Gateway with your web server, reference the CSP Gateway Configuration Guide.
CSP Components: Web Server, CSP Gateway, CSP Server
CSP uses three software components: a web server, the CSP Gateway, and a CSP server (which runs on a Caché server):
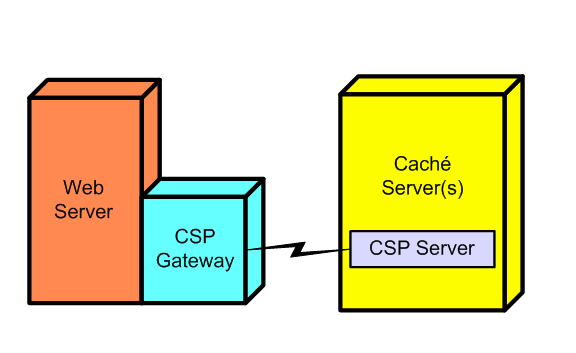
The web server and the CSP server may be implemented by one or many computers. During development, all three components (web server, CSP Gateway, and CSP server) may be on a single PC. In a large scale deployment, there may be multiple web servers and CSP servers in two- or three-tier configurations.
This book treats these components (web server, CSP Gateway, CSP server) as though there were one of each. It describes CSP as though it were only serving HTML pages, although CSP can also serve XML pages, as well as other text formats and binary formats, such as images.
What Each Component Does
The web server is a software utility that does the following:
-
Accepts incoming HTTP requests, usually from browsers
-
Checks permissions
-
Can serve static content
-
Sends requests for CSP content (URLs ending in .csp or .cls) to the CSP Gateway
The CSP Gateway is a shared library, a .dll file, or a CGI script. It does the following:
-
Determines which Caché server to send a request to.
-
Sends requests to the correct Caché server.
-
Maintains connections to the Caché server (to avoid having to continually open new connections).
The CSP server is a process running on a Caché server that is dedicated to serving requests from the CSP Gateway. It does the following:
-
Receives an HTTP request for an application
-
Checks the Application Configuration Settings (set in the Management Portal and saved in the .cpf file).
-
Runs the associated class (either written directly or generated from a CSP page) which sends HTML back to the CSP Gateway which sends it to the web server and back to the browser.
Information Flow
CSP requests are processed by a standard web server (all the leading servers are supported) and the standard HTTP protocol. CSP manages communications between the web server and Caché and invokes application code to generate the page. The request and return process is as follows:
-
An HTTP client, typically a web browser, requests a page from a web server using HTTP.
-
The web server recognizes this as a CSP request and forwards it to the CSP Gateway using a fast server API.
-
The CSP Gateway determines the Caché server to talk to and forwards requests to the CSP server on that target system.
-
The CSP server running in Caché processes the request and returns a page to the CSP Gateway, which passes it back to the web server.
-
The web server sends it to the browser for display.
Static Files
The Caché database server serves all of CSP. The Caché database server can also serve any kind of static file for a web application via the CSP Gateway. In standard web applications, web servers (not database servers) typically serve static content. To run Zen applications on Caché, you must configure your web server to allow the Caché server to serve all static files via the CSP Gateway.
To run Zen-based applications, enable the Serve Files option and configure your web server to allow static files to be served by the Caché server. Then the Zen framework will be able to deliver dependent images and JavaScript helper documents.
The CSP engine, via the stream server, handles static files in a manner consistent with major web servers, with respect to determining the character encoding of JavaScript files.
The modern convention is for all JavaScript files to be marked as Content-Type of application/javascript, and you make sure this is the case with all JavaScript files used on your pages.
With JavaScript files marked this way:
-
If a file contains a BOM (byte-order mark), the browser automatically detects this and uses the correct character set to read it.
-
If the file does not contain a BOM, then the browser assumes the file is UTF-8.
If you need to override this behavior to specify a character set for JavaScript files, set the global ^%SYS("CSP","MimeFileClassify","JS") to the list value $listbuild(contenttype, binary, charset). For example,
SET ^%SYS("CSP", "MimeFileClassify", "JS") = $listbuild("text/javascript", 0 ,"ISO-8859-1")
This sets the older content-type and uses the ISO-8859-1 character set. Also, if the Caché translate table is defined to be something other than an empty string or if the global node ^%SYS("CSP","DefaultFileCharset") is set to a null value, Caché will use this character set for all JavaScript and other text files. By default, neither of these global nodes are set.
The Serve Files option for a CSP Application is either on (Always) or off (No) or the CSP Gateway can cache static files on the web server (Always and cached). The Always and cached setting improves efficiency as the system can serve a cached static page without going back to the Caché server). To run Zen applications, the Serve Files option must be enabled with either the Always or the Always and cached settings. (For more information, see the Serve Files option in the table “CSP Application Options”.)
Configure the web server to allow static files to be served by the Caché server.
By default, the InterSystems-provided installation script does not look for, or configure an external web server. If you run a Custom Install, you can choose the option to configure any previously-installed IIS or Apache web server to enable CSP support. The installation script creates the /csp virtual directory and creates mappings for the .csp, .cls, .zen and .cxw extensions to be handled by the gateway. This is sufficient for CSP to function normally via that web server. It does not enable support for the Serve Files feature. To make this happen, you must manually configure Apache or IIS to map specific file extensions to be handled via the Gateway. This is by design because opening the database server up to exposure via this mechanism is a security risk and should not be done invisibly.
See the section “Registering Additional File Types with CSP” in the CSP Gateway Configuration Guide for instructions for your web server.
You can still, if you choose to, use a traditional configuration of serving static pages from the web server, if, for example, you already have a web application set up this way. (In this case, the setting of the Static Files option is irrelevant.) This eliminates contention when a common web server serves two different versions of Caché, each requiring different versions of certain static files (for example, hyperevent broker components).
If you have configured the web server itself to serve static files, be sure that the static content is present on every single web server.
Web Server Configuration of a URL
Caché provides a default virtual directory of /csp from which to run your CSP applications. It also provides a default virtual directory of /cacheinstance/csp for use if you are running multiple instances of Caché. If you are running multiple instances of Caché and access a CSP application using the virtual directory/csp without the /cacheinstance before it, it accesses the last installed version of Caché. If you plan to allow all your CSP applications to be called with an application path that starts with either http://localhost/csp or http//localhost/cacheinstance/csp, then you do not need to make any changes in the web server configuration.
If want to create a CSP application with an application path that begins with something other than /csp or /cacheinstance/csp, then you need to make changes in the web server configuration file entry, alias /csp.
The following table shows the configuration files that need altering.
| web server | Configuration Files |
|---|---|
| Apache, HP Secure web server |
UNIX®: /etc/httpd/conf/httpd.conf Windows: <web-server-install-directory>\conf\httpd.conf |
| Sun | config/obj.conf and config/magnus.conf |
| Microsoft IIS | Define a virtual directory as described in “Configuring a New URL on a Microsoft IIS web server”. |
The following table shows examples of accessing a CSP page using combinations of web servers and Caché instances:
| URL | web server | Instance |
|---|---|---|
| http://localhost/cache20071/csp/samples/menu.csp | public | cache20071 |
| http://localhost/cache52/csp/samples/menu.csp | public | cache52 |
| http://localhost/csp/samples/menu.csp | public | last version of Caché installed |
| http://localhost:57772/csp/sys/UtilHome.csp | private — used to access the Management Portal and online documentation | version of Caché installed using Webserver port of 57772 |
CSP is case-sensitive. Specify your path names consistently when you are configuring CSP.
Configuring a New URL on a Microsoft IIS Web Server
Microsoft IIS is configured by defining a series of virtual directories. Each virtual directory consists of a name (which corresponds to the directory portion of a URL); a physical directory (the local directory in which static files, such as .html or .jpg, can be stored, if you opt to serve static files from the web server); and a set of permissions (such as read or execute ).
Any request (URL) for CSP content includes a directory name. This directory name must correspond to either a virtual directory defined by the web server or a subdirectory of a virtual directory. This virtual directory must have at least read and execute privileges defined in order for CSP content to be served.
If you opt to serve static files from the web server, the web server looks for static files (such as .html or .jpg) in the physical directory defined for the virtual directory. Neither the web server nor the Caché server looks for .csp files in the physical directory; .csp files are stored in the machine on which the Caché server is running. If both the web server and Caché are running on the same machine (as is recommended during application development, for example) then both may, coincidentally, look in the same location for static and .csp files — and this is how Caché configures itself and the local web server during installation.
During installation, Caché detects if an IIS server is running and attempts to configure it to define a virtual directory named /csp. This is how requests to both /csp/samples and /csp/user (which are subdirectories of /csp ) are both sent to the local Caché installation.
If you add a new CSP application, you do not have to perform any IIS configuration if the URL path for the new application also starts with /csp. For example, /csp/myapp uses the IIS virtual directory defined for /csp. If you do not want your application path to start with /csp, then you need to define a new virtual directory for IIS that corresponds to your application path.
For example, to define a CSP application that uses the URL path /myapp, do the following:
-
Open the IIS manager (note: every version of Windows has a unique way to do this; typically this is available via the Windows Control Panel).
-
Define a virtual directory called /myapp by right-clicking Default Web Site and selecting New > Virtual Directory.
(For an example of how to do this, see the “Add Virtual Directories in IIS” section in the CSP Gateway Configuration Guide).
-
Grant read and execute permissions for this directory.
-
If you want the web server to serve static content, specify the physical directory in which you plan to store static content.
You also have to perform additional CSP Gateway and CSP server configuration as described in the following sections.
CSP Gateway Configuration
The CSP Gateway is a DLL or shared library installed on and loaded by the web server. The CSP Gateway detects any requests for files with a .csp or .cls extension and sends them to a defined Caché server for processing.
CSP Gateway Manager
You can configure the CSP Gateway using the CSP Gateway Manager (the CSP Web Gateway Management page) or by editing its configuration file, csp.ini, directly.
The CSP Gateway Manager is a small web application that you can use from your browser. You can access the CSP Gateway Manager by navigating to System Administration > Configuration > CSP Gateway Management. By default this accesses the CSP Gateway Manager for the private web server.
To access the CSP Gateway Manager for your production web server, change the URL by substituting localhost or localhost:<port_no> as necessary.
For information on configuring the CSP Gateway, navigate to System Administration > Configuration > CSP Gateway Management and click Help. For more detailed information, see CSP Gateway Configuration Guide.
Localization of the CSP Web Gateway Management pages is based solely on the contents of the CSPres.xml installed (if any). If no localization file is present then the CSP Web Gateway Management pages default to using the embedded English text. The language settings of the browser have no influence on this mechanism.
Defining Server Access
To prevent runtime errors, for High Availability configurations running over CSP, InterSystems recommends that you use a hardware load balancer with sticky session support enabled.
You can define a list of servers (Caché or Ensemble servers that might run CSP applications) that this CSP Gateway can access. Each server has a logical name, a TCP/IP address, a TCP/IP port number (the default is 1972), and an enabled or disabled flag. In addition, you can configure the minimum and maximum number of connections made to this server as well as timeout and logging values.
Since each server has a logical name, the CSP Gateway makes it easy to connect applications to particular servers by name and later change the characteristics of a server in one place without having to reconfigure every application using the server.
After the initial installation, the CSP Gateway has one logical server defined, LOCAL, which is defined to connect to the local copy of Caché.
To add one or more servers that you want the CSP Gateway to be able to access, open the CSP Gateway Manager as described in the previous section and click Server Access. See the section “Accessing CSP on Multiple Caché Servers” in the CSP Gateway Configuration Guide for details of the procedure.
Example of the default LOCAL server in the CSP.ini file:
LOCAL=Enabled
...
[LOCAL]
Ip_Address=127.0.0.1
TCP_Port=1972
Minimum_Server_Connections=3
Defining Application Access
A Caché installation creates a new /csp configuration. If you have configured /csp as your application, your configuration is overwritten when you install a new build of Caché. To maintain your application configuration, enter a path other than /csp.
Any directory under /csp works fine, such as /csp/myapplication, but the path cannot contain any dots (periods). These lead to ambiguity for the CSP Gateway. In this example: /csp/samples/menu.csp/csp/aaa/bbb/ccc.cls, the CSP Gateway could either interpret this as a request for /csp/samples/menu.csp/csp/aaa/bbb/ccc.cls or as a REST request for/csp/samples/menu.csp (where PATH_INFO is /csp/aaa/bbb/ccc.cls). The Gateway, working in the web server environment, has no way of resolving these ambiguities.
CSP is case-sensitive. Specify your path names consistently when you are configuring CSP.
A CSP application is a set of pages or classes that are addressed using a given URL. For example, all the CSP sample pages are part of the /csp/samples application. An application may contain subdirectories, for example /csp/samples/cinema.
The CSP Gateway Manager lets you define the URL path that a CSP application uses to connect to a Caché server. CSP considers all files within a particular URL directory (or subdirectory thereof) to be part of the same application.
By default, the CSP Gateway defines a single application path, /csp, which sends all CSP requests to the logical server LOCAL. Requests to /csp/samples and /csp/user are both sent to the local Caché installation.
If you create a new CSP application with a URL that starts with /csp, you do not have to change the CSP Gateway configuration. Your new application, such as /csp/myapp, uses the CSP application settings defined for /csp. If you do not want your URL path to start with /csp, then you need to define a new CSP application within the CSP Gateway that corresponds to your URL path.
For example, to define a CSP application that begins with the URL path /myapp, do the following:
-
Open the CSP Gateway Manager by navigating to System Administration > Configuration > CSP Gateway Management in the Management Portal.
-
Select Application Access.
-
Click Add Application.
-
Enter /myapp into the Application Path field.
-
Select the Default Server where the application is from the list (these are defined in the “Defining Server Access” section).
-
Click Submit to save the /myapp application access configuration.
For details on the other fields on the Application Access page, click Help.
CSP Gateway Parameters
The CSP Gateway has a number of parameters that you can adjust. These include timeout values, failover and load-balancing characteristics, and CGI environment variables.
For details on these parameters, see the “Operation and Configuration” chapter in the CSP Gateway Configuration Guide or click Help on the CSP Web Gateway Management page.
CSP Application Settings
When a CSP server receives an incoming HTTP request, it uses the local Caché CSP application settings to determine how to process the request. This section describes how Caché processes CSP application requests using CSP application settings.
Enabling Application Access to %CSP Pages
The following rules govern access to pages and classes:
-
By default, a user application is allowed to access the following pages:
-
Pages of the /csp/sys/ application and all of its subapplications are allowed
-
Pages of the isc/studio/templates/ and /isc/studio/usertemplates/ applications are allowed
-
-
By default, a user application is allowed to access all non-% classes
-
A user application can also access the following classes:
-
%CSP.BrokerOpens in a new tab, %CSP.StreamServerOpens in a new tab, %CSP.LoginOpens in a new tab, %CSP.PasswordChangeOpens in a new tab, %CSP.PageLookupOpens in a new tab are allowed
-
%ZEN.SVGComponent.svgPageOpens in a new tab and %ZEN.Dialog.* are allowed, with the following additional conditions
-
All other %ZEN.* classes are not allowed
-
All other %Z* classes are allowed
-
-
All %z* classes are allowed
-
Checking for allowed classes is performed in addition to checking the setting in the CSP application. You can view and change the application settings by navigating to System Administration > Security > Applications > Web Applications on the Management Portal. So a class reference must pass both sets of tests in order to be allowed. (See in the Permitted Classes setting in the table in the section “Editing Web Application Settings” in this book.)
To permit access to additional classes, configure the global ^SYS("Security","CSP","category") in the %SYS namespace, where category is AllowClass, AllowPrefix, or AllowPercent. The following sections describe these options.
Checking is done by applying the default rules first, then the categories in the order listed.
Also, each keyword can be invoked more than once. This means that you can make an entire package accessible, and then restrict access to one class in that package.
Background Information on the ^SYS Global
The ^SYS global is available in the %SYS namespace and contains configuration information, including the details described in this book. You may find it helpful to start by examining the current contents of the relevant part of this global. To do so, open the Terminal and switch to the %SYS namespace. Then enter the following command:
zw ^SYS("Security", "CSP")
The system then displays one line for each node, showing its current value. For example:
^SYS("Security","CSP")=1
^SYS("Security","CSP","AllowClass","/csp/samples/","%CSP.UI.Portal.About")=1
^SYS("Security","CSP","AllowClass","/csp/samples/","%SOAP.WebServiceInfo")=1
^SYS("Security","CSP","AllowClass","/csp/samples/","%SOAP.WebServiceInvoke")=1
^SYS("Security","CSP","AllowPrefix","/csp/samples/","%DeepSee.")=1
Category: AllowClass
If your application relies on invoking a particular class, use the AllowClass option to make that class available.
If your application relies on invoking any class other than those listed as allowed at the beginning of the “Enabling Application Access to %CSP Pages” section, it could potentially be unsafe to use. InterSystems recommends that you determine if calling this class is required, and perform a risk assessment for your deployment, so that you understand the implications of making the class available.
To enable a given web application to invoke a particular class, use the following command in the %SYS namespace:
Set ^SYS("Security", "CSP", "AllowClass", "web-app-name", "package.class") = value
Where:
-
web-app-name is the name of the web application, followed by a trailing slash.
To enable all web applications to use the given class or package, specify web-app-name as 0; in this case, you can omit the enclosing quotes.
-
package.class is the fully qualified name of a class. If you omit class, then all classes in the specified package are allowed.
-
value is either 1 or 0.
If you specify this as 1, the web application can invoke this class (or package).
If you specify this as 0, this web application cannot invoke this class (or package).
For example, to enable the /csp/webapps application to use the class %User.Page, you would use the following command:
Set ^SYS("Security", "CSP", "AllowClass", "/csp/webapps/", "%User.Page") = 1
Or to enable all web applications to use the %User.Page, you would use the following command:
Set ^SYS("Security", "CSP", "AllowClass", 0, "%User.Page") = 1
For another example, to enable the /csp/myapp application to use all classes in the %User package except for the %User.Other class, you would use the following two commands:
Set ^SYS("Security", "CSP", "AllowClass", "/csp/myapp/", "%User") = 1
Set ^SYS("Security", "CSP", "AllowClass", "/csp/myapp/", "%User.Other") = 0
Category: AllowPrefix
If your application relies on invoking multiple classes or packages that begin with the same set of characters, use the AllowPrefix option.
If your application relies on invoking any class other than those listed above, it could potentially be unsafe to use. InterSystems recommends that you determine if calling this class is required, and perform a risk assessment for your deployment, so that you understand the implications of making the class available.
To enable a given web application to invoke classes or packages that begin with the same set of characters, use the following command in the %SYS namespace:
Set ^SYS("Security", "CSP", "AllowPrefix", "web-app-name", "prefix") = value
Where:
-
web-app-name is the name of the web application, followed by a trailing slash.
To enable all web applications to use the given classes or packages, specify web-app-name as 0; in this case, you can omit the enclosing quotes.
-
prefix is the first characters in the name.
-
value is either 1 or 0.
If you specify this as 1, the web application can invoke these classes (or packages).
If you specify this as 0, this web application cannot invoke these classes (or packages).
For example, to enable the /csp/webapps application to invoke the entire MyApp package, use the following command:
Set ^SYS("Security", "CSP", "AllowPrefix", "/csp/webapps/", "MyApp.") = 1
Note that prefix is "MyApp." and the period in the prefix means that the web application cannot access the packages such as MyAppUtils. The web application can, however, access the packages MyApp.Utils and MyApp.UnitTests.
For another example, to enable all applications to access all packages that begin with My, use the following command:
Set ^SYS("Security", "CSP", "AllowPrefix", 0, "My") = 1
For another example, suppose that the /csp/myapp application should be able to access all classes in the %MyPkg package except for the class %MyPkg.Class1. In that case you would use the following two commands:
Set ^SYS("Security", "CSP", "AllowClass", "/csp/myapp/", "%MyPkg.Class1") = 0
Set ^SYS("Security", "CSP", "AllowPrefix", "/csp/myapp/", "%MyPkg.") = 1
Category: AllowPercent
If your application relies on invoking the packages that begin with the % character generally, the AllowPercent option makes those classes available.
If your application relies on invoking any class other than those listed above, it could potentially be unsafe to use. InterSystems recommends that you determine if calling this class is required, and perform a risk assessment for your deployment, so that you understand the implications of making the class available.
To enable all web applications to use all packages that begin with the % character, use the following command in the %SYS namespace:
Set ^SYS("Security", "CSP", "AllowPercent") = 1
Or use the value 0 to explicitly forbid any web application from accessing these packages.
Special Case: DeepSee
For a web application to use DeepSee, it needs access to all the classes in the %DeepSee package. To enable a particular application to use DeepSee, use the following command in the %SYS namespace:
Do EnableDeepSee^%SYS.cspServer("/csp/webapp/")
Where web-app-name is the web application’s name with a trailing slash. The previous command is equivalent to the following commands:
Set ^SYS("Security","CSP","AllowClass","web-app-name","%DeepSee.") = 1
Set ^SYS("Security","CSP","AllowClass","web-app-name","%CSP.UI.Portal.About")=1
Where web-app-name is the web application’s name with a trailing clash. Note that the first line uses %DeepSee. with a trailing period.
Or to enable all applications to use DeepSee, use the following variation:
Do EnableDeepSee^%SYS.cspServer(0)
For example, to enable the /csp/webapp web application to use DeepSee, use the following command:
Do EnableDeepSee^%SYS.cspServer("/csp/webapp/")
To disallow a specific web application from using DeepSee, use the following command:
Set ^SYS("Security", "CSP", "AllowPrefix", "web-app-name", "%DeepSee.") = 0
Editing Web Application Settings
You can create or modify settings for how you want Caché to process a specific CSP application on the Edit Web Application page of the Management Portal as follows:
-
Select System > Security > Web Applications.
This lists configured web applications. The Type column identifies an application as a user application (CSP) or a system application (CSP,System; a CSP-based utility included with Caché).
-
Select an application, click Edit, and enter or change the information.
-
When finished with edits, restart Caché for the new settings to take effect.
The General tab holds fields that specify information needed for basic operation of the application. See “Editing an Application” in the Caché Security Administration Guide for more information on these fields.
The Application Roles tab lets you select roles to which to assign the user during use of the application. The Application Roles that you select here are added to the set of roles to which the user is already assigned.
The Matching Roles tab lets you assign the application user to additional roles during use of the application, based on current role assignments.
For more on roles and custom login pages, see “Applications” in the book Caché Security Administration Guide.
Defining a New Application
To define a new CSP application named /myapp on a CSP server, follow the steps below:
-
In the Management Portal, select System > Security > Web Applications and click Create New web application.
-
Type in the URL for the new application name, /myapp in this case, and click OK.
-
Fill in any needed application properties (most are optional). (See the table in the section Application Settings.)The most important are:
-
Enable/Disable Authentication allowed — the valid authentication technologies for connecting to the application
-
Namespace — the Caché Namespace in which this application is run
-
Caché Physical Path — the physical location of CSP files (if you are using HTML-based development)
-
-
Click Save.
-
Click the Application Roles tab to select roles to assign the user to during use of the application. These Application Roles are added to the set of roles the user is already assigned to.
-
Click the Matching Roles tab to assign the application user to additional roles during use of the application, based on current role assignments.