
Managing Interfaces with GitLab for InterSystems Cloud Services
GitLab is a web-based platform that your development team can use to manage the software development process for interoperability projects built on InterSystems Cloud Services, for example, Health Connect Cloud or InterSystems IRIS Managed Service. GitLab provides tools that will help your team manage your projects and deploy them to various environments as needed. GitLab is built on top of Git, a distributed source control system used widely for tracking changes during the software development lifecycle.
InterSystems provides two approaches to using GitLab for source control. Interface engineers who prefer to use the GUI-based development tools provided by InterSystems can use the Embedded Git from the Management Portal to commit their changes to GitLab. Developers who are accustomed to writing code to develop software solutions can use Microsoft Visual Studio Code (VS Code) to make their changes and commit them to GitLab. Different members of your team can use the approach that is most comfortable for them, while working in the same codebase.
Both of these methods are referred as server-side source control, meaning that you change the code directly on the deployment of the InterSystems Cloud Service and then sync the changes to GitLab. Using client-side source control, where you make changes in a repository on your local machine before pushing them to GitLab, is beyond the scope of this document. If you have a need to use client-side source control, consult with InterSystems. Mixing server-side and client-side methodologies is not recommended.
For an online course, see Building Health Connect Cloud Interfaces with Source ControlOpens in a new tab.
The Benefits of Source Control
If you are not familiar with using source control, this section provides a brief explanation of its many benefits.
Source control:
-
Provides a secure code repository—Using a source control system ensures that the latest version of the code is always available to be deployed to a new environment in case of a planned or unplanned event.
-
Ensures a complete code history—A source control system maintains a complete record of all of the changes made to the code and lets you see the content of each change, who made the change, and when the change was made.
-
Allows easy roll back of changes—Since all previous code changes are tracked, a source control system lets you easily roll the code back to a previous version or point in time.
-
Enables multiple developers to work concurrently, but independently—Developers can do their work in separate code branches so that their code can be written and tested in isolation.
-
Permits developers to experiment freely—A developer can easily create a new branch to try something out and decide later whether to merge the changes back into the project or simply discard the branch.
-
Facilitates code review—When development on a branch is complete, a maintainer can review the changes before merging them into the project.
Introduction to Branching
Source control uses the concept of branching, which provides an easy way to manage changes to your codebase.
In its simplest form, a repository can consist of a single main development branch. A developer makes a change or a collection of related changes, and then commits the changes to the branch. If the developer decides to go back to an earlier version of the code, the developer can roll back those changes.
A developer can also create a separate branch, essentially a copy of the main development branch, to work in. This allows the developer to work on new features, enhancements, or bug fixes without directly impacting the main development branch. The developer commits any code changes to the new branch, and after development and testing is completed, this branch is then merged back into the main branch.
Branching in InterSystems Cloud Services
This section describes the branching strategy recommended for use with InterSystems Cloud Services. Experienced teams that are familiar with using source control are welcome to use other strategies after consultation with InterSystems.
Protected Branches
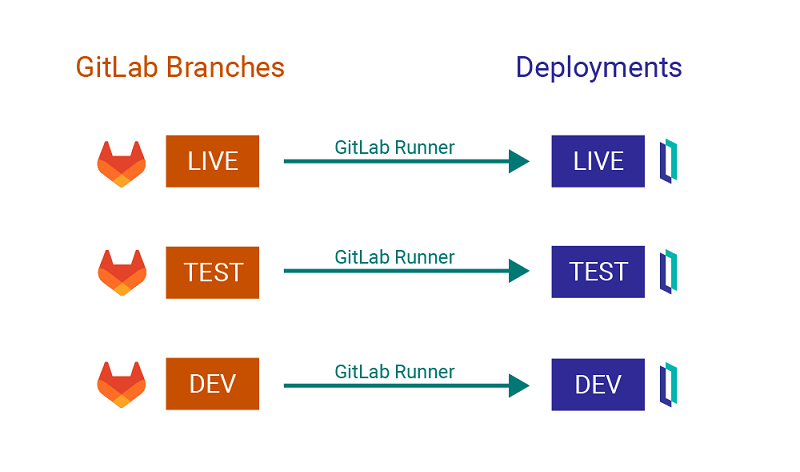
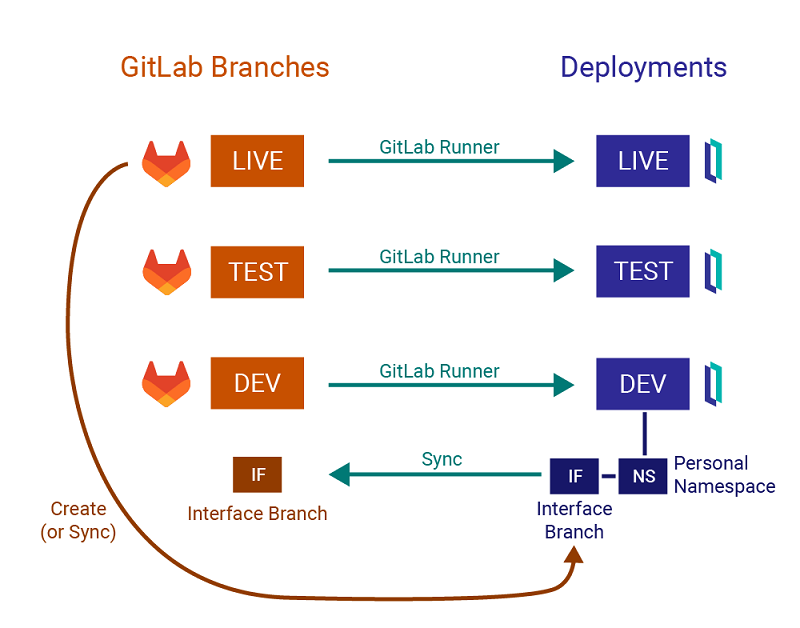
A typical customer of an InterSystems cloud service has three environments: development, test, and live. Each environment is represented by a deployment of the InterSystems cloud service, and each has a protected branch in GitLab associated with it. When code is merged to one of these branches, it is automatically pushed to the default namespace in its associated environment by means of GitLab runners. These branches are called protected branches because developers cannot commit changes directly to the branch. Instead, the developer creates a merge request, and the maintainer of the repository must review the changes and then perform the merge.
Interface Branches
InterSystems recommends using interface branches for development work, where each developer works on a single interface in their own interface branch. (An interface branch is similar to what is sometimes referred to as a feature branch.) An interface branch starts off as a copy of live branch and is tied to a developer’s personal namespace in the development environment. This strategy allows multiple developers to work on separate interfaces independently in their own branches and namespaces, which facilitates parallel development with less risk of conflicting changes. A new interface can be developed, tested, and promoted to production on its own schedule, with no impact on the work of other developers. Restricting a branch to a single new interface (or change to an interface) also makes it easier to roll back that one interface (or change). Developing several interfaces in the same branch intermingles the code, making it more difficult to later decouple those features.
Initially, the interface branch is created in a Git repository that is local to the development deployment and is tied to the developer’s personal namespace via source control hooks. However, the developer can manage this repository entirely from menus in the Management Portal or VS Code. When the developer creates an interface branch (or changes to a new branch), the contents of the filesystem in the local Git repository are updated and then these changes are immediately reflected in the contents of the namespace. Changes to the namespace can be made by using either the Management Portal’s UI-based tools or by using VS Code. These changes are then immediately reflected in the files within the local Git repository.
When development is completed on the interface, synchronizing the interface branch updates the interface branch with any new changes contained in the live branch in GitLab, commits the code to the local Git repository, and pushes the interface branch to GitLab.
Merge Requests
When work on the interface branch is complete, the developer creates a merge request in GitLab targeting the development branch. This allows other members of the development team to test the changes in the default namespace of the development environment. If all looks good, the interface branch is subsequently merged into the test branch, and ultimately the interface branch is merged into the live branch. Your organization should establish criteria that determines when an interface branch is ready to be promoted to the next branch in the chain. While in some popular development workflows, the entire development branch is promoted to test and then the entirety of test is promoted to live, promoting one interface branch at a time allows for granularity that is well suited to interface development.

Development Process Overview
This section provides a high-level overview of the development workflow recommended by InterSystems. Further details are provided in the remainder of the document.
-
In the Cloud Services Portal, in the development deployment, complete the following one-time setup steps:
-
Create a personal production and namespace to work in.
-
Create a firewall rule to allow you to access the Management Portal of the development environment.
-
Create a username to use to log into the Management Portal, and make sure the username has permissions to access your personal namespace and the environment’s default namespace.
-
-
In the Management Portal of the development environment, make sure that the Git Project Settings are correct for your namespace.
-
Create a new interface branch from the live branch in GitLab. This ensures that you start with a copy of all of the code that is currently in production, rather than code that contains features from other developers that may be in varying states of progress.
Initially, the interface branch is created in a Git repository that is local to your development deployment and is tied to your personal namespace. However, you can manage this repository entirely from menus in the Management Portal or from VS Code.
-
Work on your interface in your personal namespace, either using the GUI-based development tools or by editing the code in VS Code.
-
When you are done with your work synchronize your changes with GitLab.
This pushes the contents of your interface branch from the local Git repository into GitLab, at the same time updating it with any changes that have since been made to the live branch. (For those well versed in Git, this commits your changes to the local interface branch, rebases it on the latest state of the live branch, and pushes the interface branch to GitLab.)
-
In GitLab, create a merge request to merge the interface branch into the development branch.
When the maintainer performs the merge, the changes are pushed to the default namespace in the development environment.
-
In the default namespace of the development environment, complete any necessary testing steps.
-
Create a merge request to merge the interface branch into the test branch.
When the maintainer performs the merge, the changes are pushed to the default namespace in the test environment.
-
In the default namespace of the test environment, complete any additional testing that may be required.
-
Create a merge request to merge the interface branch into the live branch.
When the maintainer performs the merge, the changes are pushed to the default namespace in the production environment.
-
Test the changes one last time to make sure that they work in production.
If desired, delete the interface branch from GitLab to ensure a cleaner repository.
Setup Steps
Before a you can begin work as a developer, you need to complete a few one-time setup steps, as described in the following sections.
Also, make sure you have the URL for your GitLab repository, which you should have received from InterSystems. You will need this to be able to create merge requests. You can log in to GitLab using your Cloud Services Portal username and password.
You can also access GitLab from the CI/CD Pipeline menu option in the Cloud Services Portal.
Create a Personal Production and Namespace
In the Cloud Services Portal, in the development deployment, create a personal production and namespace for you to work in. The production and namespace are created with the same name and can be considered synonymous.
-
In the Cloud Services Portal, on the main menu of the development deployment, click Productions.
-
On the Productions page, under Create Interoperability Production, type the desired name of your production.
-
Click Create Production.
After you create a production, it shows up in the Productions list at the top of the page with a Production State of Stopped. When the creation process is finished, the Production State changes to Running.
Create a Firewall Rule
In the Cloud Services Portal, add a rule that will permit you to access to the Management Portal from your IP address. If you are accessing the Management Portal over a VPN, create a private firewall rule. If you are accessing the Management Portal over the public internet, create an public firewall rule.
Before accessing InterSystems Cloud Services over a VPN, you first need to set up InterSystems Network ConnectOpens in a new tab.
Before creating an public firewall rule, you must enable public access, if it is not already enabled.
To quickly add a rule to allow access from your current public IP address to the Management Portal, on the Firewall page of the Cloud Services Portal, click the Public Network tab, and then click My IP. This creates a public firewall rule to open port 443 to your public IP address.
For complete information on setting up firewall rules, see Firewall pageOpens in a new tab.
Create a Connect User
In the Cloud Services Portal, create a username that you can use to the log in to the Management Portal of the development environment and make sure that the username has access to the production you created, as well as the default production for that deployment.
-
In the Cloud Services Portal, on the main menu of the development deployment, click Connect Users.
-
On the Connect Users page, click Create User.
-
On the Create User dialog, type a Username and Email, and click Create.
The user now appears in the list of Connect Users. However the user must create a permanent password to be able to log in to the Health Connect Cloud Management Portal, and the user must be granted access to at least one production.
-
In Connect Users list, in the row for that user, click Edit Productions in the Actions column.
-
On the Access to Productions dialog, select your personal namespace and the default namespace.
-
Click Apply.
This list of namespaces is now displayed in the Productions column in the row for the user.
-
Check your email account for a temporary password.
-
Click the Password Management Page link, and log in with the username and temporary password.
-
When prompted to change your password, type a permanent password, confirm the password, and click Send.
You are redirected to the Health Connect Cloud Management Portal.
-
Make sure you can log in to the Management Portal with your username and permanent password.
Git Project Settings
In the Management Portal of your development environment, check your Git Project Settings. You only need to do this the first time you set up a namespace to use with GitLab.
-
In the Cloud Services Portal, on the main menu of the development deployment, click System Management.
-
On the System Management page, click Launch Management Portal.
-
Log in to the Management Portal with your Connect User username and password.
-
In the Management Portal, go to Interoperability > Configure > Production.
-
Click the name of the current Namespace, displayed near the top of the page.
-
In the Namespace Chooser, choose your personal namespace, and click OK.
-
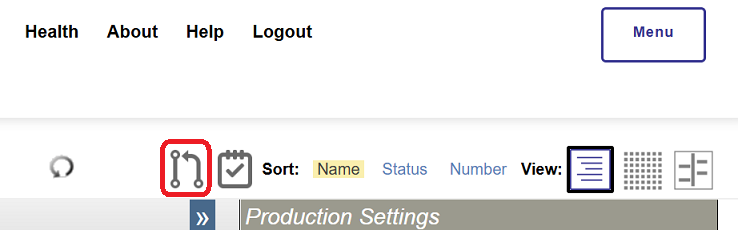
On the Production Configuration page for your personal namespace, click the Source Control Commands icon, and then click Settings.
-
On the Git Project Settings window, optionally change the Environment Name to DEVELOPMENT. This will change the System Mode displayed at the top of the Management Portal to Development System to visually differentiate it from your other environments.
You can mark your other environments as TEST or LIVE.
-
Check that the Default Merge Branch is set to live. This indicates that any new branches should be based on the live branch in GitLab.
-
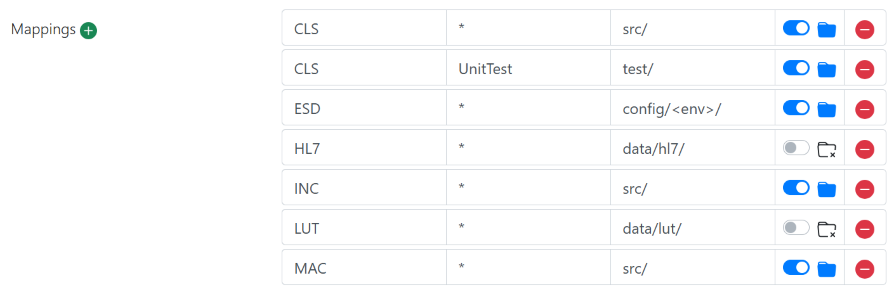
Check that your Mappings are set correctly. These settings map files with certain extensions to the proper directories in your Git repository.
Click the green plus sign to add a new mapping. Click the red minus sign to delete a mapping.
A typical mapping scheme is shown below:
The token <env> in the ESD row is automatically expanded to match the name of the environment this namespace is in, for example, development, test, or live.
See Mapping Scheme and File Types for more information.
-
Click Save, and then close the Git Project Settings window.
Mapping Scheme
The Mappings section of the Git Project Settings maps files with certain extensions to the proper directories in your Git repository. For instance, in the example below, lookup tables (with the LUT extension) are mapped to the directory data/lut/:

Move the Folders slider to the right to create hierarchical subdirectories within the specified directory, based on the name of the object. The directory paths are split at the “.” in the name.

For example, if your production class is named HCC.Connect.Production (the default name), it is mapped to /src/HCC/Connect/Production.cls.
The pattern for each mapping is Extension, Coverage, Relative Path. In the following mapping example, unit test classes (with the CLS Extension) are created in package UnitTest (the Coverage) and are mapped to the directory test/ (the Relative Path).:

So a unit test class named UnitTest.MyTest is mapped to test/UnitTest/MyTest.cls.
You can also create your own mappings based on how you want to organize your files. For example, to store all partner-related class files in the directory src/partner/, create mappings that look something like this:

So a class named Partner1.MyClass is mapped to src/partner/Partner1/MyClass.cls.
Of course, if you have 100 partners and don’t want to create 100 mappings, you could simply use a distinct package name for each partner and the standard CLS mapping would map Partner1.MyClass to src/Partner1/MyClass.cls
Test Your Mappings
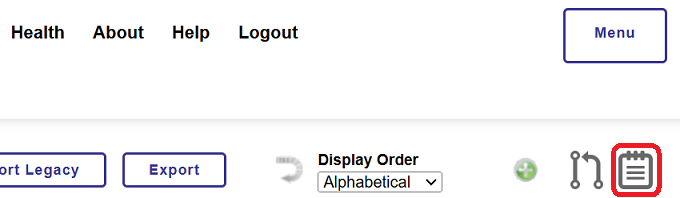
If you want to test your mappings before beginning development, create a sample file in the Management Portal, add it to source control, and then click the notepad icon.
In the Source Control Output window, check the generated file name and make sure it is mapped to the intended directory. If you added a lookup table called MyLookup, you might see something like the following:
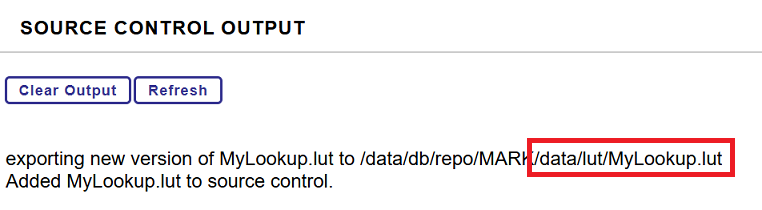
Then remove the sample file so that it does not end up getting synced to your GitLab repository. If necessary, adjust your mappings and test again.
See File Types for details on how to add or remove files of various types from source control.
File Types
This section describes the common types of files that can be added to source control, in other words, the Git repository that is local to your development deployment. You will later sync the local Git repository to GitLab.
Some types of files can be added from the Management Portal user interface, either automatically or manually, and all can be added using VS Code.
Class Definitions (*.CLS)
Class definitions have the file extension CLS and are used whenever code is required in a production.
Business hosts added from the Management Portal (Interoperability > Configure > Productions) are added to the production class, which has the file name HCC.Connect.Production.CLS by default, and the class is automatically updated in source control. Removing the business host removes its definition from the production class, and the class is automatically updated in source control.
See the following sections for special information on other types of classes.
For more information on developing productions, see Introduction to Developing ProductionsOpens in a new tab.
Data Transformations (*.CLS)
Adding a new data transformation (DTL) from the Management Portal (Interoperability > Build > Data Transformations) results in a class definition being generated. To add it to source control, open the data transformation in the Data Transformation Builder, and click Add from the Source Control Commands menu. To remove a data transformation from source control, click Remove from the Source Control Commands menu.
For more information on developing data transformations, see Defining Data TransformationsOpens in a new tab.
Business Rules (*.CLS)
Adding a new business rule from the Management Portal (Interoperability > Build > Business Rules) results in a class definition being generated and automatically added to source control. Deleting a business rule results in the class being automatically removed from source control.
For more information on developing business rules, see About Business RulesOpens in a new tab.
Business Processes (*.CLS)
Adding a new business process (BPL process) from the Management Portal (Interoperability > Build > Business Processes) results in a class definition being generated. To add it to source control, open the business process in the Business Process Designer, and click Add from the Source Control Commands menu. To remove a business process from source control, click Remove from the Source Control Commands menu.
For more information on developing business processes, see Introduction to BPL ProcessesOpens in a new tab.
UnitTests (*.CLS)
Unit tests are tests that use the InterSystems IRIS unit testing framework and should be created using VS Code. InterSystems recommends creating unit test classes inside a package called UnitTest for mapping purposes.
For more information on unit testing, see About the InterSystems IRIS %UnitTest FrameworkOpens in a new tab.
System Default Settings (*.ESD)
System default settings files have the file extension ESD and are stored in XML format.
System default settings (Interoperability > Configure > System Default Settings) can be used to store settings like IP addresses and port numbers that are specific to an environment. For example, this enables the business hosts in your development integrations to connect with specific endpoints that can be used for testing purposes. InterSystems recommends mapping ESD files to config/<env>/. The token <env> is automatically expanded to a string that reflects the current environment. This enables you to keep development system default settings separated from the settings of your test and live environments. In the case of a development environment, the files are mapped to the directory config/development/.
System default settings need to be exported from the production manually. From the Source Control Commands menu, click ExportSystemDefaults to export your current settings to the specified directory. The default file name is Ens.Config.DefaultSettings.ESD.
For more information on system default settings, see Defining System Default SettingsOpens in a new tab.
HL7 Schemas (*.HL7)
HL7 schema files have the file extension HL7 and are stored in XML format.
If you create a schema from the Management Portal (Interoperability > Interoperate > HL7 v2.x > HL7 v2.x Schema Structures), you can add it to source control by selecting the schema and clicking Add from the Source Control Commands menu. Only custom schemas can be added to source control. To remove a schema from source control, click Remove from the Source Control Commands menu.
For more information on developing HL7 schemas, see HL7 Schemas and Available ToolsOpens in a new tab.
Macro Definitions (*.INC)
Macro definition files have the extension INC (for “include”) and should be created in VS Code.
For more information on macros, see Macros and Include FilesOpens in a new tab
Lookup Tables (*.LUT)
Lookup tables have the file extension LUT and are stored in XML format.
If you create a lookup table from the Management Portal (Interoperability > Configure > Data Lookup Tables), you can add it to source control by opening the lookup table in the Lookup Table Viewer and clicking Add from the Source Control Commands menu. To remove a lookup table from source control, click Remove from the Source Control Commands menu.
For more information on lookup tables, see Defining Data Lookup TablesOpens in a new tab.
Routines (*.MAC)
ObjectScript routines have the extension MAC and should be created in VS Code.
For more information on routines, see Introduction to InterSystems IRIS ProgrammingOpens in a new tab.
Lock the Branch in The Default Namespace
The preceding sections describe Git Project Settings for a personal namespace where you will be doing development work. The Lock Branch setting is an important setting for the default namespace in your environment and locks the namespace to a particular branch. InterSystems recommends locking your default namespace to the protected branch associated with that namespace. This prevents users from accidentally switching the default namespace to a different branch.
To lock the branch in the default namespace:
-
In the Management Portal, go to Interoperability > Configure > Production.
-
Click the name of the current Namespace, displayed near the top of the page.
-
In the Namespace Chooser, choose the default namespace for your development environment, and click OK.
-
On the Production Configuration page for the default namespace, click the Source Control Commands icon, and make sure that the Status item shows that the current branch is set to your protected branch.
-
If it is not set to the correct branch, on the Source Control Commands menu, click Check Out an Existing Branch and switch to your protected branch.
-
On the Source Control Commands menu, click Settings.
-
On the Git Project Settings window, turn on the Lock Branch setting.
-
Click Save, and then close the Git Project Settings window.
-
On the Production Configuration page for the default namespace, click the Source Control Commands icon.
-
Make sure that the Status item shows that the current branch is set to the protected branch, and verify that the Create a New Branch and Check Out an Existing Branch items have been removed from the menu.
Edit an Interface Using Embedded Git
Once you have completed the necessary setup steps and checked your Git Project Settings, you are ready to begin work on an interface in your personal namespace of the development environment. This section shows the steps used to add two simple business hosts to a production using Embedded Git in the Management Portal. Changes that you make are immediately reflected in the local Git repository in your development environment.
-
In the Management Portal of your development environment, go to Interoperability > Configure > Production.
-
On the Production Configuration page, click the name of the current Namespace, displayed near the top of the page, and switch to your personal namespace.
-
Click the Source Control Commands icon, and then click Create a New Branch.
-
In the popup, type a name for your interface branch.
This creates a new interface branch in the development environment’s local Git repository, based on the live branch in GitLab. The name of the interface branch will now appear in the Source Control Commands menu next to Status.
-
Click the Refresh the Diagram icon to refresh the page with any business hosts from the interface branch in the local Git repository.
If at any point, the namespace does not reflect the current state of the local Git repository, click Import All (Force) from the Source Control Commands menu to manually import the code from the repository.
You can also view the files in the local Git repository by clicking Launch Git UI from the Source Control Commands menu.
-
Next to Services, click the + icon.
-
In the Business Service Wizard, select the HL7 Input tab.
-
On the HL7 Input tab:
-
For Input Type, select HTTP.
-
For HL7 Service Name, type HL7Service.
-
For HL7 Service Target, select Create New Router.
-
For New Rule Package, select HCC.Connect.
-
For HL7 Schema Category, select 2.3.1.
-
For Port Number, type 1224.
-
Click OK.
You should now see your new business service and business process displayed on the page.
-
Now that development on your production is complete, the next steps are to synchronize your interface branch in the local Git repository and GitLab and to create a merge request to merge your interface branch in GitLab to the development branch.
Edit an Interface Using VS Code
If you prefer to develop interfaces by writing code, you can do so in Microsoft Visual Studio Code (VS Code). This method is exactly the same as is shown in the Embedded Git example, above, except that you make changes to your personal namespace from within VS Code, instead of from the Management Portal UI. Changes that you make are immediately reflected in the local Git repository in your development environment.
Before you can use this method, you need to complete the same one-time setup steps and check your Git Project Settings. In addition, you need to install VS CodeOpens in a new tab and the InterSystems ObjectScript Extension PackOpens in a new tab.
-
In the Management Portal of your development environment, go to Interoperability > Configure > Production.
-
On the Production Configuration page, click the name of the current Namespace, displayed near the top of the page, and switch to your personal namespace.
-
Click the Source Control Commands icon, and then click Create a New Branch.
-
In the popup, type a name for your interface branch.
This creates a new interface branch in the development environment’s local Git repository, based on the live branch in GitLab. The name of the interface branch will now appear in the Source Control Commands menu next to Status.
-
Click the Refresh the Diagram icon to refresh the page with any business hosts from the interface branch in the local Git repository.
If at any point, the namespace does not reflect the current state of the local Git repository, click Import All (Force) from the Source Control Commands menu to manually import the code from the repository.
-
On the Source Control Commands icon, click Launch Git UI.
This launches the Git WebUI in a new browser window, giving you a look into the local Git repository.
-
In the main menu of the Git WebUI, click Code Workspace.
This downloads a settings file that will allow you to connect VS Code directly to your development namespace.
-
Open the workspace file you just downloaded in VS Code.
-
If VS Code indicates that it wants to sign in using InterSystems Server Credentials, click Allow.
-
Sign in using the password of the username you use to log in to the Management Portal.
-
In the Explorer tab of VS Code, open the HCC/Connect folder.
Here, you will see one or more files that correspond to the components of your production in your personal namespace.
-
Click Production.cls to view the production definition class file.
You will see an XML representation of your production, where each <Item> represents a business host, for example:
Class HCC.Connect.Production Extends Ens.Production { XData ProductionDefinition { <Production Name="HCC.Connect.Production" TestingEnabled="true" LogGeneralTraceEvents="false"> <Description>Health Connect Cloud Base Production</Description> <ActorPoolSize>1</ActorPoolSize> <Item Name="Ens.Activity.Operation.Local" Category="" ClassName="Ens.Activity.Operation.Local" PoolSize="1" Enabled="true" Foreground="false" Comment="" LogTraceEvents="false" Schedule=""> </Item> <Item Name="Ens.Enterprise.MsgBankOperation" Category="" ClassName="Ens.Enterprise.MsgBankOperation" PoolSize="1" Enabled="true" Foreground="false" Comment="Health Connect Cloud Message Bank" LogTraceEvents="false" Schedule=""> <Setting Target="Adapter" Name="IPAddress">bank</Setting> </Item> <Item Name="HL7Service" Category="" ClassName="EnsLib.HL7.Service.HTTPService" PoolSize="1" Enabled="false" Foreground="false" Comment="" LogTraceEvents="false" Schedule=""> <Setting Target="Host" Name="MessageSchemaCategory">2.3.1</Setting> <Setting Target="Host" Name="TargetConfigNames">HL7Service_Router</Setting> <Setting Target="Adapter" Name="Port">1224</Setting> </Item> <Item Name="HL7Service_Router" Category="" ClassName="EnsLib.HL7.MsgRouter.RoutingEngine" PoolSize="1" Enabled="false" Foreground="false" Comment="" LogTraceEvents="false" Schedule=""> <Setting Target="Host" Name="BusinessRuleName">HCC.Connect.HL7ServiceRoutingRule</Setting> </Item> </Production> } } -
Copy and paste one <Item> and change the Name attribute in the new item to a different name.
For example, copy the business operation Ens.Activity.Operation.Local and give the new item the name NewOperation.
-
Save the file to compile it.
-
Now, on the Production Configuration page of the Management Portal, click the Refresh the Diagram icon, and you should see the new business operation you just created.
Now that development on your production is complete, the next steps are to synchronize your interface branch in the local Git repository and GitLab and to create a merge request to merge your interface branch in GitLab to the development branch.
Sync Your Interface Branch
Once you have added your new and updated files to source control, they are held in the workspace of the local Git repository. Using the Sync command commits your changes to the local Git repository and synchronizes the interface branch to GitLab.
-
On the Production Configuration page, from the Source Control Commands menu, click Sync.
-
On the Sync Repository window, type in a meaningful Sync Commit Message, such as “Add HL7Service and HL7Service_Router” or “Add NewOperation,” and click Sync.
This commits any changes to the interface branch in the local Git repository and pushes the interface branch to GitLab.
-
When the sync process is complete, close the window.
Now your interface branch has been committed to the GitLab repository, but it is not yet available in the development branch or the default namespace of your deployment. The next step is to create a merge request to merge your interface branch in GitLab to the development branch.
Create a Merge Request
Creating a merge request indicates to the GitLab maintainer that your changes are ready to be reviewed and then merged into the development branch. To do this, you will need to know the URL to your GitLab repository, which you should have received from InterSystems.
You can also access GitLab from the CI/CD Pipeline menu option in the Cloud Services Portal.
To create a merge request:
-
Log into GitLab using your Cloud Services Portal username and password.
-
On the GitLab home page, select your project.
-
On the main menu, under Code, click Branches.
You should now see that interface branch is now in GitLab. Clicking the name of the branch shows the contents of the branch. For example, you can see the production definition in the file src/HCC/Connect/Production.cls.
-
On the main menu, under Code, click Merge Requests.
-
On the Merge Requests page, click New Merge Request.
-
On the New Merge Request page:
-
Under Source Branch, make sure the correct project is selected as the Source Project, and select your interface branch as the Source Branch.
-
Under Target Branch, make sure the correct project is selected as the Target Project, and select the development branch as the Target Branch.
-
Click Compare Branches and Continue.
-
Under Title, type a name for the merge request.
This is the name that will appear in the list of merge requests.
-
Under Description, type a description that will be helpful to the maintainer or to anyone who later needs to review the history of the repository.
-
Fill out any additional fields on the page if required by your development team’s workflow. For example, you can assign the merge request to the maintainer of the GitLab repository or specify the name of a reviewer.
-
Under Merge Options, do not select Delete source branch when merge request is accepted.
You will later create merge requests to merge this interface branch into the test branch and then into the live branch.
-
Click Create Merge Request.
-
-
On the merge request, the maintainer of the repository clicks Merge to merge the feature branch into the development branch.
Again, the maintainer should make sure not to delete the source branch upon completing the merge.
-
In the Management Portal of your development environment, on the Production Configuration page, switch to the default namespace.
You should see that the merge has activated the GitLab runner for the development environment and refreshed the default production with the new business operation you added.
When you are ready to merge the interface branch into the test branch in GitLab, or to the live branch, repeat these steps, making sure to select the correct Target Branch on the New Merge Request page.
Revert a Change
If you need to roll back a change after it is merged into a protected branch in GitLab, you can use GitLab’s built-in rollback features to revert the merge. If the troublesome change has already been promoted to the live branch, that is the first place from which it should be rolled back. Then, perform the rollback in the other environments.
-
Log into GitLab using your Cloud Services Portal username and password.
-
On the GitLab home page, select your project.
-
On the main menu, under Code, click Commits.
-
On the Commits page, change the branch to the protected branch where you want to perform the rollback.
-
Locate the commit in GitLab that corresponds with the merge you want to revert, and click the name of the commit.
-
On the Commit Details page, on the Options menu, click Revert.
-
On the Revert This Merge Request dialog:
-
Under Revert This Branch, select the protected branch where you want to perform the rollback.
-
Check Start a new merge request with these changes.
-
Click Revert.
This creates a new commit to revert the merge and a new branch with this new commit. It also starts an accompanying merge request to merge this new branch into the protected branch.
-
-
On the New Merge Request page for the new branch, click Create Merge Request.
This completes the creation of the merge request.
-
On the merge request, the maintainer of the repository clicks Merge to merge the new branch into the designated branch, thereby reverting the original merge.
-
In the Management Portal of your affected environment, on the Production Configuration page, switch to the default namespace.
You should see that the merge has activated the GitLab runner and reverted the change.