

Set Up the InterSystems ObjectScript Extension Pack
Install VS Code
If you have not already done so, you must install Visual Studio Code (VS Code) before you install the InterSystems® ObjectScript Extension Pack for VS Code.
Installation media for Visual Studio Code (VS Code) is available on the Visual Studio Code download pageOpens in a new tab. Simply download the appropriate build for your platform and follow the installation procedure.
Install the InterSystems ObjectScript Extensions
To develop ObjectScript code using VS Code, you must install the following extensions:
-
InterSystems Language Server
-
InterSystems ObjectScript
-
InterSystems Server Manager
These extension are grouped together in the InterSystems ObjectScript Extension Pack. You can install these locations from the following Visual Studio Code Marketplace page: https://marketplace.visualstudio.com/items?itemName=intersystems-community.objectscript-packOpens in a new tab. Select the Install button to initiate the installation within VS Code.
The extensions are also available for download on the Open VSX Registry, which is commonly used with forks or alternative distributions of VS Code. You can download the ObjectScript extension pack from the Open VSX Registry here: https://open-vsx.org/extension/intersystems-community/objectscript-packOpens in a new tab.
Alternatively, you can install these extensions within VS Code by performing the following steps:
-
Run VS Code.
-
From within the application, click the extensions button in the Activity Bar on the left edge of the VS Code window:

-
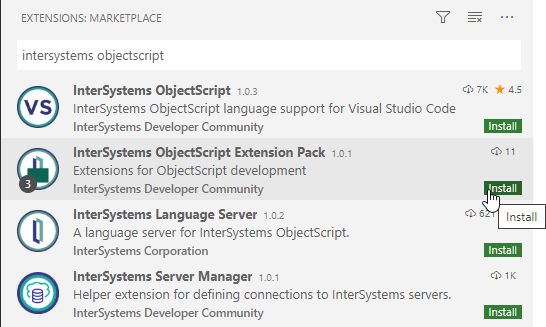
Type intersystems in the search field to find the relevant extensions in the Marketplace, as illustrated in the following image:
-
Select the Install button for the InterSystems ObjectScript Extension Pack. Alternatively, you can install each extension independently by selecting the Install button for each of the required extensions.
If you are using an Nginx web server to connect to InterSystems IRIS, you must configure Nginx to use VS CodeOpens in a new tab with the InterSystems ObjectScript Extension Pack.
Configure Your Web Server
The extensions connect with an InterSystems instance using the API which is provided by the instance’s /api/atelier web applicationOpens in a new tab. In some cases, you may need to configure the web server which serves your instance so that it can serve this connection:
-
If you are using Apache, further configuration is usually unnecessary. However, if your Apache installation does not allow WebSockets by default, you must configure it to do so in order to use the extensions’ debugging tool. Refer to the Apache documentation for detailed guidance: https://httpd.apache.org/docs/2.4/mod/mod_proxy_wstunnel.htmlOpens in a new tab.
-
If you are using Nginx, modify your configuration as described in Additional Configuration Required to Use IDEs.
-
If you are using IIS, ensure that your web server is configured as described in Enable Editing and Debugging with VS CodeOpens in a new tab.
Configure Your Instance
Because the extensions connect with an InterSystems instance using its /api/atelier web application, you must ensure that /api/atelier is enabled, and that it is properly configured to accept authenticated requests from VS Code. (Usually, this web application is properly configured upon installation. However, you may need to enable the application manually if you installed your instance with Locked Down security settings.)
Follow the instructions in Edit a Web ApplicationOpens in a new tab to review the configuration for /api/atelier, ensuring that the following conditions are met:
-
Enable Application is selected.
-
The application is enabled as a REST application, using the Dispatch Class %Api.Atelier.
-
Resource Required specifies a resource which is held exclusively by InterSystems users who are authorized to develop and deploy code on the instance. By default, InterSystems provides the %Development resource for this purpose. If you are unfamiliar with how security works within InterSystems products, refer to Introducing InterSystems SecurityOpens in a new tab for an orientation.

