Starting and Stopping Productions
By default, Ensemble does not automatically start productions. This chapter describes how to start and stop productions. It discusses the following topics:
For a live, deployed production, InterSystems recommends that you use the auto-start option. The other options are intended primarily for use during development.
Starting a Production
To start an Ensemble production from the Management Portal:
-
Click Ensemble > List > Productions.
Ensemble then displays the Production List page.
-
Click the production that you want to start.
-
Click Open.
Ensemble displays the production.
-
Click Start.
-
Click OK. Ensemble displays a dialog box that indicates progress.
Note:If any Terminal windows open as a result of starting the production, do not close them.
-
When the dialog box shows it is Done, click OK.
Stopping a Production
To stop an Ensemble production from the Management Portal:
-
Click Ensemble > List > Productions.
Ensemble then displays the Production List page.
-
Click the production that you want to stop. This must be a production that is running.
-
Click Open.
Ensemble displays the production.
-
Click Stop.
-
Click OK. Ensemble displays a dialog box that indicates progress.
Note:If any Terminal windows open as a result of starting the production, do not close them.
-
When the dialog box shows it is Done, click OK.
-
If the request to stop the production initially fails, the portal displays a message:
“Production could not stop, do you want to force a shut down?”
And provides a command:
Yes - Force to Shut Down
If you click this command, the production is forced to shut down.
If a production is Suspended or Troubled, see “Correcting Production Problem States,” in Monitoring Ensemble.
Managing Production Auto-Start
You can specify that a production is automatically started in a namespace at system startup, and is automatically stopped at system shutdown. This option is the recommended way to start and stop productions.
To access this page in the Management Portal, select Ensemble, click Manage, and then click Auto-Start Production.
To enable auto-start for a single production in the current namespace:
-
Select the production from the drop-down list.
-
Click Apply.
Ensemble displays a dialog asking you to confirm that you want to auto-start this production.
To disable auto-start in the current namespace:
-
Do not select any productions from the drop-down list.
-
Click Apply.
Ensemble displays a dialog box asking you to confirm that you do not want to auto-start any production in this namespace.
A different page lets you override auto-start for all productions.
If you define a production to auto-start in a mirror configuration, it automatically starts on the current primary node in a failover situation. No further action is necessary. For details on the mirror failover process, see “Mirroring” in the Caché High Availability Guide.
Overriding the Production Auto-Start Options in All Namespaces
For debugging purposes or during disaster recovery, you can override the auto-start options for all productions. To do so:
-
In the Management Portal, click System Administration > Configuration > Additional Settings > Startup Settings.
The Startup Settings page appears.
-
Click Edit next to the EnsembleAutoStart setting.
-
Clear the check box.
-
Click Save.
Ensemble subsequently disregards the namespace-specific settings in the Auto-Start Production page, which is described in the previous section. In other words, even if a production appears in the Startup sequence priorities for productions set to Auto-Start list for a given namespace, the system does not automatically restart the production.
Improving Restarts for Productions with Large Queues
By default, when a production is stopped, any asynchronous messages on the ^Ens.Queue global queue are moved to the ^Ens.Suspended queue. When the production is restarted, they are moved back. For productions with many messages in the queue, this can slow down the process of stopping and restarting a production. To avoid moving the messages, you can set the following ^Ens.Configuration global node:
set ^Ens.Configuration("Queues","KeepInQueues")=1
By default, the node is set to 0; you will have to change this for each namespace. This will prevent the messages from being moved out of the Ens.Queue global, which can improve restart speeds on productions which consistently have large queues.
Redeploying a Live Production
The Management Portal automates the process of deploying a production from a development system to a live system. Overview of Deploying a Production describes this process from the developer’s point of view. This section describes what Ensemble does when you are loading a new version of a production on a live system.
The developer has provided you with an XML deployment package file that contains an updated version of your production. This deployment package should be deployed to a test system before deploying it to the live system. To load it on the live system, select the correct namespace and select Ensemble, Manage, Deployment Changes, Deploy, and then click the Open Deployment button and select the file containing the XML deployment package. The form lists the new and changed items in the deployment package, displays the deployment notes that were specified when the package was created.
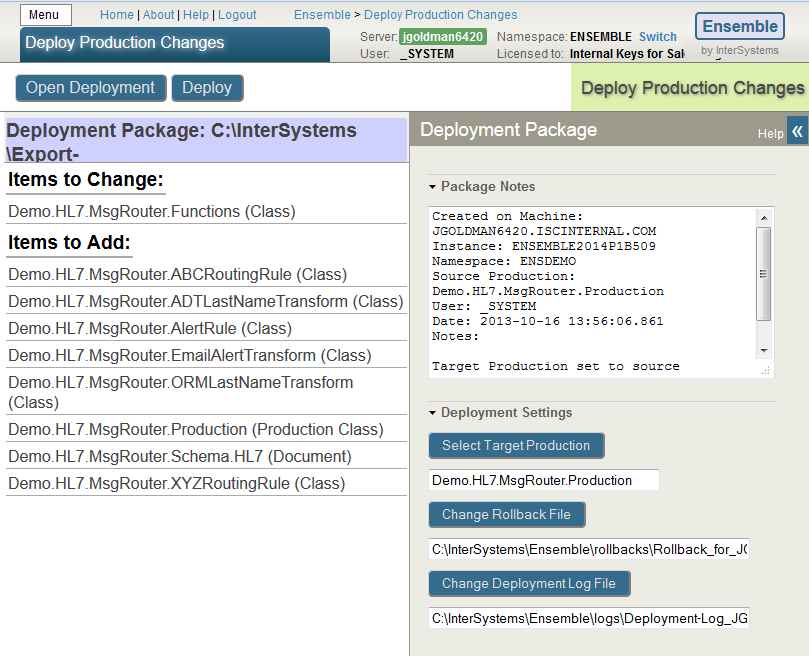
You can specify the following deployment settings:
-
Target production—specifies the production that the components will be added to. If the deployment package includes the production class from the source production, then the target production is set to the source production and cannot be changed. Otherwise, Ensemble sets the default production to the currently open production, but allows you to change it.
-
Rollback file—specifies the file to contain the rollback information.
-
Deployment log file—contains a log of the changes caused by the deployment.
When you have read the deployment notes and made any changes to the deployment settings, complete the deployment by clicking the Deploy button. Ensemble does the following to stop the production, load the new code, and then restart the production.
-
Create and save the rollback package.
-
Disable the components in the production that have a production settings (ptd) file in the deployment package.
-
Import the XML file and compile the code. If there is an error compiling any component, the entire deployment is rolled back.
-
Update the production settings.
-
Write a log detailing the deployment.
-
Enable the production components that were disabled if their current setting specify that they are enabled.
To undo the results of this deployment change, you can select the rollback file with an Open Deployment and then click the Deploy button.
If you are using studio, you use the Tools Import Local or Import Remote to import the XML file. But you must then manually compile the components and then disable and re-enable them in the production. Using the Import classes button on the Management Portal System Explorer does automatically compile the classes, but it does not create a rollback package and disable the components.
Displaying the Deployment History
You can view the deployment history of the productions in a namespace. To view the deployment history, select Ensemble, Manage, Deployment Changes, and History.
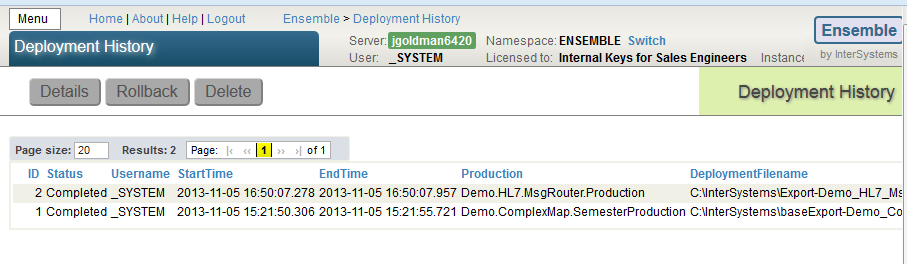
After you select one of the listed deployments, you can click Details to display information about the deployment, Rollback to undo the deployment changes, or Delete to delete the deployment history. Deleting the deployment history does not delete the rollback or log files.