Using the Caché Object Binding for .NET
One of the most important features of Caché is the ability to access database items as objects rather than rows in relational tables. In Caché .NET Binding applications, this feature is implemented using Caché proxy objects. Proxy objects are instances of .NET classes generated from classes defined in the Caché Class Dictionary. Each proxy object communicates with a corresponding object on the Caché server, and can be manipulated just as if it were the original object. The generated proxy classes are written in fully compliant .NET managed code, and can be used anywhere in your project.
This section gives some concrete examples of code using Caché proxy classes.
-
Introduction to Proxy Objects — a simple demonstration of how proxy objects are used.
-
Generating Caché Proxy Classes — using various tools to generate proxy classes.
-
Using Caché Proxy Objects — using proxy objects to create, open, alter, save, and delete objects on the Caché server.
-
Using Caché Queries — using a pre-existing Caché query to generate and manipulate a result set.
-
Using Collections and Lists — manipulating Caché lists and arrays.
-
Using Relationships — using Caché relationship objects to access and manipulate data sets.
-
Using I/O Redirection — redirecting Caché Read and Write statements.
Although the examples in this chapter use only proxy objects to access Caché data, it is also possible to access database instances via ADO.NET classes and SQL statements (as described in “Using Caché ADO.NET Managed Provider Classes”). Both types of access can be used in the same program.
The examples presented in this chapter are fragments from samples provided in the bookdemos project (see “The Caché .NET Sample Programs” for details). It is assumed that you are familiar with standard coding practices, so the fragments omit error trapping (try/catch) statements and other code that is not directly relevant to the examples. For complete, working versions of the code examples, see SampleCode.cs, located in <Cache-install-dir>\dev\dotnet\samples\bookdemos (see “Caché Installation Directory” in the Caché Installation Guide for the location of <Cache-install-dir> on your system).
Introduction to Proxy Objects
A Caché .NET project using proxy objects can be quite simple. Here is a complete, working console program that opens and reads an item from the Sample.Person database:
using System;
using InterSystems.Data.CacheClient;
using InterSystems.Data.CacheTypes;

namespace TinySpace {
  class TinyProxy {
    [STAThread]
    static void Main(string[] args) {

      CacheConnection CacheConnect = new CacheConnection();
      CacheConnect.ConnectionString = "Server = localhost; "
        + "Port = 1972; " + "Namespace = SAMPLES; "
        + "Password = SYS; " + "User ID = _SYSTEM;";
      CacheConnect.Open();

      Sample.Person person = Sample.Person.OpenId(CacheConnect, "1");
      Console.WriteLine("TinyProxy output: \r\n   "
          + person.Id() + ": "
          + person.Name
      );
      person.Close();
      CacheConnect.Close();
    } // end Main()
  } // end class TinyProxy
}
This project is almost identical to the one presented in “UsingCaché ADO.NET Managed Provider Classes” (which does not use proxy objects). Both projects contain the following important features:
-
The same Using statements may be added:
using InterSystems.Data.CacheClient; using InterSystems.Data.CacheTypes; -
The same code is used to create and open a connection to the Caché SAMPLES namespace:
CacheConnection CacheConnect = new CacheConnection(); CacheConnect.ConnectionString = "Server = localhost; " + "Port = 1972; " + "Namespace = SAMPLES; " + "Password = SYS; " + "User ID = _SYSTEM;"; CacheConnect.Open(); -
Both projects have code to open and read the instance of Sample.PersonOpens in a new tab that has an ID equal to 1.
It differs from the ADO.NET project in two significant ways:
-
The project includes a file (WizardCode.cs) containing code for the generated proxy classes. See “Generating Caché Proxy Classes” for a detailed description of how to generate this file and include it in your project.
-
The instance of Sample.PersonOpens in a new tab is accessed through a proxy object rather than CacheCommand and CacheDataReader objects.
No SQL statement is needed. Instead, the connection and the desired instance are defined by a call to the OpenId() class method:
Sample.Person person = Sample.Person.OpenId(CacheConnect, "1");Each data item in the instance is treated as a method or property that can be directly accessed with dot notation, rather than a data column to be accessed with CacheReader:
  Console.WriteLine("TinyProxy output: \r\n   "
    + person.Id() + ": "
    + person.Name
  );
In many cases, code with proxy objects can be far simpler to write and maintain than the equivalent code using ADO.NET Managed Provider classes. Your project can use both methods of access interchangeably, depending on which approach makes the most sense in any given situation.
Generating Caché Proxy Classes
This section covers the following topics:
-
Using the Caché Object Binding Wizard — a GUI program that leads you through the process of generating proxy classes.
-
Running the Proxy Generator from the Command Line — a DOS program that allows you to generate proxy classes from a batch file or an ANT script.
-
Generating Proxy Files Programmatically — calling the Proxy Generator methods directly to create proxy classes from within a .NET program.
-
Adding Proxy Code to a Project — what to do with new proxy files once you've got them.
-
Methods Inherited from Caché System Classes — a set of standard methods that the Proxy Generator adds to all proxy files.
Using the Caché Object Binding Wizard
The Caché Object Binding Wizard can be run either as a stand-alone program (CacheNetWizard.exe, located in <Cache-install-dir>\dev\dotnet\bin\v2.0.50727 by default) or as a tool integrated into Visual Studio (See “Adding the Caché Object Binding Wizard to Visual Studio”).
When you start the Wizard, the following window is displayed:
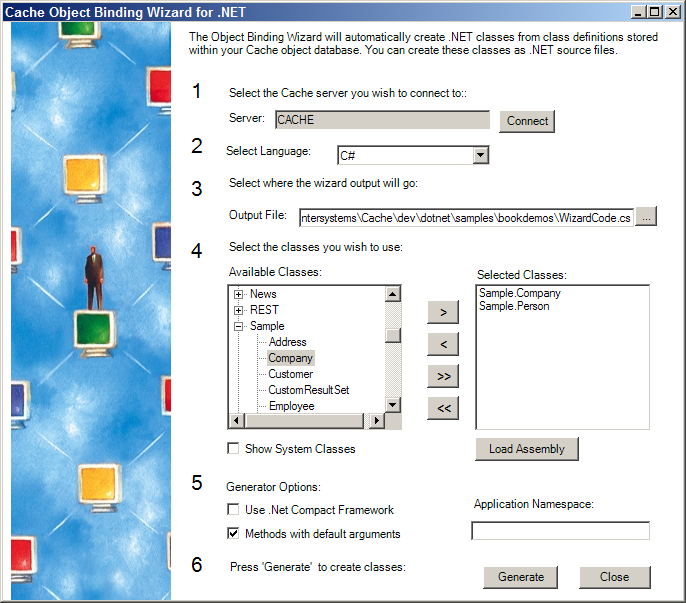
Enter the following information:
-
Select the Caché server you wish to connect to:
Select the server containing the Caché classes for which you want to generate .NET classes. To select the server:
-
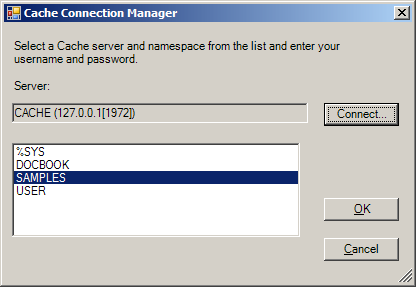
Click Connect and select your server
-
Enter your username and password at the prompt. The Cache Connection Manager is displayed:
-
Select the namespace containing your class (this will be SAMPLES for the bookdemos project)
-
Click OK.
-
-
Select language:
For the bookdemos project, you would select Language: C#.
-
Select where the Wizard output will go:
Generally, this will be the same folder that contains the .csproj file for your project. In this example, the file will be named WizardCode.cs, and will be placed in the main bookdemos project directory.
-
Select the classes you wish to use:
For this exercise, you should select the Sample.Person and Sample.Company classes from the SAMPLES namespace. The Sample.Address and Sample.Employee classes will be included automatically because they are used by Sample.Person and Sample.Company. If you check Show System Classes, classes from %SYS (the standard Caché Class Library) will be displayed along with those from SAMPLES.
-
Generator options:
For this exercise, check Methods with default arguments and leave the other fields empty. The options are:
-
Use .Net Compact Framework — generate proxy code for mobile applications.
-
Methods with default arguments — generates some optional overloads for certain system methods.
-
Application Namespace — optional namespace that will be added to the names of all generated proxy classes. For example, if you entered MyNamespace, the generated code would contain references to MyNamespace.Sample.Person rather than just Sample.Person.
Note:The server will not know about this namespace. To ensure that proxy objects referenced through relations will be generated properly, you should either use the name of your application's main assembly, or set CacheConnection.AppNamespace to the value you enter here (see “Instantiating a Proxy Object by Name” in “Using Caché Proxy Objects” for more information).
-
-
Press 'Generate' to create classes:
The generated file can now be added to your project (see “Adding Proxy Code to a Project”).
Running the Proxy Generator from the Command Line
The command-line proxy generator program (dotnet_generator.exe, located in <Cache-install-dir>\dev\dotnet\bin\v2.0.50727
by default) is useful when the same set of proxy files must be regenerated frequently. This is important when the Caché classes are still under development, since the proxy classes must be regenerated whenever the interface of a Caché class changes.
The command-line generator always requires information about the connection string, output path and type of output file (cs or vb), and a list of the classes to be generated. The following arguments are used:
-
-conn <connection string> — standard connection string (see “Creating a Connection”).
-
If generating a single output file for all classes, use -path:
-
-path <full filename> — path and name of the output file for the generated code. Type of output file to be generated is determined by extension of the filename (for example, C:\somepath\WizardCode.vb will generate a Visual Basic code file).
-
-
If generating one output file for each class, use -dir and -src-kind:
-
-dir <path> — directory where the generated proxy files will be placed.
-
-src-kind <cs|vb> — type of proxy file to generate. For each class, a file named <namespace_classname>.<src-kind> will be generated in the directory specified by -dir. Options are cs or vb.
-
-
-class-list <full filename> — path and name of a text file containing a list of the classes to be used. Each class name must be on a separate line.
The following optional arguments are also available:
-
-gen-default-args <true | false> — switch that controls generation of optional overloads to certain generated system methods. Options are true or false.
-
-app-nsp<namespace> — optional namespace that will be added to the names of all generated proxy classes. For example, if you entered MyNamespace, the generated code would contain references to MyNamespace.Sample.Person rather than just Sample.Person..
-
-use-cf <true | false> — switch that controls whether code is generated for mobile devices or standard PCs. Options are true or false.
-
-ok-api-changes-file — specifies the name of an XML file with a list of server API changes that should be ignored when checking the previously generated code at runtime.
The DOS batch file in this example calls dotnet_generator twice, generating the following output:
-
The first call generates a single file containing several proxy classes. This command generates exactly the same WizardCode.cs file as the Object Binding Wizard (see the example in “Using the Caché Object Binding Wizard”).
-
The second call generates one proxy file for each class, and generates Visual Basic code rather than C#. The filenames will be of the form <namespace_classname>.vb.
Both calls use the same connection string, output directory, and class list file.
set netgen=C:\InterSystems\Cache\dev\dotnet\bin\v2.0.50727\dotnet_generator.exe
set clist=C:\InterSystems\Cache\dev\dotnet\samples\bookdemos\Classlist.txt
set out=C:\InterSystems\Cache\dev\dotnet\samples\bookdemos
set conn="Server=localhost;Port=1972;Namespace=SAMPLES;Password=SYS;User ID=_SYSTEM;"

rem CALL #1: Generate a single WizardCode.cs proxy file
%netgen% -conn %conn% -class-list %clist% -path %out%\WizardCode.cs -gen-default-args true

rem CALL #2: Generate one <namespace_classname>.vb proxy file for each class
%netgen% -conn %conn% -class-list %clist% -dir %out% -src-kind vb -gen-default-args true
The contents of the class list file, Classlist.txt, are:
Sample.Company
Sample.Person
Although only two classes are listed, proxy classes for Sample.AddressOpens in a new tab and Sample.EmployeeOpens in a new tab are generated automatically because they are used by Sample.PersonOpens in a new tab and Sample.CompanyOpens in a new tab.
Generating Proxy Files Programmatically
The CacheConnection class includes the following methods that can be used to generate proxy files from within a .NET program:
Generates a new CS or VB proxy file that may contain definitions for several classes.
CacheConnection.GenSourceFile(filepath, generator, classlist, options, errors);
Parameters:
-
filepath — A string containing the path and filename of the file to be generated.
-
generator — A CodeDomProvider object that generates either CS or VB code.
-
classlist — An IEnumerator iterator pointing to the list of classes that will be generated.
-
options — a CacheClient.ObjBind.GeneratorOptions object.
-
errors — An IList array used to store any returned error messages.
Generates a separate CS or VB proxy file named <classname>.<filetype> for each class in classlist.
CacheConnection.GenMultipleSourceFiles(dirpath, filetype, generator, classlist, options, errors);
Parameters:
-
dirpath — A string containing the directory path for the files to be generated.
-
filetype — A string containing either ".vb" or ".cs", depending on the code to be generated.
-
generator — A CodeDomProvider object that generates either CS or VB code.
-
classlist — An IEnumerator iterator pointing to the list of classes that will be generated.
-
options — A CacheClient.ObjBind.GeneratorOptions object.
-
errors — An IList array used to store any returned error messages.
For a working example that uses both methods, see the Proxy_8_MakeProxyFiles() method in the bookdemos sample program (see “The Caché .NET Sample Programs”).
Using the Proxy Generator Methods
The following code fragments provide examples for defining the method parameters, and for calling each of the proxy generator methods.
The generator can be either a CSharpCodeProvider or a VBCodeProvider.
   System.CodeDom.Compiler.CodeDomProvider CS_generator = new CSharpCodeProvider();
   System.CodeDom.Compiler.CodeDomProvider VB_generator = new VBCodeProvider();
Each of the methods accepts an iterator pointing to the list of classes to be generated. Although only two classes are listed in the following example, proxy classes for Sample.AddressOpens in a new tab and Sample.EmployeeOpens in a new tab are generated automatically because they are used by Sample.PersonOpens in a new tab and Sample.CompanyOpens in a new tab.
   ArrayList classes = new ArrayList();
   classes.Add("Sample.Company");
   classes.Add("Sample.Person");

   System.Collections.IEnumerator classlist
   classlist = classes.GetEnumerator();
In this example, no special namespace will be generated for the proxy code, a complete set of inherited methods will be generated for each class, and no extra code will be generated for use by mobile applications.
   InterSystems.Data.CacheClient.ObjBind.GeneratorOptions options
   options = new GeneratorOptions();
   options.AppNamespace = "";
   options.GenDefaultArgMethods = true;
   options.UseCF = false;
The errors parameter will store the error messages (if any) returned from the proxy generator method call. All three methods use this parameter.
   System.Collections.IList errors
   errors = new System.Collections.ArrayList();
This example generates a C# proxy file named WizardCode.cs in directory C:\MyApp\. The file will contain code for Sample.PersonOpens in a new tab, Sample.CompanyOpens in a new tab, Sample.AddressOpens in a new tab, and Sample.EmployeeOpens in a new tab.
   string filepath = @"C:\MyApp\WizardCode.cs";
   System.CodeDom.Compiler.CodeDomProvider generator = new CSharpCodeProvider();
   conn.GenSourceFile(filepath, generator, classlist, options, errors);
This example generates a single VB proxy file for each class.
   string dirpath = @"C:\MyApp\";
   string filetype = ".vb";
   System.CodeDom.Compiler.CodeDomProvider generator = new VBCodeProvider();
   conn.GenMultipleSourceFiles(dirpath, filetype, generator, classlist, options, errors);
The following files will be generated in C:\MyApp\:
   Person.vb
   Company.vb
   Address.vb
   Employee.vb
The proxy files for Sample.AddressOpens in a new tab and Sample.EmployeeOpens in a new tab are generated automatically because they are used by Sample.PersonOpens in a new tab and Sample.CompanyOpens in a new tab.
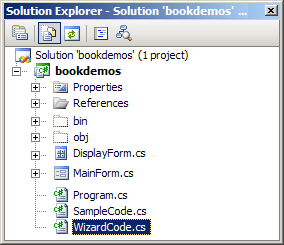
Adding Proxy Code to a Project
After generating .NET proxy files, add the code to your project as follows:
-
From the Visual Studio main menu, select Project > Add Existing Item...
-
Browse to the generated proxy file (or files, if you chose to generate one file for each class) and click Add.
The file will be listed in the Visual Studio Solution Explorer.
You can now use proxy objects as described in the following sections.
A generated proxy class is not updated automatically when you change the corresponding Caché class. The generated classes will continue to work as long as there are no changes in the signatures of the properties, methods, and queries that were present when the proxy classes were generated. If any signatures have changed, the proxy class will throw CacheInvalidProxyException with a description of what was modified or deleted.
Methods Inherited from Caché System Classes
The proxy file generators also provide proxy methods for certain classes inherited from the standard Caché Class Library. For example, the Sample classes inherit methods from Caché %Library.PersistentOpens in a new tab and %Library.PopulateOpens in a new tab. Proxies for these methods are automatically added when you generate the proxy files. This section provides a quick summary of the most commonly used methods. For more detailed information on a method, see the entries for these classes in the Caché Class Reference. For a generic guide to the use of Caché objects, see “Working with Registered Objects” in Using Caché Objects.
The following %Library.PersistentOpens in a new tab proxies are generated:
-
Id() — Returns the persistent object ID, if there is one, of this object. Returns a null string if there is no object ID.
string ID = person.Id(); -
Save() — Stores an in-memory version of an object to disk. If the object was stored previously (and thus, already has an OID), Save() updates the on-disk version. Otherwise, Save() saves the object and generates a new OID for it.
CacheStatus sc = person.Save(); -
Open() — Loads an object from the database into memory and returns an OREF referring to the object.
-
OpenId() — Loads an object from the database into memory and returns an OREF referring to the object. OpenId() is identical in operation to the Open() method except that it uses an ID value instead of an OID value to retrieve an instance.
Sample.Person person = Sample.Person.OpenId(CacheConnect, "1"); -
ExistsId() — Checks to see if the object identified by the specified ID exists in the extent.
if (!(bool)Sample.Person.ExistsId(CacheConnect, ID)) { string Message = "No person with id " + ID + " in database."; }; -
DeleteId() — Deletes the stored version of the object with the specified ID from the database.
CacheStatus sc = Sample.Person.DeleteId(CacheConnect, ID); -
Extent() — This is a system provided query that yields a result set containing every instance within this extent.
CacheCommand Command = Sample.Person.Extent(CacheConnect); -
KillExtent() — Deletes all instances of a class and its subclasses.
CacheStatus sc = Sample.Person.KillExtent(CacheConnect)
The following %Library.PopulateOpens in a new tab proxies are generated:
-
Populate() — Creates a specified number of instances of a class and stores them in the database.
long newrecs = (long)Sample.Person.Populate(CacheConnect, 100); -
OnPopulate() — For additional control over the generated data you can define an OnPopulate() method within your class. If an OnPopulate() method is defined then the Populate() method will call it for each object it generates.
-
PopulateSerial() — Create a single instance of a serial object.
For a working example that uses the KillExtent() and Populate() methods, see the Proxy_6_Repopulate() method in the bookdemos sample program (see “The Caché .NET Sample Programs”).
Using Proxy Objects
Caché proxy objects can be used to perform most of the standard operations on instances in a database. This section describes how to open and read an instance, how to create or delete instances, and how to alter and save existing instances.
Opening and Reading Objects
Use the OpenId() method to access an instance by ID (instances can also be accessed through SQL queries, as discussed later in “Using Caché Queries”). OpenId() is a static class method, qualified with the type name rather than an instance name:
Sample.Person person = Sample.Person.OpenId(CacheConnect, "1");
Once the object has been instantiated, you can use standard dot notation to read and write the person information:
  string Name = person.Name
  string ID = person.Id();

  person.Home.City = "Smallville";
  person.Home.State = "MN";
In this example, person.Home is actually an embedded Sample.AddressOpens in a new tab object. It is automatically created or destroyed along with the Sample.PersonOpens in a new tab object.
For a working example, see the Proxy_1_ReadObject() method in the bookdemos sample program (see “The Caché .NET Sample Programs”).
Creating and Saving Objects
Caché proxy object constructors use information in a CacheConnection object to create a link between the proxy object and a corresponding object on the Caché server:
  Sample.Person person = new Sample.Person(CacheConnect);
  person.Name = "Luthor, Lexus A.";
  person.SSN = "999-45-6789";
Use the Save() method to create a persistent instance in the database. Once the instance has been saved, the Id() method can be used to get the newly generated ID number:
  CacheStatus sc = person.Save();
  Display.WriteLine("Save status: " + sc.IsOK.ToString());
  string ID = person.Id();
  Display.WriteLine("Saved id: " + person.Id());
The ExistsId() class method can be used to test whether or not an instance exists in the database:
  string personExists = Sample.Person.ExistsId(CacheConnect, ID).ToString()
  Display.WriteLine("person " + ID + " exists: " + personExists)
For a working example, see the Proxy_2_SaveDelete() method in the bookdemos sample program (see “The Caché .NET Sample Programs”).
Instantiating a Proxy Object by Name
In some cases, an object that is returned from the server differs from the object that the client requested. For example, the client may request an instance of Sample.PersonOpens in a new tab, but the server returns Sample.EmployeeOpens in a new tab. In order to instantiate an object of the desired class, the binding has to know the exact name of the proxy type, including the application namespace (if any).
When a proxy class is generated, there is an option to specify the namespace that contains it. For example, if the application namespace is MyAppNsp, the Sample.PersonOpens in a new tab proxy class can be specified as MyAppNsp.Sample.Person. Alternatively, the object could be generated as Sample.PersonOpens in a new tab and then "MyAppNsp" could be assigned to the connection.AppNamespace property. Either option allows the binding to deduce that the full name of the proxy type is "MyAppNsp.Sample.Person".
The binding tries to avoid instantiation by name as much as possible, so if a class is already loaded in memory, the binding uses the type in memory to create an instance. In this case, the exact class name is not necessary. In the following example, Y() returns a proxy object that the client knows must be Sample.PersonOpens in a new tab:
  Sample.Person p = new Sample.Person(conn);
  Sample.Person q = x.Y();
The first line creates object p, and loads Sample.PersonOpens in a new tab in memory. In this case, the binding does not need to the full name, and x.Y() will not throw an exception. When the first line is commented out, the second line will fail if the full name of the proxy class is actually something like "MyAppNsp.Sample.Person".
Closing Proxy Objects
The Close() method disconnects a proxy object and closes the corresponding object on the server, but does not change the persistent instance in the database:
person.Close();
Always use Close() to destroy a proxy object.
Object reference counts are not maintained on the client. Every time the server returns an object (either by reference or as a return value) its reference count is increased. When Close() is called, the reference count is decreased. The object is closed on the server when the count reaches 0.
Do not use code such as:
person = nothing; //Do NOT do this!
This closes the proxy object on the client side, but does not decrement the reference count on the server. This could result in a situation where your code assumes that an object has been closed, but it remains open on the server.
By default Close() calls are cached. Although the proxy object can no longer be used, it is not actually destroyed until the reference count can be decremented on the server. This does not happen until the server is called again (for example, when a different proxy object calls a method).
In some situations, caching may not be desirable. For example, if an object is opened with Concurrency Level 4 (Exclusive Lock), the lock will not be released until the next server call. To destroy the object immediately, you can call Close() with the optional useCache parameter set to false:
person.Close(false);
This causes a message to be sent to the server immediately, destroying the proxy object and releasing its resources.
Deleting Persistent Objects from the Database
The DeleteId() class method deletes the instance from the database. You can use the ExistsId() method to make sure that it is gone:
  CacheStatus sc = Sample.Person.DeleteId(CacheConnect, ID);
  Display.WriteLine("Delete status: " + sc.IsOK.ToString());
  Display.WriteLine("person " + ID + " exists: "
    + Sample.Person.ExistsId(CacheConnect, ID).ToString());
For a working example, see the Proxy_2_SaveDelete() method in the bookdemos sample program (see “The Caché .NET Sample Programs”).
Using Caché Queries
A Caché Query is an SQL query defined as part of a Caché class. For example, the Sample.PersonOpens in a new tab class defines the ByName query as follows:
Query ByName(name As %String = "") As %SQLQuery(CONTAINID = 1, SELECTMODE = "RUNTIME")
      [ SqlName = SP_Sample_By_Name, SqlProc ]
{
   SELECT ID, Name, DOB, SSN
   FROM Sample.Person
   WHERE (Name %STARTSWITH :name)
   ORDER BY Name
}
Since queries return relational tables, Caché proxy objects take advantage of certain ADO.NET classes to generate query results. In the Sample.PersonOpens in a new tab proxy class, ByName is a class method. It accepts a connection object, and returns an ADO.NET Managed Provider CacheCommand object that can be used to execute the predefined SQL query:
CacheCommand Command = Sample.Person.ByName(CacheConnect);
In this example, the Command.Connection property has been set to CacheConnect, and Command.CommandText contains the predefined ByName query string.
To set the Command.Parameters property, we create and add a CacheParameter object with a value of A (which will get all records where the Name field starts with A):
  CacheParameter Name_param = new CacheParameter("name", CacheDbType.NVarChar);
  Name_param.Value = "A";
  Command.Parameters.Add(Name_param);
The CacheParameter and CacheDataReader ADO.NET Managed Provider classes must be used to define parameters and execute the query, just as they are in an ADO.NET SQL query (see “Using SQL Queries with CacheParameter”). However, this example will use the query to return a set of object IDs that will be used to access objects.
A CacheDataReader object is used to get the ID of each row in the result set. Each ID is used to instantiate the corresponding Sample.PersonOpens in a new tab proxy object, which is then used to access the data:
  Sample.Person person;
  string ID;

  CacheDataReader reader = Command.ExecuteReader();
  while (reader.Read()) {
    ID = reader[reader.GetOrdinal("ID")].ToString();
    person = Sample.Person.OpenId(CacheConnect, ID);

    Display.WriteLine(
        person.Id() + "\t"
      + person.Name + "\n\t"
      + person.SSN + "\t"
      + person.DOB.ToString().Split(' ')[0].ToString()
    );
  };
For a working example, see the Proxy_3_ByNameQuery() method in the bookdemos sample program (see “The Caché .NET Sample Programs”).
Using Collections and Lists
Caché proxy objects interpret Caché collections and streams as standard .NET objects. Collections can be manipulated by iterators such as foreach, and implement standard methods such as add() and insert(). Caché lists ($List format) are interpreted as CacheSysList objects and accessed by instances of CacheSysListReader (in the InterSystems.Data.CacheTypes namespace).
Collections of serial objects are exposed as .NET Dictionary objects. Serial objects are held as global nodes, where each node address and value is stored as a Dictionary key and value.
The Person class includes the FavoriteColors property, which is a Caché list of strings. The foreach iterator can be used to access elements of the list:
  CacheListOfStrings colors = person.FavoriteColors
  int row = 0;
  foreach (string color in colors) {
    Display.WriteLine("   Element #" + row++ + " = " + color);
  }
The standard collection methods are available. The following example removes the first element, inserts a new first element, and adds a new last element:
  if (colors.Count > 0) colors.RemoveAt(0);
  colors.Insert(0,"Blue");
  colors.Add("Green");
For a working example, see the Proxy_4_Collection() method in the bookdemos sample program (see “The Caché .NET Sample Programs”).
Caché does not support the creation of proxy classes that inherit from collections. For example, the Caché Proxy Generator would throw an error when attempting to generate a proxy for the following ObjectScript class:
Class User.ListOfPerson Extends %Library.ListOfObjects
{Parameter ELEMENTTYPE = "Sample.Person";}
Using Relationships
If a Caché database defines a relationship, the Caché Proxy Generator will create a CacheRelationshipObject class that encapsulates the relationship. The Sample.CompanyOpens in a new tab class contains a one-to-many relationship with Sample.EmployeeOpens in a new tab (which is a subclass of Sample.PersonOpens in a new tab). The following example opens an instance of Sample.EmployeeOpens in a new tab, and then uses the relationship to generate a list of the employee's co-workers.
The employee instance is opened by the standard OpenId() method. It contains a Company relationship, which is used to instantiate the corresponding company object :
  Sample.Employee employee = Sample.Employee.OpenId(CacheConnect,ID)
  Sample.Company company = employee.Company;

  Display.WriteLine("ID:    " + (string)employee.Id());
  Display.WriteLine("Name:   " + employee.Name)
  Display.WriteLine("Works at: " + company.Name);
The company object contains the inverse Employees relationship, which this example instantiates as an object named colleagues. The colleagues object can then be treated as a collection containing a set of Employee objects:
  CacheRelationshipObject colleagues = company.Employees;

  Display.WriteLine("Colleagues: ");
  foreach (Sample.Employee colleague in colleagues) {
    Display.WriteLine("\t" + colleague.Name);
  }
For a working example, see the Proxy_5_Relationship() method in the bookdemos sample program (see “The Caché .NET Sample Programs”).
Using I/O Redirection
When a Caché method calls a Read or Write statement, the statement is associated with standard input or standard output on the client machine by default. For example, the PrintPerson() method in the Sample.EmployeeOpens in a new tab class includes the following line:
Write !,"Name: ", ..Name, ?30, "Title: ", ..Title
The following example calls PrintPerson() from a Sample.EmployeeOpens in a new tab proxy object:
   Sample.Employee employee = Sample.Employee.OpenId(CacheConnect, "102");
   employee.PrintPerson();
By default, output from this call will be redirected to the client console using the CacheConnection.DefaultOutputRedirection delegate object, which is implemented in the following code:
  public static OutputRedirection DefaultOutputRedirection =
     new OutputRedirection(CacheConnection.OutputToConsole);

  static void OutputToConsole(string output)
  {
    Console.Out.Write(output);
  }
The default redirection delegates are defined when a CacheConnection object is created. The constructor executes code similar to the following example:
   private void Init() {
      OutputRedirectionDelegate = DefaultOutputRedirection;
      InputRedirectionDelegate = DefaultInputRedirection;
   }
In order to provide your own output redirection, you need to implement an output method with the same signature as OutputToConsole, create an OutputRedirection object with the new method as its delegate, and then assign the new object to the OutputRedirectionDelegate field of a connection object.
This example redirects output to a System.IO.StringWriter stream. First, a new output redirection method is defined:
  static System.IO.StringWriter WriteOutput;

  static void RedirectToStream(string output)
  {
    MyClass.WriteOutput.Write(output);
  }
The new method will redirect output to the WriteOutput stream, which can later be accessed by a StringReader. To use the new delegate, the WriteOutput stream is instantiated, a new connection conn is opened, and RedirectToStream() is set as the delegate to be used by conn:
  WriteOutput = new System.IO.StringWriter();
  conn = new CacheConnection(MyConnectString);
  conn.Open();

   conn.OutputRedirectionDelegate =
     new CacheConnection.OutputRedirection(MyClass.RedirectToStream);
When PrintPerson() is called, the resulting output is redirected to WriteOutput (which stores it in an underlying StringBuilder). Now a StringReader can be used to recover the stored text:
   ReadOutput = new System.IO.StringReader(WriteOutput.ToString());
   string capturedOutput = ReadOutput.ReadToEnd();
The redirection delegate for the connection object can be changed as many times as desired. The following code sets conn back to the default redirection delegate:
conn.OutputRedirectionDelegate = CacheConnection.DefaultOutputRedirection;
Input from Caché Read statements can be redirected in a similar way, using an InputRedirection delegate.
For a working example, see the Proxy_7_Redirection() method in the bookdemos sample program (see “The Caché .NET Sample Programs”).