
InterSystems Reports Server with InterSystems IRIS
The InterSystems Reports Server (powered by insightsoftware’s Report Server) collects data from the InterSystems IRIS® or InterSystems IRIS for Health™ instance where you store your data and presents it to the user endpoint in a format which you specify using the InterSystems Reports Designer. The InterSystems Reports Server keeps track of how your Reports Server is configured using a system database, which is maintained by an InterSystems IRIS or InterSystems IRIS for Health instance as well.
These three entities—the InterSystems Reports Server, the InterSystems IRIS data source, and the InterSystems IRIS system database instance—do not need to run on the same machine, as long as they can communicate with each other. InterSystems recommends that you configure a unique instance of InterSystems Reports Server for each data source. It is possible for the same instance of InterSystems IRIS to act as both the data source and the system database.
Set Up the InterSystems Reports Server
InterSystems Reports Server can be deployed on-premises from an installation kit or as a container.
If you want to upgrade your version of the InterSystems Reports Server, it is not necessary to perform the full deployment procedures as described below; refer to Upgrade InterSystems Reports Server for instructions on the upgrade process.
From an Installation Kit
The procedure for setting up the InterSystems Reports server involves deploying the InterSystems Reports Server (supplied by Logi Analytics) and configuring an existing InterSystems IRIS instance to maintain the server’s system database.
Use the following steps to install and set up the latest version of the InterSystems Reports Server:
-
Make sure the machine where you are installing InterSystems Reports Server meets Logi Report Server’s minimum system requirementsOpens in a new tab. The machine which runs InterSystems Reports Server must use a version of JDK that is supported by both InterSystems IRIS (see Supported Java TechnologiesOpens in a new tab) and Logi Report Server. Make a note of the path to the JDK. You need this information when you select a JDK later in the installation.
Note:Beginning with version 2024.1, JDK 11 is required to install InterSystems Reports Server.
-
Make sure that the instance of InterSystems IRIS you have installed to maintain your server’s system database is reachable from the machine where you are installing InterSystems Reports Server. Make a note of the hostname or IP address for this instance, as well as the superserver port (you can find this in the About section of the Management PortalOpens in a new tab).
-
Download and unzip the InterSystems Reports Server installation kit from the WRC Distributions page, using the information you received when you purchased InterSystems Reports. On a Unix or macOS system, you can unzip the kit file using the command line by navigating to the directory where you downloaded the kit file and issuing the following command, replacing <kitFilename> with the filename:
tar -xf <kitFilename>The kit should include the following files:
-
intersystems-jdbc-<jdbcVersionNumber>.jar
-
intersystems-reports-<reportsVersionNumber>.jar
-
readme.txt
-
server.exe (for Windows) or server.bin (for Unix/macOS)
-
version.txt
Where <jdbcVersionNumber> and <reportsVersionNumber> are version numbers for the components packaged within each .jar file.
-
-
From the command line, navigate to the directory containing the kit files.
-
For Unix and macOS systems, you must manually add execute permissions for both .jar files as well as the server.bin file before running the installer script. (On Windows, the necessary permissions should be added automatically.) To do so, issue the following command for each of the three files, replacing <filename> with the name of the file:
chmod u+x <filename> -
Run the installer as follows:
-
On Windows systems: run the server.exe executable.
-
On Unix or macOS systems, execute the following command:
java -cp .:./* com.intersystems.reports.Installer
-
-
The installer script prompts you for the following information:
-
The hostname or IP address for your InterSystems IRIS instance.
-
The superserver port of your InterSystems IRIS instance.
-
The InterSystems IRIS namespace to be used by this InterSystems Reports Server. Note each InterSystems Reports Server requires a separate namespace. If the given namespace does not exist, the script will create it.
-
The unique name to assign to this InterSystems Reports Server (Logi Report Server Name).
-
The computer hosting this InterSystems Reports Server (Logi Report Server Host).
Note that InterSystems IRIS will use this address to access this Reports Server, so ensure it is reachable from the machine hosting the InterSystems IRIS instance. If the system database instance of InterSystems IRIS and the InterSystems Reports Server are being hosted on the same machine, do not use localhost. Instead, use 127.0.0.1 (the IP address) or the machine’s hostname
-
The port the InterSystems Reports Server will use. This port must be available and between 1 and 65535.
-
Enable Single Sign-On — controls whether InterSystems IRIS will be able to use single sign-on to access this InterSystems Reports Server from the Management Portal.
-
InterSystems IRIS user—this InterSystems Reports Server will connect as (Report User). If this user does not exist, the script will create it.
-
Password for the report user specified in the last step.
-
The license user from the user/key pair you received when you purchased InterSystems Reports.
-
The license key from the user/key pair you received when you purchased InterSystems Reports.
Note:The Terminal does not display input when you enter the license key. If your installation fails, confirm that you entered the license key correctly and try again, or try installing using a manual configuration file.
If you need to update the license for the InterSystems Reports Server at any point after the initial installation, you can do so by following the instructions provided in the Logi Report documentationOpens in a new tab.
-
The absolute path on this computer where you want to install the InterSystems Reports Server.
-
The JDK path.
After you enter this information, the installer sets up the Reports Server and then uses a JDBC connection to connect to InterSystems IRIS and set up the report namespace and report user.
-
You should then see messages like the following:
================================================================================

                      InterSystems Reports Installation

================================================================================
Loaded configuration from C:\iscreports-sample\config.properties
Performing IRIS setup...
Waiting for JDBC connection to setup users and namespaces (as necessary)...
Successfully connected to jdbc:IRIS://127.0.0.1:1972/%SYS.
Successfully saved Report Server definition "report-server"
Using pre-existing report namespace "REPORTS".
Created report user "REPORT".
Successfully connected to jdbc:IRIS://127.0.0.1:1972/REPORTS.
Granted %DB_OBJECT_DEFINITION to REPORT
Installing Logi Report Server (this may take a few minutes)...
Configuring single sign on from IRIS to Logi Report server...
================================================================================

              InterSystems Reports Installation was successful.

================================================================================
Alternative: Perform Manual Configuration and Installation
Instead of installing as described above, you can edit a configuration file and use that in the installation. The steps are as follows:
-
Follow steps 1–3 of the basic installation procedure, making sure of prerequisites and obtaining the kit.
-
Within the same directory as the rest of the installation kit, create a config.properties file with the relevant information. The following sample demonstrates the fields that need to be populated:
IRIS.Host=127.0.0.1
IRIS.SSPort=1972
IRIS.ReportNamespace=REPORTS
LOGI.ServerName=report-server
LOGI.Host=127.0.0.1
LOGI.Port=8888
LOGI.EnableSSO=true
IRIS.SystemUser=_system
IRIS.SystemPassword=SYS
IRIS.ReportUser=REPORT
IRIS.ReportPassword=SYS
LOGI.LicenseUser=Intersystems
LOGI.LicenseKey=999999999999999999999999999999999999999999999999
LOGI.InstallPath=C:\LogiReport\Server
LOGI.JdkPath=C:\Program Files\Java\jdk-16.0.2
Note:
-
IRIS.Host is the name of the server where the InterSystems IRIS instance is installed.
-
IRIS.SSPort is the superserver port for the InterSystems IRIS instance (you can find this in the About section of IRIS Management Portal).
-
LOGI.InstallPath is the path where the InterSystems Reports Server will be installed in your machine
-
LOGI.JdkPath is the path to the JDK on your machine (To find this for Windows, type echo %JAVA_HOME% at a command prompt. To find this for Unix, type which java or whereis java.)
-
-
Open a command window and change directory to the location where your InterSystems Reports installation kit is located.
-
Enter the following command:
-
Windows:
java -cp .;./* com.intersystems.reports.Installer --load config.properties -
Unix:
java -cp .:./* com.intersystems.reports.Installer --load config.properties
-
As a Container
If you want to run your server from a DockerOpens in a new tab container, use the Report Server container image that Logi Analytics provides through the Docker Hub: https://hub.docker.com/r/logianalytics/logireport-serverOpens in a new tab.
Logi Analytics provides the following instructions for deploying the Report Server container:
-
Using and Upgrading Report Server on Docker: https://docs-report.zendesk.com/hc/en-us/articles/12491350336141-Using-and-Upgrading-Report-Server-on-DockerOpens in a new tab
-
Environment Variable Configuration for Docker: https://docs-report.zendesk.com/hc/en-us/articles/28891700401805-Environment-Variable-Configuration-for-DockerOpens in a new tab
The system database solution which this container image uses by default is sufficient for testing and evaluation purposes only. (see https://docs-report.zendesk.com/hc/en-us/articles/12491127473293-Configuring-Server-Databases-for-Server-MetadataOpens in a new tab).
For any other use case, InterSystems strongly recommends that you configure the container to use an InterSystems IRIS or InterSystems IRIS for Health instance to maintain the server’s system database. Read the following Developer Community article for a demonstration of how to do so: https://community.intersystems.com/post/running-intersystems-reports-containersOpens in a new tab
Upgrade the InterSystems Reports Server
You can upgrade to the latest version of the InterSystems Reports Server by performing the following steps:
-
Download and unzip the installation kit for the latest version of the InterSystems Reports Server from the WRC Distributions page, using the information you received when you purchased InterSystems Reports. On a Unix or macOS system, you can unzip the kit file using the command line by navigating to the directory where you downloaded the kit file and issuing the following command, replacing <kitFilename> with the filename:
tar -xf <kitFilename>The kit should include an executable file named server.exe (for Windows systems) or server.bin (for Unix and macOS systems).
-
Run the server.exe or server.bin file to launch the installer. Because this installer must overwrite some existing InterSystems Reports Server files, you must run the installer from a user account that holds the same permissions on the relevant files and directories as the user account which was used during the initial InterSystems Reports Server installation.
-
Respond to the prompts in the installer according to your system configuration, selecting Next as needed to advance to the next step. Note the following:
-
You must provide your license user ID and license key again.
-
When the installer gives you the option to Install or Upgrade the server, select Upgrade.
-
When the installer gives you the option to Upgrade or Overwrite, select Upgrade.
-
Update the InterSystems Reports Server License
If you need to update the license for the InterSystems Reports Server at any point after the initial installation, Logi Analytics’ documentation provides instructions for doing so using the Server ConsoleOpens in a new tab.
Using the Management Portal
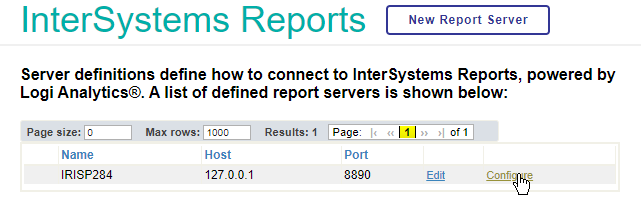
You can use the Management Portal to create, view, and edit InterSystems IRIS Reports server configurations. The installation process creates a report server, which is listed on the InterSystems Reports page on the Management Portal. To find this page, select System Administration > Configuration > InterSystems Reports. The following screen shot shows the page with the initial report server. The server name listed here is the one you supplied to the install script as Logi Report Server Name.
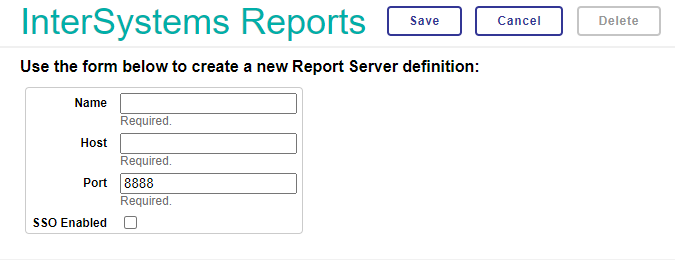
Selecting the New Report Server button opens the form shown below, which you can use to configure a new report server by entering the Name, Host, and Port, and using the SSO Enabled check box to determine whether single sign-on is enabled.
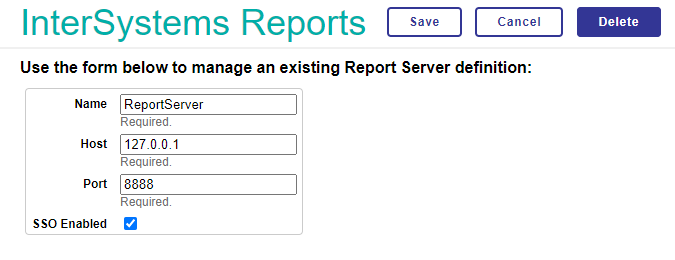
Selecting a server in the list and using the Edit button opens the same form initialized with values from the selected server. You can modify the server configuration, or use the Delete button to remove it entirely. Selecting the SSO Enabled check box enables the Linked User Accounts feature, see Enabling Linked User Accounts.
If Linked User Accounts has been enabled, you can access the Reports Server from the Management Portal. Select System Administration > Configuration > InterSystems Reports to navigate to the InterSystems Reports page, which lists existing Reports Servers. Select Configure.
This action opens the InterSystems Reports Configuration page:
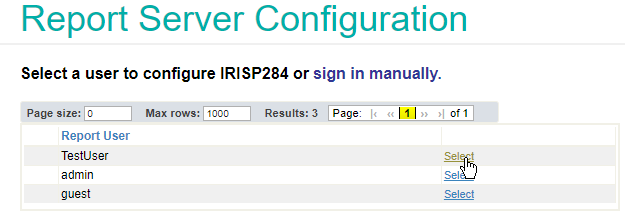
Clicking on Select opens Logi Report, logged in as TestUser.
Enabling Linked User Accounts
InterSystems Reports does not support the use of the linked user account feature with the following versions of InterSystems IRIS data platform: 2022.3, 2023.1, 2023.2.
Linked user accounts is a feature that enables you to access the Reports Server directly from the InterSystems IRIS Management Portal without entering an additional Logi username and password. This functionality is achieved by linking a user account on the InterSystems IRIS server with a Logi user account. This linkage is made by assigning a role to the InterSystems IRIS user. The name of this role must follow a specific naming convention.
-
The first part of the name is the name you supplied as the Logi Report Server Name during server installation.
-
The second half of the name is the name of a Logi user.
-
The two halves of the name are separated by an underscore character (_).
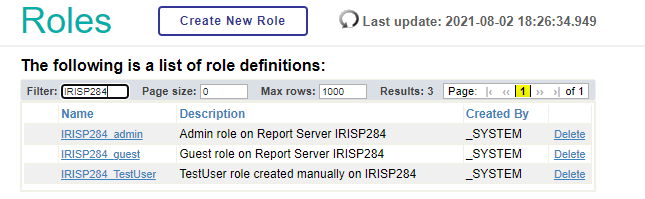
For example, if the Logi Report Server Name is IRISP284 and there is a Logi user named TestUser, a role having the following name can link an InterSystems IRIS user to TestUser on Logi Report:
IRISP284_TestUser
Logi users named admin and guest exist on Logi Report systems by default. When you enable linked user accounts on an InterSystems IRIS report server, that action creates roles to link InterSystems IRIS users to these Logi accounts. These roles are:
-
LogiServerConfigName_admin
-
LogiServerConfigName_guest
When the linked user accounts feature is disabled, these roles are not edited or deleted, but do not appear in the configure page. You can create additional roles for linking user accounts as you would create any other InterSystems IRIS roles, being careful to follow the naming convention.
Given a Logi server configuration name IRISP284, the following screen shot shows the default roles create by the installation script, and an additional role for Logi user TestUser created through the Management Portal.
The ability of users to configure report servers is influenced by the privileges assigned to them. Users with %Admin_Secure have access to report server operations that indirectly manipulate roles, while users without that privilege do not. When creating a new report server, users without %Admin_Secure are unable to toggle linked user accounts. The form is presented to such users with the SSO Enabled check box disabled. If a new report server is created with SSO Enabled selected, the default roles are created automatically.
If these roles already exist, they are not overwritten or updated upon creation of the report server. The admin and guest roles, whether generated manually or automatically, and other roles of the form "<ReportServer.Name>_role" are updated automatically when you change the name of the report server. These roles are also deleted upon deletion of the report server.