HL7 Schemas and Available Tools
This chapter provides an overview of the Ensemble tools that you can use to work with HL7 Version 2 schemas and documents. It contains the following sections:
Overview of HL7 Schemas and Messages
Ensemble can process and pass through an HL7 message without using a schema to parse it, but associating a schema with a message allows you to do the following:
-
Parse the message and access field values in:
-
Data transformations
-
Routing rules
-
Custom ObjectScript code
-
-
Validate that the message conforms to the schema.
Each HL7 message is identified by a message type, which is specified in the MSH segment MessageType field (MSH:9). Some message types share the same message structure. For example, in HL7 Version 2.3.1, the ADT_A05 message to pre-admit a patient has the same structure as the ADT_A01 admit message. The schema specifies that the ADT_A05 message has the structure type ADT_A01.
In order to parse an HL7 message, Ensemble needs two pieces of information:
-
Schema category—this is the HL7 version number, such as 2.3.1 or 2.7, or it may be a category for a custom schema defined in Ensemble. Ensemble gets the schema category from the business service Message Schema Category setting or from the Data Transformation settings. Although the HL7 message includes a schema version number in the MSH segment VersionID field (MSH:12), Ensemble does not use this value because many applications do not set this field consistently.
-
Structure type—Ensemble gets the message type from the MSH:9 field and then checks the schema definition to get the structure type for that message.
Ensemble uses the MSH:9.3 subfield to qualify the message type in some cases. The MSH:9:3 subfield is used in HL7 messages in two ways: 1) as a modifier to the message type, or 2) to specify the structure type. If MSH:9:3 modifies the message type, typically as a numeric digit, Ensemble includes it as part of the message type. If MSH:9:3 specifies a structure type, such as ADT_A01, Ensemble ignores it in both determining the message type and setting the Name property. Ensemble does not need the MSH:9.3 subfield to determine the structure type because it gets the structure type from the schema.
When a business service or Data Transformation creates an EnsLib.HL7.Message object to store an HL7 message, it combines the schema category and structure type and stores it in the DocType property using this syntax:
category:structureType
For example, valid DocType values for category 2.3.1 include 2.3.1:ACK, 2.3.1:ADT_A17, 2.3.1:BAR_P01, and 2.3.1:PEX_P07. The message type, which can be different from the structure type is stored in the Name property.
If you create an EnsLib.HL7.Message object in ObjectScript code, you should set the DocType and Name properties based on the value in the MSH:9 field.
The HL7 standard allows local extensions, such as trailing Z segments. These segments are not defined in the base schema categories. If you want to access a field in a custom Z segment in a data transformation, routing rule, or ObjectScript, you need to define a custom schema category that specifies the extended message. See “Using the Custom Schema Editor” for details on defining a custom schema.
Using the HL7 Schema Structures Page
The HL7 Schemas page enables you to import and view HL7 Version 2 schema specifications.
To display this page, navigate to Ensemble > Interoperate > HL7 v2.x > HL7 v2.x Schema Structures from the Home page. For general information on using this page, see “Using the Schema Structures Page” in Ensemble Virtual Documents.
The HL7 Schemas page provides an additional tab: Message Types. This tab identifies two message structures as a request/response pair.
Ensemble includes the following HL7 schema versions:
-
2.1
-
2.2
-
2.3
-
2.3.1
-
2.4
-
2.5
-
2.5.1
-
2.6
-
2.7
-
2.7.1
For information on creating and editing custom schema categories, see “Using the Custom Schema Editor”.
Note that HL7 Version 3 is not listed as an HL7 schema category, because it uses entirely different data conventions from HL7 Version 2. For details, see the Ensemble HL7 Version 3 Development Guide.
The following example shows how to use this page in more detail.
Viewing a List of Document Types
To list all the document type structures in a category, first select the category and then click the DocType Structures tab.
Viewing a Message Structure
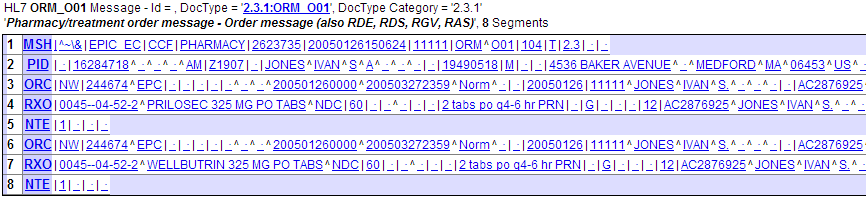
To view the internal organization of a message structure, click its name from the DocType Structures tab on the HL7 Schemas page. Ensemble displays the segment structure of the message using the system of visual cues explained below. This is the HL7 Schema Message Structure page. The following example shows the 2.3.1:ORM_O01 message structure.
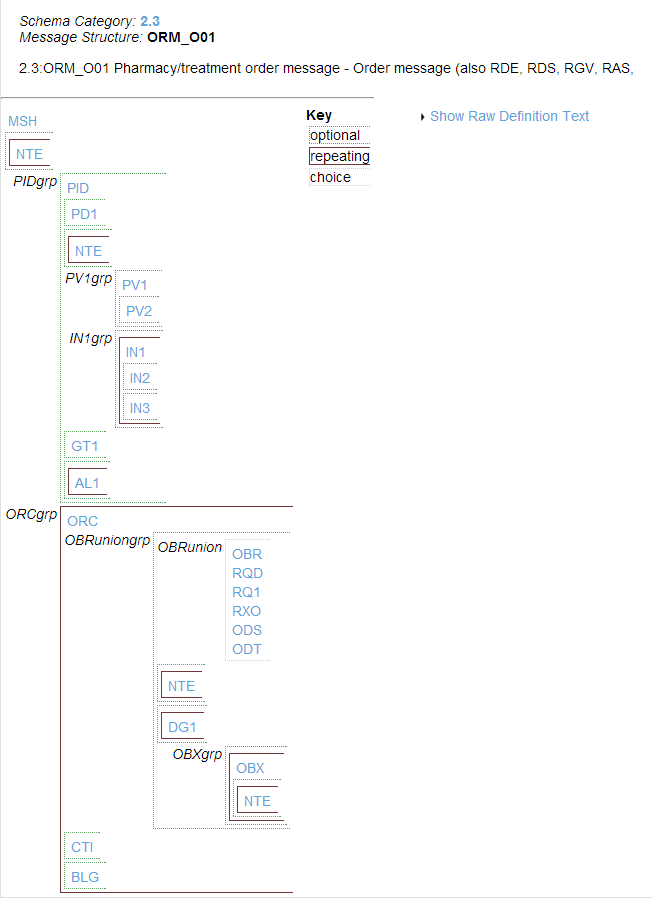
The visual conventions on this page are as follows:
-
The segments that comprise the message structure are listed in sequential order, from left to right and top to bottom.
-
The three-letter name of each message segment is displayed: MSH, NTE, PID, etc. This name indicates the type of segment that exists at this location in the HL7 message structure.
-
Segment names must be all uppercase.
-
Green dotted lines enclose segments, groups, or fields that are optional.
-
Brown solid lines enclose segments, groups, or fields that, if present, may repeat several times.
-
Yellow dashed lines enclose a choice: this is a union of segments. Only one segment from the union can appear at this location within the message structure. It may be any of the segments listed.
-
A segment, group, or field may be both repeating and optional (see any NTE above).
-
To see the message structure in a raw text format, click Show Raw Definition Text.
When you are viewing a segment diagram, if you hover the cursor over a three-letter segment name, a tooltip displays the syntax for referring to this segment in a virtual property path.
The message structure name displayed before the diagram has two parts, separated by a colon:
category:structure
Where:
-
category is the name of a schema category, such as 2.3.1.
-
structure is the name of a message within that schema category.
Viewing a Segment Structure
To view the structure of a message segment, click on its name in any page similar to the example shown in the previous section. Ensemble displays a table that lists all the fields in that segment. This is the HL7 Schema Segment Structure page.
For example, if you click the PR1 segment in the 2.3:ADT_A01 message structure, Ensemble displays the following page.
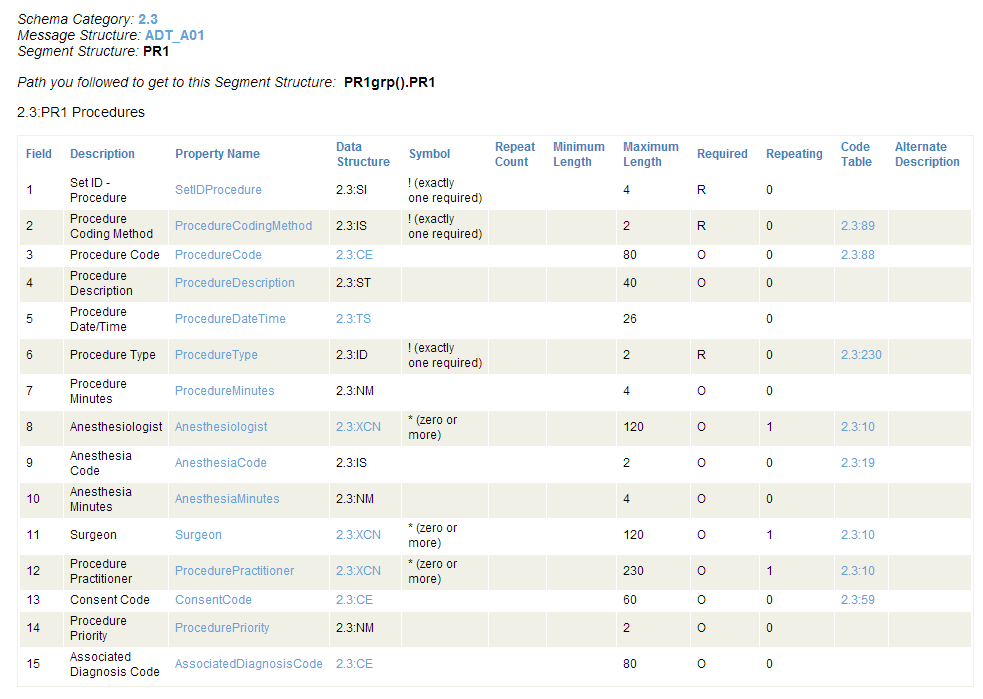
The columns are as follows:
-
Field — the number to use to access the field within the segment (if you prefer numbers).
-
Description — a short description of the field.
-
Property Name — the name to use to access the field within the segment (if you prefer names).
-
Data Structure — for more complex field values that use a data structure, you need further syntax details before you can complete the segment:field virtual property path. You can get this by clicking on the name in this column
-
Symbol — indicates the syntax rules for the field. The characters in this column indicate whether you can expect this field to be present, absent, or repeated within the message segment. Possible values are:
Symbol Meaning ! (1 only) The field is required; it must occur only once. ? (0 or 1) The field is optional, but if it occurs, it may occur only once. + (1 or more) The field may repeat one or more times. * (0 or more) The field may repeat zero or more times. & The field may be present, and may repeat, but only under certain conditions. n* (0 to n) The field repeats a maximum of n times. -
Repeat Count — the maximum number of times the field can repeat (if it repeats, and if there is a maximum).
-
Minimum Length — the minimum number of characters in the field. Each repeat of the field must contain this number of characters.
-
Maximum Length — the maximum number of characters in the field. Each repeat of the field may contain this number of characters.
-
Required — displays R for required, O for optional.
-
Repeating — displays 1 for true, 0 for false.
-
Code Table — click on an entry to view the valid codes that may be entered in this field.
-
Alternate Description — a second, longer description of the field.
You can use this information, particularly the Property Name column, to build virtual property paths for Ensemble in the format segment:field. The following are examples of virtual property paths involving simple field values from the PR1 segment in the 2.3:ADT_A01 message structure. The () shortcut syntax indicates all available instances of a repeating field, whereas (1) indicates the first instance:
PR1grp().PR1:ProcedureType
PR1grp().PR1:ProcedureCode()
PR1grp().PR1:ProcedureCode(1)
PR1grp().PR1:ProcedureCode(x)
PR1grp().PR1:ProcedurePriority
Viewing a Data Structure
When you click on a name in the Data Structure column, Ensemble displays all the fields in that data structure. This is the HL7 Data Structure page. The following columns of the display are most useful:
-
The Component column lists the numbers you can use to access fields within the segments (if you prefer numbers).
-
The Property Name column lists the names you can use to access fields within the segments (if you prefer names).
-
Click on an entry in the Data Structure column (if any) to drill down for detail.
-
Click on an entry in the Code Table column (if any) to view the valid codes that may be entered in this field.
The following sample page appears when you click the Data Structure item called 2.3:XCN in the segment structure page above. The page states that the category 2.3 data structure XCN describes an “Extended Composite ID number and name” and consists of fourteen fields. Of these, some are simple values, some are data structures, and some are codes.
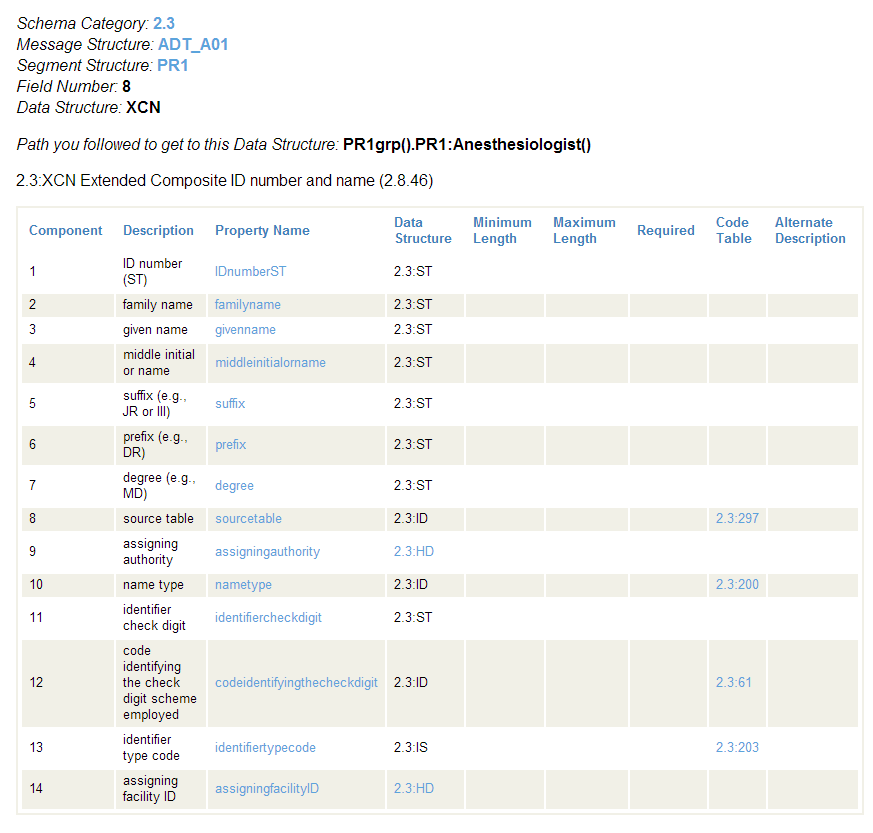
Given this information, you can create virtual property paths for the complex PR1grp().PR1:Surgeon field in the message structure 2.3:ADT_A01 as follows:
PR1grp().PR1:Surgeon.familyname
PR1grp().PR1:Surgeon.degree
Viewing a Code Table
When you click on a name in the Code Table column, it lists and explains the valid codes for that field. This is the HL7 Code Table page. The following sample page appears when you click the Code Table item called 2.3:200 in the data structure page shown in the previous section.
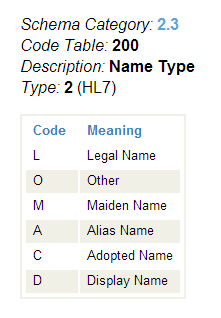
The example above shows that the category 2.3 code table 200 describes a “Name type” that can have the value L, O, M, A, C, or D.
This means that if you have an HL7 message with a DocType of 2.3:ADT_A01, it has an optional virtual property with the path PR1grp().PR1:Anesthesiologist.nametype that can contain one of the following values: L, O, M, A, C, or D.
Choosing a Different Category
It is a feature of the HL7 standard that a message structure can differ by HL7 version, even when the structure has the same name and number. For example, both HL7 2.4 and HL7 2.5 define a message structure called ORD_O04, but these definitions contain different segments. Ensemble provides the message structure definitions 2.4:ORD_O04 and 2.5:ORD_O04. The HL7 Message Structure page makes it easy to see the differences between the two definitions, as the following two figures show.

Using the Custom Schema Editor
The Custom Schema Editor allows you to create a new custom HL7 schema or edit an existing custom HL7 schema. Typically, a custom schema has a base schema, which is a standard schema or another custom schema. When Ensemble is using the custom schema to parse a message, if the message type, segment, or other element is not defined in the custom schema, it uses the definition in the base schema. Consequently, you only have to define the elements in the custom schema that are not present in the base schema or require a different definition from the one in the base schema. You cannot edit a standard schema.
The most common reason to define a custom schema is to be able to parse HL7 messages with trailing Z segments. Ensemble can handle messages with trailing Z segments that are not defined in the schema, but to do any of the following you need to define a custom schema:
-
Access field paths in the trailing Z segments in a routing rule, data transformation, or ObjectScript code.
-
Validate the trailing Z segments.
If you have a production that is currently using a standard schema and you need to access trailing Z segment field paths in a data transformation or routing rule, you should do the following:
-
Use the Custom Schema Editor in the Management Portal to create a new HL7 schema. Enter a name for the custom schema and specify the base schema.
-
Define the Z segment that can appear in your message. If your Z segment has similar fields to an existing segment in the base schema, you can copy the definition from the base and then modify it as needed. Otherwise, you can create a new segment. You can add fields, delete fields, or change the order of fields.
-
For each message type that includes the trailing Z segments, create a message type and structure type in the custom schema that is copied from the underlying schema. Add the Z segment to the end of the structure type.
-
Modify the business service in your production to use the new custom schema instead of the base schema.
-
Test the production by supplying new messages with the trailing Z segments to the production’s business services. If you view the messages in the message viewer, the Z segments will be shown in blue if they are defined in the schema. Unrecognized segments are shown in black.
Detailed instructions are in the following sections.
Creating a New Custom Schema
To start the Custom Schema Editor from the Management Portal, select Ensemble, Interoperate, HL7 v2.x, and HL7 v2.x Schema Structures.
To create a new HL7 schema, click New. In the Custom Schema Editor, select the base schema, schema name, and, optionally, a schema description. For example, to define a custom schema based on the Version 2.5 standard schema category, you could enter the following:
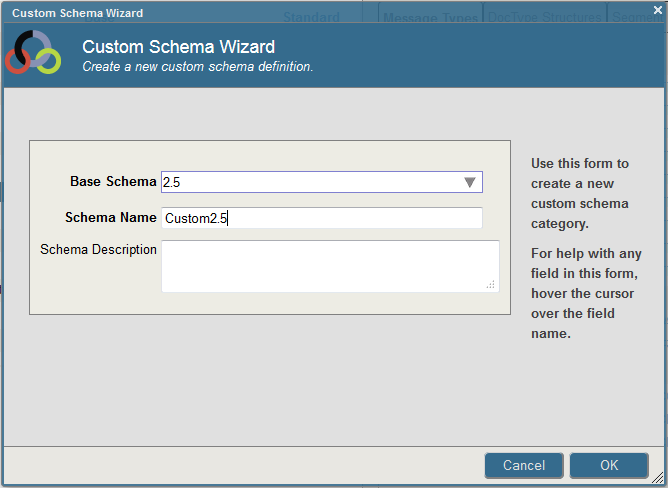
Once you have created the custom schema, the Custom Schema Editor presents you with an empty schema, and you can define the message types, structure types, segment structures, data structures, and code tables in it. You have to define only the elements that have different definitions than those in the base schema or that are not defined in the base schema.
The Custom HL7 Schema Editor has the following tabs:
-
Message Types
-
DocType Structures
-
Segment Structures
-
Data Structures
-
Code Tables
On each of these tabs, you can copy the elements from an existing base definition by selecting Copy From Base. This allows you to create a message type or other element that is an extension of an existing definition without having to reenter the common definitions.
Defining a New Segment
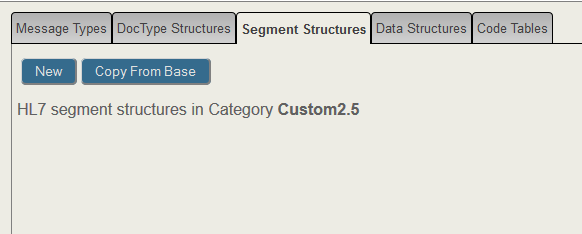
To define a new Z segment, select your new custom schema in the left panel and then select the Segment Structures tab. For custom schemas, the Segment Structures tab has the New and Copy From Base buttons and lists the segments that are currently defined in the custom schema. Since the schema doesn’t have any segments defined, the segment structure list is empty. If you are viewing a standard schema, you cannot add new segments and the buttons are not present
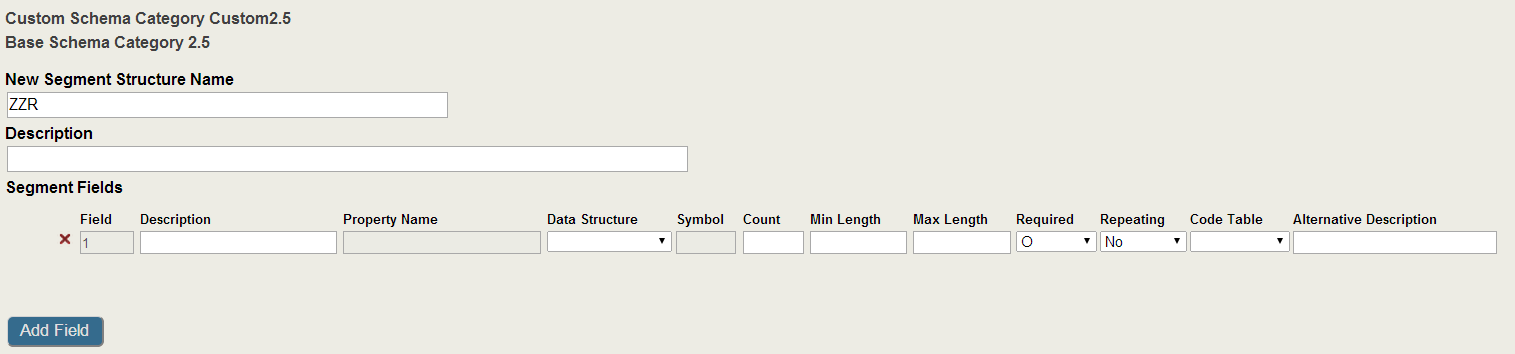
If you want to define a new segment without copying fields from another segment, click the New button and the wizard creates an empty segment. Name the segment and click the Add Field button. The wizard creates an empty field and you can fill in the form. For example:
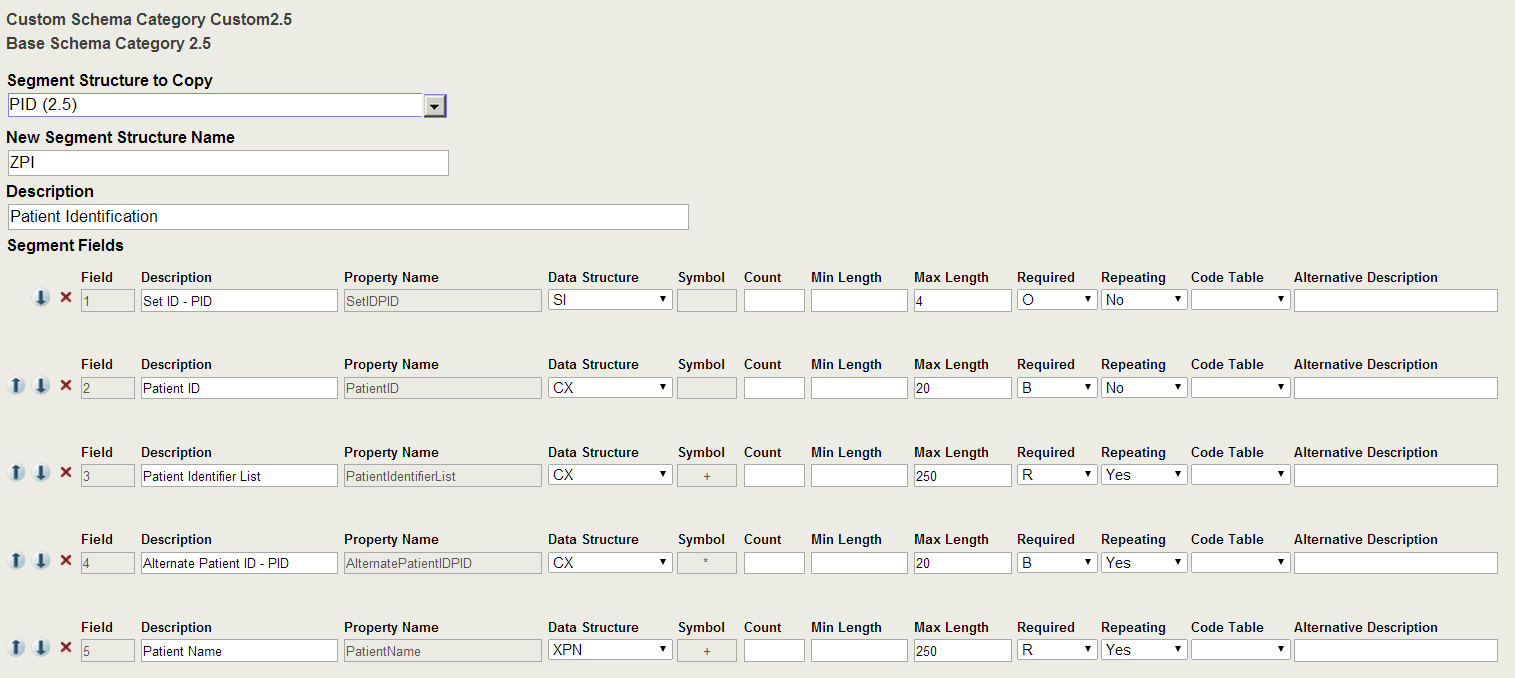
If you are creating a segment that is very similar to an existing segment in the base schema, you should choose Copy From Base, it creates a new segment with the same fields as the specified segment. The Custom Segment Structure Wizard displays the copied fields and has a New button after the fields to create a new field. For example, the following segment was copied from the PID segment.
Once you have creating the segment either as a new segment or as a copy of a base segment, you can add or update fields as follows:
-
Click the Add Field button to add a field at the end of the segment.
-
Update the form text boxes that define the segment field. You cannot edit the Property Name text box. The wizard sets the property name based on the field Description value after it removes any spaces or special symbols. The property name is set when you click OK to end the wizard.
-
Change the order of a field by clicking on the up or down arrows.
-
Delete a field from the segment by clicking the red X.
When you have completed entering the fields, click OK to save the segment.
You can edit any saved segment in a custom schema by clicking on the segment name and then clicking Edit.
Once you have defined your Z segments, you should define the message types and structure types that contain the Z segments.
Defining a New Message Type and Structure Type
The Message Type identifies the message and matches the value in the HL7 MSH:9 field. When you define a message type, you specify the sending message structure type, which may be the same as the message type, and the return type. But you specify the segments that can be in the message in the structure type not in the message type. When you create a message type, you can optionally create a structure type at the same time.
To add a Z segment to a message type that is defined in the base schema, copy the message type and structure to the custom schema and then add the trailing Z segment to the structure type. For example, to add the ZPI segment to the ORU_R01 message in a custom schema that has Version 2.5 as the base schema, do the following:
-
Select your custom schema in the left panel, select the Message Types tab, and click Copy From Base.
-
Select the ORU_R01 message type in the Message Type to Copy pull-down. The wizard fills in the new message type name to be the same as the copied message type and sets the Sending Message Structure and Returning Message Type to match the definition in the base. By checking the box, you automatically create the sending message structure in the custom schema if it is not yet defined. It is created by copying the structure from the base schema.
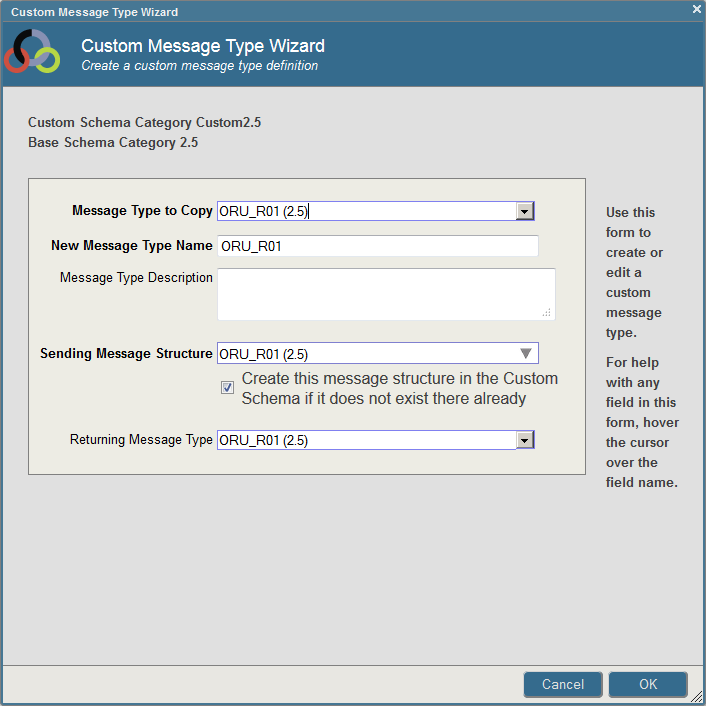
After you click OK, the ORU_R01 message type and the ORU_R01 structure type are defined in the custom schema.
-
Click the DocType Structures tab and the ORU_R01 structure type. The custom schema editor displays the graphical representation of the structure type. Click the Edit button.
The Custom Message Structure Wizard displays the following:
-
Message Structure Name
-
Description
-
Raw Definition—To edit the structure, you edit the raw definition and then click Save. The raw definition uses the same convention as Studio to describe the structure. Each element is separated by ~ (tilde character), optional segments are indicated by [] (square brackets) and repeating segments are indicated by <> (angle brackets).
-
All Segments—This list contains all segments defined in the custom schema and base schema. You can type the segment names listed into the raw definition.
-
Visual Representation—This graphic description of the structure is updated whenever you save the raw definition.
Update the raw definition by entering ~[~ZPI~] at the end of the definition to indicate that the trailing Z segment is optional.
-
-
Click Save to save the raw definition. The wizard updates the visual representation. Click OK to end the wizard.
For example, if you are using the Custom Message Structure Wizard to edit a copy of the ORU_R01 structure type, the wizard displays the following:
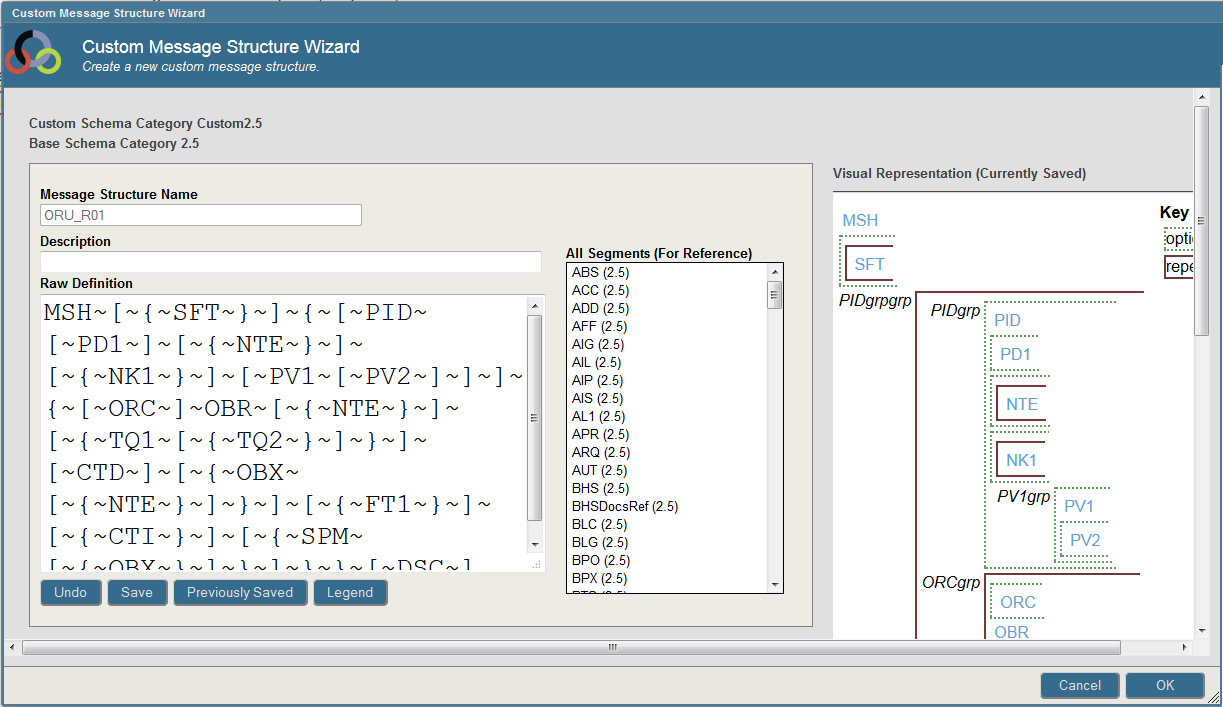
The Undo button reverts your previous key stroke. The Save button saves the raw definition. The Previously Saved button undoes all changes and reloads the last saved definition. The Legend button displays a help message that explains the raw definition syntax.
When you are extending a message definition from the base schema, you should use the same segment and structure name as specified in the base schema.
Once you have defined a message structure in the custom schema, that definition is used for all message types that share the same structure. For example, if you add the ZPI trailing segment to the ORU_R30 structure, the trailing Z segment is allowed in the ORU_R30, ORU_R31, and ORU_R32 message types because they all share the same ORU_R30 structure. It is not necessary to include the message types in the custom schema. The definition from the base schema will use the structure type from the custom schema.
Editing Data Structures and Code Tables
Data structures provide a mechanism to specify a field that has a structured value rather than a simple data type, and code tables provide a mechanism to define a set of allowed values for a field. Typically, data structures and code tables are defined by the HL7 standard body and are not defined as custom extensions. The Custom HL7 Schema Editor does allow you to define data structures and code tables in your custom schemas in the rare cases where this is needed. The wizard to edit data structures is very similar to the wizard to edit segments. The wizard to edit code tables allows you to define codes and descriptions for the code table. The codes specify the values that can be used in a field.
Using the HL7 Message Viewer Page
Ensemble provides a Message Viewer page for HL7. You can use this page to display, transform, and export HL7 messages (either external files or messages from the Ensemble message archives).
To access this page:
-
Click Ensemble.
-
Click Interoperate.
-
Click HL7 v2.x.
-
Click HL7 v2.x Message Viewer and then click Go.
Selecting Options
To specify the document to display:
-
For Document Source, select File, Message Header ID, or Message Body ID.
-
Specify the document to display:
-
If you selected File, use Browse to choose a file. For Document Number in File, type the number of the document to display.
-
If you selected Message Header ID or Message Body ID, type the ID of the message header or message body to display.
-
-
Specify how to parse the document. To do so, select one of the following options for Document Structure or Schema:
-
As received by a business service — Use the schema as assigned by a business service. If you select this, select a business service from the drop-down list.
This option enables you to determine the DocType to which a particular business service would assign this document.
-
Use a specific Schema Category/Version — Choose a document category from the drop-down list.
-
Use a specific DocType — Enter the name of an document structure (<MessageStructure>) in the format category:structure. The parser uses this document structure.
-
Use content-declared Version:Name — Use the document structure associated with the document type declared in the document.
-
Use object's stored DocType — Use the DocType as declared in the document body object. (This option does not apply to stored documents loaded from a file.)
-
None — Do not use any DocType to parse the document. Instead, display the raw segments without transforming any of them into links.
This option enables you to try interpreting documents from a particular data source as different schema category types to determine which DocType is the right one to use when handling documents from that source. There are a variety of reasons why you might need to do this. For example, you might find when you update an external application that it has changed the actual version of the documents it sends, but has neglected to update the type declaration that it sends in these documents. It is also useful in determining which of the built-in categories to use as a schema base, when a document uses a custom document structure.
-
-
Optionally click Transform Document? and specify the transformation details. See Testing a Transformation.
-
Click OK.
Parsing the Message
The Message Viewer displays the following on the right side of the screen after completing the steps above:
-
Summary Report, which contains following basic information about the document:
-
The Data Transformation applied, if applicable
-
The Message ID
-
The DocType
-
The DocType Category
-
The DocType description, if available
-
The number of segments
-
The number of child and parent documents, if applicable
-
-
Message Data, which has one row for each segment in the message structure. Each row contains:
-
Segment number
-
Segment name, such as PID or NTE
-
Field contents and separators, as contained in the message
If the message matches the schema you have selected, segments and elements will appear in blue, as seen below. Clicking on the segments or fields will link to the relevant structure page.
-
Displaying the Segment Address
To display the segment address, hover the cursor over a segment name in the shaded column. The tooltip displays the following:
-
Segment address to use in a virtual property path
-
Descriptive name of this segment

Displaying the Field Address
To display the field address, hover the cursor over a field within the message structure. The tooltip displays the following:
-
The field address to use in a virtual property path (as a number)
-
The field address to use in a virtual property path (as a name)
-
Characters that indicate the syntax rules for this field. The characters can begin with:
Symbol Meaning ! (1 only) The field is required; it must occur only once. ? (0 or 1) The field is optional, but if it occurs, it may occur only once. + (1 or more) The field may repeat one or more times. * (0 or more) The field may repeat zero or more times. & The field may be present, and may repeat, but only under certain conditions. n* (0 to n) The field repeats a maximum of n times. (m) m is the maximum number of characters in the field. Each repeat of the field may contain this number of characters.

Batch Messages
If a field is enclosed with angle brackets (<,>) it is a link to a sub-document. Click on it to view that document’s summary report and message data.
Also see “Viewing Batch Messages,” later in this chapter.
Testing a Transformation
To test a transformation:
-
Click Transform Document?.
-
For Choose Data Transformation, select a data transformation.
-
For Choose Display Option, select one of the following:
-
Transformation Result Only — Display only the transformed document.
-
Original Message and Result Together — Display both the original document and the transformed document.
-
-
Now do either or both of the following:
-
Click OK to display the transformed document.
-
Click Save Result To File? to save the transformed document to a file. In this case, also specify a path and filename.
The default directory is the management directory for the active namespace. For example, if you installed Ensemble into the directory C:\MyCache and your current namespace is ENSDEMO, the file is saved as C:\MyCache\Mgr\ENSDEMO\filename
-
Viewing Batch Messages
The HL7 Document page handles a message differently if it is a group of HL7 messages in batch format, rather than a single HL7 message. Specifically, it allows you to walk through the batch message structure one level at a time.
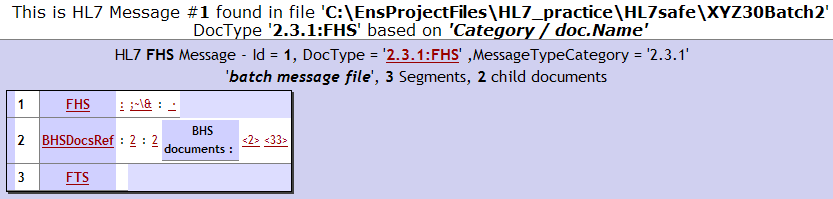
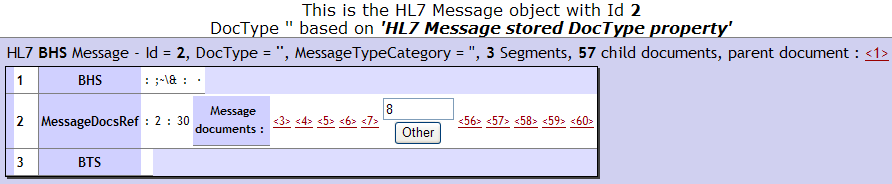
The following display is the result of asking to view a batch message that begins with an FHS segment. Ensemble parses the batch message and finds that it has 3 segments: FHS, FTS, and a block of child documents in between. The block contains two child documents; each beginning with BHS and ending with BTS. The message is a two-level batch message.
The Message Viewer assigns the child documents the identifiers <2> and <33>. It displays the top-level parent document, using links (<2> and <33>) to represent the two child documents. The display is as follows:
When you click on a child document link in an HL7 batch message display, a new browser window opens to display the child document. The Message Viewer window, with the top-level parent, remains open in the original browser window.
The next display is the result of clicking the child document link <2> in the previous display. This example is a two-level batch message, so the child document <2> has children of its own: child documents <3> through <32>.
This example highlights a useful navigation feature of the Message Viewer. If there are more than 10 child documents in a batch message, the Message Viewer displays links to the first five and last five child documents. Between the lists is a text field, into which you can enter any identifier number between the first and last numbers. After you enter a number, click Other. A new browser window opens to display the child document.
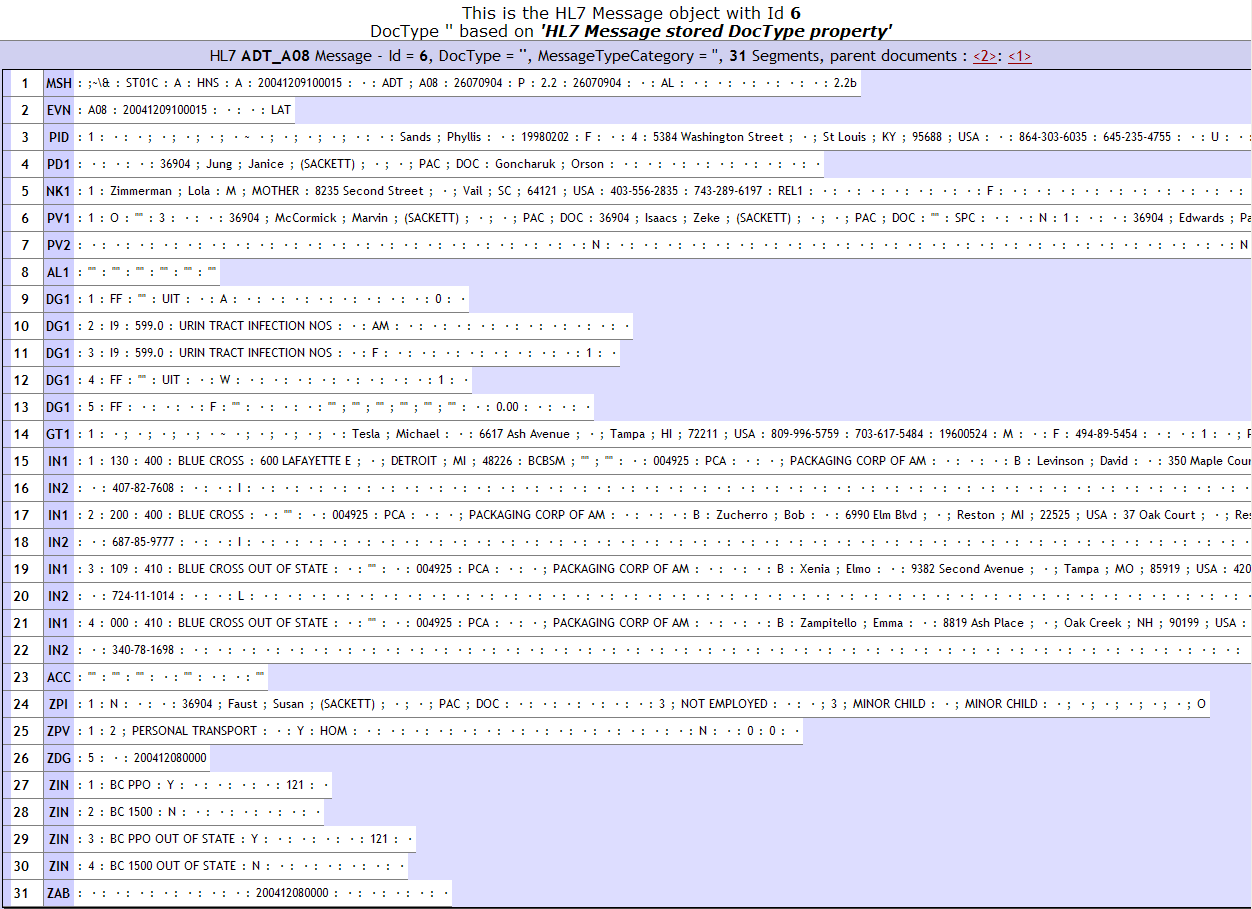
The next display is the result of clicking the child document link <6> in the previous display. Since this is the lowest level of the batch message hierarchy, message <6> is a normal HL7 Version 2 message that begins with an MSH segment.
When you are done viewing messages in the batch message hierarchy, you can close all the pop-up browser windows until the top-level parent document remains in the original Message Viewer window. From here, you may return to other Management Portal activities.
HL7 Classes
For reference, this section lists the classes that Ensemble provides to enable you to work with HL7 Version 2 documents.
| Item | Classes | Notes |
|---|---|---|
| Business services | Each of these HL7 business service classes uses a different adapter, as indicated by the class name. The HL7 HTTP service can either use the CSP port or a special port. | |
| Business processes | EnsLib.HL7.MsgRouter.RoutingEngineOpens in a new tab | This class is a specialized version of the standard virtual document routing process. |
| Business operations | Each of these HL7 business operation classes uses a different adapter, as indicated by the class name. | |
| Messages | EnsLib.HL7.MessageOpens in a new tab | This is a specialized message class to carry HL7 documents as Ensemble virtual documents. |
| Search tables | EnsLib.HL7.SearchTableOpens in a new tab | This is a specialized search table class for HL7 documents. |
You can also create and use subclasses of these classes.
The business host classes include configurable targets. The following diagram shows some of them:
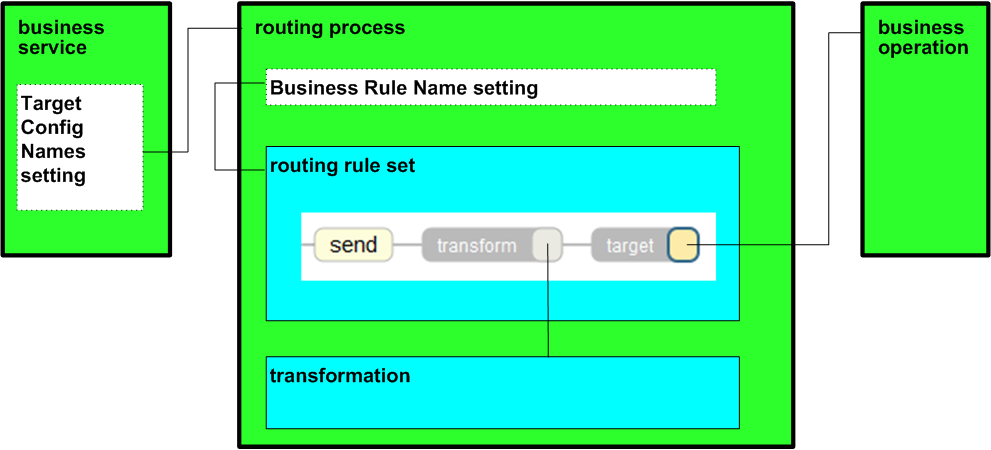
For information on other configurable targets, see “Reference.”
Details on the HL7 Message Class
Ensemble provides a built-in class for HL7 Version 2 virtual documents. The class is EnsLib.HL7.MessageOpens in a new tab. For basic information on virtual document message classes, see “Virtual Document Classes” in Ensemble Virtual Documents. In addition to the basic properties and methods, EnsLib.HL7.MessageOpens in a new tab provides the following properties:
The TypeCategory property contains an HL7 category name. Typically, the HL7 business service that receives HL7 data from outside Ensemble instantiates an HL7 message and assigns a TypeCategory value to it. Ensemble combines this TypeCategory with the message type declared in the MSH segment of the incoming message data; this combination identifies a <MessageType> within the HL7 schema definition. This <MessageType> has an associated <MessageStructure> that Ensemble uses as the DocType for the HL7 message, if no other DocType is assigned.
The Name property is a read-only string that contains the HL7 message structure name (such as ADT_A08 or ORM_O01) that the external data source has provided in the MSH segment. The Name can be useful in determining the HL7 message structure that the clinical application thinks that it is sending, although this can differ from the actual message contents.