Troubleshooting Zen Reports
This section provides instructions for troubleshooting Zen reports. Topics include:
Changing Character Sets
The Zen report class parameter ENCODING contributes an encoding attribute to the xsl:output instruction in the generated XSLT for the report; for example:
<xsl:output method="xml" version="1.0" encoding="UTF-8" indent="no"/>
The default ENCODING for all Zen reports is "UTF-8". If you need to use a character set other than the UTF-8 character set, for example the Latin-1 set, provide an alternate value for ENCODING in the Zen report class. For example:
Parameter ENCODING="ISO-8859-1";
Displaying XHTML with URI Query Parameters
Sometimes you want to display XHTML in the browser, but all you see is the XSLT data for the Zen report. This can occur for a number of reasons, including a DEFAULTMODE setting of "xml" in the Zen report class. However, there are situations that causes problems when you have correctly set DEFAULTMODE to "html" or $MODE=html, yet you still cannot see the XHTML output as you expect. This section describes what to do in those cases.
When invoked in the browser, a Zen report generates XML, sends this XML to the client, then transforms this XML to XHTML on the client by following an xml-stylesheet processing instruction. The attributes for this instruction appear as query parameters in a URI string sent to the browser. Internet Explorer only understands URI instructions that have one parameter after the ? question mark. Problems can occur when the generated xml-stylesheet instructions for a Zen report class contains multiple parameters and the browser is Internet Explorer.
For this reason, many of the Zen report class parameters provide the information needed in xml-stylesheet processing instructions, so that this information does not need to appear in the URI query string. Once you have correctly configured the class parameters, Zen handles these instructions appropriately, regardless of the browser.
Even if the user enters only one parameter, such as $MODE, when entering the URI string for a Zen report, the subsequent processing for the report may invisibly add more parameters, or the browser may have difficulty understanding additional parameters, as in the following cases:
-
The Zen report class has its CSP class parameter PRIVATE set to 1. This makes the page private. A private page can only be navigated to from another page within the same CSP session. In this case Caché automatically adds the CSPToken parameter to the query parameter string in the URI, so on Internet Explorer the string cannot support additional query parameters.
-
The Caché namespace and database associated with your Zen report has been configured with the Allowed Authentication Methods field on the Excel Servers page set to Unauthenticated access.
Unauthenticated access causes a problem that Password authentication does not. Password access requires a user to enter a username and password before running a Zen report that is associated with a particular Caché namespace and database. This login transaction gives Zen the opportunity to detect that the browser supports cookies, so that when the user subsequently enters the URI of a Zen report, multiple parameters in the query string work well.
Without a login transaction, Zen has no opportunity to detect that the browser supports cookies, so that when the user subsequently enters the URI of a Zen report, additional parameters in this query string do not work on Internet Explorer.
There are several options to handle these situations. Any one of them solves the problem:
-
Use the Web Applications page (System Administration > Security > Applications > Web Applications) to configure the Caché namespace and database that contains the Zen report class with a Use Cookie for Session value of Always.
-
Use class parameter EMBEDXSL=1 in the Zen report class.
-
Use class parameter STYLESHEETDEFAULTMODE="tohtml" in the Zen report class.
-
Use the Web Applications page (System Administration > Security > Applications > Web Applications) to configure the Caché namespace and database that contains the Zen report class with an Allowed Authentication Methods value of Password, and verify that the class parameter XSLTMODE="server" in the Zen report class. XSLTMODE="server" is the default if the parameter is not set.
Solving PDF Generation Problems
Zen reports generally requires Java in order to generate HTML and PDF output. If you are not using the default installed FOP, or are generating HTML reports with XSLTMODE="browser", Java may not be involved in report generation. If Java is not installed, or is configured incorrectly, Zen reports generates an error. The solution is:
-
Install Java if it is not installed.
-
Ensure that the JAVA_HOME environment variable is set. This variable is used by FOP in generating PDFs.
-
Ensure that the Java installation directory is on the path used by Caché Server Pages, or the path the Caché user uses.
If you are having trouble using Zen reports to generate PDF output, the problem may arise from one of the following sources:
-
Changes that you know you have made to the Zen report class do not appear in the PDF output when you view your Zen report. This can happen due to caching of previously displayed pages, especially in Firefox. To overcome this problem you must fully exit Firefox and start a new Firefox session before viewing the revised Zen report. It is not necessary for you to restart Caché.
-
Incorrect configuration of Caché to point to the XSL-FO to PDF rendering tool (FOP or RenderX). For correct instructions, see the section “Configuring Zen Reports for PDF Output.”
-
Broken installation of the renderer (FOP or RenderX).
-
An XSL-FO command that the rendering engine does not understand. Zen generates XSL-FO following the XSL-FO standard, but not all rendering engines are complete implementations of the XSL-FO standard. FOP, which is free of charge, is known to be incomplete.
-
Syntax errors in XData ReportDisplay. The rendering engine (FOP or RenderX) can report these as errors when Zen does not catch them on the server side.
The following sample troubleshooting session explores problems with displaying a Zen report in PDF format. In this example:
-
Zen is running on Caché for Macintosh
-
The browser is running on Windows
-
The Caché installation directory is /Applications/Cach81
-
The Web Server is configured on the default port, 80
-
The name of the Caché for Macintosh server machine is mypro
These instructions assume that FOP is the XSL-FO to PDF rendering tool, but similar instructions apply to RenderX:
-
Use these Caché Terminal commands to point Caché to the FOP execution script on the Macintosh machine, for example:
zn "%SYS" Set ^%SYS("zenreport","transformerpath")="/Applications/fop-0.94/fop.bat" -
Run the report from the browser on Windows; for example:
http://mypro.local:80/csp/app/ZENApp.MyRep.cls?$MODE=pdf
The PDF report should display.
If the PDF report does not display, you can test for problems in the FOP installation as follows:
-
Make sure the /Applications/Cach81/mgr/temp directory on the Caché server is empty.
-
Enter the following URI in the browser on Windows:
http://mypro.local:80/csp/app/ZENApp.MyRep.cls?$MODE=pdf&$LOG=1&$NODELETE=1 -
Rename the XML and XSLT output files from this run by entering the following commands on the Macintosh where Caché is installed:
cd /Applications/Cache81/mgr/temp mv *.xsl test.xsl mv *.xml test.xml -
While still in the /Applications/Cach81/mgr/temp directory, run FOP with the files test.xml and test.xsl, by entering the following command:
/Applications/fop-0.94/fop -xml test.xml -xsl test.xsl -pdf test.pdf -
Examine the console output for any errors. If there are so many errors that they run off the console screen, you can redirect the console output to the file test.log as follows:
/Applications/fop-0.94/fop -xml test.xml -xsl test.xsl -pdf test.pdf > test.log -
Try to view the output file test.pdf.
Viewing Intermediate Files
Several URI query parameters are available to help in troubleshooting Zen reports. These parameters allow you to view and save the intermediate and final files generated by the transformation pipeline. These files might include generated XSLT or XSL-FO files, text files containing error messages from the XML parser, or the final XHTML or PDF files that result from the completed pipeline.
For information about how to supply report options as URI query parameters, and how to handle side effects that may occur in some browsers, see the section “Invoking Zen Reports from a Web Browser.” In that section, the table URI Query Parameters for Zen Reports lists all possible URI query parameters. This section lists only a few of them.
The diagnostic query parameters are:
-
$LOG — Use with $MODE=html or $MODE=pdf to view diagnostic messages.
-
$MODE — Choose one of the values listed in “Changing Output Mode to View Intermediate Files” to view one of the intermediate files.
-
$NODELETE — Save intermediate files to the general Caché temporary directory.
-
$REPORTNAME — Save intermediate files with the name and location of your choice.
-
$USETEMPFILES — Save generated XSLT files in the CSP directory for your application.
Adding Saxon Messages to Log Files
To enable diagnostic query parameters to produce a text file listing errors detected by the Saxon parser while it generates XHTML output, you must configure Zen reports with the location of the Saxon .jar file. Zen reports can produce useful diagnostic information from the XHTML generation process without this command, but they do not produce the additional messages from the Saxon parser unless you provide one of the commands described here.
You can issue these commands from the Caché Terminal command prompt. Depending on the version number for the Saxon parser, the required command may be:
set ^%SYS("zenreport","saxjar")="c:\saxon65\saxon.jar"
Or:
set ^%SYS("zenreport","saxjar")="c:\saxon\saxon8.jar"
Or:
set ^%SYS("zenreport","saxjar")="c:\saxon9\saxon9.jar"
Logging Messages from the XSL-FO Parser
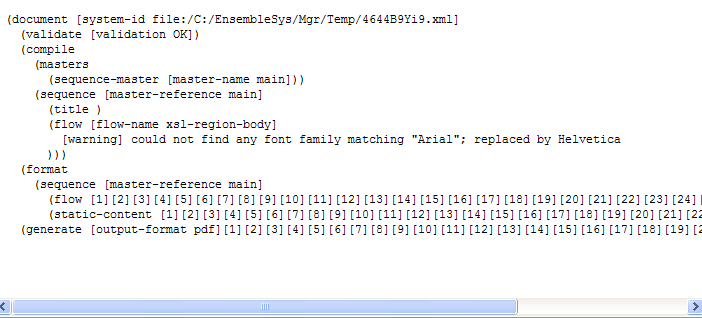
When specifying $MODE=html or $MODE=pdf as described in “Invoking Zen Reports from a Web Browser,” you can also set the query parameter $LOG=1. This allows you to view the output of the transformation from XML to XHTML or the transformation from XML via XSLT to XSL-FO to PDF, respectively. For example:
http://localhost:57772/csp/myPath/myApp.myReport.cls?$MODE=pdf&$LOG=1
Where 57772 is the port number assigned to the Caché server. The following figure shows an example where $MODE=pdf&$LOG=1. Here the volume of output from $LOG=1 is significant because the document contains many pages and the rendering engine is RenderX. Sometimes there is little or no output from $LOG=1. The number of messages depends on the parser in use (FOP or RenderX) and how that parse is configured for logging (quiet or verbose).
Changing Output Mode to View Intermediate Files
As an alternative to $LOG, you can display diagnostic information for a Zen report by providing a special value for the $MODE query parameter when you supply the .cls URI to the browser. These special values include:
-
tohtml – To view the XSLT stylesheet that turns XML into XHTML:
http://localhost:57772/csp/myPath/myApp.myReport.cls?$MODE=tohtml
-
toxslfo – To view the XSLT stylesheet that turns XML into XSL-FO:
http://localhost:57772/csp/myPath/myApp.myReport.cls?$MODE=toxslfo
-
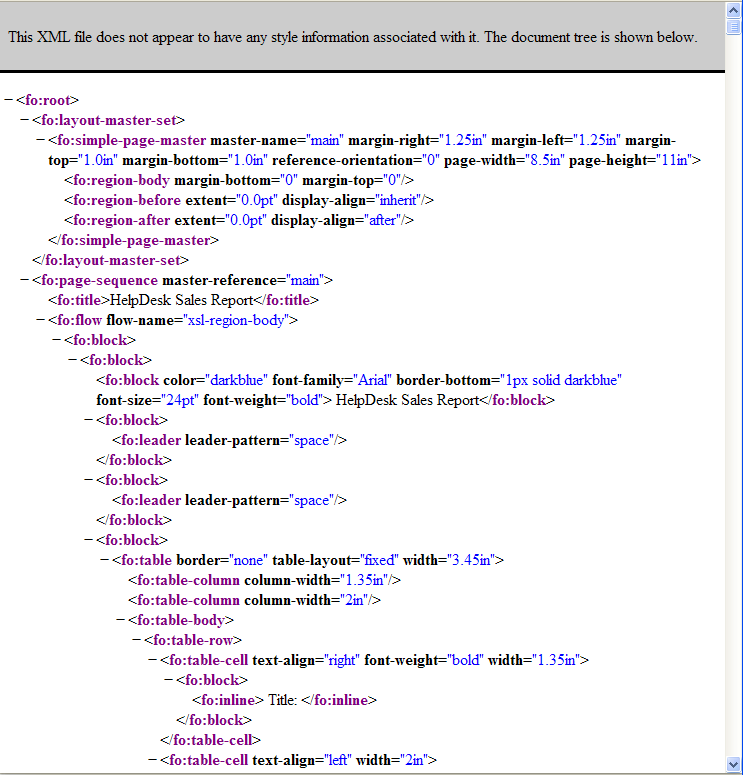
xslfo – To view the XSL-FO stylesheet before PDF rendering:
http://localhost:57772/csp/myPath/myApp.myReport.cls?$MODE=xslfo
Where 57772 is the port number assigned to the Caché server. The following figure shows an example where $MODE=xslfo. The message “This XML file does not appear to have any style information associated with it” displays at the top of the page because the output is neither XHTML nor PDF.
Preserving Intermediate Files for Later Viewing
$LOG and $MODE each display only one form of output at a time, and do not save the files for later viewing. When your processing pipeline for report output has multiple intermediate files of various types, you can add the query parameter called $NODELETE to save all intermediate and final output files for later viewing. Zen assigns these output files arbitrarily generated names such as 2037q4XM9.xsl. You can identify the specific file you need by its time stamp and filename extension.
Zen stores $NODELETE files in the following location, where C:\MyCache is the name of your installation directory:
C:\MyCache\Mgr\Temp
You can reset this location using the Startup page (System Administration > Configuration > Additional Settings > Startup). In the TempDirectory row, click Edit. Enter a subdirectory name other than Temp. Caché creates a subdirectory of this name under the Mgr subdirectory in the Caché installation directory, as shown for Temp in the previous example.
When you change the Caché temporary directory, it changes for all Caché applications, not just for applications that use Zen reports.
You can use $NODELETE during regular processing, when $MODE=html or $MODE=pdf, or you can combine it with special values of $LOG or $MODE to save the output for further study.
For example, suppose you turn on logging and avoid deleting files for a Zen report by entering the following URL in Firefox:
http://localhost:57772/csp/myns/jsl.MyReport.cls?$MODE=html&$LOG=1&$NODELETE=1
The set of files has names like the following:
-
2172nQ1_2.xsl
-
2172PhA_4.htm
-
2172UqbS3.txt
-
2172UZ9x1.xml
Internet Explorer users are limited in the number of URI query parameters they can use when invoking a Zen report from the browser. If you need to set $NODELETE but cannot spare a URI query parameter to do it, you can set an equivalent option from the Terminal prompt, as follows:
-
Set your Caché namespace to the one in which you are running the report, for example:
zn "myNameSpace" -
Enable the “no delete” option for intermediate files:
Set ^CacheTemp.ZEN("DebugZen","NoDelete")=1
Setting a File Name for Intermediate and Final Files
The $REPORTNAME query parameter allows you to save all files generated by the transformation pipeline with the name and location of your choice.
The REPORTDIR class parameter specifies the location for these files in the local file system on the Caché server. If you do not supply a value for REPORTDIR, Zen stores $REPORTNAME files in the Caché temporary directory, which by default is:
C:\MyCache\Mgr\Temp
This default may be changed, as explained in the section “Preserving Intermediate Files for Later Viewing.” To ensure that output files are well organized, InterSystems recommends that you set a value for REPORTDIR if you plan to use $REPORTNAME.
Unlike most parameters that share a name except for the $ (dollar sign), there is no relationship between the REPORTNAME class parameter and the $REPORTNAME query parameter.
The following is a sample $REPORTNAME session:
-
Specify the following line in the Zen report class:
Parameter REPORTDIR = "c:\zenout"
-
Enter a line like the following in the browser address field:
http://localhost:57772/csp/rpt/Re.Rpt1.cls?$MODE=html&$REPORTNAME=teste
Where:
-
57772 is the port number assigned to the Caché server
-
Re.Rpt1.cls is your Zen report class name
-
rpt is the namespace where your application resides
-
teste is the filename you wish to use for the output
-
-
Change to the directory you specified in step 1, and list the generated files as follows:
C:\> cd zenout
C:\zenout> dir
 Volume in drive C has no label.
 Volume Serial Number is 6035-CA91

 Directory of C:\zenout

06/19/2008 02:55 PM  <DIR>  .
06/19/2008 02:55 PM  <DIR>  ..
06/19/2008 02:55 PM   6,320 teste.htm
06/19/2008 02:55 PM     559 teste.txt
06/19/2008 02:55 PM     753 teste.xml
06/19/2008 02:55 PM   4,892 teste.xsl

 4 File(s)         12,524 bytes
 2 Dir(s)  17,536,151,552 bytes free
You can run a session like this without setting the Saxon .jar location as described at the beginning of this section. You still see the intermediate files, but you see no error messages in the browser and no .txt file is generated, so you have no information about syntax errors from the parser.
This sample session also works with $MODE=pdf. Because the FOP and RenderX rendering engines always produce a syntax analysis, in the PDF case the browser always reports on error messages, and you always see a .txt file that contains a syntax report. As a commercial product, RenderX has better syntax analysis than FOP, so it is useful to be able to run RenderX to analyze PDF generation errors. If you are generating XML, for instance by setting $MODE=xml, you save only the .xml file.
Saving the Intermediate XSLT Transformation File
The purpose of the $USETEMPFILES and USETEMPFILES options discussed in this section is to work around a limitation in the xml-stylesheet processing instruction on Internet Explorer. This limitation causes display problems, particularly when the Zen report class has its CSP class parameter PRIVATE set to 1 (True) or session cookies are turned off. The problems arise only when report processing is done in the browser. For this reason, $USETEMPFILES is only valid when XSLTMODE="browser" or $XSLT=browser. $USETEMPFILES does not work when XLSTMODE="server" or $XSLT=server.
A Zen report class generates an XSLT stylesheet. It subsequently uses the generated XSLT stylesheet to generate the output XHTML. There is a URI parameter called $USETEMPFILES that you can use to save this interim XSLT stylesheet as a file. The default for $USETEMPFILES is 0 (false). In this case Zen generates and uses XSLT but does not save it to a file. When the $USETEMPFILES query parameter is set to 1 (true) Zen saves the intermediate XSLT stylesheet to a file so that you can view it for diagnostic purposes.
There are several reasons why you might use $USETEMPFILES to save the generated XSLT stylesheet, when $NODELETE and $REPORTNAME are also available and provide more flexibility. The reasons for using $USETEMPFILES are as follows:
-
$USETEMPFILES addresses display problems that occur when the browser is Internet Explorer, report processing is occurring in the browser (it happens on the server by default), and the Zen report class has its CSP class parameter PRIVATE set to 1 (True) or session cookies are turned off.
-
Zen saves the .xsl files for $USETEMPFILES in a different location for each Caché namespace. $NODELETE saves all intermediate files in the same Caché temporary directory.
-
Internet Explorer users are limited in the number of URI query parameters they can use when invoking a Zen report from the browser. These users might not be able to supply $NODELETE or $REPORTNAME as a URI query parameter in the browser address field. Unlike $NODELETE and $REPORTNAME, $USETEMPFILES has a Zen report class parameter equivalent called USETEMPFILES, which you can set to 1 in the Zen report class to enable the $USETEMPFILES feature without using a URI query parameter.
Important:A $USETEMPFILES query parameter supplied to the browser overrides any value set for the class parameter USETEMPFILES in the Zen report class.
-
When you are diagnosing style issues, the .xsl file may be the only file of interest. $USETEMPFILES only saves the .xsl file.
When USETEMPFILES=1, after running a report Zen stores .xsl stylesheet files in specific locations, which it records as strings in the following global node:
^%SYS("zenreport","tmpdir")
To find out the current temporary file names and locations, issue the ZWRITE command with ^%SYS("zenreport","tmpdir") at the Terminal prompt. The resulting list of files is something like the following, where C:\MyCache is the name of your installation directory, ZENApp.MyReportOpens in a new tab is the full package and class name of a Zen report class residing in the SAMPLES namespace and a report residing in the ENSEMBLE namespace, and Cinema.MyReport is the full package and class name of another report residing in the SAMPLES namespace. The resulting list of files is something like the following (line endings added for typesetting):
 SAMPLES>zw ^%SYS("zenreport")
 ^%SYS("zenreport","tmpdir","ENSEMBLE","ZENApp.MyReport",
 "C:\MyCache\CSP\ensemble\jnSi7x6mbFXHDg.xsl")=""
 ^%SYS("zenreport","tmpdir","SAMPLES","Cinema.MyReport",
 "C:\MyCache\CSP\samples\PhaRNCLC1ZZJzg.xsl")=""
 ^%SYS("zenreport","tmpdir","SAMPLES","ZENApp.MyReport",
 "C:\MyCache\CSP\samples\T4XLVtQaHJUuNA.xsl")=""
If you have not run any reports with XSLTMODE="browser" and USETEMPFILES=1 then ^%SYS("zenreport","tmpdir") is empty.
Periodically you might want to delete the generated .xsl files that Zen has saved as a result of the $USETEMPFILES option. You can do so by issuing the following command at the Terminal prompt, or from within an ObjectScript routine. In this example, ZENApp.MyReportOpens in a new tab is the full package and class name of the Zen report class:
SAMPLES>do ##class(ZENApp.MyReport).%DeleteTempFiles()
After issuing this command, the list of files is as follows:
 SAMPLES>zw ^%SYS("zenreport")
^%SYS("zenreport","tmpdir","ENSEMBLE","ZENApp.MyReport",
"C:\MyCache\CSP\ensemble\jnSi7x6mbFXHDg.xsl")=""
^%SYS("zenreport","tmpdir","SAMPLES","Cinema.MyReport",
"C:\MyCache\CSP\samples\PhaRNCLC1ZZJzg.xsl")=""
Note that this command deletes only those temporary files related to the Zen report class specified in the command, in the namespace where the command is run. The default value for $USETEMPFILES is 0 (false).
Debugging XHTML Seen in the Browser
It can be difficult to debug the Zen report output that appears in browsers. Some of the difficulties arise because when you use XML+XSLT in your browser, asking to View Page Source presents you with the original XML file, not the XHTML that you might have expected. This makes debugging XSLT transformations somewhat difficult.
Often what is needed to understand a Zen report problem or debug the XSLT is not a full-fledged XSLT debugger like <oXygen/> or XMLSpy, but a representation of the XHTML that corresponds to the browser's rendering decisions. This section describes how to achieve this in Firefox and Internet Explorer.
Internet Explorer and Firefox have different XSLT rendering engines and do not render some Zen reports in the same way. For example, consider the following Zen report fragment:
<item field="@author" />
<item value=" " />
<item field="@author" />
Internet Explorer renders the following XHTML:
<span>BOB</span>
<span> </span>
<span>BOB</span>
Firefox renders the following XHTML:
<span>BOB</span><span/><span>BOB</span>
There are XSLT debugging tools available for IE which you can find by searching the Web for “debug XSL output in IE”. InterSystems does not recommend a specific tool, but there are many available.
For Firefox:
-
Follow the instructions in the previous sections, such as “Logging Messages from the XSL-FO Parser” and “Preserving Intermediate Files for Later Viewing,” to enable logging and avoid deleting files. For example:
http://localhost:57772/csp/myns/jsl.MyReport.cls?$MODE=html&$LOG=1&$NODELETE=1The files that you can use for debugging are output in the general Caché temporary directory with names like 2172nQ1_2.xsl and 2172UZ9x1.xml.
When you save intermediate files in this way, the generated .htm file is generated by the Saxon parser, and does not render in the Firefox browser in the same way as the XHTML produced by Firefox’s built-in XSLT renderer.
-
To generate the XHTML that corresponds to Firefox’s rendering decisions, run the following JavaScript in Firefox. Be sure to substitute the names of your .xsl and .xml intermediate files. This script opens a new window so you need to turn off popup blocking to use it:
var oXmlDom = document.implementation.createDocument(null,null,null); var oXslDom = document.implementation.createDocument(null,null,null); oXmlDom.async = false; oXmlDom.load("2172UZ9x1.xml"); oXslDom.async = false; oXslDom.load("2172nQ1_2.xsl"); var oProcessor = new XSLTProcessor(); oProcessor.importStylesheet(oXslDom); var oResultDom = oProcessor.transformToDocument(oXmlDom); var xml_out = (new XMLSerializer()).serializeToString(oResultDom); var newWindow = window.open("","",""); newWindow.document.write(xml_out); newWindow.document.close(); -
In the newly opened window, ask to View Page Source. You can now see the XHTML that corresponds to Firefox’s rendering decisions.
Troubleshooting the <call> element
In order for Zen report generation to work correctly, the generated XSLT must be able to locate the elements in the generated XML. Zen reports that use the <call> element can be more complex in terms of the matching between XML and XSLT. The following information on the attributes used when calling subreports from the ReportDisplay block may be helpful in resolving problems.
The subreport attribute provides the mode attribute of some instances of xsl:apply-templates and xsl:template.
The subreportname attribute provides the value of the match attribute of some instances of xsl:template and contributes to the value of the select attribute of some xsl:apply-templates elements.
Also see the section “Viewing Intermediate Files” for information on using $REPORTNAME to view generated XSLT.