Keeping the Cubes Current
This chapter discusses how to use the Cube Manager and other tools for updating the cubes. It discusses the following topics:
Also see the appendix “Using Cube Versions.”
Overview
The generic phrase updating a cube refers to the process of causing a cube to reflect the current contents of the source table and related tables. DeepSee provides three techniques:
-
Rebuild the cube, using the Rebuild option in the Architect, for example. This process can be time-consuming, and queries cannot be executed while a cube is being rebuilt.
-
Synchronize the cube. The cube synchronization feature (also known as the DSTIME feature) enables DeepSee to keep track of changes to the data. You periodically synchronize the cube to include those changes.
It is possible to execute queries during synchronization.
Depending on the cube implementation and depending on which data changes, it may not be possible to use this feature; see “When Cube Synchronization Is Possible,” later in this chapter.
-
Update the cube manually. This process uses the %ProcessFact() and %DeleteFact() methods. Unlike with the other options, in this case, it is necessary for your code to know which records of the fact table to update or delete.
It is possible to execute queries during the manual updates.
You can use any suitable combination of these techniques. The following table compares them:
| Rebuilding | Synchronizing | Updating Manually | |
|---|---|---|---|
| Comparative duration of process | long | short | short |
| Able to execute queries during this process | no | yes | yes |
| Technique is available in all scenarios | yes | no | yes |
| Technique requires you to know which records were changed | no | no | yes |
| Technique invalidates parts of the result cache | yes | yes | yes |
| User interfaces that provide this option | Cube Manager and Architect | Cube Manager | none |
For information on the Cube Manager, see “Using the Cube Manager,” later in this chapter.
Cube Updates and Related Cubes
For any kind of update, whenever you have cube-to-cube relationships, it is necessary to update the cubes in a specific order. In particular, update the independent cube first. Then update any cubes that depend on it. To do this, you can use the Cube Manager, which traverses the relationships and determines the correct update order.
Or you can write and use a utility method or routine that builds your DeepSee cubes in the appropriate order.
Cube Updates and the Result Cache
For any cube that uses more than 512,000 records (by default), DeepSee maintains and uses a result cache. For any combination of update techniques and tools, you should also carefully consider the frequency of cube updates, because any update could invalidate parts of the result cache.
For large data sets, DeepSee maintains and uses a result cache for each cube as follows: Each time a user executes a query (via the Analyzer for example), DeepSee caches the results for that query. The next time any user runs that query, DeepSee checks to see if the cache is still valid. If so, DeepSee then uses the cached values. Otherwise, DeepSee re-executes the query, uses the new values, and caches the new values. The net effect is that performance improves over time as more users run more queries.
When you update a cube in any way, parts of the result cache are considered invalid and are cleared. The details depend upon options in the cube definition (see “Cache Buckets and Fact Order,” earlier in this book). Therefore, it is not generally desirable to update constantly.
How Cube Synchronization Works
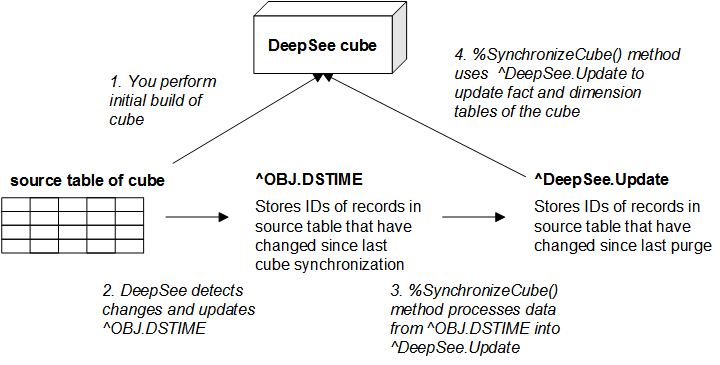
This section describes briefly how cube synchronization works. Internally, this feature uses two globals: ^OBJ.DSTIME and ^DeepSee.Update.
First, it is necessary to perform an initial build of the cube.
When Caché detects a change within the source table used by a cube, it adds entries to the ^OBJ.DSTIME global. These entries are to indicate which IDs have been added, changed, or deleted.
When you synchronize the cube (via %SynchronizeCube(), described later in this chapter), Caché first reads the ^OBJ.DSTIME global and uses it to update the ^DeepSee.Update global. After it adds an ID to the ^DeepSee.Update global, Caché removes the same ID from the ^OBJ.DSTIME global. (Note that in previous versions, the cube synchronization feature used only one global; the newer system prevents a race condition.)
Then Caché uses the ^DeepSee.Update global and updates the fact and dimension tables of the cube, thus bringing the cube up to date.
The following figure shows the overall flow:
The subsections discuss the following details:
When Cube Synchronization Is Possible
You can use the cube synchronization feature in scenarios where all the following items are true:
-
The base class for the cube is a persistent class (but is not a linked table).
-
The changed record is a record in that class.
When Cube Synchronization Is Not Possible
You cannot use the cube synchronization feature in the following scenarios:
-
The base class for the cube is a data connector. (See the chapter “Defining Data Connectors.”)
-
The base class for the cube is a linked table. (See “Using the Caché SQL Gateway” in Using Caché SQL.)
-
The changed record is not in the extent of the base class used by the cube. That is, the changed record belongs to another table.
In these scenarios, the cube synchronization feature cannot detect the change, and your application must update the cube manually as described in “Updating Cubes Manually.”
Also, cube synchronization does not affect age dimensions (that is, dimensions whose Dimension type is age).
Cube Synchronization in a Mirrored Environment
If you use DeepSee on a mirror server, note that the ^OBJ.DSTIME global is part of the application data and should be mirrored (if it mapped to a different database, for example, that database should be mirrored). The ^DeepSee.Update global is generated by DeepSee code and thus is present only in the database that contains the cube definitions and data.
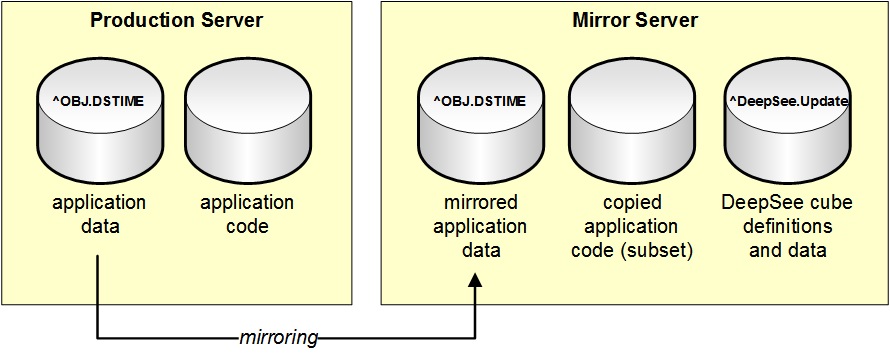
On the mirror server, the databases that store the ^OBJ.DSTIME and ^DeepSee.Update globals must be read/write. Note that you can store both of these globals in the same database, although the above figure shows them in separate databases.
For a discussion of using DeepSee on a mirror server, see “Recommended Architecture” in the first chapter of this book.
Structure of the Cube Synchronization Globals
This section describes the structure of the cube synchronization globals. You do not need this information to use cube synchronization; this information is provided in case you wish to use these globals for other purposes.
^OBJ.DSTIME
The ^OBJ.DSTIME global has a different form depending on whether DSINTERVAL is set.
If DSINTERVAL is not set, this global has nodes like the following:
| Node | Value |
|---|---|
| ^OBJ.DSTIME(class,increment,ID) where class is the full package and class name of the source class, increment is 0, and ID is the ID of the new, changed, or deleted record in the given class | One of the following values:
|
Note that it is possible to manually delete a fact from a fact table without deleting the corresponding record from the source class by using the %SetDSTimeIndex() method.
If DSINTERVAL is set, this global has nodes like the following:
| Node | Value |
|---|---|
| ^OBJ.DSTIME(class,timestamp,ID) where class and ID are the same as in the other scenario, and timestamp is the number of seconds since midnight on December 31st, 1840 | Same as in the other scenario |
DeepSee removes unneeded entries from the ^OBJ.DSTIME global when you synchronize or rebuild a cube.
^DeepSee.Update
The ^DeepSee.Update global has nodes as follows:
| Node | Value |
|---|---|
| ^DeepSee.Update | Integer that indicates the next value of increment to use |
| ^DeepSee.Update(class,increment,ID) where class is the full package and class name of the source class, increment is 0 or a positive integer, and ID is the ID of the new, changed, or deleted record in the given class. Each time you synchronize cubes, DeepSee new nodes to this global, using the next highest integer for increment. See the example. | Same as in the ^OBJ.DSTIME global |
| ^DeepSee.Update("cubes",cube,"dstime") where cube is the logical name of a cube | Integer that indicates the next value of increment to use when creating nodes in this global to record changes for the given cube. |
| ^DeepSee.Update("cubes",cube,"lastDataUpdate") where cube is the logical name of a cube | The date and time (in $H format) when this cube was last synchronized. |
Here is an example:
^DeepSee.Update=3
^DeepSee.Update("DeepSee.Study.Patient",0,1)=0
^DeepSee.Update("DeepSee.Study.Patient",0,2)=0
^DeepSee.Update("DeepSee.Study.Patient",0,100)=0
^DeepSee.Update("DeepSee.Study.Patient",1,1)=2
^DeepSee.Update("DeepSee.Study.Patient",1,120)=0
^DeepSee.Update("DeepSee.Study.Patient",2,42)=0
^DeepSee.Update("DeepSee.Study.Patient",2,43)=0
^DeepSee.Update("DeepSee.Study.Patient",2,50)=0
^DeepSee.Update("DeepSee.Study.Patient",2,57)=0
^DeepSee.Update("cubes","PATIENTS","dstime")=3
^DeepSee.Update("cubes","PATIENTS","lastDataUpdate")="64211,63222.68"
The nodes under ^DeepSee.Update("DeepSee.Study.Patient",0) represent the first set of changes, the nodes under ^DeepSee.Update("DeepSee.Study.Patient",1 represent the second set of changes, and so on.
DeepSee does not automatically remove nodes from ^DeepSee.Update global. For information on purging this global; see “Purging DSTIME.”
Enabling Cube Synchronization
Before you can synchronize a cube, you must enable the cube synchronization feature for that cube. To do so:
-
Make sure that cube synchronization is possible in your scenario. See “When Cube Synchronization Is Possible,” earlier in this chapter.
-
Add the DSTIME parameter to the base class used by that cube, as follows:
Parameter DSTIME="AUTO";The parameter value is not case-sensitive.
-
Also optionally add the following parameter to the base class:
Parameter DSINTERVAL = 5;This parameter primarily affects how entries are stored in the ^OBJ.DSTIME global; see “Structure of the Cube Synchronization Globals.” The form of the ^OBJ.DSTIME global has no effect on the behavior of the cube synchronization mechanism.
-
Recompile the base class and all cube classes that use it.
-
Rebuild these cubes.
Clearing the ^OBJ.DSTIME Global
This section describes how to clear the ^OBJ.DSTIME global. In some cases, you might want to periodically clear the ^OBJ.DSTIME global. For example, if you are not using cubes in DeepSee, you may want to clear the ^OBJ.DSTIME global to free up space.
You can set up a task in the Task Manager to periodically clear the ^OBJ.DSTIME global. To do so, create a new task with an OnTask() method such as the following:
Method OnTask() As %Status
{
  set classname=$ORDER(^OBJ.DSTIME(""))
  while (classname="") {

    //check to see if this classname is contained in ^DeepSee.Cubes("classes")
    set test=$DATA(^DeepSee.Cubes("classes",classname))

    if (test'=1) {
        kill ^OBJ.DSTIME(classname)

    }
    set classname=$ORDER(^OBJ.DSTIME(classname))

  }

  q $$$OK
}
This task clears ^OBJ.DSTIME entries if they aren’t being used by DeepSee cubes. Use the Task Schedule Wizard to schedule the task to run as often as necessary.
Using the Cube Manager
This section describes how to access and use the Cube Manager, which is designed to help you manage cube updates. You use it to determine how and when to update cubes. It adds tasks that rebuild or synchronize cubes at the scheduled dates and times that you choose. This section discusses the following topics:
The Cube Manager tasks are visible in the Task Manager, which is discussed in “Using the Task Manager” in the Caché System Administration Guide. InterSystems recommends that you do not modify these tasks in any way.
Introduction to the Cube Manager
The Cube Manager enables you to define the cube registry, which contains information about the cubes in the current namespace. In particular, it contains information about how they are to be built, synchronized, or both.
The cube registry defines a set of cube groups. A cube group is a collection of cubes that need to be updated together, either because they are related or because you have chosen to update them together. When you first access the Cube Manager, it displays an initial set of cube groups. Each initial cube group is either a single cube or a set of cubes that are related to each other (and thus must be updated as a group). You can merge these initial cube groups together as wanted. You cannot, however, break up any of the initial cube groups.
Each cube group is initially unregistered, which means that it is not included in the cube registry. After you register a cube group (thus placing it into the registry), you define an update plan for it. The Cube Manager creates automatic tasks that use these update plans. See the next section for details.
Introduction to Update Plans
The update plan for a cube group specifies how and when the cubes are to be updated. Each group has a default plan, which you can modify. You can also specify different update plans for specific cubes in the group. In both cases, the plan choices are as follows:
-
Build and Synch — Rebuild periodically, once a week by default. Also synchronize periodically, once a day by default.
This option is not supported for a given cube unless that cube supports synchronization (as described earlier in this chapter).
-
Build Only — Rebuild periodically, once a week by default.
-
Synch Only — Synchronize the cubes periodically, once a day by default.
This option is not supported for a given cube unless that cube supports synchronization (as described earlier in this chapter).
Important:Before you synchronize cubes from the Cube Manager, it is necessary to build the cubes at least once from the Cube Manager.
-
Manual — Do not rebuild or synchronize from the Cube Manager.
Instead, use any suitable combination of other tools: the Build option in the Architect and the %BuildCube(), %SynchronizeCube(), %ProcessFact(), and %DeleteFact() methods. For details on the latter three methods, see later sections of this chapter.
For each plan (other than Manual), you can customize the schedule details.
For any namespace, the Cube Manager defines two tasks: one performs all requested cube build activity in this namespace, and one performs all requested cube synchronization activity in this namespace. Both of these tasks follow the instructions provided in the cube registry. Both tasks also automatically process cubes in the correct order required by any relationships.
The Cube Manager provides an Exclude check box for each registered group and cube, which you can use to exclude that group or cube from any activity by the Cube Manager. Specifically, the Cube Manager tasks ignore any excluded groups and cubes. Initially these check boxes are selected, because it is generally best to not to perform updates until you are ready to do so. For example, you might want to adjust the DeepSee agent counts before building any cubes.
Accessing the Cube Manager
To access the Cube Manager, do the following in the Management Portal:
-
Switch to the appropriate namespace as follows:
-
Click Switch.
-
Click the namespace.
-
Click OK.
-
-
Click DeepSee > Admin > Cube Management > Registry.
-
If you have not used the Cube Manager in this namespace, it prompts you for information about the cube registry. In this case, specify the following information:
-
Cube Registry Class Name — Specify a complete class name, including package. This class definition will be the cube registry for this namespace.
-
Disable — Optionally click this to disable the registry. If the registry is disabled, the Cube Manager tasks are suspended. (Because there are no Cube Manager tasks yet, it would be redundant to disable the registry at this point.)
-
Update Groups — Specify how to update groups with respect to each other. If you select Serially, the tasks update one group at a time. If you select In Parallel, the tasks update the groups in parallel.
-
Allow build to start after this time — Specify the earliest possible build time.
You can change all these details later, apart from the class name.
Then click OK.
-
The system displays the Cube Registry page. You can view this page in two modes (via the View buttons). Click the left View button for tree view or click the right View button for table view.
Tree View
In tree view, the left area of the Cube Manager displays a tree of unregistered cube groups. For example:
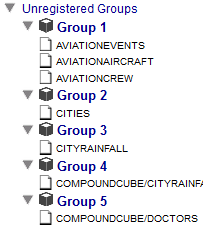
The middle area displays a table (initially empty) with information for the registered groups. The following example shows what this table looks like after you have registered a group:
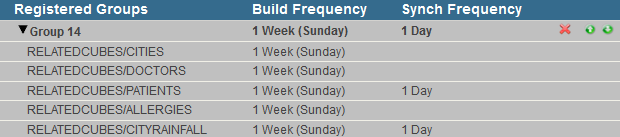
This area is color-coded as follows:
-
White background — The group or cube is included, which means that the Cube Manager tasks update it. See the Exclude option in “Specifying an Update Plan,” later in this chapter.
-
Gray background — The group or cube is excluded, which means that the Cube Manager tasks ignore it.
This area also lists (in italics) any subject areas based on a given cube, for example:
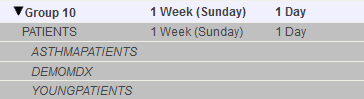
Note that you cannot specify update plans for the subject areas, because updates in a cube are automatically available in any subject area based on that cube. (So there is no need and no way to update a subject area independently from the cube on which it is based.)
In the right area, the Details tab (not shown) displays details for the current selection. You can make edits in this tab. The Tools tab provides links to other tools.
When the Cube Manager is in tree view, you can expand or collapse the display of all registered groups, which are shown in the middle area. To do so, use the Expand All or Collapse All button, as applicable, at the top of the middle area. These buttons do not affect the left area of the page, which displays the unregistered groups.
Table View
In table view, the Cube Manager lists all cubes in the current namespace, with their update plans. For example:
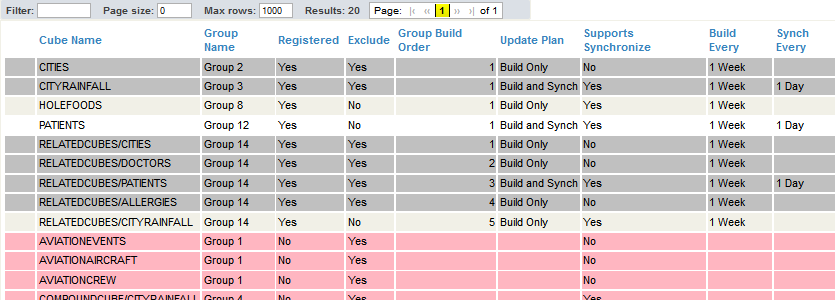
This table is color-coded as follows:
-
White background — The cube is included, which means that the Cube Manager tasks update it. See the Exclude option in “Specifying an Update Plan,” later in this chapter.
-
Gray background — The cube is excluded, which means that the Cube Manager tasks ignore it.
-
Pink background — The cube is not registered and therefore has no update plan.
The Group Name field indicates the group to which each cube belongs, and the Group Build Order field indicates the order in which each cube is to be built or synchronized within its group. The Cube Manager computes this order only for cubes in registered groups.
In the right area, the Details tab (not shown) displays details for the current selection. You can make edits in this tab. The Tools tab provides links to other tools.
Modifying the Registry Details
When you first access the Cube Manager, it prompts you for initial information. To modify these details later (other than the registry class name, which cannot be changed):
-
Display the Cube Manager in tree view.
-
In the middle area, click the heading that starts Registered Groups.
-
Edit the details on the right.
For information on the options, see the previous section.
-
Click Save.
Registering a Cube Group
To register a cube group:
-
Display the Cube Manager in tree view.
-
Expand the list of unregistered cubes on the left.
-
Drag the group from that area and drop it onto the Registered Groups heading in the middle area.
Or display the Cube Manager in table view, click the row for any cube in the group, and click Register Group in the right area.
In either case, the change is automatically saved.
Specifying an Update Plan
To specify the update plan for a cube group and its cubes:
-
Display the Cube Manager in tree view.
-
Click the group in the middle area.
-
In the Details pane on the right, specify the following information:
-
Name — Unique name of this group.
-
Exclude — Controls whether the generated tasks perform update activities for cubes in this group. Initially this option is selected, and the group is excluded.
The Cube Manager displays any excluded groups or cubes with a gray background.
-
Update Plan — Select an update plan.
Note that the Cube Manager does not permit you to use synchronization unless that cube supports it (as described earlier in this chapter). For example, you can choose the Build and Synch plan for the group, but the Cube Manager automatically sets the update plan to Build for any cube that does not support synchronization.
Important:Before you synchronize cubes from the Cube Manager, it is necessary to build the cubes at least once from the Cube Manager.
-
Build every — Use these fields to specify the schedule for the build task (if applicable).
-
Synch every — Use these fields to specify the schedule for the synchronization task (if applicable).
-
Build Cubes Synchronously — Select this to cause DeepSee to build these cubes synchronously (if applicable). If this option is clear, DeepSee builds them asynchronously.
Initially, these details apply to all cubes in the group. If you edit details for a specific cube and then later want to reapply the group defaults, click Apply to All Cubes in Group.
-
-
Optionally click a cube within this group (in the middle area) and edit information for that cube in the Details pane on the right.
The options are similar to those for the entire group, but include the following additional options, depending on whether the cube supports synchronization:
-
Post-Build Code — Specify a single line of ObjectScript to be executed immediately after building this cube. For example:
do ##class(MyApp.Utils).MyPostBuildMethod("transactionscube") -
Pre-Synchronize Code — Specify a single line of ObjectScript to be executed immediately before synchronizing this cube. For example:
do ##class(MyApp.Utils).MyPresynchMethod("transactionscube")If needed, to abort the synchronization, do the following in your code:
set $$$ABORTSYNCH=1 -
Post-Synchronize Code — Specify a single line of ObjectScript to be executed immediately after synchronizing this cube. For example:
do ##class(MyApp.Utils).MyPostsynchMethod("transactionscube")
In all cases, your code can perform any processing required.
Modify each cube as needed.
-
-
Click Save.
When you do so, the Cube Manager creates or updates the cube registry in this namespace. If the Task Manager does not yet include the necessary tasks, the Cube Manager creates them.
Merging Groups
You can merge one group (group A) into another (group B). Specifically this moves all the cubes from group A into the group B and then removes the now-empty group A.
To merge one group into another, use the following procedure. In this procedure, group A must not yet be registered, and group B must be registered.
-
Display the Cube Manager in tree view.
-
Drag group A (the group that contains the cubes that you want to move) from the left area and drop it into the group heading of group B (the target group) in the middle area.
The system prompts you to confirm the action.
-
Click OK.
If group B currently has an update plan that cannot be used for some of the newly moved cubes, the system displays a dialog box to indicate this. Click OK. For any such cubes, the Cube Manager selects an update plan that can be used.
-
Review the update plan for each newly moved cube and modify it as needed.
-
Click Save.
Or use the following alternative procedure. In this procedure, both groups must already be registered.
-
Display the Cube Manager in table view.
-
In the middle area, click the row for any cube in group A (the group that contains the cubes that you want to move).
-
On the right, click Merge to another group and then select group B (the target group) from the drop-down list.
-
Click Merge.
The system prompts you to confirm the action.
-
Click OK.
If group B currently has an update plan that cannot be used for some of the newly moved cubes, the system displays a dialog box to indicate this. Click OK. For any such cubes, the Cube Manager selects an update plan that can be used.
-
Review the update plan for each newly moved cube and modify it as needed.
-
Click Save.
Building All the Registered Cubes
DeepSee provides a utility method that you can use to build all the registered cubes, in the correct order. The method is BuildAllRegisteredGroups() in the class %DeepSee.CubeManager.UtilsOpens in a new tab. This method ignores the schedule specified in the registry but uses the build order specified in the registry.
Before you synchronize cubes from the Cube Manager, it is necessary to build the cubes at least once from the Cube Manager user interface.
Performing On-Demand Builds
The Cube Manager also provides options to build cubes on demand (that is, ignoring the schedule). In this kind of build, the Cube Manager rebuilds the requested cube as well as any cubes that depend on it.
To perform an on-demand build:
-
Save any changes to the cube registry.
Important:The build options are disabled if there are any unsaved changes.
-
Select a registered cube. To do so, either:
-
Display the Cube Manager in tree view and then click a cube in the middle area.
-
Display the Cube Manager in table view and click a cube that shows Yes in the Registered column.
-
-
On the right, clear the Exclude option.
-
Click Build Dependency List.
The Cube Manager then displays the build dialog box.
-
Click Build List.
The dialog box displays progress of the build.
-
When the build is done, click OK.
There are other ways to perform on-demand builds:
-
Display the Cube Manager in tree view. Click the header of the table in the middle area. Then click Build All Registered Groups. Continue as described previously.
-
Display the Cube Manager in tree view. Click a cube group in the middle area. Then click Build This Group. Continue as described previously.
Unregistering a Cube Group
To unregister a cube group:
-
Display the Cube Manager in tree view.
-
In the middle area, click the X in the row for the cube group.
-
Click OK.
Viewing Cube Manager Events
For certain events, the Cube Manager writes log entries to a table, which you can query via SQL. The table name is %DeepSee_CubeManager.CubeEvent. The CubeEvent field indicates the type of cube event. Possible logical values for this field include the following:
| CubeEvent Value | When the Cube Manager Writes This Log Entry |
|---|---|
| register | Immediately after registering a cube group. |
| update | Immediately after saving changes to a cube group. |
| unregister | Immediately after unregistering a cube group. |
| build | When building a cube. The Cube Manager generates an initial log just before starting the build, and then updates that entry after the build is complete. |
| synch | When synchronizing a cube. The Cube Manager generates an initial log just before starting the synchronization is started, and then updates that entry after the synchronization is complete. |
| presynch | Immediately after executing any code specified by the Pre-Synchronize Code option. |
| postsynch | Immediately after executing any code specified by the Post-Synchronize Code option. |
| postbuild | Immediately after executing any code specified by the Post-Build Code option. |
| repair | When you use the Build Dependency List option (which performs an on-demand build of a given cube and any related cubes). The Cube Manager generates an initial log just before starting the build, and then updates that entry after the build is complete. |
For information on other fields in this table, see the class reference for %DeepSee.CubeManager.CubeEventOpens in a new tab.
Restricting Access to the Cube Manager
You may want to manage the cube update schedule without allowing users to change that schedule through the Cube Registry page. To restrict access to the Cube Registry page, set the UserUpdatesLocked attribute to "true" in either the RegistryMap or RegistryMapGroup objects within your saved cube registry. For example:
<RegistryMap Disabled="false" IndependentSync="false" SerialUpdates="false" UserUpdatesLocked="true">
When UserUpdatesLocked is set to "true" for a RegistryMap:
-
The registry’s Disable setting cannot be changed through the Details tab. For information on accessing this tab, see Modifying the Registry Details.
When UserUpdatesLocked is set to "true" for a RegistryMapGroup:
-
Each registered group’s Exclude checkbox is displayed but disabled
-
Each registered cube’s Exclude checkbox is hidden
-
Each registered group’s Update Plan is hidden
-
Each registered cube’s Update Plan is hidden
-
The red X button for removing registered groups is removed
-
The Build Frequency and Synch Frequency columns are left blank
-
The Build Dependency List is available for cubes, but the Build This Group button is disabled.
Using %SynchronizeCube()
Before you can synchronize a cube, follow the steps in “Enabling Cube Synchronization,” earlier in this chapter.
To synchronize a cube programmatically (that is, without the Cube Manager), call the %SynchronizeCube() method of the %DeepSee.UtilsOpens in a new tab class, which has the following signature:
classmethod %SynchronizeCube(pCubeName As %String, pVerbose As %Boolean = 1) as %Status
For the specified cube (pCubeName), this method finds and applies all changes from the source data that have been made since the last call to this method.
If pVerbose is true, the method writes status information to the console. For additional arguments for this method, see the class referenceOpens in a new tab.
You can call %SynchronizeCube() in either of the following ways:
-
Call the method from the part of your code that changes the data in the base class.
This is the approach used in the Patients sample.
-
Periodically call %SynchronizeCube() as a recurring task.
If %SynchronizeCube() displays the message No changes detected, this can indicate that you had not previously rebuilt the cube.
Purging DSTIME
For historical reasons and for convenience, the phrase purging DSTIME refers to purging the older entries from the ^OBJ.DSTIME global. It is necessary to purge this global periodically because it can become quite large.
As of release 2017.2, to purge DSTIME for a given cube, do the following:
-
Call the REST API /Data/GetDSTIME. See “GET /Data/GetDSTIME” in Tools for Creating DeepSee Web Clients. Pass, as an argument, the full name of the source class of the cube.
This REST call returns the last ^OBJ.DSTIME timestamp processed for that source class on a given server. In the case of an async mirror setup, the timestamp retrieved from this REST service will be the most recent timestamp that can safely be purged on the primary production server.
-
Using the returned timestamp as an argument, call the %PurgeUpdateBuffer() method of %DeepSee.UtilsOpens in a new tab so that you purge ^OBJ.DSTIME up to but not including the timestamp processed on the remote server. The default behavior for this method is to increment the top node of the local ^OBJ.DSTIME so that every purge will provide a new sync point to be propagated to the DeepSee server.
Updating Cubes Manually
As described in “When Cube Synchronization Is Not Possible,” it is sometimes necessary to update a cube manually. In these situations, your application must do the following:
-
Determine the IDs of the affected records in the base class.
-
Update the cube for those records by calling the %ProcessFact() and %DeleteFact() methods of %DeepSee.UtilsOpens in a new tab.
As input, these methods require the ID of the affected row or rows.
The following list provides information on these methods:
classmethod %ProcessFact(pCubeName As %String,
                         pSourceId As %String = "",
                         pVerbose As %Boolean = 0) as %Status
Where pCubeName is the logical name of a cube, and pSourceID is the ID of a record in the base class used by that cube. For the given cube, this method updates the corresponding row of the fact table, the associated indices, and any level tables if affected.
If pVerbose is true, the method writes status information to the console.
classmethod %DeleteFact(pCubeName As %String,
                        pSourceId As %String = "",
                        pVerbose As %Boolean = 0) as %Status
Where pCubeName is the logical name of a cube, and pSourceID is the ID of a record in the base class used by that cube. For the given cube, this method deletes the corresponding row of the fact table and updates the indices correspondingly.
If pVerbose is true, the method writes status information to the console.
Other Options
This section discusses other options that are more advanced or less common:
Using DSTIME=MANUAL
Instead of letting DeepSee automatically update the ^OBJ.DSTIME global, you can update this global at times that you choose. To do so:
-
Specify DSTIME as "MANUAL" rather than "AUTO".
-
Then within your application, call the method %SetDSTimeIndex() of the class %DeepSee.UtilsOpens in a new tab whenever you add, change, or delete objects of the class, or when you want to update the ^OBJ.DSTIME global.
This method has the following signature:
ClassMethod %SetDSTimeIndex(pClassName As %String,
                            pObjectId As %String,
                            pAction As %Integer,
                            pInterval As %Integer = 0)
Where:
-
pClassName is the full package and class name of the object that you have added, changed, or deleted.
-
pObjectId is the object ID for that object.
-
pAction is 0 if you updated the object, 1 if you added it, or 2 if you deleted it or want to delete the corresponding fact from the fact table without deleting the object. The value of pAction is used as the value of the resulting ^OBJ.DSTIME node. Note that facts are removed from a cube during synchronization if the corresponding record does not exist in the source class, or if a value of 2 is specified for pAction.
-
pInterval is an optional integer. If you specify this as a positive integer, DeepSee uses time stamp subscripts in the ^OBJ.DSTIME and ^DeepSee.Update globals. See the discussion of the DSINTERVAL parameter in “Enable Cube Synchronization.”
-
Then, when you want to update a given cube, call the %SynchronizeCube() method of the %DeepSee.UtilsOpens in a new tab class, as described previously.
Injecting Facts into the Fact Table and Dimension Tables
In rare cases, you might need the fact table to include records that do not correspond to any source records. In such cases, use the %InjectFact() method of the cube class.
This method has the following signature:
classmethod %InjectFact(ByRef pFactId As %String,
                        ByRef pValues As %String,
                        pDimensionsOnly As %Boolean = 0)
                        as %Status
Where:
-
pFactId is the ID of the fact. Set this to "" for an insert. On return, this argument contains the ID used for the fact.
-
pValues is a multidimensional array of fact values. In this array, the subscript is the sourceProperty name (case-sensitive).
-
pDimensionsOnly controls whether the method affects both the fact table and dimension tables or just the dimension tables. If this argument is true, the method affects only the dimension tables. You use this argument if you prebuild the dimension tables as described in the next section.
Caution:Do not use this method to update dimension tables for levels that are based on source expressions. To add records to those tables, instead use an SQL UPDATE statement.
You can use %InjectFact() to update dimension tables for levels that are based on source properties.
Prebuilding Dimension Tables
By default, DeepSee populates the dimension tables at the same time that it builds the fact table. It is possible to prebuild one or more dimension tables so that they are populated before the fact table, if this is necessary for some reason.
To prebuild one or more dimension tables, do the following:
-
Implement the %OnBuildCube() callback in the cube definition class. This method has the following signature:
classmethod %OnBuildCube() as %StatusThe %BuildCube() method calls this method just after it removes the old cube contents and before it starts processing the new contents.
-
In this implementation, invoke the %InjectFact() method of the cube class and specify the pDimensionsOnly argument as true.
For details on this method, see the previous section.
For example, the following partial implementation predefines the Cities dimension in the HoleFoods sample:
ClassMethod %OnBuildCube() As %Status
{
    // pre-build City dimension
    Set tVar("Outlet.Country.Region.Name") = "N. America"
    Set tVar("Outlet.Country.Name") = "USA"

    Set tVar("Outlet") = 1000
    Set tVar("Outlet.City") = "Cambridge"
    Do ..%InjectFact("",.tVar,1)

    Set tVar("Outlet") = 1001
    Set tVar("Outlet.City") = "Somerville"
    Do ..%InjectFact("",.tVar,1)

    Set tVar("Outlet") = 1002
    Set tVar("Outlet.City") = "Chelsea"
    Do ..%InjectFact("",.tVar,1)

    Quit $$$OK
}
Notes:
-
It is necessary to provide a unique ID as well as a name for a member.
-
For completeness, this code should also provide the city population, longitude, and latitude, because the corresponding dimension table contains these values.
-
It is also necessary to provide values for any higher level members.
Updating a Dimension Table Manually
In some cases, there is no change to your base class, but there is a change to a lookup table that is used as a level. In these cases, you can update the cube in any of the ways described earlier in this chapter. If the only change is to a single dimension table, however, it is quicker to update the level table directly. You can do so via the %UpdateDimensionProperty() method of %DeepSee.UtilsOpens in a new tab.
This method has the following signature:
classmethod %UpdateDimensionProperty(pCubeName As %String,
                                     pSpec As %String,
                                     pValue As %String,
                                     pKey As %String)
                                     as %Status
Where:
-
pCubeName is the name of the cube.
-
pSpec is the MDX member expression that refers to the level member to update. You must use the dimension, hierarchy, and level identifiers in this expression. For example: "[docd].[h1].[doctor].&[61]"
As a variation, pSpec can be a reference to a member property. For example: "[homed].[h1].[city].&[Magnolia].Properties(""Principal Export"")"
DeepSee uses this argument and the pCubeName argument to determine the table and row to update.
-
pValue is the new name for this member, if any.
Or, if you specified a member property, pValue is used as the new value of the property.
-
pKey is the new key for this member, if any.
Specify this argument only if you specify a member for pSpec.
You can make three kinds of changes with this method:
-
Specify a new key for a member. For example:
Set tSC = ##class(%DeepSee.Utils).%UpdateDimensionProperty("patients","[docd].[h1].[doctor].&[186]",,"100000")By default, the key is also used as the name, so this action might also change the name.
-
Specify a new name for a member. For example:
Set tSC = ##class(%DeepSee.Utils).%UpdateDimensionProperty("patients","[docd].[doctor].&[186]","Psmith, Alvin")By default, the name is the key, so this action might change the key.
-
Specify a new value for some other property (both Name and Key are properties). For example:
Set memberprop="homed.h1.city.Pine.Properties(""Principal Export"")"

Set tSC = ##class(%DeepSee.Utils).%UpdateDimensionProperty("patients",memberprop,"Sandwiches")
Examples
The Patients sample includes utility methods that change data and that use either synchronization or manual updates as appropriate. To try these methods, you can use a dashboard provided with this sample:
-
Open the User Portal in the SAMPLES namespace.
-
Click the dashboard Real Time Updates.
-
Click the buttons in the upper left area. Each of these executes a KPI action that executes a method to randomly change data in this sample. The action launches the method via JOB, which starts a background process.
-
Add Patients adds patients.
This action calls a method that adds 100 patients and calls %SynchronizeCube() after adding each patient.
-
Change Patient Groups changes the patient group assignment for some patients.
This action calls a method that randomly changes the patient group assignment for some percentage of patients and calls %SynchronizeCube() after each change.
-
Delete Some Patients deletes some patients.
This action calls a method that deletes 1 percent of the patients and calls %SynchronizeCube() after each deletion.
-
Change Favorite Colors changes the favorite color for some patients.
This action calls a method that randomly changes the favorite color for some percentage of the patients. In this case, the changed data is stored in the DeepSee_Study.PatientDetails table, which is not the base table for the Patients cube. Hence it is necessary to use %ProcessFact() instead of %SynchronizeCube().
The method includes the following block of code:
    Set patID=patdetails.PatientID

    Set myquery="SELECT ID FROM DeepSee_Study.Patient WHERE PatientID=?"
    Set rset=##class(%ResultSet).%New("%DynamicQuery:SQL")
    Set status=rset.Prepare(myquery)
    If $$$ISERR(status) {Do $System.Status.DisplayError(status) Quit}
    Set status=rset.Execute(patID)
    If $$$ISERR(status) {Do $System.Status.DisplayError(status) Quit}
    While rset.Next() {
        Set id=rset.Data("ID")
        Do ##class(%DeepSee.Utils).%ProcessFact("patients",id)
        }
This block of code executes an SQL query to return all patients who are affected by the change to the data. It then iterates through those patients and updates the Patients cube for each of them.
-
Add Encounters adds encounters for some patients.
This action calls a method that includes logic similar to that for DeepSee.Study.PatientDetailsOpens in a new tab; see the previous item.
-
Change Doctor Groups changes the doctor group assignment for some of the primary care physicians.
This action calls a method that includes logic similar to that for DeepSee.Study.PatientDetailsOpens in a new tab.
-
These methods write log details to the global ^DeepSee.Study.Log. For example:
^DeepSee.Study.Log(1)="13 May 2011 05:29:37PM Adding patients..."
^DeepSee.Study.Log(2)="13 May 2011 05:29:38PM Current patient count is 10200"