Creating Portlets for Use in Dashboards
This chapter describes how to create portlets that users can add to dashboards, as widgets. It discusses the following topics:
Portlet Basics
To define a portlet, create and compile a class as follows:
-
Use %DeepSee.Component.Portlet.abstractPortletOpens in a new tab as a superclass.
-
Implement the %DrawHTML() method, which should draw the body of the portlet as HTML.
This method has the following signature:
method %DrawHTML()Also see “Using Settings” for additional options.
-
Optionally implement the %OnGetPortletName() method, which returns the localized name of the portlet, to display in the Widget Builder dialog box.
Otherwise, the short class name becomes the portlet name.
This method has the following signature:
classmethod %OnGetPortletName() as %String -
Optionally implement the %OnGetPortletIcon() method, which returns the URL of the icon for the portlet, to display in the Widget Builder dialog box.
Otherwise, the system uses a generic icon.
This method has the following signature:
classmethod %OnGetPortletIcon() as %String -
Optionally implement the %OnGetPortletSettings() method, which returns one or more configurable settings. See “Defining Settings.”
Otherwise, the portlet has no settings.
-
Optionally implement the adjustContentSize() method, which DeepSee calls whenever the widget containing the portlet is loaded or resized. This method has the following signature:
ClientMethod adjustContentSize(load, width, height) [ Language = javascript ] -
Optionally implement the onApplyFilters() method, which DeepSee calls whenever a filter change is sent to the widget. This method has the following signature:
ClientMethod onApplyFilters(refresh) [ Language = javascript ]
Defining and Using Settings
It is fairly simple to define a portlet that provides configurable settings. To do this, implement the %OnGetPortletSettings() method in the portlet class. This method has two purposes:
-
To define settings to be listed in the Settings menu for this widget, in the Dashboard Designer.
-
To receive values for these settings via the dashboard URL. For information on passing the values via the URL, see the chapter “Accessing Dashboards from Your Application.”
The %OnGetPortletSettings() method has the following signature:
classmethod %OnGetPortletSettings(Output pInfo As %List, ByRef pSettings) as %Status
pInfo should be a multidimensional array that contains the following nodes:
| Node | Value |
|---|---|
| pInfo(integer) | List returned by $LISTBUILD as follows:
$LB(name,default,type,caption,tooltip)
|
pSettings is a multidimensional array that is passed to this method; it contains the values of any settings passed via the URL. For details, see the second subsection.
Types of Settings
In the pInfo argument of %OnGetPortletSettings(), you can specify the type of each setting; this controls how the Dashboard Designer displays that setting. Use one of the following:
-
"%Integer"
-
"%Boolean"
-
"ENUM^caption1:value1,caption2:value2" or a similar form. In this string, caption1 and caption2 are labels to display in the Dashboard Designer, and value1 and value2 are the corresponding values that are actually used. In practice, a setting of this type can provide only a few options, before the Dashboard Designer runs out of space to display them. See the next item.
-
"DRILL^caption1:value1,caption2:value2" or a similar form. In this string, caption1 and caption2 are labels to display in the Dashboard Designer, and value1 and value2 are the corresponding values that are actually used.
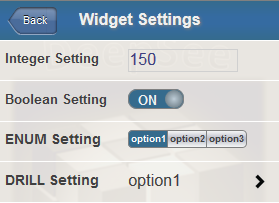
The following figure shows a sample of each of these types of setting:

The following implementation of %OnGetPortletSettings() shows how these settings were defined:
ClassMethod %OnGetPortletSettings(Output pInfo As %List, ByRef pSettings) As %Status
{
 Kill pInfo
 set pInfo($I(pInfo)) = $LB("INTEGERSETTING","150","%Integer","Integer Setting","Sample integer setting")

 set pInfo($I(pInfo)) = $LB("BOOLEANSETTING","1","%Boolean","Boolean Setting","Sample boolean setting")

 set pInfo($I(pInfo)) = $LB("ENUMSETTING","150","ENUM^option1:150,option2:200,option3:200",
 "ENUM Setting","Sample ENUM setting")

 set pInfo($I(pInfo)) = $LB("DRILLSETTING","150",
 "DRILL^option1:150,option2:200,option3:200,option4:200,option5:200,option6:200,option7:200",
 "DRILL Setting","Sample DRILL setting")

 Quit pInfo
}
Receiving Settings Passed Via URL
The URL of a dashboard can pass values to some or all widgets on that dashboard, including values for any portlet settings. To accept these values, when you implement %OnGetPortletSettings(), use the pSettings argument, which is a multidimensional array that contains values for any settings that were provided in the URL. The structure of this array is as follows:
| Node | Value |
|---|---|
| pSettings("setting") where setting is the name of a setting | Value of that setting |
One approach is to use $GET(pSettings("setting") as the default value for each setting. For example:
ClassMethod %OnGetPortletSettings(Output pInfo As %List, ByRef pSettings) As %Status
{
  Kill pInfo
  Set pInfo($I(pInfo)) = $LB("LOGO",$G(pSettings("LOGO")),"","Clock logo","Logo displayed on top of clock")

  Set pInfo($I(pInfo)) = $LB("STEP",$G(pSettings("STEP"),"10"),"%Integer",
 "Second hand redraw interval (msec)","milliseconds steps of second hand")

  Set pInfo($I(pInfo)) = $LB("OFFSET",$G(pSettings("OFFSET"),"0"),"%Integer",
  "Offset from base time (min)","minutes difference from base time (Local or UTC)")

  Set pInfo($I(pInfo)) = $LB("UTC",$G(pSettings("UTC"),"0"),"%Boolean","UTC","Time Base: local (default) or UTC")

  Set pInfo($I(pInfo)) = $LB("CIRCLE",$G(pSettings("CIRCLE"),"1"),"%Boolean",
  "Circle","Shape: square (default) or circle")

  Set pInfo($I(pInfo)) = $LB("SIZE",$G(pSettings("SIZE"),"150"),"%Integer","Size","Size of the clock")

  Quit pInfo
}
Using Settings
To use the settings in the portlet, define the %DrawHTML() method so that it extracts the values of the settings from the settings property of the portlet and then uses those values in whatever manner is suitable for your needs. The settings property of the portlet is a multidimensional array of the following form:
| Node | Value |
|---|---|
| settings("setting") where setting is the name of a setting | Value of that setting |
For a simple example, %DrawHTML() could contain extract a setting called SIZE:
set size=$G(..settings("SIZE"))
And the method could use this value to set the size of the portlet.
Examples
The following shows a simple example:
Class DeepSee.Model.Custom.MyPortlet Extends %DeepSee.Component.Portlet.abstractPortlet
{

/// Static HTML display method: draw the BODY of this component as HTML.
Method %DrawHTML()
{
  &html<<div class="portletDiv" style="overflow:hidden;">>
  &html<<div style="font-size:16px; border-bottom:1px solid gray;">My Widget</div>>

  Set tInfo(1) = $LB("Sales","UP","12")
  Set tInfo(2) = $LB("Costs","DOWN","-8")
  Set tInfo(3) = $LB("Profits","UP","18")

  &html<<table width="100%" cellspacing="0" border="0">>
  Set n = $O(tInfo(""))
  While (n'="") {
    Set tName = $LG(tInfo(n),1)
    Set tDir = $LG(tInfo(n),2)
    Set tPct = $LG(tInfo(n),3)
    Set clr = $S(tPct<0:"red",1:"black")
    Set bg = $S(n#2:"#FFEEEE",1:"white")
    Set tPct = tPct _ "%"
    &html<<tr style="font-size:24px; background:#(bg)#;color:#(clr)#;">
      <td style="padding:4px;">#(tName)#</td>
      <td style="padding:4px;">#(tDir)#</td>
      <td style="padding:4px;text-align:right;">#(tPct)#</td></tr>>
    Set n = $O(tInfo(n))
  }
  &html<</table>>
  &html<</div>>
}

}
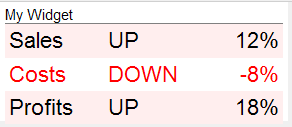
When used as a widget, the widget has the following contents:

This example displays static data, but your portlet could display real-time data.
For a more complex example that also defines settings, see DeepSee.Model.PortletDemo.ClockPortlet in the SAMPLES database.
Using a Data Source
You can also define a portlet that accesses data, because %DeepSee.Component.Portlet.abstractPortletOpens in a new tab implements the ZEN dataView API. To take advantage of this option, you should be familiar with Zen.
If a data source is defined, your portlet widget creates the appropriate dataController for the data source and connects to that. The most convenient way to create such a portlet is as follows:
-
In the %DrawHTML() method of the portlet, do nothing but force a modification of the renderFlag property:
Method %DrawHTML()
{
    Set ..renderFlag = ..renderFlag + 1
}
This causes ZEN to render this component on the client.
-
Implement a client-side renderContents() method. This should (a) connect to the dataController, and (b) create dynamic HTML and use it to render the enclosingDiv of the portlet.
ClientMethod renderContents() [Language = javascript]
{
    var html = [];

    // do we have a data controller?
    var controller = this.getController();
    if (null == controller) {
        // try to connect to dataController
        this.connectToController();
        controller = this.getController();
    }

    if (controller) {
        html[html.length] = controller;

    }
    else {
        html[html.length] = 'No data source';
    }

    this.getEnclosingDiv().innerHTML = html.join('');
}