Adding Business Hosts
This chapter describes how to use the Production Configuration page to add business hosts to a production. It contains the following sections:
For information on the color coding in the diagram, see the previous chapter.
The next chapter describes how to configure settings for the production and all business hosts.
Introduction
An Ensemble business host is any business service, business process, or business operation within an Ensemble production. These are also referred to generically as configuration items.
A configuration item is always associated with a specific production. It may resemble or duplicate items in other productions. Each production is an entirely closed universe that does not use configuration items from other productions.
Configuration Names
By default, the name of a configuration item is the name of its underlying host class. However, you can assign a different name, to describe the purpose of the item, for example.
For example, if you have a business service class that communicates with a specific type of server, and you use it to communicate with the same type of server in different enterprise locations, you must configure the business service with different settings to communicate with each enterprise location, even though the type of server is the same. Each different configuration of the business service must have a different Name in the diagram (except see “Working with Multiple Versions of a Business Host,” later in this chapter).
The following rules govern configuration names:
-
The name must consist of at least one character.
-
The name can contain letters, numbers, and any printable character except for the following: | ; , : [
-
Neither the first nor the last character can be any of the following: ! $ .
-
The name (if is it one character long) cannot be *
Adding Business Hosts to a Production
To add a business host to a production:
-
Identify (or create and compile) the appropriate business host class.
-
Open the production on the Production Configuration page.
-
Click plus-sign icon next to the Services, Processes, or Operations column heading.
-
Use the wizard that Ensemble displays. See the next topic for details on the options.
-
Click OK to add the process to the production.
-
Configure the business process as needed.
This process does not generate any new classes. It updates the production class.
Wizard Options
This section describes the options in the Business Service Wizard, the Business Process Wizard, and Business Operation Wizard.
Options in the Business Service Wizard
The Business Service Wizard provides multiple tabs, which correspond to different types of business service classes to use. Click a tab and then specify values as follows:
-
If you click the All Services tab, specify the following values:
-
Choose a host class from the Service Class list. If the class you need is not listed, create and compile the class in Studio, and then return here to choose it.
-
Specify a configuration Service Name. For rules, see “Configuration Names,” earlier in this chapter.
-
Enter a text label in the Display Category field to sort and organize items within the production. Display Category names are case-sensitive, and space characters are allowed. To place an item in multiple categories, list them in the Display Category field separated by commas (do not allow spaces around these commas).
-
Comment is an optional text description.
-
-
If you click the HL7 Input tab, specify the following values:
-
Choose TCP, File, FTP, HTTP, or SOAP to select an existing specialized Ensemble host class.
-
Specify a configuration Name. For rules, see “Configuration Names,” earlier in this chapter.
-
Use the Target Name field to identify the business process or business operation to which this business service will send the HL7 messages that it receives.
-
-
If you click the X12 Input tab, specify the following values:
-
Choose TCP, File, or FTP to select an existing specialized Ensemble host class.
-
Specify a configuration Name. For rules, see “Configuration Names,” earlier in this chapter.
-
Use the Target Name field to identify the business process or business operation to which this business service will send the HL7 messages that it receives.
-
-
If you click the Business Metric tab, specify the following values:
-
Choose a host class from the MetricClass drop-down list. If the class you need does not appear on this list, create the class in Studio, then return to choose it.
See “Creating Business Metrics” in Developing Ensemble Productions.
-
Specify a configuration Name. For rules, see “Configuration Names,” earlier in this chapter.
-
Enter a text label in the Category field to sort and organize items within the production. Category names are case-sensitive, and space characters are allowed. To place an item in multiple categories, list them in the Category field separated by commas (do not allow spaces around these commas).
-
Comment is an optional text description.
-
Call Interval determines how often the business metric will recalculate the values of its properties. The Call Interval is in seconds, starting from a minimum of 0.1 seconds. The default is 5 seconds.
-
Options in the Business Process Wizard
The Business Process Wizard provides multiple tabs, which correspond to different types of business process classes to use. Click a tab and then specify values as follows:
-
If you click the All Processes tab, specify the following values:
-
Business Process Class — Choose a base class from the list of valid business process classes. If the class you need does not appear on this list, create and compile the class and then return here to choose it.
-
Specify a configuration Name. For rules, see “Configuration Names,” earlier in this chapter.
The wizard defaults to the business process class name if you leave this blank.
-
Specify other values as given after this list.
-
-
If you click the HL7 Router or X12 Router tab, specify the following values:
-
Auto-create Rule — Select this check box to create a rule definition name based on the business process class name.
-
Routing Rule Name — Use the field to identify the name of the routing rule set to which this business process sends the messages that it receives. Only appears if the previous check box is cleared.
Once you select a rule name, you can click the magnifying glass to open the Ensemble Rule Editor.
-
Specify a configuration Name. For rules, see “Configuration Names,” earlier in this chapter.
The underlying business process class is either EnsLib.HL7.MsgRouter.RoutingEngineOpens in a new tab or EnsLib.MsgRouter.VDocRoutingEngineOpens in a new tab depending on which type of router you choose.
-
Specify other values as given after this list.
-
-
If you click the Component tab, specify the following values:
-
Component Class — Choose a base class from the list of valid business process classes designated as components.
-
Component Name — Enter a configuration name for this item. For rules, see “Configuration Names,” earlier in this chapter. The wizard defaults to the component class name if you leave this blank.
-
Specify other values as given after this list.
-
Note that all types of business process share the following optional fields:
-
Display Category — Enter a text label in the field to sort and organize items within the production. Category names are case-sensitive and space characters are allowed. To place an item in multiple categories, enter a comma-separated list.
-
Comment — Enter a brief comment about the business process to appear in the informational settings.
-
Enable Now — Select this check box if you want this business process to begin processing messages immediately when the production runs; clear it for the process to be initially disabled.
Options in the Business Operation Wizard
The Business Operation Wizard provides multiple tabs, which correspond to different types of business operation classes to use. Click a tab and then specify values as follows:
-
If you click the All Operations tab, specify the following values:
-
Choose a host class from the Operation Class list. If the class you need does not appear on this list, create the class in Studio, then return here to choose it.
-
Specify a configuration Name. For rules, see “Configuration Names,” earlier in this chapter.
-
Enter a text label in the Display Category field to sort and organize items within the production. Display Category names are case-sensitive, and space characters are allowed. To place an item in multiple categories, list them in the Display Category field separated by commas (do not allow spaces around these commas).
-
Comment is an optional text description.
-
Specify other values as given after this list.
-
-
If you click the HL7 Output tab, specify the following values:
-
Choose TCP, File, FTP, HTTP, or SOAP to determine the host class. Each class already exists and requires no programming. Simply choose one.
-
Specify a configuration Name. For rules, see “Configuration Names,” earlier in this chapter.
-
Specify other values as given after this list.
-
-
If you click the X12 Output tab, specify the following values:
-
Choose TCP, File, or FTP to determine the host class. Each class already exists and requires no programming. Simply choose one.
-
Give the item a configuration X12 Operation Name. For rules, see “Configuration Names,” earlier in this chapter.
-
Specify other values as given after this list.
-
-
If you click the Workflow tab, specify the following values:
-
Choose a host class from the Operation Class drop-down list. If the class you need does not appear on this list, create the class in Studio, then return here to choose it.
-
Give the item a configuration Operation Name. For rules, see “Configuration Names,” earlier in this chapter.
-
Choose whether or not to auto-create a workflow role.
-
Specify other values as given after this list.
-
All types of business operation share the following optional fields:
-
Display Category — Enter a text label in the field to sort and organize items within the production. Category names are case-sensitive and space characters are allowed. To place an item in multiple categories, enter a comma-separated list.
-
Comment — Enter a brief comment about the business operation to appear in the informational settings.
-
Enable Now — Select this check box if you want this business operation to begin processing messages immediately when the production runs; clear it for the operation to be initially disabled.
Enabling, Disabling, or Restarting a Business Host
To enable, disable, or restart a business host, do either of the following:
-
Double-click a host item. Ensemble displays a dialog box that allows you to enable, disable, or restart the host item depending on the current state of the production and the host item:
-
If the production is running and the host item is enabled, the dialog box gives you the option to disable the host item, restart the host item, or to cancel the request.
-
If the production is not running and the host item is enabled, the dialog box gives you the option to disable the host item or to cancel the request.
-
If the host item is disabled, the dialog box gives you the option to enable the host item or cancel the request.
-
-
Select or clear the Enabled setting (as appropriate) and then click Apply. To restart a host item, first disable it and then enable it.
You cannot disable a business process with a pool size of 0. The management portal does not allow this action because disabling it would stop all business processes with a pool size of 0, which use the same shared actor queue. If you want to disable only a single business process, you must first set its pool size to 1 or more. After you apply the settings, you can disable it. If you do want to stop all business processes using the shared actor pool, select Production Settings and set the Actor Pool Size to 0.
Changing the Class That a Business Host Uses
To modify a business host so that it is based on a different class:
-
Display the Production Configuration page:
-
Click the business host in the diagram.
-
Click the Actions tab.
-
Click Change Class.
-
Select a new class.
Copying a Business Host
To create a copy of a business host within a given production:
-
Display the Production Configuration page:
-
Click the business host in the diagram.
-
Click the Actions tab.
-
Click Copy.
-
Click Copy to create a copy of the selected business host.
A dialog box prompts you to enter a configuration name.
-
Enter a unique name and click OK.
When first created, the copy has the same host class and settings as the original; only the name is different. Generally your next step is to configure the copy to make it unique. For example:
-
If you have an incoming TCP business service that receives messages from a client application, and you want to receive messages from a similar application on a different application server, you can copy the first TCP service and configure the copy with the other server address.
-
If you have a business process for one message routing interface, and you want a similar one but with alterations for another interface, you can copy the first routing process and configure the copy to route messages between different sets of business services and business operations.
-
If you have an outgoing email business operation that alerts a user, but you want to alert another user at different times of day, you can copy the first outgoing email operation and configure the copy with the other email address.
The copy has no relationship to the original item; you can configure, enable, and disable each item independently.
The Copy command works only within the same production. You cannot copy a business host from one production to another.
Deleting a Business Host
To delete a business host within a given production:
-
Display the Production Configuration page:
-
Click the business host in the diagram.
-
Click the Actions tab.
-
Click Delete.
This process removes this item from the production configuration. This action does not delete the business host class on which the business host is based.
Repairing an Error
If the class for a given business host is not available, the diagram displays the item with a red background. To fix the error:
-
Select the item.
-
Click the Actions tab.
-
Now either click Delete to remove the item or click Change Class to choose a class.
Viewing and Configuring Connections
When you click the status indicator of a business host, lines connect items as defined by the values in the Target Config Names setting or, in the case of a routing process, as defined by the associated Business Rule Name. The following figure shows an example:
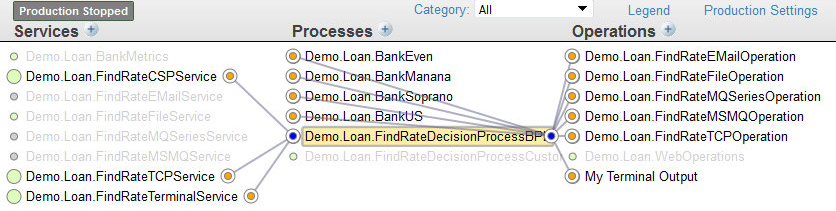
You can assign a business service Target Config Names by clicking its status indicator and dragging the pointer to a business process or operation until you see its status indicator highlighted. When you do so, the Production Configuration page displays a dialog window requesting you to confirm the connection. If you confirm the connection, the page displays a Settings applied message and the item is added to the list in the Target Config Names setting.
Working with Multiple Versions of a Business Host
During development, it can be convenient to include multiple “versions” of a business host in the production and then switch among them for testing.
Only one of them can be enabled at any time; when you enable one, Ensemble automatically disables any previously enabled version.
To create and work with multiple versions of a host:
-
Add the first business host as usual.
-
Add the next business host and provide the same configuration name as for the first one.
The production configuration still shows only one business host with the given name.
-
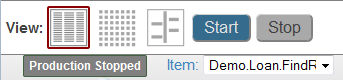
If you are not in listing view, click the listing view icon
 .
. -
Select the business host.
Now the diagram displays a small box that indicates the number of items that have this name, as follows:
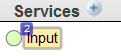
Also, the area above the diagram shows a drop-down list that you can use to select the specific item to work with:
By default, the enabled version is selected. If no host is enabled, the selected version is the first business host that you added.
-
Use the Item list to select the version that you want to configure. Specify configuration details as usual and apply them.
-
Repeat if needed.
To understand why this is useful, consider the following: when testing or troubleshooting the production you might want to send messages by typing them at the console command line, or by reading data from files. But when running the production, you might intend for these messages to arrive from an external application via a TCP connection. Each means of obtaining input for the production requires a different business service host class.