Converting Interfaces to Ensemble
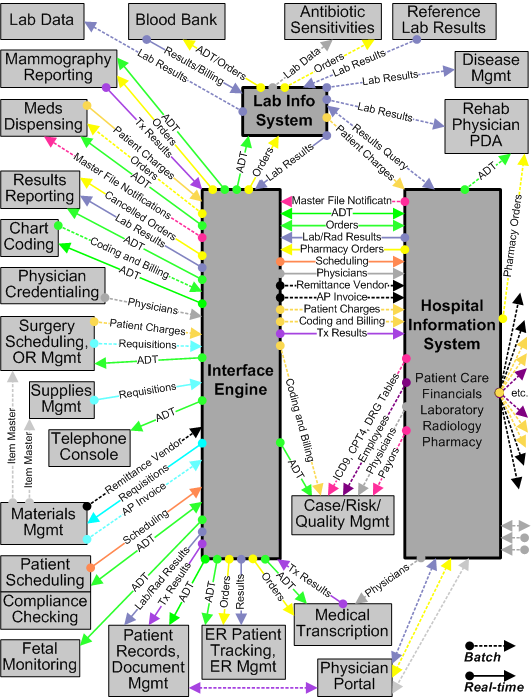
The following diagram shows some of the information technology required to run a typical hospital. The diagram reflects the complex challenges faced by hospital IT staff. In the diagram, the various end-user applications exchange HL7 messages with the lab information system and hospital information system (HIS). An interface engine routes HL7 messages between the systems. Not all hospital applications are shown; the focus is on the HL7 messages that enter and leave the interface engine.
This chapter assumes that for each clinical application, you might need to define both inbound and outbound interfaces. The figure illustrates this by providing a circle at the source of each type of message and an arrow at each destination. Various combinations of inbound and outbound interfaces are shown. Within this chapter, an interface is inbound or outbound relative to the clinical application. An inbound interface receives messages from the HIS or lab system via the interface engine. An outbound interface sends messages to the HIS or lab system via the interface engine. Other interfaces within the hospital IT configuration are outside the scope of this chapter, even if they appear in the diagram.
In the diagram, solid arrows represent real-time information exchange; dotted arrows represent batch transmissions. Variations in arrow color highlight the different categories of data: green for admitting, yellow for pharmacy, gold for patients, orange for scheduling, pink for master file notifications, purple for transactions, aqua for requisitions, blue for laboratory, gray for physicians, and black for vendors.
Often when you bring Ensemble into such a configuration, it is for the purpose of replacing an existing interface engine with Ensemble. In order to do this you must:
-
Use an Ensemble production as a routing engine, as described in previous chapters.
-
Convert each of the existing interfaces to use the Ensemble routing engine instead of the previous interface engine.
-
Once all of the interfaces are converted, remove the previous interface engine from the configuration.
The conversion approach in this chapter leaves the existing interface engine in place and converts the interfaces one by one to use Ensemble. Unconverted interfaces continue to use the previous engine while you test and confirm that the new interface works properly using Ensemble. As soon as the converted interface works correctly, you begin work on the next unconverted interface. This incremental change policy ensures the best chance of uninterrupted, error-free service during the conversion.
You could take an approach that converts groups of related interfaces at the same time. That is, you could decide to convert all of the interfaces that convey messages to and from the Blood Bank application, then move on to Fetal Monitoring. Still, you may find that the work boils down to converting one interface at a time.
This chapter explains how to convert one existing HL7 interface to use Ensemble. The general steps are as follows. Each section of this chapter describes one of these steps in detail:
The procedure in this chapter reverses the order in which you would usually describe an Ensemble production. (“An HL7 business service receives an incoming message...”) However, experience with interface conversion shows that if you develop the elements top-down, beginning with the business service and working down to the custom schema, you must often backtrack to previous steps to fill in or correct the names of the lower-level items, in the various forms where you have configured higher-level items.
The procedure in this chapter takes a bottom-up approach, reducing backtracking to a minimum by creating the lower-level items first, so that their names are known when it is time to configure the higher-level items. Bottom-up order works as shown in this chapter: Steps 1 and 2; Steps 3, 4, 5, 6, 7, 8; Steps 9 and 10.
You might have success performing this procedure in top-down order, especially if you have well-established naming conventions, which reduce simple errors. Top-down order works as follows: Steps 1 and 2; Steps 8, 7, 6, 5, 4, 3; Steps 9 and 10.
Backing Up the Production
The following steps outline a general-purpose backup procedure for Ensemble productions that use HL7. The exact steps will vary depending on your packaging and naming conventions for Ensemble classes, custom classes, routing rules, and custom HL7 category definitions.
Regarding XML backup files: If you use a UNIX® system, never FTP a backup XML file in binary mode. Regular FTP will convert this file from DOS to UNIX® properly, but binary FTP might not.
Backup from Studio
To perform a full backup from Studio:
-
Start Studio and change to the namespace that you are backing up.
-
Export your own package(s) of classes from Studio. This should export all of your business service, business process, business operation, data transformation, and utility classes. To back up a package:
-
Select the package name in the Workspace window
-
Right-click and select Export from the context menu.
-
Select the Export in XML format check box, choose an appropriate file name, and click OK.
If necessary, rather than choosing a package you can select individual classes for export from Studio:
-
Select Tools and Export, then click Add.
-
Choose Files of type All Files, enter File name *.cls, then click Open.
-
Select your classes from the list and click Open to add them to the Export list.
-
Select the Export in XML format check box, choose an appropriate file name, and click OK.
-
-
Export your own business rules (File name *.rul).
-
Export your own Custom Schemas (File name *.hl7).
-
The resulting XML file(s) can be imported into any Ensemble-enabled namespace.
Backup from ObjectScript
The steps in the above procedure can be cumbersome if you need to repeat them often from Studio. You should code them into an ObjectScript method as soon as is convenient. The exact code will vary, depending on your packaging and naming conventions for Ensemble classes, custom classes (including data transformations), business rules, and custom category definitions. The general idea is that an ObjectScript version of this procedure would create a single master list of all items to be exported, and then export everything on the list to a single XML file, appropriately dated. In detail:
-
Use the $system.OBJ.GetPackageList method with the ObjectScript $ORDER or $O function to assemble a list of all classes (*.cls) in each of the packages of interest. The code for each package will look something like the following example for a custom package named Mutro:
  do $system.OBJ.GetPackageList(.tList,"Mutro","ars")
  set class="" for  {
    set class=$o(tList(class)) quit:class=""
    set tFullList(class_".cls")=""
  }
For more information about ObjectScript functions like $ORDER and $EXTRACT, see the “ObjectScript Functions” chapter in the Caché ObjectScript Reference.
-
Use the ^EnsHL7.Schema global and the ObjectScript functions $ORDER and $EXTRACT to assemble a list of all custom schemas (*.hl7) within the Ensemble-enabled namespace. In the following example, the list is easily created because the customer used a naming convention for custom schemas; all names start with the prefix Mutro_:
set cat="" for { set cat=$o(^EnsHL7.Schema(cat)) quit:cat="" if $e(cat,1,6)="Mutro_" set tFullList(cat_".hl7")="" } -
Set the output directory, create the XML filename using a time stamp, and export the files. Something like:
 ; Normalize the directory name and figure the file name
 if pDir'="" set pDir=$tr(pDir,"\","/")
 if $e(pDir,$l(pDir))'="/" set pDir=pDir_"/"
 for count=1:1  {
   set filename=pDir_"backup_"_$zdate($h,8)_"_"_count_".xml"
   quit:##class(%File).Exists(filename)=0
   }
 ;
 ; Export all the items on the list
 Set tSC=$system.OBJ.Export(.tFullList,pDir_"backup_"_$zdate($h,8)_".xml")
 Do:('tSC) $system.Status.DisplayError(tSC)
 ;
 Set tSC=$system.OBJ.Export(.tFullList,filename)
 Do:('tSC) $system.Status.DisplayError(tSC)
 ;
 write !,"Backup to file "_filename_" done.",!
The above example expects a parameter pDir to be passed to the method, but pDir can quite easily be set to a specific directory by the backup method. The example uses the ObjectScript functions $TRANSLATE, $EXTRACT, $ZDATE, and $HOROLOG as well as the %File.Exists() and $system.OBJ.Export() methods.
Describing the Interface
Each clinical application in use at the enterprise provides its own HL7 application specification document. The specification document explains which types of HL7 event the application can send (or receive), and which message segments and pieces of each segment the application sends (or expects) for these events. For example, for an MSH segment the HL7 application specification document shows exactly what the segment will look like, what will be hardcoded, what format will be used for strings, etc. The information is extremely detailed. The administrator of each clinical application can show you this document for his or her application.
The source and target applications each have an HL7 application specification document. However, any single interface between these applications, such as the interface that you are converting, uses a small subset of the possibilities listed in the specification document. Your best source for a description of an interface is actually the interface definition that you are replacing.
Open the existing interface definition (for example, in eGate, the collaboration rule). With this definition in view, open a text file and type into it a brief description of what the interface does. Do not try to reproduce the coding conventions of the existing definition (LOOP, CASE, etc.) in detail. Simply identify:
-
The message segments that you expect to arrive from the source
-
How the interface changes them before sending them to the target
In preparing a description of an interface that you are converting to Ensemble, it can be helpful to compare terminology between the technology you are replacing and Ensemble. As an example, the following table lists analogies between SeeBeyond and Ensemble terminology.
| SeeBeyond | Ensemble |
|---|---|
| Collaboration rule | Interface definition |
| COPY or DUPLICATE | <assign> statement in a DTL data transformation |
| DISPLAY | <trace> statement in a DTL data transformation |
| LOOP | <foreach> or the shorthand notation () in DTL |
| IF | <if> statement in a DTL data transformation |
| CASE | Routing rule |
| FUNCTION | Code in business services or business operations; also <code> |
| CHANGE-PATTERN | Text replacement using functions like $CHAR and $PIECE |
The Inbound Interface
Suppose you have a source application from which a variety of HL7 messages arrive. However, only ancillary orders are of interest, and then only for certain types of patients, certain types of orders, and when the message is genuine and not a test of the system. In describing which messages are of interest from this source, you might type something like:
Send only:
  Message Type "ORM_O01 "
  PV1:18 Patient Type = "ER" or "ECM" or "ERQ"
  ORC:1 Order Control = "NW" or "CA" or "OC"
  PID:5 Last Name not "TEST"
The Outbound Interface
How the interface changes these message segments, before sending them, depends on what the target application needs to receive. Based on your knowledge of the interface and the sources of information listed above, you might type something like:
Copy source MSH to target.
Set target MSH:11 Processing ID = "P".
Copy source MSH:10 Control ID to target MSH:13 Sequence Number.

Copy source PID to target.
Set target PID:1 Set ID = "1".
Copy source PID:2 Patient External ID
  to the 2nd repetition of target PID:3 Patient Internal ID and
  set its Identifier Type = "PI".
Null out target PID:2.

Copy source ORC to target.
If source ORC:1 Order Control = "CA" or "OC",
  then set target ORC:5 Order Status to "CA".
If source ORC:2.1 Placer Order Number is empty, then
  copy source ORC:3.1 Filler Order Number
  to target ORC:2.1 Placer Order Number and
  set target ORC:2.2 Placer Application = "ULTRA".
Set target ORC:3.2 Filler Application = "ULTRA".

Copy source OBR to target.
If source OBR:2.1 Placer Order Number is empty, then
  copy source OBR:3.1 Filler Order Number
  to target OBR:2.1 Placer Order Number and
  set target OBR:2.2 Placer Application = "ULTRA".
Set target OBR:3.2 Filler Application = "ULTRA".
Set target OBR:4.3 Coding Scheme (SIM Department) = "LAB".
Choosing Schema Categories
In this step, you must determine which HL7 schema will be used for the inbound and outbound sides of the interface. This begins with an approximate choice, which you refine by testing messages against that schema in the Management Portal.
Each clinical application has an HL7 application specification document that identifies the HL7 schema version that it uses when sending messages, and that it expects when receiving messages. You can confirm this version against the message data sent by the application. Its outgoing message MSH segment states an HL7 version number that (in theory) announces what HL7 version the application is using.
You may discover that neither source of information is strictly accurate. Clinical applications can update their HL7 versions at different times so that one application uses a new HL7 version and another does not. Applications can upgrade HL7 versions or add or change Z segments or without changing the contents of the MSH segment or documenting the change.
Choosing an Incoming Schema Category
Choose a schema category for the inbound side of the interface (as the message enters Ensemble via an HL7 business service) as follows:
-
Capture some sample messages from the source application in text files. You can use archived file copies of these messages, if you have them.
-
In the Management Portal, use the HL7 Schema Structures page to find an HL7 standard schema that seems to match the structure of the message segments you are interested in.
-
Use the Message Viewer page to test your text file messages against your chosen schema. Try different choices of schema until you find the standard schema that most closely matches your message structure.
Tip:Do not be concerned with the specific HL7 separator characters expected on each side of the interface. The HL7 business operation handles these appropriately.
-
The messages from the source application might contain extra segments that are not in the schema. If so, when you parse the messages using the Message Viewer option, the messages may either accept the message, or generate a bad message error, as follows:
-
If the message contains extra Z segments, and the schema defines those Z segments, the message is okay.
-
If the message contains extra Z segments, but the schema does not define any Z segments, the message is okay.
-
If the message contains extra Z segments, and the schema defines Z segments, but the Z segments found in the message do not match the Z segments in the schema, it is a bad message.
-
If the message contains extra non-Z segments, then regardless of Z segments, it is a bad message.
For background, see “Controlling Message Validation” in Ensemble Virtual Documents. For HL7 details, see the reference for the Validation setting in the Ensemble HL7 Version 2 Development Guide.
-
-
If the messages trigger one of the bad message error conditions, try choosing a different standard schema.
If that does not work, create a custom HL7 category definition to accommodate the nonstandard message structure. See “Creating Custom Schema Categories” in Ensemble Virtual Documents.
Choosing an Outgoing Schema Category
Repeat a similar procedure to choose a schema for the outbound interface.
Defining Routing Rule Sets
Create routing rule sets. For information, see “Defining Routing Rule Sets for HL7” in the Ensemble HL7 Version 2 Development Guide.
Creating Data Transformations
Create DTL data transformations. For information, see “Defining DTL Data Transformations for HL7” in the Ensemble HL7 Version 2 Development Guide.
Adding Business Operations
The business operation for an HL7 interface controls the outgoing message transmission to the target application. For information on adding HL7 business operations, see “Configuring the Production” in the Ensemble HL7 Version 2 Development Guide.
For testing purposes, it is useful to configure a production with two HL7 business operations that have the same configuration name:
-
One is an FTP or TCP business operation that controls the FTP or TCP transmission of HL7 messages across the interface when the production is running normally.
-
The other is a File business operation that sends HL7 messages to a file during testing or troubleshooting of the interface.
By Ensemble convention (the items have the same configured name) only one of these configuration items can be enabled at a time. Enable one or the other depending on whether you want a “test” environment (the File operation) or a “live” environment (the TCP or FTP operation).
The steps to create a “live” business operation and its “test” counterpart are as follows:
-
Examine the target application to see which separators it expects HL7 messages to contain.
-
Create the “live” (FTP or TCP) HL7 business operation.
-
Use similar steps to create a “test” (File) HL7 business operation.
Give the “test” (File) operation the same configuration Name as the “live” one.
-
Use the Enabled field to enable and disable the “live” (FTP or TCP) or “test” (File) versions of the business operation. Only one business service of the same name can be active at one time.
For additional details, see “Working with Multiple Versions of a Business Host” in Configuring Ensemble Productions.
Creating or Editing a Routing Process
To enable your new interface to work with the Ensemble routing engine, you must add a routing process to the production that:
-
Tells how to interpret data from the source (identifies a routing rule)
-
Tells where to send the interpreted data (identifies a business operation)
You can create a new HL7 routing process. For details, see “Configuring the Production” in the Ensemble HL7 Version 2 Development Guide.
Adding Business Services
The business service for an HL7 interface receives the incoming messages from the source application. For information on adding HL7 business services, see “Configuring the Production” in the Ensemble HL7 Version 2 Development Guide.
For testing purposes, it is useful to configure a production with two HL7 business services that have the same configuration name:
-
One is an FTP or TCP business service that receives HL7 messages from the source application via FTP or TCP when the production is running normally.
-
The other is a File business service that receives HL7 messages from a file during testing or troubleshooting of the interface.
By Ensemble convention (the items have the same configured name) only one of these configuration items can be enabled at a time. Enable one or the other depending on whether you want a “test” environment (the File service) or a “live” environment (the TCP or FTP service).
The steps to create a “live” business service and its “test” counterpart are as follows:
-
Create the “live” (FTP or TCP) HL7 business service.
-
Use similar steps to create a “test” (File) HL7 business service.
Give the “test” (File) service the same configuration Name as the “live” one.
-
Use the Enabled field to enable and disable the “live” (FTP or TCP) or “test” (File) versions of the business service. Only one business service of the same name can be active at one time.
For additional details, see “Working with Multiple Versions of a Business Host” in Configuring Ensemble Productions.
Testing the Interface
Generally you need to maintain a separate “test” production that is an exact copy of the production that runs “live” at your health facility. Develop the new Ensemble interface within the “test” production. When that is done, you can migrate a copy of the new interface to the “live” production.
To test a new interface:
-
Capture some sample messages from the source application in files.
-
In the “test” production, enable the File business service and the File business operation and send the messages as files.
-
Examine the resulting HL7 message data in the output files to see if it meets the requirements for the target application.
-
If necessary, adjust the interface elements and retest.
-
Selectively disable the “test” (File) versions and re-enable the “live” (FTP or TCP) versions of the business service and business operation, still within the “test” production.
Deploying the Interface
Once you have completed testing the Ensemble interface in the test production, it is time to add the new Ensemble interface elements to the production that you are running live. To do this:
-
Back up the complete live production as described in the first step of this procedure.
-
Export the new elements of the test production, created in the previous steps:
-
Export the new classes for the interface: business process, data transformation(s), business operations, business services, and any utility classes.
-
Export the business rule(s) *.rul
-
Export the custom schema(s) *.hl7
-
-
Copy the new XML <Item> elements that the new interface added to the XDATA section of the production class. For example:
Configuration Item Sample Start of <Item> Element Business service (Test) <Item name="App1toApp2_In" Business service (Live) <Item name="App1toApp2_In" Business process (if new) <Item name="App1toApp2" Business operation (Test) <Item name="App1toApp2_Out" Business operation (Live) <Item name="App1toApp2_Out" -
Transfer the new interface elements to the live production as follows:
-
Suspend or shut down the live production.
-
Import and compile the new classes, rules, and schema.
-
If your choice was to edit the ACTIONS string on the business process on the “live” system rather than importing the business process as a class, do so now. Compile the edited class.
-
Paste the new <Item> elements into the XDATA section of the production class. Compile the production class.
-
Resume or restart the live production.
-
-
Optionally, configure alerts for the new production elements:
-
HL7 business service and business operations have a configuration setting called Alert On Error. When Alert On Error is set to True, as soon as the item encounters any type of error condition it automatically triggers an alert. An alert writes a message to the Ensemble Event Log and can also send notification to a user via email or pager. Setting Alert On Error to False disables the option.
-
Alert Grace Period (for business services) and Alert Retry Grace Period (for business operations) provide useful constraints on the frequency of alerts when they are enabled.
Note:This procedure describes how to add interfaces to the “live” production one by one. Alerts are easy to configure as described in this step, once they have been set up. To set them up for the “test” or “live” production, see “Pager and Email Alerts” in the Ensemble HL7 Version 2 Development Guide.
-
-
Ensure that the new interface is processing all new messages.
-
Disable or clean up the previous interface technology:
-
Ensure that all previously pending requests are satisfied and all queues are empty.
-
Disable the old interface. For eGate elements, disable the “start automatically” option.
-