Add Global, Routine, and Package Mapping to a Namespace
Add Global, Routine, and Package Mapping to a Namespace
In addition to having access to the globals and routines in the mapped database, you can also map globals, routines, and class packages from other databases on the same or different systems. This allows simple references to data which can exist anywhere and is the primary feature of a namespace. You can map whole globals or pieces of globals; this feature allows data to easily span disks. For more information about mapping globals, routines, and packages, see the “Useful Skills to Learn” chapter of the Caché Programming Orientation Guide.
Mappings are sorted alphabetically; if subscripts are specified, they are sorted by name and subscript. See the “Global Structure” chapter of the Using Caché Globals guide).
Click the appropriate choice to begin mapping:
The following is a schematic diagram of how mapping works in a sample airline reservation application:
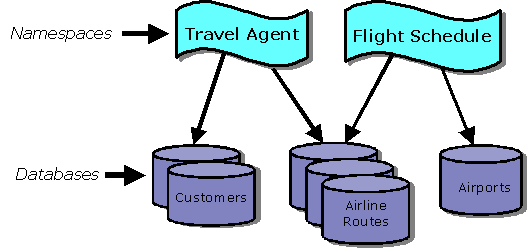
Data and programs are stored in Caché databases, the physical storage locations, and referred to by namespaces, the logical references.
If there is mapped content with the same identifier as local content (such as a package, class, global, or routine name), the mapped content will be visible, rather than the local content. As such, you should be as specific with your mappings as possible, to prevent mapping away from existing content.
To avoid unwanted conflicts, follow Rules and Guidelines for Identifiers when naming content and creating mappings.
Global Mappings
You can add a mapping for a new global to your namespace at the global and global subscript level that overrides the default database mapping for globals of the namespace:
-
Navigate to the Namespaces page (System Administration > Configuration > System Configuration > Namespaces) and click Global Mappings in the row of the namespace where you want to map the global.
-
From the Global Mappings page click New Global Mapping.
-
Select the Global database location database where the global is located.
-
Enter the Global name. You can use the * character as part of the global name to specify multiple globals, for example ABC*.
-
Enter the Global subscripts to be mapped. The subscript reference must begin with an open parenthesis. Some examples follow:
(1) ("A") (1):(5) ("A"):("Z") ("B",23,"m"):("E",5) (BEGIN):("X") ("Y"):(END)Note:When specifying a range (for example, ("A"):("Z"), the range is “from-to” (not “from-through”) the specified subscripts; that is, the lower end of a defined subscript range is inclusive, while the upper end of the defined subscript range is exclusive. For example, Name (1):(10) includes Name (1) but does not include Name (10); the exclusive upper range allows you to have a defined upper boundary when working with subscripted ranges, such as Name ("a"):("b"), where Name ("aa") and Name ("aaaaa") are equally valid ranges to precede Name ("b").
You can use the reserved words BEGIN and END to refer to the first and last possible subscripts; however, you cannot use the asterisk (*) wildcard with subscripted globals because global subscripts must be mapped individually.
For more information about subscript-level mapping (SLM) ranges, see Setting Global Mappings in the “Global Structure” chapter of Using Caché Globals.
-
Click Advanced to display the following:
-
Select the Collation. Collation applies only to new subscript-level mapping globals.
-
Select the Lock Database Location. For more information see Global in the “[Map]” section of the Caché Parameter File Reference.
-
-
Click OK.
Note:>> displayed in the first column of the new mappings row indicates that you opened the mapping for editing.
-
To save the mappings in the cpf file, click Save Changes.
While it is possible to add a mapping changing the database location of an existing global, this does not actually move the global. As a consequence, the global becomes inaccessible, as it remains in the original database while the namespace expects to find it in the newly mapped database. For a new mapping for an existing global to be successful, you must relocate the global manually, for example using Terminal or Studio, by creating it on the new database and removing it from the original database.
Routine Mappings
You can add mappings to your namespace at the routine level that overrides the default database mapping for routines of the namespace:
-
Navigate to the Namespaces page (System Administration > Configuration > System Configuration > Namespaces) and click Routine Mappings in the row of the namespace where you want to map the global.
-
From the Routine Mappings page, click New Routine Mapping.
-
Select the Routine database location database where the routine is located.
-
Enter the Routine name. The routine does not have to exist when you map it (that is, it can be the name of a routine you plan to create).
-
Click OK.
Note:>> displayed in the first column of the new mappings row indicates that you opened the mapping for editing.
-
To save the mappings in the cpf file, click Save Changes.
For example, using the preceding Sample Namespace Mapping example, if you plan to create a schedule routine (for example, BOSZZairline) in the airports database (in the FlightSchedule namespace) and you want it to be available to users in the TravelAgent namespace, navigate to the Routine Mappings page (in the TravelAgent namespace row), then click New Routine Mapping. Enter the information as shown in the following Routine Mapping dialog box:
When you map one or more routines, be sure to identify all the code and data needed by those routines, and ensure that all that code and data is available in all the target namespaces. The mapped routines could depend on the following items:
-
Include files
-
Other routines
-
Classes
-
Tables
-
Globals
Use additional routine, package, and global mappings as needed to ensure that these items are available in the target namespaces.
Package Mappings
You can add a class package mappings which makes all the classes within a package (and all the generated routines for those classes) in a specific database visible to another namespace:
-
Navigate to the Namespaces page (System Administration > Configuration > System Configuration > Namespaces) and click Package Mappings in the row of the namespace where you want to map the package.
-
From the Package Mappings page, click New.
-
Select the Package database location database where the package is located.
-
Select the Package name. The package does not have to exist when you map it (that is, it can be the name of a package you plan to create); you can specify a new package name, as follows:
-
Click New Package.
-
In the New package name text box, enter a name.
-
-
Click OK.
Note:>> displayed in the first column of the new mappings row indicates that you opened the mapping for editing.
-
To save the mappings in the cpf file, click Save Changes.
See the Package Mapping section in the “Packages” chapter of Using Caché Objects for a description of packages and the procedure for mapping them.
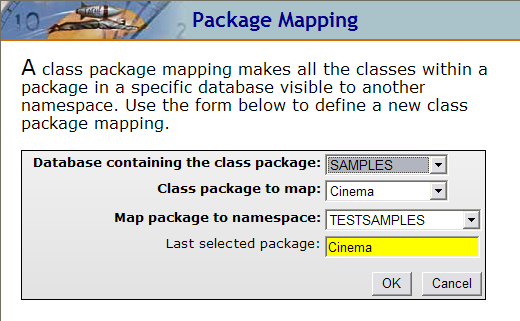
For example, to make the class definitions in the Cinema package of the SAMPLES database available in the TESTSAMPLES namespace, navigate to the Package Mappings page and click New Package Mapping. Enter the information as shown in the following Package Mapping dialog box:
When you map a package, be sure to identify all the code and data needed by the classes in that package, and ensure that all that code and data is available in all the target namespaces. The mapped classes could depend on the following items:
-
Include files
-
Routines
-
Other classes
-
Tables
-
Globals
Use additional routine, package, and global mappings as needed to ensure that these items are available in the target namespaces.
Mapping Data to All Namespaces
In addition to mapping globals, routines, and packages to specific namespaces, you can map them to all namespaces. To enable this form of mapping:
-
First, create a namespace named %ALL, as described in the Create/Modify a Namespace section.
Note:%ALL is not visible except for the purposes of mapping data; that is, it is not a real namespace, but a mechanism for mapping data to all namespaces (except DOCBOOK and SAMPLES).
-
Then, make the desired mappings in the %ALL namespace, as described in the Add Global, Routine, and Package Mapping to a Namespace section.
Note:For mappings in the DOCBOOK and SAMPLES namespaces, you must create the mappings separately.
These %ALL mappings apply in all namespaces. You cannot create namespace-specific mappings to resources that are mapped in the %ALL namespace, as %ALL mappings override any namespace-specific mappings to the same resource.
%ALL mappings apply to every namespace, including %SYS. It is possible to break certain features by creating a mapping that overrides a routine or global the instance relies on.
You should create mappings as narrowly as possible when using %ALL. Additionally, closely follow the Rules and Guidelines for Identifies; in particular, do not create %ALL mappings for any globals listed in Global Names to Avoid.
When you create a subscript-level mapping in the %ALL namespace, a mapping for the root global is automatically created to %DEFAULTDB. The %DEFAULTDB variable represents the default database for any given namespace.