Defining and Building Indices
This chapter describes how to define and build indices on field values within tables. It includes the following topics:
Overview: index types and attributes.
Data Access:
-
Automatically-Defined Indices for Unique and Primary Key constraints
Defining Indices:
Performing Operations on Indices:
This chapter describes how to define and build indices. It does not describe which fields to index or how to analyze the effectiveness of defined indices. See “What to Index” for information on which fields to index to optimize performance of specific queries. See “Index Usage Analysis” for tools to analyze index usage for all queries in the current namespace.
Overview
An index is a structure maintained by a persistent class that Caché can use to optimize queries and other operations.
You can define an index on the values of a field within a table, or the corresponding property within a class. (You can also define an index on the combined values of several fields/properties.) The same index is created, regardless of whether you defined it using SQL field and table syntax, or class property syntax. Caché automatically defines indices when certain types of fields (properties) are defined. You can define additional indices on any field in which data is stored or for which data can be reliably derived. Caché provides several types of indices. You can define more than one index for the same field (property), providing indices of different types for different purposes.
Caché populates and maintains indices (by default) whenever a data insert, update, or delete operation is carried out against the database, whether using SQL field and table syntax, or class property syntax. You can override this default (by using the %NOINDEX keyword) to rapidly make changes to the data, and then build or rebuild the corresponding index as a separate operation. You can define indices before populating a table with data. You can also define indices for a table that is already populated with data and then populate (build) the index as a separate operation.
Caché makes use of available indices when preparing and executing SQL queries. By default it selects which indices to use to optimize query performance. You can override this default to prevent the use of one or more indices for a specific query or for all queries, as appropriate. For information about optimizing index usage, refer to the Using Indices section of the “Optimizing Query Performance” chapter of this book.
Index Attributes
Every index has a unique name. This name is used for database administrative purposes (reporting, index building, dropping indices, and so on). Like other SQL entities, an index has both an SQL index name and a corresponding index property name; these names differ in permitted characters, case-sensitivity, and maximum length. If defined using the SQL CREATE INDEX command, the system generates a corresponding index property name. If defined using a persistent class definition, the SqlName keyword allows the user to specify a different SQL index name. The Management Portal SQL interface Catalog Details displays the SQL index name (SQL Map Name) and the corresponding index property name (Index Name) for each index.
The index type is defined by two index class keywords, Type and Extent. The types of indices available with Caché include:
-
Standard Indices (Type = index) — A persistent array that associates the indexed value(s) with the RowID(s) of the row(s) that contains the value(s). Any index not explicitly defined as a bitmap index, bitslice index, or extent index is a standard index.
-
Bitmap Indices (Type = bitmap) — A special kind of index that uses a series of bitstrings to represent the set of object ID values that correspond to a given indexed value; Caché includes a number of performance optimizations for bitmap indices.
-
Bitslice Indices (Type = bitslice) — A special kind of index that enables very fast evaluation of certain expressions, such as sums and range conditions. Certain SQL queries automatically use bitslice indices.
-
Extent Indices — An index of all of the objects in an extent. For more information, see the Extent index keyword page in the Caché Class Definition Reference.
The maximum number of indices for a table (class) is 400.
Storage Type and Indices
The index functionality described here applies to data stored in a persistent class.
Caché SQL supports index functionality for data stored using the Caché default storage structure: %CacheStorage (CacheStorage-mapped classes).
Caché SQL also supports index functionality for data stored using %CacheSQLStorage (CacheSQLStorage-mapped classes). You can define an index for a CacheSQLStorage-mapped class using a functional index type. The index is defined in the same manner as an index in a class using default storage, with the following special considerations:
-
The class must define the IdKey functional index, if it is not automatically system assigned.
-
This functional index must be defined as an INDEX.
Refer to %Library.FunctionalIndexOpens in a new tab for further details.
Note that the %CacheStorageOpens in a new tab and %CacheSQLStorageOpens in a new tab class methods should not be called directly. Instead, you should invoke index functionality using the %PersistentOpens in a new tab class methods and the operations described in this chapter.
Index Global Names
The subscripted global used to store index data is generated using one of two strategies:
-
%CLASSPARAMETER USEEXTENTSETOpens in a new tab=0 uses a global naming strategy that creates “traditional” global names, consisting of a user-specified name, an appended letter code, and the name of the index. These global names are comprehensible to the user, but can be long and are less efficient than hashed global names.
-
If USEEXTENTSET=0 and DEFAULTGLOBAL is not specified, the following example describes the generated global names: the Sample.MyTest persistent class would define a Master Map global named ^Sample.MyTestD a Bitmap Extent index global name ^Sample.MyTestI("$MyTest") (or ^Sample.MyTestI("DDLBEIndex")), and for the defined index NameIDX, it defines a global named ^Sample.MyTestI("NameIDX"). Note that these globals specify the persistent class name (which is case-sensitive), not the SQL table name. For a full list of the appended letter codes, refer to the DEFAULTGLOBALOpens in a new tab parameter of the %Library.PersistentOpens in a new tab class.
-
If USEEXTENTSET=0 and DEFAULTGLOBALOpens in a new tab is specified, the specified global name is substituted for the persistent class name. This allows you to specify a name that is shorter or clearer than the persistent class name. For example, if DEFAULTGLOBAL="^MyGlobal" the globals would have names such as the following: ^MyGlobalD and ^MyGlobalI("NameIDX").
-
-
%CLASSPARAMETER USEEXTENTSETOpens in a new tab=1 uses a global naming strategy that creates hashed global names. This involves hashing the package name, hashing the class name, then appending a dot and a sequential integer suffix that identifies the index. These global names are less comprehensible to the user, but tend to be shorter and more efficient.
The integer suffix is keyed solely to the index name; the field(s) associated with the index name and the index type have no effect on integer numbering. For example, ^EW3K.CgZk.1 is the Master Map, ^EW3K.CgZk.2 is the Bitmap Extent, ^EW3K.CgZk.3 is a defined standard index NameIDX for the LastName field, and ^EW3K.CgZk.4 is the defined index WorkIdIDX. If you delete NameIDX the global ^EW3K.CgZk.3 is deleted, creating a gap in the integer sequence. If you define LNameIDX for the LastName field, the global ^EW3K.CgZk.5 is created; however, if you later create bitmap index NameIDX for the FullName field, the index global will again be ^EW3K.CgZk.3. For further details on this index global naming convention, refer to the USEEXTENTSETOpens in a new tab parameter of the %Library.PersistentOpens in a new tab class.
-
If USEEXTENTSET=1 and DEFAULTGLOBAL is not specified, the package name and class name are hashed, as described above. The sequential integer suffix is appended.
-
If USEEXTENTSET=1 and DEFAULTGLOBAL is specified, the DEFAULTGLOBAL name is used rather than the hashed package name and class name. The sequential integer suffix is appended. For example, if DEFAULTGLOBAL="^MyGlobal" the globals would have names such as the following: ^MyGlobal.1 and ^MyGlobal.3.
-
If you use the CREATE TABLE command to define a table, USEEXTENTSETOpens in a new tab defaults to 1. Therefore, by default, CREATE TABLE creates hashed global names. This default behavior can be changed using the %CLASSPARAMETER keyword and the USEEXTENTSET and DEFAULTGLOBAL parameters. You can change the system-wide default using the SetDDLUseExtentSet()Opens in a new tab method.
If you define a persistent class that is projected to a table, USEEXTENTSETOpens in a new tab defaults to 0. Therefore, by default, traditional global names are used.
DEFAULTGLOBAL, if defined, serves as a default value. If the ExtentLocation, DataLocation, or IndexLocation storage keywords are defined, those values are used rather than the defaults described above. For further details, refer to Hashed Global Names in the “Introduction to Persistent Objects” chapter of Defining and Using Classes.
You can supply the global name to ZWRITE to display the index data.
Master Map
The system automatically defines a Master Map (Data/Master) for every table. The Master Map is not an index, it is a map that directly accesses the data itself using its map subscript field(s). By default, the master map subscript field is the system-defined RowID field. By default, this direct data access using the RowID field is represented with the SQL Map Name IDKEY.
By default, a user-defined primary key is not the IDKEY. This is because Master Map lookup using RowID integers is almost always more efficient than lookup by primary key values. However, if you specify that the primary key is the IDKEY, the primary key index is defined as the Master Map for the table and SQL Map Name is the primary key index name.
For a single-field primary key/IDKEY, the primary key index is the Master Map, but the Master Map data access column remains the RowID. This is because there is a one-to-one match between a record’s unique primary key field value and its RowID value, and RowID is the presumed more efficient lookup. For a multi-field primary key/IDKEY, the Master Map is given the primary key index name, and the Master Map data access columns are the primary key fields.
You can view the Master Map definition through the Management Portal SQL Catalog Details tab.
For SQL and default storage, the Master Map data is stored in a global named ^package.classnameD. Note that this global name specifies the persistent class name, not the corresponding SQL table name, and that the global name is case-sensitive. You can use ZWRITE to display the Master Map data.
Data access using a Master Map is inefficient, especially for large tables. For this reason, it is recommended that the user define indices that can be used to access data fields specified in WHERE conditions, JOIN operations, and other operations.
Automatically-Defined Indices
The system automatically defines certain indices when you define a table. The following indices are automatically generated when you define a table and populated when you add or modify table data. If you define:
-
A primary key that is not an IDKEY, the system generates a corresponding index of type Unique. The name of the primary key index may be user-specified or derived from the name of the table. For example, if you define an unnamed primary key, the corresponding index will be named tablenamePKEY#, where # is a sequential integer for each unique and primary key constraint.
-
A UNIQUE field, Caché generates an index for each UNIQUE field with the name tablenameUNIQUE#, where # is a sequential integer for each unique and primary key constraint.
-
A UNIQUE constraint, the system generates an index for each UNIQUE constraint with the specified name, indexing the fields that together define a unique value.
You can view these indices through the Management Portal SQL Catalog Details tab. The CREATE INDEX command can be used to add a UNIQUE field constraint; the DROP INDEX command can be used to remove a UNIQUE field constraint.
By default, the system generates the IDKEY index on the RowID field. Defining an IDENTITY field does not generate an index. However, if you define an IDENTITY field and make that field the primary key, Caché defines the IdKey index on the IDENTITY field and makes it the primary key index. This is shown in the following example:
CREATE TABLE Sample.MyStudents (
           FirstName VARCHAR(12),
           LastName VARCHAR(12),
           StudentID IDENTITY,
           CONSTRAINT StudentPK PRIMARY KEY (StudentID) )
Similarly, if you define an IDENTITY field and give that field a UNIQUE constraint, Caché explicitly defines an IdKey/Unique index on the IDENTITY field. This is shown in the following example:
CREATE TABLE Sample.MyStudents (
           FirstName VARCHAR(12),
           LastName VARCHAR(12),
           StudentID IDENTITY,
           CONSTRAINT StudentU UNIQUE (StudentID) )
These IDENTITY indexing operations only occur when there is no explicitly defined IdKey index and the table contains no data.
Bitmap Extent Index
A bitmap extent index is a bitmap index for the rows of the table, not for any specified field of the table. In a bitmap extent index, each bit represents a sequential RowID integer value, and the value of each bit specifies whether or not the corresponding row exists. InterSystems SQL uses this index to improve performance of COUNT(*), which returns the number of records (rows) in the table. A table can have, at most, one bitmap extent index. Attempting to create more than one bitmap extent index results in an SQLCODE -400 error with the %msg ERROR #5445: Multiple Extent indices defined: DDLBEIndex.
All tables defined using CREATE TABLE automatically define a bitmap extent index. This automatically-generated index is assigned the Index Name DDLBEIndex and the SQL MapName %%DDLBEIndex. A table defined as a class may have a bitmap extent index defined with an Index Name and SQL MapName of $ClassName (where ClassName is the name of the table’s persistent class.)
You can use the CREATE INDEX command with the BITMAPEXTENT keyword to add a bitmap extent index to a table, or to rename an automatically-generated bitmap extent index. For further details, refer to CREATE INDEX.
You can view a table’s bitmap extent index through the Management Portal SQL Catalog Details tab. Though a table can have only one bitmap extent index, a table that inherits from another table is listed with both its own bitmap extent index and the bitmap extent index of the table it extends from. For example, the Sample.Employee table extends the Sample.Person table; in the Catalog Details Maps/IndicesSample.Employee lists both a $Employee and $Person bitmap extent index.
In a table that undergoes many DELETE operations the storage for a bitmap extent index can gradually become less efficient. You can rebuild a Bitmap Extent index from the Management Portal by selecting the table’s Catalog Details tab, Maps/Indices option and selecting Rebuild Index.
The %SYS.Maint.BitmapOpens in a new tab utility methods compress the bitmap extent index, as well as bitmap indices and bitslice indices. For further details, see “Maintaining Bitmap Indices”.
Invoking the %BuildIndices() method builds an existing bitmap extent index in any of the following cases: the %BuildIndices() pIndexList argument is not specified (build all defined indices); pIndexList specifies the bitmap extent index by name; or pIndexList specifies any defined bitmap index. See “Building Indices Programmatically”.
Defining Indices
There are two ways to define indices:
-
Defining Indices Using a Class Definition, which includes:
Defining Indices Using a Class Definition
Within Studio, you can add index definitions to a %Persistent class definition using either the New Index Wizard or by editing the text of the class definition. An index is defined on one or more index property expressions optionally followed by one or more optional index keywords. It takes the form:
INDEX index_name ON index_property_expression_list [index_keyword_list];
where:
-
index_name is a valid identifier.
-
index_property_expression_list is a list of the one or more comma-separated property expressions that serve as the basis for the index.
-
index_keyword_list is an optional comma-separated list of index keywords, enclosed in square brackets. Used to specify the index Type for a bitmap or bitslice index. Also used to specify a Unique, IdKey, or PrimaryKey index. (An IdKey or PrimaryKey index is, by definition, also a Unique index.) The complete list of index keywords appears in the Caché Class Definition Reference.
The index_property_expression_list argument consists of one or more index property expressions. An index property expression consists of:
-
The name of the property to be indexed.
-
An optional (ELEMENTS) or (KEYS) expression, which provide a means of indexing on collection subvalues. If the index property is not a collection, the user can use the BuildValueArray() method to produce an array containing keys and elements. For more information on keys and elements, see the “Indexing Collections” section.
-
An optional collation expression. This consists of a collation name followed optionally by a list of one or more comma-separated collation parameters. You cannot specify an index collation for a Unique, IdKey, or PrimaryKey index. A Unique or PrimaryKey index takes its collation from the property (field) that is being indexing. An IdKey index is always EXACT collation. For a list of valid collation names, see the “Collation Types” section of the “Collation” chapter of Using Caché SQL.
For example, the following class definition defines two properties and an index based on each of them:
Class MyApp.Student Extends %Persistent [DdlAllowed]
{
 Property Name As %String;
 Property GPA As %Decimal;

 Index NameIDX On Name;
 Index GPAIDX On GPA;
}
A more complex index definition might be:
Index Index1 On (Property1 As SQLUPPER(77), Property2 AS EXACT);Properties That Can Be Indexed
The only properties that can be indexed are:
-
Those that are stored in the database
-
Those that can be reliably derived from stored properties
A property that can be reliably derived (and is not stored) must be defined with the SQLComputed keyword as true; the code specified by SQLComputeCode must be the only way to derive the property’s value and the property cannot be set directly.
If it is possible to directly set the value of a derived property, such as is the case of a simple (non-collection) property defined as Transient and not also defined as Calculated, then directly setting the property’s value overrides the computation defined in SQLComputeCode and the value cannot be derived reliably from stored properties; this type of derived property is referred to as nondeterministic. (The Calculated keyword actually means that no instance memory is allocated.) The general rule is that only derived properties defined as Calculated and SQLComputed can be indexed. There is, however, an exception for derived collections: a collection that is derived (SQLComputed) and is Transient (not stored) and is not also defined as Calculated (meaning no instance memory) can be indexed.
There must not be a sequential pair of vertical bars (||) within the values of any property used by an IdKey index, unless that property is a valid reference to an instance of a persistent class. This restriction is required by the Caché SQL internal mechanism. The use of || in IdKey properties can result in unpredictable behavior.
Indices on Multiple Properties
You can define indices on combinations of two or more properties (fields). Within a class definition, use the On clause of the index definition to specify a list of properties, such as:
Class MyApp.Employee Extends %Persistent [DdlAllowed]
{
 Property Name As %String;
 Property Salary As %Integer;
 Property State As %String(MAXLEN=2);

 Index MainIDX On(State,Salary);
}
An index on multiple properties may be useful if you need to perform queries that use a combination of field values, such as:
SELECT Name,State,Salary
  FROM Employee
  ORDER BY State,Salary
Index Collation
A Unique, PrimaryKey, or IdKey index cannot specify a collation type. For other types of indices, each property specified in an index definition can optionally have a collation type. The index collation type should match the property (field) collation type when the index is applied.
-
If an index definition includes an explicitly specified collation for a property, the index uses that collation.
-
If an index definition does not include an explicitly specified collation for a property, the index uses the collation explicitly specified in the property definition.
-
If the property definition does not include an explicitly specified collation, then the index uses the collation that is the default for the property data type.
For example, the Name property is defined as a string, and therefore has, by default, SQLUPPER collation. If you define an index on Name, it takes, by default, the property’s collation, and the index would also be defined with SQLUPPER. The property collation and the index collation match.
However, if a comparison applies a different collation, for example, WHERE %EXACT(Name)=%EXACT(:invar), the property collation type in this usage no longer matches the index collation type. A mismatch between the property comparison collation type and the index collation type may cause the index to not be used. Therefore, in this case, you might wish to define the index for the Name property with collation EXACT. If an ON clause of a JOIN statement specifies a collation type, for example, FROM Table1 LEFT JOIN Table2 ON %EXACT(Table1.Name) = %EXACT(Table2.Name), a mismatch between the property collation type specified here and the index collation type may cause Caché to not use the index.
The following rules govern collation matches between an index and a property:
-
Matching collation types always maximize use of an index.
-
A mismatch of collation types, where the property is specified with EXACT collation (as shown above) and the index has some other collation allow the index to be used, but its use is less effective than matching collation types.
-
A mismatch of collation types, where the property collation is not EXACT and the property collation does not match the index collation, causes the index to not be used.
To explicitly specify a collation for a property in an index definition, the syntax is:
Index IndexName On PropertyName As CollationName;
where
-
IndexName is the name of the index
-
PropertyName is the property being indexed
-
CollationName is the type of collation being used for the index
For example:
Index NameIDX On Name As Exact;Different properties can have different collation types. For example, in the following example the F1 property uses SQLUPPER collation while F2 uses EXACT collation:
Index Index1 On (F1 As SQLUPPER, F2 As EXACT);For a list of recommended collation types, see the “Collation Types” section of the “Collation” chapter of Using Caché SQL.
An index specified as Unique, PrimaryKey, or IdKey cannot specify an index collation. The index takes its collation from the property collations.
Using the Unique, PrimaryKey, and IdKey Keywords with Indices
As is typical with SQL, Caché supports the notions of a unique key and a primary key. Caché also has the ability to define an ID key, which is one that is a unique record ID for the instance of a class (row of a table). These features are implemented through the Unique, PrimaryKey, and IdKey keywords:
-
Unique — Defines a UNIQUE constraint on the properties listed in the index’s list of properties. That is, only a unique data value for this property (field) can be indexed. Uniqueness is determined based on the property’s collation. For example, if the property collation is EXACT, values that differ in letter case are unique; if the property collation is SQLUPPER, values that differ in letter case are not unique. However, note that the uniqueness of indices is not checked for properties that are undefined. In accordance with the SQL standard, an undefined property is always treated as unique.
-
PrimaryKey — Defines a PRIMARY KEY constraint on the properties listed in the index’s list of properties.
-
IdKey — Defines a unique constraint and specifies which properties are used to define the unique identity of an instance (row). An IdKey always has EXACT collation, even when it is of data type string.
Note:Every class/table has an ID key. If it is not defined explicitly (such as with an index IdKey), the system generates an ID key value automatically.
The syntax of such keywords appears in the following example:
Class MyApp.SampleTable Extends %Persistent [DdlAllowed]
{
  Property Prop1 As %String;
  Property Prop2 As %String;
  Property Prop3 As %String;

  Index Prop1IDX on Prop1 [ Unique ];
  Index Prop2IDX on Prop2 [ PrimaryKey ];
  Index Prop3IDX on Prop3 [ IdKey ];
}The IdKey, PrimaryKey, and Unique keywords are only valid with standard indices. You cannot use them with bitmap or bitslice indices.
It is also valid syntax to specify both the IdKey and PrimaryKey keywords together, such as:
Index IDPKIDX on Prop4 [ IdKey, PrimaryKey ];This syntax specifies that the IDPKIDX index is both the IdKey for the class (table), as well as its primary key. All other combinations of these keywords are redundant.
For any index defined with one of these keywords, there is a method that allows you to open the instance of the class where the properties associated with the index have particular values; for more information, see the “Opening an Instance by Index Key” section.
For more information on the IdKey keyword, see the IdKey page of the Caché Class Definition Reference. For more information on the PrimaryKey keyword, see the PrimaryKey page of the Caché Class Definition Reference. For more information on the Unique keyword, see the Unique page of the Caché Class Definition Reference.
Defining iFind Indices
You can define iFind indices in a table class definition as follows:
Class Sample.TextBooks Extends %Persistent [DdlAllowed]
{
 Property BookName As %String;
 Property SampleText As %String(MAXLEN=5000);

 Index NameIDX On BookName [ IdKey ];
 Index ifindIDXB On (SampleText) As %iFind.Index.Basic;
 Index ifindIDXS On (SampleText) As %iFind.Index.Semantic;
 Index ifindIDXA On (SampleText) As %iFind.Index.Analytic;
}
For further details refer to iFind Search Tool.
Storing Data with Indices
You can specify that a copy of one or more data values be stored within an index using the index Data keyword:
Class Sample.Person Extends %Persistent [DdlAllowed]
{
 Property Name As %String;
 Property SSN As %String(MAXLEN=20);

 Index NameIDX On Name [Data = Name];
}
In this case, the index, NameIDX, is subscripted by the collated (uppercase) value of the various Name values. A copy of the actual (uncollated) value of the Name is stored within the index. These copies are maintained when changes are made to the Sample.PersonOpens in a new tab table through SQL or to corresponding the Sample.PersonOpens in a new tab class or its instances through objects.
Maintaining a copy of data along within an index can be helpful in cases where you frequently perform selective (selecting a few rows out of many) or ordered searches that return a few columns out of many.
For example, consider the following query against the Sample.PersonOpens in a new tab table:
SELECT Name FROM Sample.Person ORDER BY NameThe SQL Engine could decide to satisfy this request entirely by reading from the NameIDX and never reading the master data for the table.
You cannot store data values with a bitmap index.
Indexing a NULL
If the data has a NULL (no data present) for an indexed field, the corresponding index represents this using an index null marker. By default, the index null marker value is -1E14. Use of an index null marker provides that null values collate before all non-null values.
The %Library.BigIntOpens in a new tab data type can potentially store small negative numbers less than -1E14. By default, the %BigInt index null marker value is -1E14, and is therefore compatible with existing %BigInt indices. If indexed %BigInt data values are likely to include these extremely small negative numbers, you can change the index null marker value for a specific field as part of property definition using the INDEXNULLMARKER property parameter, as shown in the following example:
Property ExtremeNums As %Library.BigInt(INDEXNULLMARKER = "-1E19");
You can also change the index null marker default value in a data type class definition. Refer to %Library.DataTypeOpens in a new tab for details.
Indexing Collections
When a property is indexed, the value that is placed in the index is the entire collated property value. For collections, it is possible to define index properties that correspond to the element and key values of the collection by appending (ELEMENTS) or (KEYS) to the property name. (ELEMENTS) and (KEYS) allow you to specify that multiple values are produced from a single property value and each of these sub-values is indexed. When the property is a collection then the ELEMENTS token references the elements of the collection by value and the KEYS token references them by position. When both ELEMENTS and KEYS are present in a single index definition then the index key value includes the key and associated element value.
For example, suppose there is an index based on FavoriteColors property of the Sample.PersonOpens in a new tab class. The simplest form of an index on the items in this property’s collection would be either of:
INDEX fcIDX1 ON (FavoriteColors(ELEMENTS));or
INDEX fcIDX2 ON (FavoriteColors(KEYS));where FavoriteColor(ELEMENTS) refers to the elements of the FavoriteColors property, since it is a collection. The general form is propertyName(ELEMENTS) or propertyName(KEYS), where that collection’s content is the set of elements contained in a property defined as a List Of or an Array Of some data type). For information on collections, see the chapter “Working with Collections” in Using Caché Objects.
To index literal properties (described in the “Defining and Using Literal Properties” chapter of Using Caché Objects), you can create an index value array as produced by a propertyNameBuildValueArray() method (described in the following section). As with collections proper, the (ELEMENTS) and (KEYS) syntax is valid with index value arrays.
If property-collection is projected as array, then the index must obey the following restrictions in order to be projected to the collection table. The index must include (KEYS). The index cannot reference any properties other than the collection itself and the object's ID value. If a projected index also defines DATA to be stored in the index, then the data properties stored must also be restricted to the collection and the ID. Otherwise the index is not projected. This restriction applies to an index on a collection property that is projected as an array; it does not apply to an index on a collection that is projected as a list. For further details, refer to “Controlling the SQL Projection of Collection Properties” in Using Cache Objects.
Indices that correspond to element or key values of a collection can also have all the standard index features, such as storing data with the index, index-specific collations, and so on.
Indexing Data Type Properties with (ELEMENTS) and (KEYS)
For the purposes of indexing data type properties, you can also create index value arrays using the BuildValueArray() method. This method parses a property value into an array of keys and elements; it does this by producing a collection of element values derived from the value of the property with which it is associated. When you use BuildValueArray() to create an index value array, its structure is suitable for indexing.
The BuildValueArray() method has the name propertyNameBuildValueArray() and its signature is:
ClassMethod propertynameBuildValueArray(value, ByRef valueArray As %Library.String) As %Status
where
-
The name of the BuildValueArray() method derives from the property name in the typical way for composite methods.
-
The first argument is the property value.
-
The second argument is an array that is passed by reference. This is an array containing key-element pairs where the array subscripted by the key is equal to the element.
-
The method returns a %Status value.
Consider this example:
/// DescriptiveWords is a comma-delimited string of words
Property DescriptiveWords As %String;

/// Index based on DescriptiveWords
Index dwIDX On DescriptiveWords(ELEMENTS);

/// The DescriptiveWordsBuildValueArray() method demonstrates how to index on subvalues of a property.
///
/// (If DescriptiveWords were defined as a collection, this method would not be necessary.)
ClassMethod DescriptiveWordsBuildValueArray(
     Words As %Library.String = "",
     ByRef wordArray As %Library.String)
   As %Status {
 If Words '= "" {
   For tPointer = 1:1:$Length(Words,",") {
     Set tWord = $Piece(Words,",",tPointer)
     If tWord '= "" {
       Set wordArray(tPointer) = tWord
     }
   }
 }
 Else {
   Set wordArray("TODO") = "Enter keywords for this person"
 }
 Quit $$$OK
}
In this case, the dwIDX index is based on the DescriptiveWords property. The DescriptiveWordsBuildValueArray() method takes the value specified by the Words argument, creates an index value array based on that value, and stores it in wordArray. Caché uses the implementation of BuildValueArray() internally; you do not call this method.
It is not necessary to base any of the element/key values on the property value. The only recommendation is that the same array of elements and keys be created each time this method is passed a given value.
Setting values for DescriptiveWords property of various instances and examining those values involves activity such as the following:
SAMPLES>SET empsalesoref = ##class(MyApp.Salesperson).%OpenId(3)

SAMPLES>SET empsalesoref.DescriptiveWords = "Creative"

SAMPLES>WRITE empsalesoref.%Save()
1
SAMPLES>SET empsalesoref = ##class(MyApp.Salesperson).%OpenId(4)

SAMPLES>SET empsalesoref.DescriptiveWords = "Logical,Tall"

SAMPLES>WRITE empsalesoref.%Save()
1
This results in sample index content such as:
| DescriptiveWords(ELEMENTS) | ID | Data |
|---|---|---|
| " CREATIVE" | 3 | "" |
| " ENTER KEYWORDS FOR THIS PERSON" | 1 | "" |
| " ENTER KEYWORDS FOR THIS PERSON" | 2 | "" |
| " LOGICAL" | 4 | "" |
| " TALL" | 4 | "" |
This table displays index content in an abstracted form. The actual form of storage on disk is subject to change.
Projecting an Index on array(ELEMENTS) to a Child Table
In order to project a parent table index on array(ELEMENTS) to a child table, the child class/table must have all of the necessary columns to properly maintain the index. It must include information about the key, which is part of the child table RowID. Every index row must provide complete RowID information, which enables returning to the corresponding master map row.
Lacking this complete RowID information, an INSERT to a child table cannot populate the associated parent table index on array(ELEMENTS).
Indexing an Embedded Object (%SerialObject) Property
To index a property in an embedded object, you create an index in the persistent class referencing that embedded object. The property name must specify the name of the referencing field in the table (%Persistent class) and the property in the embedded object (%SerialObject), as shown in the following example:
Class Sample.Person Extends (%Persistent) [ DdlAllowed ]
{  Property Name As %String(MAXLEN=50);
   Property Home As Sample.Address;
   Index StateInx On Home.State;
}
Here Home is a property in Sample.Person that references the embedded object Sample.Address, which contains the State property, as shown in the following example:
Class Sample.Address Extends (%SerialObject)
{  Property Street As %String;
   Property City As %String;
   Property State As %String;
   Property PostalCode As %String;
 }
Only the data values in the instance of the embedded object associated with the persistent class property reference are indexed. You cannot index a %SerialObject property directly.
You can also define an index on an embedded object property using the SQL CREATE INDEX statement, as shown in the following example:
CREATE INDEX StateIdx ON TABLE Sample.Person (Home_State)For further details, refer to Introduction to Serial Objects in Defining and Using Classes and Embedded Object (%SerialObject) in the “Defining Tables” chapter of Using Caché SQL.
Notes on Indices Defined in Classes
When working with indices in class definitions, here are some points to keep in mind:
-
Index definitions are only inherited from the primary (first) superclass.
-
If you use Studio to add (or remove) an index definition for a class that has data stored within the database, you must manually populate the index by using one of the procedures described in “Building Indices.”
Defining Indices Using DDL
If you are using DDL statements to define tables, you can also use the following DDL commands to create and remove indices:
The DDL index commands do the following:
-
They update the corresponding class and table definitions on which an index is being added or removed. The modified class definition is recompiled.
-
They add or remove index data in the database as needed: The CREATE INDEX command populates the index using the data currently stored within the database. Similarly, the DROP INDEX command deletes the index data (that is, the actual index) from the database.
Bitmap Indices
A bitmap index is a special type of index that uses a series of bitstrings to represent the set of ID values that correspond to a given indexed data value. You can define a bitmap index for a field if the table’s ID field is defined as a positive integer (see restrictions).
Bitmap indices have the following important features:
-
Bitmaps are highly compressed: bitmap indices can be significantly smaller than standard indices. This reduces disk and cache usage considerably.
-
Bitmaps operations are optimized for transaction processing: you can use bitmap indices within tables with no performance penalty as compared with using standard indices.
-
Logical operations on bitmaps (counting, AND, and OR) are optimized for high performance.
-
The SQL Engine includes a number of special optimizations that can take advantage of bitmap indices.
Subject to the restrictions listed below, bitmap indices operate in the same manner as standard indices. Indexed values are collated and you can index on combinations of multiple fields.
This chapter addresses the following topics related to bitmap indices:
Bitmap Index Operation
Bitmap indices work in the following way. Suppose you have a Person table containing a number of columns:
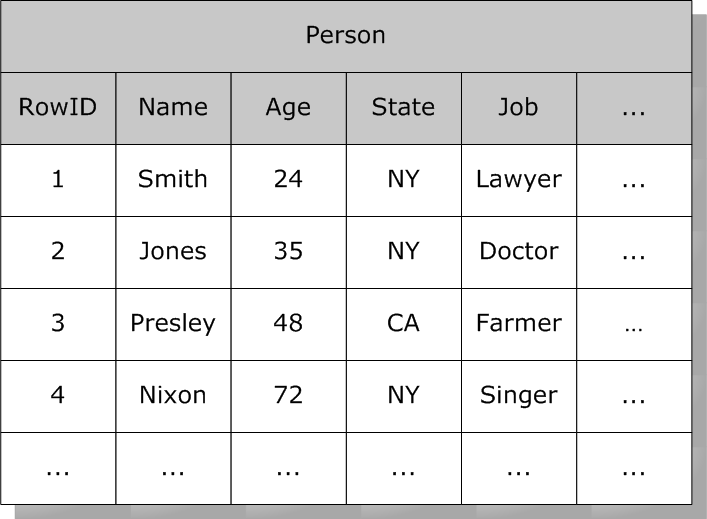
Each row in this table has a system-assigned ID number (a set of increasing integer values). A bitmap index uses a set of bitstrings (a string containing 1 and 0 values). Within a bitstring, the ordinal position of a bit corresponds to the ID (row number) of the indexed table. For a given value, say where State is “NY”, there is a string of bits with a 1 for every position that corresponds to a row containing “NY” and a 0 in every other position.
For example, a bitmap index on State might look like this:

While an index on Age might look like this:
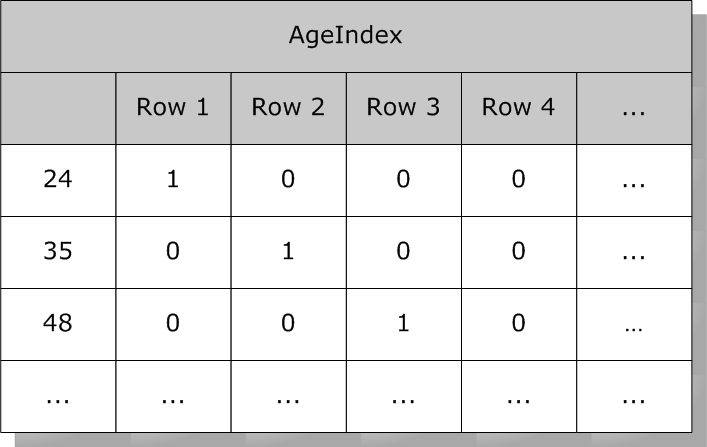
The Age field shown here can be an ordinary data field or a field whose value can be reliably derived (Calculated and SQLComputed).
In addition to using bitmap indices for standard operations, the SQL engine can use bitmap indices to efficiently perform special set-based operations using combinations of multiple indices. For example, to find all instances of Person that are 24 years old and live in New York, the SQL Engine can simply perform the logical AND of the Age and State indices:
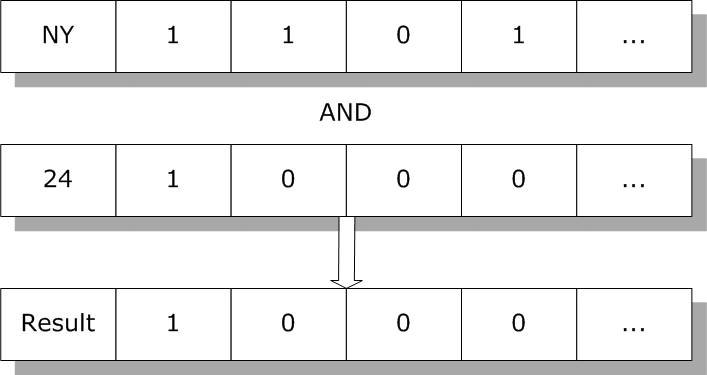
The resulting bitmap contains the set of all rows that match the search criteria. The SQL Engine uses this to return data from these rows.
The SQL Engine can use bitmap indices for the following operations:
-
ANDing of multiple conditions on a given table.
-
ORing of multiple conditions on a given table.
-
RANGE conditions on a given table.
-
COUNT operations on a given table.
Defining a Bitmap Index Using a Class Definition
Within Studio, you can add bitmap index definitions to a class definition using either the New Index Wizard or by editing the text of the class definition in the same way that you would create a standard index. The only difference is that you need to specify the index Type as being “bitmap”:
Class MyApp.SalesPerson Extends %Persistent [DdlAllowed]
{
 Property Name As %String;
 Property Region As %Integer;

 Index RegionIDX On Region [Type = bitmap];
}
Defining Bitmap Indices Using DDL
If you are using DDL statements to define tables, you can also use the following DDL commands to create and remove bitmap indices:
This is identical to creating standard indices, except that you must add the BITMAP keyword to the CREATE INDEX statement:
CREATE BITMAP INDEX RegionIDX ON TABLE MyApp.SalesPerson (Region)Generating a Bitmap Extent Index
When compiling a class that contains a bitmap index, the class compiler generates a bitmap extent index if there are any bitmap indices present in the class and no bitmap extent index is defined for that class. The class inherits the bitmap extent index from the primary superclass if it exists, either defined or generated. When building indices for a class, the bitmap extent index is built either if it is asked to be built or if another bitmap index is being built and the bitmap extent index structure is empty.
Caché does not generate a bitmap extent index unless there are bitmap indices present. A bitmap extent index is defined as: type = bitmap, extent = true. That means a bitmap extent index inherited from a primary superclass is considered to be a bitmap index and will trigger a bitmap extent index to be generated in the subclass, if no bitmap extent index is explicitly defined in that subclass.
Caché does not generate a bitmap extent index in a superclass based on future possibility. This means that Caché does not ever generate a bitmap extent index in a persistent class unless an index whose type = bitmap is present. A presumption that some future subclass might introduce an index with type = bitmap is not sufficient.
Special care is required during the process of adding a bitmap index to a class on a production system (where users are actively using a particular class, compiling said class, and subsequently building the bitmap index structure for it). On such a system, the bitmap extent index may be populated in the interim between the compile completing and the index build proceeding. This can cause the index build procedure to not implicitly build the bitmap extent index, which leads to a partially complete bitmap extent index.
Choosing an Index Type
The following is a general guideline for choosing between bitmap and standard indices. In general, use standard indices for indexing on all types of keys and references:
-
Primary key
-
Foreign key
-
Unique keys
-
Relationships
-
Simple object references
Otherwise, bitmap indices are generally preferable (assuming that the table uses system-assigned numeric ID numbers).
Other factors:
-
Separate bitmap indices on each property usually have better performance than a bitmap index on multiple properties. This is because the SQL engine can efficiently combine separate bitmap indices using AND and OR operations.
-
If a property (or a set of properties that you really need to index together) has more than 10,000-20,000 distinct values (or value combinations), consider standard indices. If, however, these values are very unevenly distributed so that a small number of values accounts for a substantial fraction of rows, then a bitmap index could be much better. In general, the goal is to reduce the overall size required by the index.
Restrictions on Bitmap Indices
Bitmap indices have the following restrictions:
-
You can only define a bitmap index for a field in a record that has a positive integer value ID. Therefore, you can only define bitmap indices in tables (classes) that either use system-assigned numeric ID values, or use an IdKey to define custom ID values when the IdKey is based on a single property with type %Integer and MINVAL > 0, or type %Numeric with SCALE = 0 and MINVAL > 0.
You can use the $SYSTEM.SQL.SetBitmapFriendlyCheck()Opens in a new tab method to set a system-wide configuration parameter to check at compile time for this restriction, determining whether a defined bitmap index is allowed in a %CacheSQLStorage class. This check only applies to classes that use %CacheSQLStorage. You can use $SYSTEM.SQL.GetBitmapFriendlyCheck()Opens in a new tab to determine the current configuration of this option.
-
You cannot define a bitmap index for a field in a record that uses a multi-field ID key.
-
You cannot define a bitmap index on a UNIQUE column.
-
You cannot use bitmap indices on child tables within parent-child relationships.
-
You cannot store data values within a bitmap index.
For a table containing more than 1 million records, a bitmap index is less efficient than a standard index when the number of unique values exceeds 10,000. Therefore, for a large table it is recommended that you avoid using a bitmap index for any field that contains (or is likely to contain) more than 10,000 unique values; for a table of any size, avoid using a bitmap index for any field that is likely to contain more than 20,000 unique values. These are general approximations, not exact numbers.
Application Logic Restrictions
A bitmap structure can be represented by an array of bit strings, where each element of the array represents a "chunk" with a fixed number of bits. Because undefined is equivalent to a chunk with all 0 bits, the array can be sparse. An array element that represents a chunk of all 0 bits need not exist at all. For this reason, application logic should avoid depending on the $BITCOUNT(str,0) count of 0-valued bits.
Because a bit string contains internal formatting, application logic should never depend upon the physical length of a bit string or upon equating two bit strings that have the same bit values. Following a rollback operation, a bit string is restored to its bit values prior to the transaction. However, because of internal formatting, the rolled back bit string may not equate to or have the same physical length as the bit string prior to the transaction.
Maintaining Bitmap Indices
In a volatile table (one that undergoes many INSERT and DELETE operations) the storage for a bitmap index can gradually become less efficient. To maintain bitmap indices, you can run the %SYS.Maint.BitmapOpens in a new tab utility methods to compress the bitmap indices, restoring them to optimal efficiency. You can use the OneClass()Opens in a new tab method to compress the bitmap indices for a single class. Or you can use the Namespace()Opens in a new tab method to compress the bitmap indices for an entire namespace. These maintenance methods can be run on a live system.
The results of running the %SYS.Maint.BitmapOpens in a new tab utility methods are written to the process that invoked the method. These results are also written to the class %SYS.Maint.BitmapResultsOpens in a new tab.
SQL Manipulation of Bitmap Chunks
InterSystems SQL provides the following extensions to directly manipulate bitmap indices:
-
%CHUNK function
-
%BITPOS function
-
%BITMAP aggregate function
-
%BITMAPCHUNK aggregate function
-
%SETINCHUNK predicate condition
All of these extensions follow the InterSystems SQL conventions for bitmap representation, representing a set of positive integers as a sequence of bitmap chunks, of up to 64,000 integers each.
These extensions enable easier and more efficient manipulation of certain conditions and filters, both within a query and in embedded SQL. In embedded SQL they enable simple input and output of bitmaps, especially at the single chunk level. They support the processing of complete bitmaps, which are handled by %BITMAP() and the %SQL.Bitmap class. They also enable bitmap processing for non-RowID values, such as foreign key values, parent-reference of a child table, either column of an association, etc.
For example, to output the bitmap for a specified chunk:
SELECT %BITMAPCHUNK(Home_Zip) FROM Sample.Person
WHERE %CHUNK(Home_Zip)=2
To output all the chunks for the whole table:
SELECT %CHUNK(Home_Zip),%BITMAPCHUNK(Home_Zip) FROM Sample.Person
GROUP BY %CHUNK(Home_Zip) ORDER BY 1
%CHUNK function
%CHUNK(f) returns the chunk assignment for a bitmap indexed field f value. This is calculated as f\64000+1. %CHUNK(f) for any field or value f that is not a bitmap indexed field always returns 1.
%BITPOS function
%BITPOS(f) returns the bit position assigned to a bitmap indexed field f value within its chunk. This is calculated as f#64000+1 . %BITPOS(f) for any field or value f that is not a bitmap indexed field returns 1 more than its integer value. A string has an integer value of 0.
%BITMAP aggregate function
The aggregate function %BITMAP(f) combines many f values into a %SQL.Bitmap object, in which the bit corresponding to f in the proper chunk is set to 1 for each value f in the result set. f in all of the above would normally be a positive integer field (or expression), usually (but not necessarily) the RowID.
%BITMAPCHUNK aggregate function
The aggregate function %BITMAPCHUNK(f) combines many values of the field f into an InterSystems SQL standard bitmap string of 64,000 bits, in which bit f#64000+1=%BITPOS(f) is set to 1 for each value f in the set. Note that the bit is set in the result regardless of the value of %CHUNK(f) . %BITMAPCHUNK() yields NULL for the empty set, and like any other aggregate it ignores NULL values in the input.
%SETINCHUNK predicate condition
The condition (f %SETINCHUNK bm) is true if and only if ($BIT(bm,%BITPOS(f))=1) . bm could be any bitmap expression string, e.g. an input host variable :bm, or the result of a %BITMAPCHUNK() aggregate function, etc. Note that the <bm> bit is checked regardless of the value of %CHUNK(f) . If <bm> is not a bitmap or is NULL, the condition returns FALSE. (f %SETINCHUNK NULL) yields FALSE (not UNKNOWN).
Bitslice Indices
A bitslice index is used for a numeric data field when that field is used for a SUM, COUNT, or AVG aggregate calculation. A bitslice index represents each numeric data value as a binary bit string. Rather than indexing a numeric data value using a boolean flag (as in a bitmap index), a bitslice index represents each value in binary and creates a bitmap for each digit in the binary value to record which rows have a 1 for that binary digit. This is a highly specialized type of index that can substantially improve performance of SUM, COUNT, or AVG aggregate calculations. (A bitslice index is not used for COUNT(*) calculations.) Bitslice indices are not used for other aggregate functions or other SQL numeric operations. The SQL optimizer determines whether a defined bitslice index should be used.
You can create a bitslice index for a string data field, but the bitslice index will represent these data values as canonical numbers. In other words, any non-numeric string, such as “abc” will be indexed as 0. This type of bitslice index could be used to rapidly COUNT records that have a value for a string field and not count those that are NULL.
In the following example, Salary would be a candidate for a bitslice index:
SELECT AVG(Salary) FROM SalesPersonA bitslice index can be used for an aggregate calculation in a query that uses a WHERE clause. This is most effective if the WHERE clause is inclusive of a large number of records. In the following example, the SQL optimizer would probably use a bitslice index on Salary, if defined; if so, it would also use a bitmap index on Region, either using a defined bitmap or generating a bitmap tempfile for Region:
SELECT AVG(Salary) FROM SalesPerson WHERE Region=2However, a bitslice index is not used when the WHERE condition cannot be satisfied by an index, but must be performed by reading the table that contains the field being aggregated. The following example would not use the bitslice index on Salary:
SELECT AVG(Salary) FROM SalesPerson WHERE Name LIKE '%Mc%'A bitslice index can be defined for any field containing numeric values. InterSystems SQL uses a scale parameter to convert fractional numbers into bitstrings, as described in the ObjectScript $FACTOR function. A bitslice index can be defined for a field of data type string; in this case, non-numeric string data values are treated as 0 for the purposes of the bitslice index.
A bitslice index can only be defined for fields in records that have system-assigned row Ids with positive integer values. A bitslice index can only be defined for a single field name, not a concatenation of multiple fields. You cannot specify a WITH DATA clause.
The following example compares a bitslice index to a bitmap index. If you create a bitmap index for values 1, 5, and 22 for rows 1, 2, and 3, it creates an index for the values:
^gloI("bitmap",1,1)= "100"
^gloI("bitmap",5,1)= "010"
^gloI("bitmap",22,1)="001"
If you create a bitslice index for values 1, 5, and 22 for rows 1, 2, and 3, it first converts the values to bit values:
1 =   00001
5 =   00101
22 = 10110
It then creates an index for the bits:
^gloI("bitslice",1,1)="110"
^gloI("bitslice",2,1)="001"
^gloI("bitslice",3,1)="011"
^gloI("bitslice",4,1)="000"
^gloI("bitslice",5,1)="001"
In this example, the value 22 in a bitmap index required setting 1 global node; the value 22 in a bitslice index required setting 3 global nodes.
Note that an INSERT or UPDATE requires setting a bit in all n bitslices, rather than setting a single bitstring. These additional global set operations can affect performance of INSERT and UPDATE operations that involve populating bitslice indices. Populating and maintaining a bitslice index using INSERT, UPDATE, or DELETE operations is slower than populating a bitmap index or a regular index. Maintaining multiple bitslice indices, and/or maintaining a bitslice index on a field that is frequently updated may have a significant performance cost.
In a volatile table (one that undergoes many INSERT, UPDATE, and DELETE operations) the storage for a bitslice index can gradually become less efficient. The %SYS.Maint.BitmapOpens in a new tab utility methods compress both bitmap indices and bitslice indices, restoring efficiency. For further details, see “Maintaining Bitmap Indices”.
Building Indices
The current database access determines how you should rebuild an existing index:
-
Inactive System (no other processes accessing data during index build or rebuild)
-
READONLY active system (other processes able to query the data during index build or rebuild)
-
READ and WRITE active system (other processes able to modify the data and to query the data during index build or rebuild)
Building Indices on an Inactive System
The system automatically generates methods (provided by the %PersistentOpens in a new tab class) that build (that is, provide values for) or purge (that is, remove values for) every index defined for a class (table). You can use these methods in either of two ways:
Building an index does the following:
-
Removes the current contents of the index.
-
Scans (reads every row) of the main table and adds index entries for each row in the table. If possible, the special $SortBegin and $SortEnd functions are used to make sure that building of large indices is efficient. When building a standard index, this use of $SortBegin/$SortEnd can use space in the CACHETEMP database, in addition to caching data in memory. Therefore, when building a very large standard index, Caché can require space in CACHETEMP roughly equivalent to the size of the final index.
Methods to build indices are only provided for classes (tables) that use Caché default storage structure. Classes mapped to legacy storage structures do not support index building as it assumed that the legacy application manages the creation of indices.
Building Indices with the Management Portal
You can build existing indices (rebuild indices) for a table by doing the following:
-
From the Management Portal select System Explorer, then SQL (System, SQL). Select a namespace with the Switch option at the top of the page; this displays the list of available namespaces. After selecting a namespace, select the Schema drop-down list on the left side of the screen. This displays a list of the schemas in the current namespace with boolean flags indicating whether there are any tables or any views associated with each schema.
-
Select a schema from this list; it appears in the Schema box. Just above it is a drop-down list that allows you to select Tables, System Tables, Views, Procedures, or All of these that belong to the schema. Select either Tables or All, then open the Tables folder to list the tables in this schema. If there are no tables, opening the folder displays a blank page. (If you have not selected Tables or All, opening the Tables folder lists the tables for the entire namespace.)
-
Select one of the listed Tables. This displays the Catalog Details for the table.
-
To rebuild all indices: click the Actions drop-down list and select Rebuild Table’s Indices.
-
To rebuild a single index: click the Indices button to display the existing indices. Each listed index has the option to Rebuild Index.
-
Do not rebuild indices while the table’s data is being accessed by other users. To rebuild indices on an active system, see below.
Building Indices Programmatically
The preferred way of building indices for an inactive table is to use the %BuildIndices() method provided with the persistent class for the table. To build an index (or indices) programmatically, use the %Library.Persistent.%BuildIndices()Opens in a new tab method.
-
Build All Indices: Invoking %BuildIndices() with no arguments builds (provides values for) all the indices defined for a given class (table):
SET sc = ##class(MyApp.SalesPerson).%BuildIndices() IF sc=1 {WRITE !,"Successful index build" } ELSE {WRITE !,"Index build failed",! DO $System.Status.DisplayError(sc) QUIT} -
Build Specified Indices: Invoking %BuildIndices() with a $List of index names as the first argument builds (provides values for) the specified defined indices for a given class (table):
SET sc = ##class(MyApp.SalesPerson).%BuildIndices($ListBuild("NameIDX","SSNKey")) IF sc=1 {WRITE !,"Successful index build" } ELSE {WRITE !,"Index build failed",! DO $System.Status.DisplayError(sc) QUIT} -
Build All Indices Except: Invoking %BuildIndices() with a $List of index names as the seventh argument builds (provides values for) all defined indices for a given class (table) except for the specified indices:
 SET sc = ##class(MyApp.SalesPerson).%BuildIndices("",,,,,,$ListBuild("NameIDX","SSNKey"))
 IF sc=1 {WRITE !,"Successful index build" }
 ELSE {WRITE !,"Index build failed",!
       DO $System.Status.DisplayError(sc) QUIT}
The %BuildIndices() method does the following:
-
Invokes the $SortBegin function on any (non-bitmap) indices to be rebuilt (this initiates a high performance sorting operation for these indices).
-
Loops over the main data for the class (table), gathers the values used by indices, and adds these values to the indices (with appropriate collation transformation).
-
Invokes the $SortEnd function to finish the process of sorting the indices.
If the indices already have values, you must call %BuildIndices() with two arguments, where the second argument has a value of 1. Specifying 1 for this argument causes the method to purge the values before rebuilding them. For example:
 SET sc = ##class(MyApp.SalesPerson).%BuildIndices(,1)
 IF sc=1 {WRITE !,"Successful index build" }
 ELSE {WRITE !,"Index build failed",!
       DO $System.Status.DisplayError(sc) QUIT}
which purges and rebuilds all the indices. You can also purge and rebuild a subset of the indices, such as in:
 SET sc = ##class(MyApp.SalesPerson).%BuildIndices($ListBuild("NameIDX","SSNKey"),1)
 IF sc=1 {WRITE !,"Successful index build" }
 ELSE {WRITE !,"Index build failed",!
DO $System.Status.DisplayError(sc) QUIT} Do not rebuild indices while the table’s data is being accessed by other users. To rebuild indices on an active system, see below.
%BuildIndices() also provides arguments that specify the kind of locking to perform and whether to disable journaling during lock building.
By default, %BuildIndices() builds index entries for all IDs. However, you can specify a range of IDs and %BuildIndices() will build the index entries only for IDs in that range, inclusive. For example, if you use INSERT with the %NOINDEX restriction to add a series of new records into a table, you can later use %BuildIndices() with an ID range to build index entries for those new records.
%BuildIndices() returns a %Status value. If %BuildIndices() fails due to a problem retrieving data, the system generates an SQLCODE error and a message (%msg) that include the %ROWID where the error was encountered.
Building Indices on a READONLY Active System
If a table is currently in use for query operations only (READONLY), you can build new indices or rebuild existing indices without interrupting query operations. If all the classes for which you wish to build one or more indices are currently READONLY, use the same series of operations described in “Building Indices on a READ and WRITE Active System”, with the following difference: when you use %BuildIndices()Opens in a new tab set pLockFlag=3 (shared extent lock).
Building Indices on a READ and WRITE Active System
If a persistent class (table) is currently in use and is available for READ and WRITE access (query and data modification), you can build new indices or rebuild existing indices without interrupting these operations. If the class for which you wish to rebuild one or more indices is currently READ and WRITE accessible, the preferred way of building indices is to use the %BuildIndices() method provided with the persistent class for the table.
The following information applies to Dynamic SQL queries, not Embedded SQL. Embedded SQL checks the MapSelectability setting when it's compiled, not at runtime. Therefore, turning off MapSelectability for an index does not have any effect on Embedded SQL queries which have already been compiled. As a result, Embedded SQL queries could still try to use the disabled index and will give incorrect results.
The following is the preferred series of operations for building one or more indices during concurrent READ and WRITE access:
-
Make the index that you wish to build unavailable to queries (READ access). This is done using SetMapSelectability()Opens in a new tab. This makes the index unavailable for use by the Query Optimizer. This operation should be performed both when rebuilding an existing index and when creating a new index. For example:
WRITE $SYSTEM.SQL.SetMapSelectability("Sample.MyStudents","StudentNameIDX",0)where:
-
The first argument is the Schema.Table name, which is the SqlTableName, not the persistent class name. For example, the default schema is SQLUser, not User. This value is case-sensitive.
-
The second argument is the SQL index map name. This is typically the name of the index, and refers to the name under which the index is stored on disk. For a new index, this is the name you will use when you create the index. This value is not case-sensitive.
-
The third argument is the MapSelectability flag, where 0 defines the index map as non-selectable (off), and 1 defines the index map as selectable (on). Specify 0.
You can determine if an index is non-selectable by invoking the GetMapSelectability()Opens in a new tab method. This method returns 0 if you have explicitly flagged an index as non-selectable. In all other cases it returns 1; it does not perform validation checks for the existence of the table or the index. Note that the Schema.Table name is the SqlTableName, and is case-sensitive.
SetMapSelectability() and GetMapSelectability() apply to index maps in the current namespace only. If this table is mapped to multiple namespaces, and the index needs to be built in each namespace, SetMapSelectability() should be called in each namespace.
-
-
Establish concurrent operations for the duration of the index build:
-
For a new index: Create the index definition in the class (or the new SQL Index Map specification in the %CacheSQLStorageOpens in a new tab of the class). Compile the class. At this point, the index exists in the table definition; this means that object saves, SQL INSERT operations, and SQL UPDATE operations are all filed in the index. However, because of the SetMapSelectability() call made in step 1, this index map is not chosen for any data retrieval. SetMapSelectability() prevents queries from using the extent index, but the data map will be projected to SQL to use the index global and the data global. For a new index this is appropriate because the index has not yet been populated. Population of the extent index needs to occur before queries can be run against the table.
-
For an existing index: Purge any cached queries that reference the table. The first operation that the index build performs is to kill the index. Therefore, you cannot rely on any code that is optimized to use the index while the index is being rebuilt.
-
-
Use the %BuildIndices()Opens in a new tab method of your class with pLockFlag=2 to build the index or indices.
-
Once you have completed building the index, enable the map for selectability by the Query Optimizer. Set the third argument, the MapSelectability flag to 1, as shown in the following example:
WRITE $SYSTEM.SQL.SetMapSelectability("Sample.MyStudents","StudentNameIDX",1) -
Once again, purge any cached queries that reference the table. This will eliminate cached queries that were created during this process that could not use the index, and are thus less optimal than the same queries using the index.
This completes the process. The index is fully populated and the Query Optimizer is able to consider the index.
%BuildIndices() can only be used to rebuild indices for tables that have positive integer ID values. You can also use %BuildIndices() to rebuild indices in a child table if the parent table has positive integer ID values. For other tables, use the %ValidateIndices() method as described in Validate Indices. Because %ValidateIndices() is the slowest method for building indices, it should only be used when there is no other option.
The %ConstructIndicesParallel() Method
The %ConstructIndicesParallel()Opens in a new tab method is a class method of the %Library.IndexBuilderOpens in a new tab class that builds the indices specified by the INDEXBUILDERFILTER parameter. It allows you to specify which sets of instances to build indices for (based on ID/row number of instances in the class/table). It also allows you to specify the number of background jobs for populating the index, as well as locking and journaling behavior during its operation.
%ConstructIndicesParallel() requires changes to the class to inherit from %Library.IndexBuilder and define the INDEXBUILDERFILTER class parameter. The INDEXBUILDERFILTER class parameter is recognized by the %Library.IndexBuilder.%ConstructIndicesParallel() method and specifies which indices to build or rebuild. INDEXBUILDERFILTER is a string value of an index name or a comma-separated list of index names. Each specified index is built or rebuilt; if INDEXBUILDERFILTER is not defined or set is to "", then all the indices in the class are built.
For example, suppose you add the NameIDX index to class MyApp.SalesPerson and would like to build only that index. You would then define the INDEXBUILDERFILTER parameter as follows:
Parameter INDEXBUILDERFILTER = "NameIDX";When building indices on an active READ/WRITE system the following argument values are mandatory: either (Sortbegin=0 AND LockFlag=2) or ( LockFlag=1 ). See the class documentation for %ConstructIndicesParallel()Opens in a new tab for details on its arguments.
%ConstructIndicesParallel() displays output regarding its progress. When all jobs have completed their work, the method returns. Here is an example of the output:
SAMPLES>SET sc=##class(MyApp.SalesPerson).%ConstructIndicesParallel(,,,1,,1,1)
Building 32 chunks and will use parallel build algorithm with 2 drone processes.
SortBegin is requested.
Started drone process: 48938
Started drone process: 48939
Expected time to complete is 17 secs to build 32 chunks of 64,000 objects using 2 processes.
Waiting for processes to complete....done.
Elapsed time using 2 processes was 28.126064.
SAMPLES>
Large-scale data modification during index rebuild: If a process is modifying large numbers of rows in the table within a single transaction while an index rebuild is in progress, lock table contention issues may arise.
Populating an Index in Sections
When creating an index of this kind, you do not need to populate the entire index at once. Prior to enabling the map for selectability, the index is not visible, so queries will not operate on its partial data.
For example, suppose you can only run the index builder for a short period each night. If there are 300,000,000 rows in the table, you can build 100,000,000 rows each night over a period of three nights. On the first night, you would make a call such as:
SET sc=##class(Sample.Person).%ConstructIndicesParallel(,1,100000000,0,0,2,0)On the second night, you would then make this call:
SET sc=##class(Sample.Person).%ConstructIndicesParallel(,100000001,200000000,0,0,2,0)And on the third night, you would make this call:
SET sc=##class(Sample.Person).%ConstructIndicesParallel(,200000001,-1,0,0,2,0)Validating Indices
You can validate indices using the either of the following methods:
-
$SYSTEM.OBJ.ValidateIndices()Opens in a new tab validates the indices for a table, and also validates any indices in collection child tables for that table.
-
%Library.Storage.%ValidateIndices()Opens in a new tab validates the indices for a table. Collection child table indices must be validated with separate %ValidateIndices() calls.
Both methods check the data integrity of one or more indices for a specified table, and optionally correct any index integrity issues found. They perform index validation in two steps:
-
Confirm that an index entity is properly defined for every row (object) in the table (class).
-
Traverse each index and for every entry indexed, make sure there is a value and matching entry in the table (class).
If either method finds discrepancies, it can correct the index structure and/or contents. It can validate, and optionally correct, standard indices, bitmap indices, bitmap extent indices, and bitslice indices.
%ValidateIndices() is commonly run from the Terminal. It displays output to the current device. This method can be applied to a specified %List of index names, or to all indices defined for the specified table (class). It operates only on those indices that originated in specified class; if an index originated in a superclass, that index can be validated by calling %ValidateIndices() on the superclass. %ValidateIndices() is not supported for READONLY classes.
The following example uses %ValidateIndices() to validate and correct all indices for the table Sample.Person:
  ZNSPACE "Samples"
  SET status=##class(Sample.Person).%ValidateIndices("",1,2,1)
  IF status=1 {WRITE !,"Successful index validation/correction" }
  ELSE {WRITE !,"Index validation/correction failed",!
        DO $System.Status.DisplayError(status) QUIT}
In this example, the first argument ("") specifies that all indices are to be validated; the second argument (1) specifies that index discrepancies should be corrected; the third argument (2) specifies exclusive locking on the entire table; and the fourth argument (1) specifies using multiple processes (if available) to perform validation. The method returns a %Status value.
Validating Indices by Name
The first argument of %ValidateIndices() or the second argument of $SYSTEM.OBJ.ValidateIndices() specifies which indices are to be validated as a %List structure. The IdKey index is always validated, regardless of the first argument value. You can validates all of the table’s indices by specifying an empty string value (""). You can validates individual indices for the table by specifying a list structure. The following example validates the IdKey index and the two specified indices: NameIDX and SSNKey:
  ZNSPACE "Samples"
  SET IndList=$LISTBUILD("NameIDX","SSNKey")
  SET status=##class(Sample.Person).%ValidateIndices(IndList,1,2,1)
  SET status=##class(Sample.Person).%ValidateIndices(IndList,1,2,1)
  IF status=1 {WRITE !,"Successful index validation/correction" }
  ELSE {WRITE !,"Index validation/correction failed",!
        DO $System.Status.DisplayError(status) QUIT}
For either method, if the index list contains a non-existent index name, the method performs no index validation and returns a %Status error. If the index list contains a duplicate valid index name, the method validates the specified indices, ignoring the duplicate and issuing no error.
Listing Indices
The INFORMATION.SCHEMA.INDEXESOpens in a new tab persistent class displays information about all column indices in the current namespace. It returns one record for each indexed column. It provides a number of index properties, including the name of the index, table name, and column name that the index maps to. Each column record also provides the ordinal position of that column in the index map; this value is 1 unless the index maps to multiple columns. It also provides the boolean properties PRIMARYKEY and NONUNIQUE (0=index value must be unique).
The following example returns one row for each column that participates in an index for all non-system indices in the current namespace:
SELECT Index_Name,Table_Schema,Table_Name,Column_Name,Ordinal_Position,
Primary_Key,Non_Unique
FROM INFORMATION_SCHEMA.INDEXES WHERE NOT Table_Schema %STARTSWITH '%'
You can list indices for a selected table using the Management Portal SQL interface Catalog Details Maps/Indices option. This displays one line for each index, and displays index information not provided by INFORMATION.SCHEMA.INDEXESOpens in a new tab.
Open, Exists, and Delete Methods
The Caché indexing facility supports the following operations:
-
Opening an Instance by Index Key
-
Checking If an Instance Exists
-
Deleting an Instance
Opening an Instance by Index Key
For ID key, primary key, or unique indices, the indexnameOpen() method (where indexname is the name of the index) allows you to open the object whose index property value or values match supplied value or values. Because this method has one argument corresponding to each property in the index, the method has three or more arguments:
-
The first argument(s) each correspond to the properties in the index.
-
The penultimate argument specifies the concurrency value with which the object is to be opened (with the available concurrency settings listed in the “Object Concurrency” appendix of Using Caché Objects).
-
The final argument can accept a %Status code, in case the method fails to open an instance.
The method returns an OREF if it locates a matching instance.
For example, suppose that a class includes the following index definition:
Index SSNKey On SSN [ Unique ];then, if the referenced object has been stored to disk and has a unique ID value, you can invoke the method as follows:
SET person = ##class(Sample.Person).SSNKeyOpen("111-22-3333",2,.sc)Upon successful completion, the method has set the value of person to the OREF of the instance of Sample.PersonOpens in a new tab whose SSN property has a value of 111–22–3333.
The second argument to the method specifies the concurrency value, which here is 2 (shared). The third argument holds an optional %Status code; if the method does not find an object that matches the supplied value, then an error message is written to the status parameter sc.
This method is implemented as the %Library.CacheIndex.Open()Opens in a new tab method; this method is analogous to the %Persistent.Open()Opens in a new tab and %Persistent.OpenId()Opens in a new tab methods, except that it uses the properties in the index definition instead of the OID or ID argument.
Checking If an Instance Exists
The indexnameExists() method (where indexname is the name of the index) checks if an instance exists with the index property value or values specified by the method’s arguments. The method has one argument corresponding to each property in the index; its final, optional argument can receive the object’s ID, if one matches the supplied value(s). The method returns a boolean, indicating success (1) or failure (0). This method is implemented as the %Library.CacheIndex.Exists()Opens in a new tab method.
For example, suppose that a class includes the following index definition:
Index SSNKey On SSN [ Unique ];then, if the referenced object has been stored to disk and has a unique ID value, you can invoke the method as follows:
SET success = ##class(Sample.Person).SSNKeyExists("111-22-3333",.id)Upon successful completion, success equals 1 and id contains the ID matching the object that was found.
This method returns values for all indices except:
-
bitmap indices, or a bitmap extent index.
-
when the index includes an (ELEMENTS) or (KEYS) expression. For more information on such indices, see the section “Indexing Collections.”
Deleting an Instance
The indexnameDelete() method (where indexname is the name of the index) is meant for use with a Unique, PrimaryKey, and or IdKey index; it deletes the instance whose key value matches the supplied key property/column values. There is one optional argument, which you can use to specify a concurrency setting for the operation. The method returns a %Status code. It is implemented as the %Library.CacheIndex.Delete()Opens in a new tab method.