
Configurations Page
Configurations Page
The Configurations page lets you set up InterSystems Network Connect, a hub you can use to connect your corporate network and your InterSystems cloud service deployments. First you attach your deployments to the hub. Then you attach one or more VPN connections or private circuits, which go from your corporate gateway devices to the hub.
Network Connect is also adding support for Peer Networks. A peer network is a customer-owned hub that can be used to connect additional networks.
If you ever want to delete a Network Connect deployment, you must detach any InterSystems cloud service deployments, VPN connections, private circuits, or peer networks before proceeding.
You cannot delete a InterSystems cloud service deployment that is attached to Network Connect. You must detach it before proceeding.
VPN Routing Types
Network Connect supports two types of routing for VPNs, dynamic and static.
Dynamic routing advertises routes using the Border Gateway Protocol (BGP) for easier configuration of route tables. BGP lets you choose which local networks should be reachable over the VPN and makes their routes available. InterSystems recommends using Dynamic VPNs because they allow the automatic synchronization of route tables between your private network route tables and the route tables in Network Connect and the InterSystems cloud service deployments.
Static routing requires route tables to be configured manually.
Network Connect uses dynamic routing with private circuits and static routing for peer networks.
Manage Deployment Attachments
The Deployment Attachments section of the Configurations page displays a list of any InterSystems cloud service deployments currently attached to the hub.
To attach an additional InterSystems cloud service deployment to the hub:
-
On the Configurations page, in the Deployment Attachments section, click Attach Deployment.
-
On the Available Deployment Attachments dialog, select the InterSystems cloud service deployment you want to attach to the hub, and then click Attach.
Note:The deployment must be in the same AWS region as Network Connect.
You cannot attach a deployment that has a private network address range that conflicts with that of a deployment already attached to Network Connect.
You can only attach one deployment at a time. Repeat these steps to attach another deployment.
The deployment is added to the list of active deployment attachments with a status of COMPLETE. This may take a few minutes.
To detach a deployment from the hub, in the Actions column in the row for that deployment, click the Detach VPC icon.
You cannot detach an InterSystems cloud service deployment from the hub if it has any private firewall rules defined for the private network. You must delete the rules from the Health Connect Cloud or InterSystems IRIS Managed Service Firewall page first.
Manage VPN Connections
The VPN Connections section of the Configurations page displays a list of any VPN gateway devices currently attached to the hub. A VPN can be configured to use the public internet or a private circuit. If using a private circuit, it must be set up before creating the VPN. (See Manage Private Circuits.)
Each entry in the list includes information such as:
-
Device Name
-
Routing Type (static or dynamic)
-
State (such as CREATING or COMPLETE)
-
Device IP address and ASN (for dynamic VPNs)
-
Tunnel IP addresses and status indicators
-
Network Type (Public Internet or Private Circuit)
To attach an additional VPN gateway device to the hub:
-
On the Configurations page, in the VPN Connections section, click Create VPN.
-
On the VPN Gateway Device dialog, choose the Routing Type of your VPN, either static or dynamic.
-
In the Name field, type a name for this VPN gateway device.
-
If this VPN uses a private circuit, in the Private Circuit Attachment dropdown, select the name of the private circuit attachment.
Leave this field blank if the VPN uses the public internet.
-
In the Gateway Device IP Address field, type the IP address of your VPN gateway device.
If the VPN uses the public internet, this can be a public IP address or behind a NAT.
If the VPN uses a private circuit, this must be an IP address in the private address space.
-
For VPNs using dynamic routing, in the BGP ASN field, type a Border Gateway Protocol (BGP) Autonomous System Number (ASN).
This ASN is used for routing purposes and must be unique in the network you are creating. See the on-screen hint for guidance on what range of ASNs to use.
-
Click Create.
The VPN connection is added to the list of active deployment attachments. Creation of a connection can take a few minutes. When the connection is ready, the State field changes from CREATING to COMPLETE.
Next, you need to complete the setup process on the corporate network side by configuring your gateway device:
-
In the VPN Connections section, in the Actions column for your VPN connection, click the Download Configuration for this Connection icon.
-
In the Gateway Device dialog box:
-
Enter the Vendor, Platform, and Software of your device.
The list of gateway devices is provided by AWS. If you do not see your exact device, choose the one most similar to your model.
-
Choose the Ike Version of your device.
This is the version of the Internet Key Exchange (IKE) protocol used by the device.
-
Click Download to download configuration instructions specific to your device and the settings you provided.
-
-
Follow the instructions in the document you just downloaded to configure the gateway device on the corporate network side.
These instructions are provided by AWS and are tailored for your specific gateway device. The VPN uses two tunnels, for redundancy, and you must configure both tunnels on your gateway device.
If you are using a dynamic VPN, the instructions include information on how to set up BGP, allowing you to choose which local networks should be reachable over the VPN and advertising the routes to Network Connect.
Note:The IKE and IPSec configuration settings in the instructions are for the AWS minimum encryption requirements.
Instead of these defaults, InterSystems recommends using the following settings for both Phase 1 and Phase 2 of the VPN encryption process:
-
Encryption Algorithm: AES256
-
Integrity Algorithm: SHA2-256
-
Diffie-Hellman Group: 20
-
-
After you have configured your gateway device, go back to the Configurations page and confirm that the Tunnel 1 Status and Tunnel 2 Status of your VPN connection appear with check marks.
This may take a few minutes. You may also have to click Refresh on the Configurations page to see the updated tunnel statuses.
To detach a VPN connection from the hub, in the Actions column in the row for that VPN connection, click the Delete VPN icon.
You cannot delete a static VPN if it has any networks associated with it. On the Networks page, delete all networks that target the static VPN, and then delete the VPN.
Manage Private Circuits
Please contact InterSystemsOpens in a new tab if you would like to set up a private circuit or remove an existing private circuit.
Once a private circuit has been set up, it will automatically appear in the Private Circuits section of the Configurations page as an attachment, along with any associated interfaces. The Connection Status column for your interfaces should show a green check mark.
A green check mark means that the physical connection is online for this interface, but it does not mean that traffic is flowing. If your connection is not yet configured or is misconfigured, you will still see the check mark.
The private circuit uses Border Gateway Protocol (BGP) to share its routes with Network Connect. The Autonomous System Number (ASN) of the attachment represents the Network Connect side of the private circuit, while the ASN of the interface represents the customer side.
After verifying that your private circuit appears in Network Connect, you need to complete the setup process on the corporate network side by configuring each of the interfaces on your gateway device:
-
In the Private Circuits section, in the Actions column for your private circuit, click the Download Connection Router Configuration icon.
-
In the Gateway Device dialog box:
-
In the Interface dropdown, select the interface you are configuring.
-
Enter the Vendor, Platform, and Software of your device.
If you do not see your exact device, choose the one most similar to your model.
-
Click Download to download configuration instructions specific to your device and software version.
-
-
Follow the instructions in the document you just downloaded to configure the interface on your gateway device.
The document will guide you through the process of configuring BGP for your private circuit interface.
For additional security, you can optionally set up a VPN over your private circuit to encrypt and authenticate traffic. A VPN defined to use the private circuit can use dynamic routing, in which case it uses its own layer of BGP peering. However, a VPN that uses a private circuit can also use static routing. See Manage VPN Connections.
About Peer Networks
A peer network is a hub hosted by a cloud service provider, where a number of VPNs or other connections can be attached. The peer network can then be attached to virtual cloud-based networks or other peer networks, eliminating the need for creating large numbers of point-to-point connections.
If you have an existing peer network hosted in the same cloud service provider as Network Connect, you can use Network Connect to direct traffic between your InterSystems cloud service deployments and your peer network.
Currently attached peer networks are displayed in the Peer Networks section on the Configurations page, along with the route tables that direct traffic from your peer network to your deployments. Use the Networks page to manage routes that target traffic from your deployments to your peer network.
Please contact InterSystemsOpens in a new tab if you would like to attach a peer network to Network Connect.
Route Table Configuration
The Configurations page displays visual representations of several types of route tables that are used to control traffic flowing between your InterSystems cloud service deployments and your VPNs, private circuits, or peer networks:
-
When you expand an entry in the VPN Connections section or the Private Circuits section or the Peer Networks section, you can see the route table that Network Connect uses to direct traffic from the VPN, private circuit, or peer network to the attached deployments.
-
When you expand an entry in the Deployment Attachments section, you can see two route tables:
The Deployment Route Table is used by the deployment to direct traffic to Network Connect. For any given route, the Route Target is always Network Connect.
The Network Connect Route Table is used to direct that traffic from Network Connect to the VPNs, private circuits, or peer networks. For a given route, the Route Target is the target of that route, for example, the Device Name of the target VPN.
After you attach a VPN, private circuit, or peer network, the deployment route tables need to be populated so that the attached deployments can communicate with it.
If your route tables get too large, Network Connect may use route summarization to bring the number of routes under the maximum number allowed. This aggregates routes by combining multiple CIDR blocks into larger CIDR blocks, thereby reducing the total number of routes.
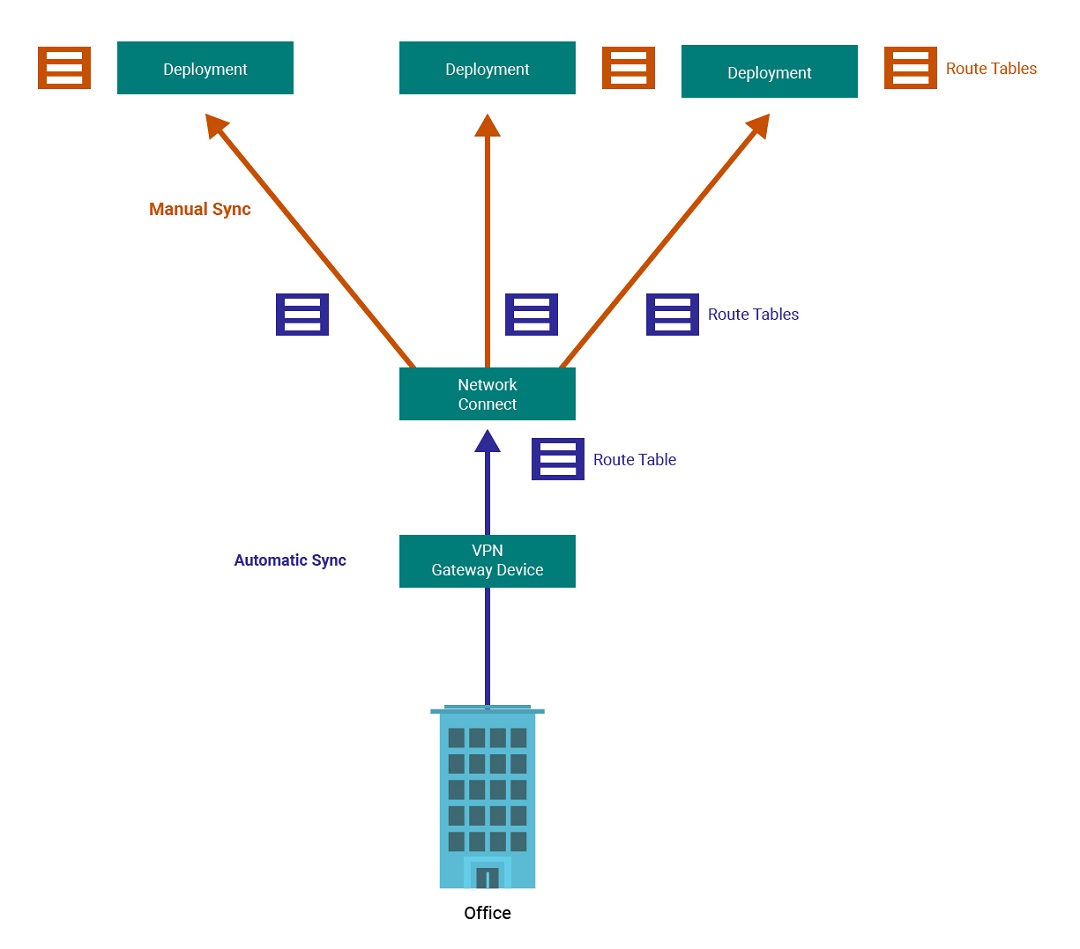
Dynamic Routing
In the case of dynamic VPNs or private circuits, routing information is automatically synchronized when you attach your gateway device to Network Connect. For this reason, you should make sure that your gateway device advertises its routes over BGP before you attach it to Network Connect.
Then, to synchronize the routing information from Network Connect to a deployment’s route table, click the Sync Routes icon in the Actions column for that deployment.
The diagram below illustrates this two-step process:
-
Automatic synchronization of routes from your gateway device to Network Connect when you attach the dynamic VPN or private circuit.
-
Manual synchronization of routes from Network Connect to a deployment when you click the Sync Routes icon.
Route tables are also synchronized from Network Connect to an attached InterSystems cloud service deployment when you create a new private firewall rule in the deployment.
Static Routing
The case of static VPNs and peer networks, a manual configuration step is required to populate the deployment route tables. Enter your routes on the Networks page, and then check the route tables for each deployment attachment to verify that the new routes have been synced successfully. If any routes do not appear for a particular deployment attachment, click the Sync Routes button to update the route table for that deployment.
For details on defining networks for static routing, see Networks page.
Communicate with a InterSystems Cloud Service Deployment Using Network Connect
Once you have attached a InterSystems cloud service deployment and a attached a VPN connection, private circuit, or peer network to Network Connect, you can communicate with the InterSystems cloud service deployment over the connection by using the deployment’s Virtual IP address. This address can be found on the Overview page of the Health Connect Cloud or InterSystems IRIS Managed Service deployment. If the InterSystems cloud service deployment was configured with the High Availability option, this Virtual IP address will continue to work no matter which mirror member is the primary member.