
Introducing InterSystems Network Connect
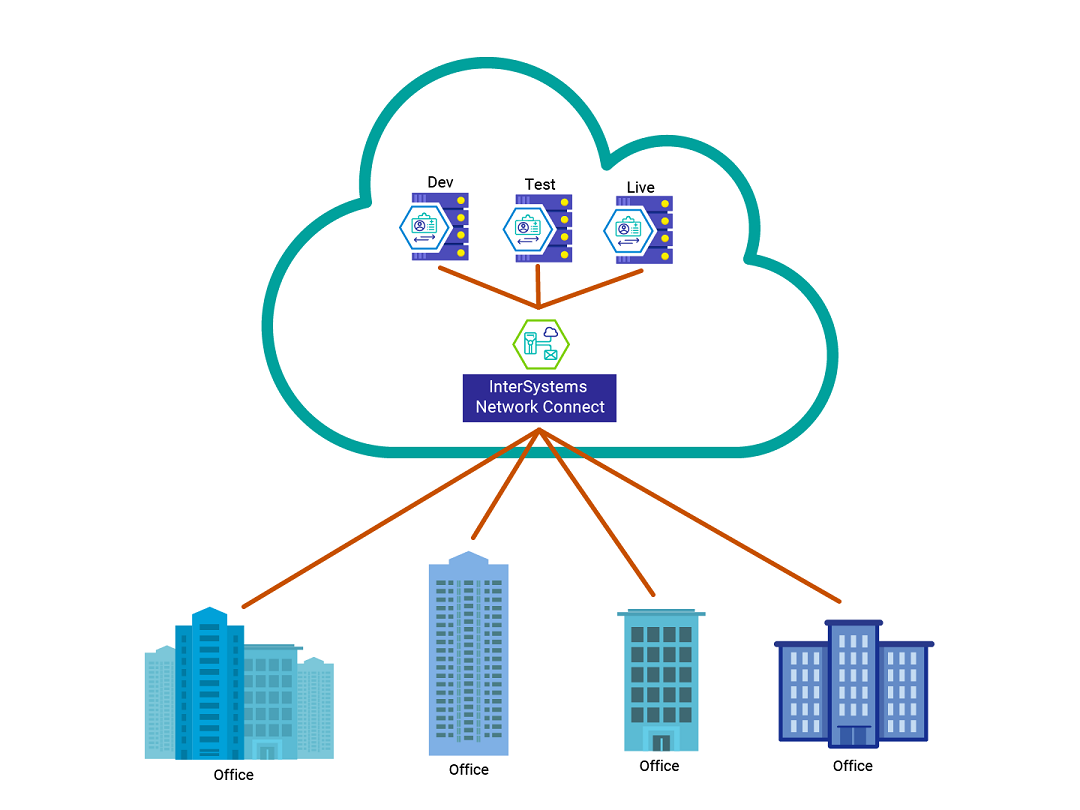
Use InterSystems Network Connect as a hub to connect your corporate network to all of your InterSystems cloud service deployments securely. Network Connect allows you to attach your InterSystems cloud service deployments to the hub and then to attach one or more secure connections from your corporate network to the hub. For example, you may have several office locations that each need to access three InterSystems cloud service deployments, representing your Development, Test, and Live environments. The hub topology allows you to create these secure channels efficiently, without having to create point-to-point connections for each combination of offices and deployments.
You can connect your corporate network to Network Connect using a VPN, which uses the Internet Protocol Security (IPsec) group of protocols to encrypt and authenticate IP packets, allowing you to send secure traffic over shared network infrastructure (in other words, the public internet). You can also use the private circuit option, where you provision a private physical connection between your on-premises location and the AWS private backbone network. This mechanism provides dedicated bandwidth and ensures that your network traffic never touches the public internet, resulting in improved network performance and security. To provide even greater security, you can set up a VPN over the private circuit, which combines the benefits of a dedicated line and the encryption of IPsec.
Network Connect also supports customer-controlled peer networks. You can attach VPNs and other connections to your peer network and then attach it to Network Connect. This allows you to route traffic between the peer network and your deployments.
If you want to subscribe to Network Connect, please contact InterSystemsOpens in a new tab. Currently, Network Connect is only available to HealthShare® Health Connect Cloud™, InterSystems IRIS® Managed Service, InterSystems FHIR Server, and InterSystems Data Studio™ customers.
Make sure each deployment you are planning on attaching to InterSystems Network Connect uses an IP address range for its private network that is distinct from the IP address range used for any other deployment attached to Network Connect. If your private networks contain overlapping IP addresses, they will cause a conflict when you try to attach the deployments to Network Connect.
All deployments must be in the same AWS region as Network Connect.
After subscribing to Network Connect, follow the easy steps in this introduction to get up and running.
For information on the configuration of Network Connect, see InterSystems Network Connect Reference Information.
To learn how a development team can work together using Network Connect, see Tenants PageOpens in a new tab.
To view a video overview of Network Connect, see Creating and Managing VPNs with InterSystems Network ConnectOpens in a new tab.
Set Up InterSystems Network Connect
Once you have subscribed to InterSystems Network Connect, follow these steps to get up and running.
Log in to the Cloud Services Portal
If you have an account in the Cloud Services PortalOpens in a new tab, log in to the portal.
If you do not have an account, sign up for one, as follows:
-
In your browser, go to the Cloud Services Portal create new account pageOpens in a new tab.
-
On the Create a New Account page, enter the requested information, and click Create Account.
-
Type the verification code sent to the email account you provided, and click Submit.
-
On the login screen, log in with your username and password.
If multi-factor authentication (MFA) is required to access your account, you will be asked to enable MFA. For more information, see Set Up Multi-Factor Authentication (MFA)Opens in a new tab.
After you log in to your new account, you are taken to the Cloud Services page.
Create a Deployment
After logging in to the Cloud Services Portal, the next step is to deploy Network Connect in the cloud.
-
On the main menu, click Deployments.
-
On the Deployments page, click Create New Deployment.
-
On the Create InterSystems IRIS Deployment page, in the Deployment Options section:
-
Under Networking Services, select Network Connect.
-
Under Network Connect Configuration, type an ASN (Autonomous System Number).
For routing purposes, this ASN must be unique in the network you are creating.
-
Click Continue.
-
-
In the Cloud Options section:
-
Under Cloud Provider, select a provider. (AWS is the only provider currently available.)
-
Under Region, select a region.
-
Click Continue.
-
-
In the Deployment Name section:
-
Type a name for your deployment. This cannot be changed once created.
-
Click Continue.
-
-
In the Review section:
-
Review the summary information.
-
Click Create.
-
It takes a few minutes to deploy Network Connect. When the deployment has been created, the status under the deployment name changes from CREATING to COMPLETE.
You can only create one Network Connect deployment per tenant. For information on tenants, see Tenants PageOpens in a new tab.
Click the card for the deployment to go to the Overview page for your new deployment. This page contains summary information, including your deployment’s Deployment ID. For more information, see Overview Page.
The Deployment ID uniquely identifies your deployment. If a deployment has a status where you cannot access the deployment’s Overview page (for example, CREATING or UPDATING), its card on the Deployments page will display the Deployment ID.
You cannot delete a Network Connect deployment if any InterSystems cloud service deployments, VPN connections, or private circuits are attached to it. You must detach these on the Configurations page before proceeding.
You can now configure your Network Connect deployment by clicking Configurations on the main menu. To read about all of the tasks you can perform on a deployment using the Cloud Services Portal, see Reference Information.
InterSystems Network Connect and the Health and Social Care Network
If you are a customer in the UK who connects to the Health and Social Care Network (HSCN) to exchange electronic information with other organizations, you can use InterSystems Network Connect to connect your InterSystems cloud service deployments to the HSCN. A peer network that is connected to the HSCN will appear on the Configurations page, allowing your deployments to communicate with NHS applications or other entities on the HSCN. In addition, a set of predefined routes will be set up for you on the Networks page to target traffic to the peer network.