
Welcome to InterSystems OMOP
The InterSystems OMOP, available as a HealthShare service through the InterSystems Cloud Services Portal, transforms HL7® FHIR® data into the Observational Medical Outcomes Partnership (OMOP) Common Data Model (CDM). The InterSystems OMOP looks at FHIR data stored in an S3 bucket and automatically transforms and sends the data to the cloud-hosted repository in the OMOP CDMOpens in a new tab format. You can then use external Observational Health Data Sciences and Informatics (OHDSI) tools, such as ATLAS or HADES, in conjunction with a database driverOpens in a new tab, such as JDBC, to perform analytical tasks on your data.
Deploy InterSystems OMOP
The following steps outline how to create an InterSystems OMOP deployment:
-
Create an S3 bucket for use with InterSystems OMOP and create a folder within it.
-
Go to the Cloud Services PortalOpens in a new tab to sign up for a subscription. Click Create Deployment to bring up the deployment creation page. Select InterSystems OMOP from the list of services. Fill out the fields to configure your deployment. You can edit these fields later on the Configurations page.
Input PropertiesIn the Input S3 Bucket field, specify the name of the S3 bucket.
In the Input S3 Prefix field, specify the name of the folder in the bucket that stores the FHIR data.
In the Terminology S3 Prefix field, specify the name of the folder in the bucket that stores any additional terminology mapping.
In the Input S3 Bucket Region field, specify the region of the S3 bucket.
Target PropertiesSelect OMOP Server from the Target type drop down.
Patient ID SelectionIn the Unique Patient Key FHIRPath Expression field, enter a FHIRPath expression that, when applied to a Patient resource, evaluates to a unique identifier for the patient. This expression allows the service to determine whether a new Patient corresponds with an existing Person record in the OMOP CDM. If nothing is specified, the deployment assumes that Patient.id uniquely identifies patients.
In the Person Source Value FHIRPath Expression field, enter a FHIRPath expression that, when applied to a Patient resource, evaluations to a value used to populate the PERSON.person_source_value field in the OMOP CDM. The default is the Patient.id field.
The following FHIRPath expression (which has been formatted for legibility) can be used in either the Unique Patient Key FHIRPath Expression or Person Source Value FHIRPath Expression field to select the patient’s SSN:
Patient.identifier.where(
  type.coding.code = 'SS' and
  type.coding.system = 'http://terminology.hl7.org/CodeSystem/v2-0203'
).value
Data Filtering and SuppressionUnder Suppressed OMOP Tables, select the names of the OMOP tables that you would like to suppress. In particular, you can prevent the creation of the following OMOP tables: Condition_Occurrence, Measurement, Observation, Procedure_Occurrence, Death, and Drug_Exposure. This suppression can be used to avoid projecting any data that you are not permitted to use.
Under Suppressed OMOP Fields, select the names of the fields of particular tables to exclude sensitive information. You can exclude the following fields: LOCATION.address_1, LOCATION.zip, PROVIDER.provider_name, PROVIDER.dea, PROVIDER.npi, and CARE_SITE.care_site_name.
To read more about the mapping from FHIR resources to OMOP tables, refer to InterSystems OMOP Transformation Details.
External OMOP Repository Connection ParametersBy default, the OMOP Platform provides users with a deployment of InterSystems IRIS® Cloud SQL with the OMOP ontology preloaded to store your transformed data. However, if you would prefer to store your transformed data in an external data source, you can select the Enable External Database box and fill out the fields to establish a JDBC connection with the external source. In particular, you must provide the JDBC Url, the JDBC Port, the name of the JDBC User, the JDBC password, and a TLS certificate.
-
Enter a password to secure your deployment, then select a cloud provider and region. Give your deployment a name, then review your configuration and click Create.
-
In the deployments table, see your named deployment appear with a status of “Pending.” It can take up to 20 minutes to create the deployment. Once the deployment is created, it is marked with a status of “Running.”
-
Open your deployment. On the Configurations page, copy the provided policy and add it to the list of policy statements accepted by your S3 bucket. While on this page, you may also edit some of the configuration parameters you set while creating the deployment; however, note that changing these values after deployment creation does not change any data that has already been transformed.
-
Upload your FHIR files to your S3 bucket to trigger the transformation. For more details on how these files should be formatted and how the transformation works, see Transform FHIR Data.
-
To see your deployment in action, navigate to the Metrics page in the Cloud Services Portal. Notice that the Bulk FHIR file you previously uploaded is listed with the time the ingestion began. Once ingestion is complete, the number of patients will also be listed in the table, indicating that the transformation from the FHIR format to the OMOP CDM has begun. When the transformation is complete, the time that the transformation
Once the file has been completely processed, click on the file name to see metrics that provide an overview of the data. To understand how the transformation maps FHIR fields to OMOP CDM fields, see InterSystems OMOP Transformation Details.
-
You can view any transformation errors or warnings on the Errors page and metrics about the resources loaded on the Metrics page. See the Understand Process Errors section for information on the errors and warnings that the transformation reports.
-
To view the data itself, you can navigate to the SQL Query Tools page and query the schema that store the OMOP data. If you configured access to an external OMOP repository, you can also access the data through that external source.
Congratulations! You have successfully deployed InterSystems OMOP and completed the transformation pipeline.
Transform FHIR Data
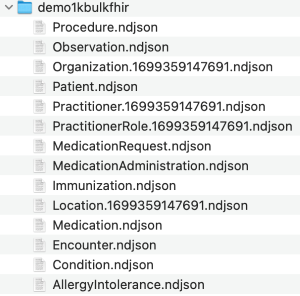
The deployment periodically looks in the S3 bucket to see if new files have been added and performs the data transformation on these files automatically. Simply add bulk FHIR files to your S3 bucket to start the transformation of your data to the OMOP CDM. FHIR data added to your S3 bucket can be stored in an NDJSON file with a standard FHIR bundle structure, a folder containing multiple layers of such NDJSON files, or contained in a zip file in the Bulk FHIR format. A zipped file should be structured as shown in the picture below:
For more information about the NDJSON format used in Bulk FHIR, see the official HL7 documentationOpens in a new tab.
All transformed data is stored in the OMOP repository in your deployment. If new FHIR data is for an existing patient then, to ensure data integrity, the service deletes all the existing data for the patient in the OMOP repository and replaces it with the new FHIR data. Therefore, the new FHIR data should include all the historical patient data previously sent to the OMOP platform. Any data the references a patient that is not included in the new FHIR data is considered “orphaned” and is reported as an ingestion error.
When updating a patient, ensure the new FHIR data contains the historical patient data as the OMOP platform deletes all existing data for the patient.
The deployment automatically maps nonstandard terminologies in FHIR data to the standard terminology in OMOP ontology. Below is an example of mapping ICD10 to SCT:

For more information about mapping non-standard terminologies in FHIR data to standardized terminologies in OMOP, see Terminology Mapping.
Access OMOP Data
You can access the data in the deployment from a Python, Java, .NET, or C++ application through the use of a database driver, in just three steps:
-
Download the InterSystems driverOpens in a new tab for DB-API, JDBC, ADO.NET, or ODBC.
-
Get the connection information from your deployment from the Deployment Details section of the Overview page in the Portal, and confirm that external connections are enabled.
-
Add the connection string to your application as described in Connecting Your Application to InterSystems IRIS Cloud SQL.
Once you have accessed the data from your application, use OHDSI toolsOpens in a new tab to assess and analyze the data that has been standardized in the OMOP CDM. See OMOP Odyssey - CelebrationOpens in a new tab, an article in the InterSystems Developer CommunityOpens in a new tab, for more information on using the iris dialect with the DatabaseConnectorOpens in a new tab in HADES.
Other Developer Community articles that you may find helpful as you explore performing analytical OHDSI tasks on InterSystems OMOP:
-
OMOP Odyssey - InterSystems OMOP, The Cloud ServiceOpens in a new tab: Configure InterSystems OMOP to use an external OMOP database, such as Postgres.
-
OMOP Odyssey - FHIR to OMOP ETLOpens in a new tab: Explore the transformation from FHIR to OMOP in depth.
-
OMOP Odyssey - No Code CDM Exploration with Databricks AI/BI GenieOpens in a new tab: Use Databricks to write no-code queries for an OMOP repository.
Understand Process Errors
The Errors page reports any issues that arose as your deployment accessed the S3 bucket, processed files added to the S3 bucket, and stored the transformed records in a repository. These issues fall into two distinct categories:
-
Warnings: The deployment raises a warning when there is a failure to map data in a field from a FHIR resource to a non-required field in an OMOP CDM record; this OMOP CDM record is created, but contains one (or more) empty fields. If a warning is triggered when processing a coded field with a value not found in the OMOP CDM ontology, it can be addressed by adding a custom terminology mapping to include the data.
-
Errors: The deployment raises an error when there is an issue processing the data contained in a particular field. In this case, the deployment fails to create an OMOP CDM record and reports what FHIR resource the error originated from. The issue can arise from any of the following cases:
-
Missing a required field: The deployment raises an error when the transformation would create an OMOP CDM record that lacks one of the required fields of the OMOP CDM. This typically occurs when the FHIR resource does not have data in the field that maps to the required field.
-
Unrecognized terminology: When the deployment cannot recognize the FHIR terminology, it cannot map to standard OMOP concepts.
-
FHIR validation errors: The deployment validates all FHIR resources before attempting to transform them and any resource that fails validation is not transformed into an OMOP CDM record. Any FHIR resource that does not conform with the standard fails validation. For example, if a property has wrong datatype or if the FHIR resource does not contain a required property.
-
S3 access errors: The deployment raises an error when it cannot properly connect with the configured S3 bucket.
-
External data source access errors: The deployment raises an error when there is an issue with the connection between the deployment and the external data source in which it attempts to store an OMOP CDM record.
-
To fix most of these issues, you must modify the input FHIR data. Error messages reported on the Errors page indicate which resources the OMOP Platform was unable to transform, so you can find the origin of the error, modify the source, and re-upload the data that failed the transformation.
To fix an S3 access error, make sure that the input properties specifying how to access your bucket are correct.
Transformation Error Examples
The transformation cannot find a value in the source FHIR resource. For example: a Patient resource contains neither the gender element nor the birthSex extension.
The system element is missing or contains a value that cannot convert to OMOP’s vocabulary ID. To remediate, add an entry to the system lookup table.
The code element is missing or contains a value that cannot convert to the concept ID of a standard OMOP concept. To remediate this error, add an entry to the primary lookup table.
Terminology Mapping
If you defined a Terminology S3 Prefix when creating a deployment, you can extend the default vocabulary of the OMOP Platform by uploading a .csv file into your S3 bucket at the defined location. Each file is processed individually when it is added to the S3 bucket.
There are two valid formats of .csv files that can be uploaded to your bucket. One format adds values to the OMOP vocabularyOpens in a new tab file and the other adds values to the OMOP conceptOpens in a new tab file, enabling you to define extensions on the default vocabulary sets. By adding various vocabularies and concepts, you can ensure the proper transformation of data from the OMOP CDM into the FHIR format.
Add a .csv file that has exactly two columns: system and vocabulary (in that order). In the system column, denote the FHIR code system’s canonical URL. In the vocabulary column, specify the VOCABULARY_ID of the code system from the OMOP CDM. These two columns create a mapping between a specific FHIR code system and a supported OMOP vocabulary, ensuring that data is transformed correctly.
To add a new mapping or update an older one, a value in both columns is necessary; this will add or update the name of the vocabulary associated with the specified coding system’s canonical URL. To delete a mapping, leave the vocabulary field blank, but specify a coding system URL; this will remove the coding system URL from the system’s transformation process.
The following example demonstrates what this .csv file might look like. It contains three rows: the first row adds the LOINC vocabulary, the second row adds the ICD9CM vocabulary, and the third row removes the vocabulary (RxNorm) associated with the urn:oid:2.16.840.1.113883.6.88 coding system.
system,vocabulary
http://loinc.org,LOINC
urn:oid:2.16.840.1.113883.6.2,ICD9CM
urn:oid:2.16.840.1.113883.6.88,
Add a .csv file that has seven columns:
-
domainId: The DOMAIN_IDOpens in a new tab of the OMOP concept.
-
system: The FHIR code system’s canonical URLOpens in a new tab.
-
code: The code in FHIR to be translated to a standard OMOP concept. This value typically goes with system and display.
-
conceptId: The CONCEPT_IDOpens in a new tab of a standard OMOP concept.
-
relationshipId: The mapping relationshipOpens in a new tab, either “Maps to” or “Maps to value.”
-
display: An optional column that represents the meaning of the code within the system.
-
sourceConceptId: An optional column that specifies the unique CONCEPT_ID of a non-standard concept that corresponds to the code extracted from FHIR.
All rows must have unique values for domainId, system, and code. display, and sourceConceptId are optional for all rows.
To add or update a row, specify values in the domainId, system, code, conceptId and relationshipId columns. To delete a concept mapping from the table, simply specify values for domainId, system, and code, while omitting the conceptId.
The following example demonstrates what this .csv file might look like. It contains three rows: the first two rows add concept mappings, and the third row removes one.
domainId,system,code,conceptId,relationshipId,display,sourceConceptId
Drug,urn:oid:1.2.36.1.2001.1005.17,AGRPL,40213153,Maps to,Agrippal,
Unit,http://unitsofmeasure.org,m[IU]/L,9040,,Maps to,m[IU]/L,
Unit,http://unitsofmeasure.org,{score},,,,
The following diagram (also seen above in Transform FHIR Data) demonstrates many of these fields in action. A FHIR record is represented as the source data, which is ingested into the OMOP CDM as a non-standard concept. Using the concept relationship defined by the mapping file, the non-standard concept is mapped to a standard concept.
-
domainId: Found under the standard or non-standard Concept > domain_id, with the value Observation (related standard and non-standard concepts typically have the same domain_id).
-
system: Found under Source Data > system, with the value http://hl7.org/fhir/sid/icd-10-cm.
-
code: Found under Source Data > code, with value W61.51.
-
conceptId: Found under the standard Concept > concept_id, with value 4314097.
-
relationshipId: Found under Concept_Relationship > relationship_id, with value Maps to.
-
display: Found under non-standard Concept > concept_name.
-
sourceConceptId: Found under the non-standard Concept > concept_id with value 21222, which corresponds with the ICD10CM code W61.51, representing the non-standard “Bitten by goose” concept_name.
Default Vocabulary
By default, InterSystems OMOP already supports a subset of the OHDSI Standardized Vocabularies. Transformations that require these vocabularies work out of the box and do not require you to manually add any additional vocabularies. These supported vocabularies are:
Learning Resources
To learn more about the InterSystems OMOP, explore the following resources:
-
What is the InterSystems OMOP?Opens in a new tab (video, 3m)
-
Using InterSystems OMOP to Transform FHIR DataOpens in a new tab (video, 20m)
To learn more about working with OHDSI tools with InterSystems OMOP and other InterSystems products, explore the following articles in the InterSystems Developer Community:
-
OMOP Odyssey - InterSystems OMOP, The Cloud ServiceOpens in a new tab (Developer Community article, 8m)
-
OMOP Odyssey - CelebrationOpens in a new tab (Developer Community article, 5m)
-
OMOP Odyssey - FHIR to OMOP ETLOpens in a new tab (Developer Community article, 5m)
-
OMOP Odyssey - No Code CDM Exploration with Databricks AI/BI GenieOpens in a new tab (Developer Community article, 4m)