X12 Schemas and Available Tools
This chapter provides an overview of the Ensemble tools that you can use to work with X12 schemas and documents. It contains the following sections:
Using the X12 Schema Structures Page
The X12 Schemas page enables you to import and view X12 schema specifications.
To display this page, click Ensemble > Interoperate > ASC X12 > ASC X12 Schema Structures.
For general information on using this page, see “Using the Schema Structures Page” in Ensemble Virtual Documents.
To determine the schema structures, Ensemble extracts details from the .SETS, .SEGS, .COMS, .ELMS, and .CODES sections of the SEF file that was imported to define the structure of this X12 document. The description of a document is extracted from the .INI section of the SEF file that defines this X12 schema; an example is “Healthcare Claim Status Request.”
Loading X12 Schemas into Ensemble
To load an X12 schema into Ensemble from the Schema Structures page, click Import and select your file.
For suggestions on where to find SEF files (X12 schemas) to import, see “Standard Exchange Format (SEF) Files,” in the first chapter.
Loading SEF Files Programmatically
To load SEF files programmatically:
-
Start a Terminal session.
-
Change to an Ensemble namespace and issue the following command:
Do ##class(EnsLib.EDI.SEF.Compiler).Import(filename)
Where filename is the full pathname of the SEF file.
This command imports the data from the SEF file and makes it available as a schema definition within Ensemble.
-
Ensemble creates a name for the new schema category from the first piece of the first line in the .INI section of the SEF file. For example, in 837_X097.SEF you might see this line:
.INI 837_X098,,004 010 X098,X,X12-4010,Healthcare Claim: Professional
The extracted schema category would have this name:
837_X098
Due to the schema naming convention, if you want to edit an SEF file to customize it, InterSystems suggests that you first change the text in the SEF file that provides its category name, so that you can distinguish your version from any other SEF file that you also import into Ensemble.
-
An SEF file may contain syntax errors. If so, Ensemble issues an error message and identifies the location of the error in the SEF file.
Viewing a Document Structure
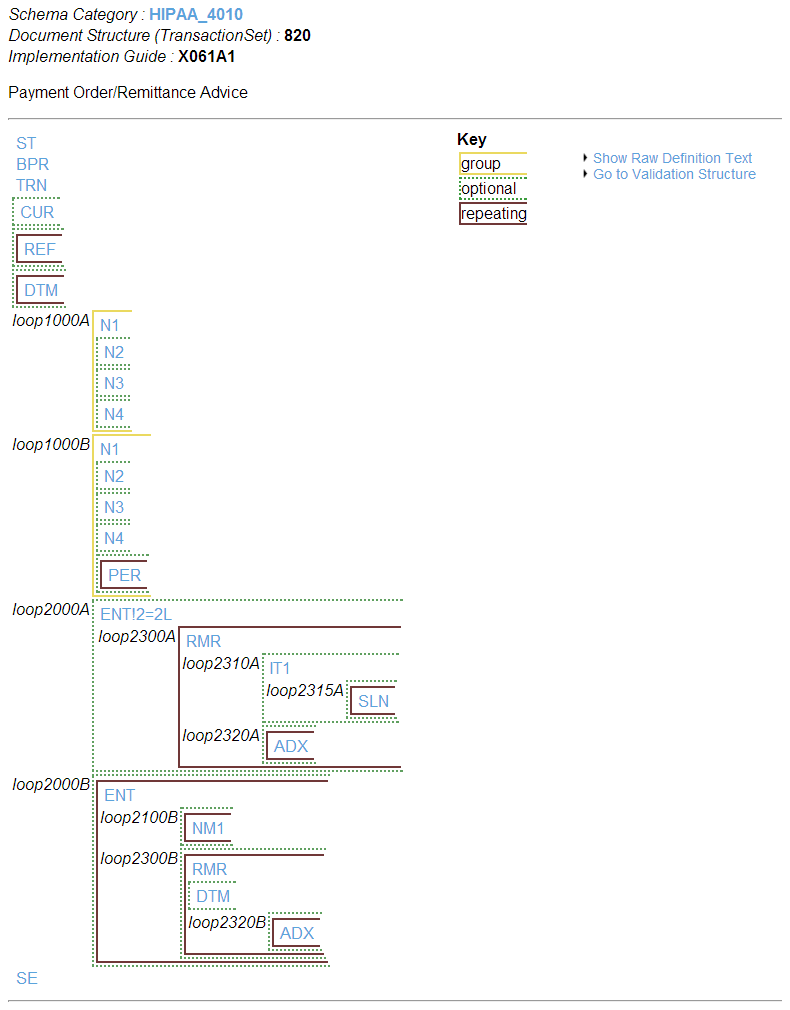
To view the internal organization of a document structure, click its name from the DocType Structures tab on the X12 Schemas page. Ensemble displays the segment structure of the document using the system of visual cues explained below. This is the X12 Document Structure page. The following example shows the HIPAA_4010:820 document structure.
Layout
-
Segments are listed in blue text and link to the relevant segment structure page.
-
Loops are listed in black text.
-
The segments that comprise the document structure are listed in sequential order, from left to right and top to bottom.
-
The name of each document segment is displayed: BPR, NM1, DTM, etc. This name indicates the type of segment that exists at this location in the X12 document structure.
-
Green dotted lines enclose segments that are optional.
-
Brown solid lines enclose segments that, if present, may repeat several times.
-
Yellow solid lines enclose segments that are part of a group.
-
A segment may be both repeating and optional (see segment NM1 above).
-
When you are viewing a segment diagram, if you hover the cursor over a three-letter segment name, a tooltip displays the syntax for referring to this segment in a virtual property path.
Raw Definition
To see the document structure in a raw text format, click Show Raw Definition Text. The raw definition of the HIPAA_4010:820 document structure is as follows:

Loops in X12 can have custom names. Note in the above raw definition sample for HIPAA_4010:820 that loop titles directly follow open bracket characters “[,{,(” unlike segment names, which are separated from bracket characters by a tilde “~”. To use a custom loop name, type in your custom name in the place of the default loop name within the schema file prior to importing the schema into Ensemble.
Legacy Document Structure
You can view the old document structure viewer for schemas by clicking Go to Validation Structure. The legacy document structure also provides some information that is not available in the default document structure viewer. For example, the legacy document structure can provide code tables, the number of loop repetitions allowed, and syntax notes.
Implementation Guide
This code identifies the relevant ASC X12 Implementation Guide which can be found at http://www.wpc-edi.com/Opens in a new tab. The identifier is unique across all document structures and schemas.
Viewing a Segment Structure
To view the structure of a document segment, click on its name in any page similar to the example shown in the previous section. Ensemble displays a table that lists all the fields in that segment. This is the X12 Schema Segment Structure page.
For example, if you click on the PER segment in the HIPAA_4010:276 document structure, Ensemble displays the following page.
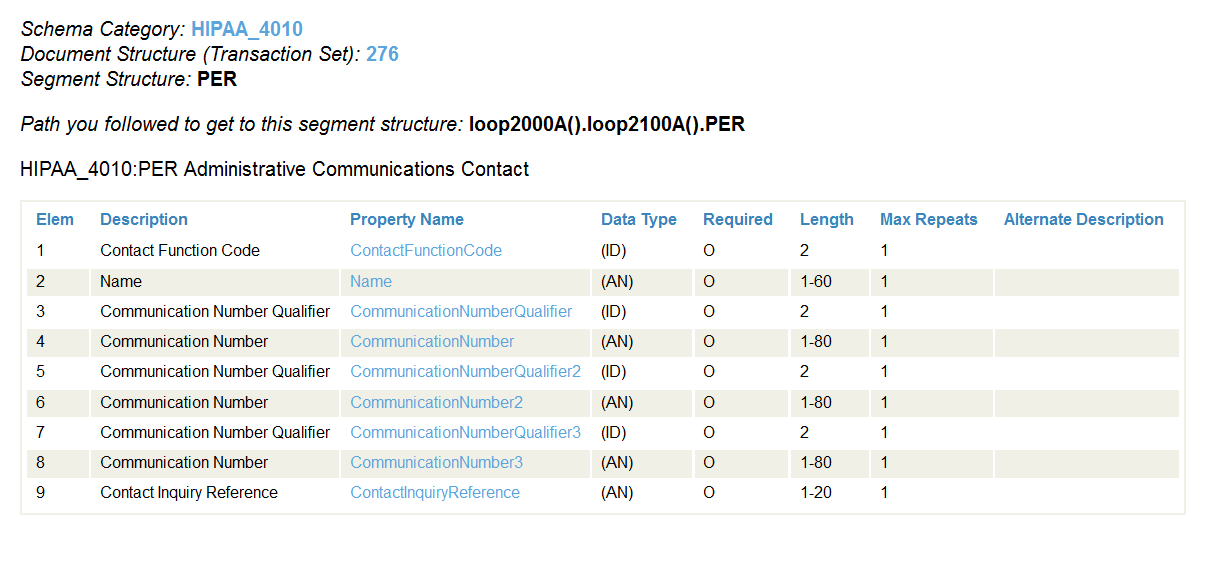
The columns are as follows:
-
Elem — the number to use to access the element within the segment (if you prefer numbers).
-
Description — a short description of the element.
-
Property Name — the name to use to access the element within the segment (if you prefer names).
-
Data Type — a one- to two-letter symbol representing the element data type. See the table below for details.
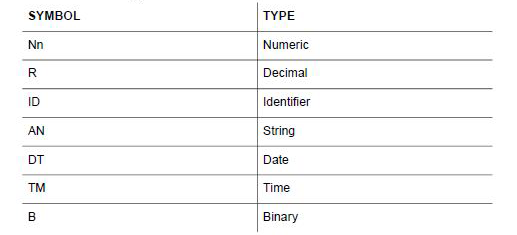
-
Required — displays R for required, O for optional.
-
Length — the number of characters that can be in the element. If only one number is present, it represents the maximum number of characters. If two numbers are separated by a hyphen, it is the range of characters that can be in the associated element (minimum-maximum).
-
Max Repeats — the maximum number of times the element can repeat.
-
Alternate Description — a second, longer description of the element.
You can use this information, particularly the Property Name column, to build virtual property paths for Ensemble in the format segment:elem. The following are examples of virtual property paths involving simple elem values from the PER segment in the HIPAA_4010:276 document structure. The () shortcut syntax indicates all available instances of a repeating field, whereas (1) indicates the first instance:
loop2000A().loop2100A().PER:ContactFunctionCode
loop2000A().loop2100A(1).PER:ContactFunctionCode
loop2000A().loop2100A(2).PER:ContactFunctionCode
loop2000A().loop2100A(x).PER:ContactFunctionCode
loop2000A().loop2100A().PER:Name
Viewing a Composite Structure
When you click on a name in the Composite Structure column, Ensemble displays all the elements in that data structure. This is the X12 Composite Structure page. The column values are identical to those of the previous section.
Choosing a Different Category
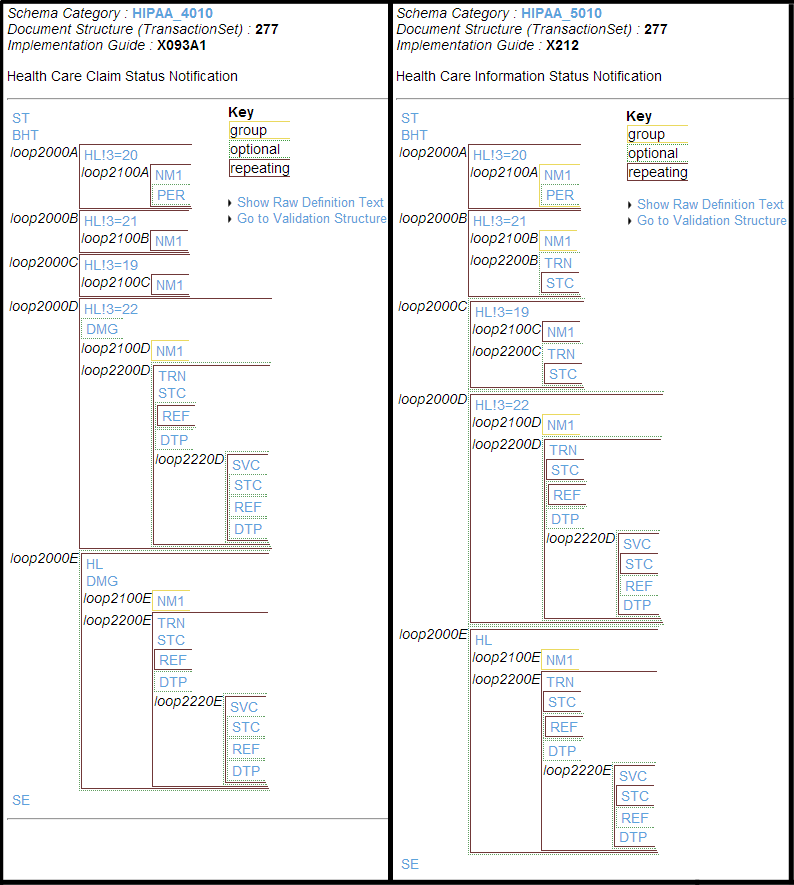
It is a feature of the X12 standard that a document structure can differ by X12 version, even when the structure has the same name and number. For example, both X12 HIPAA_4010 and X12 HIPAA_5010 define a document structure called 277, but these definitions contain different segments. Ensemble provides the document structure definitions HIPAA_4010:277 and HIPAA_5010:277. The X12 Document Structure page makes it easy to see the differences between the two definitions, as the following two figures show.
Using the X12 Document Viewer Page
Ensemble provides a Document Viewer page for X12. You can use this page to display, transform, and export X12 documents (either external files or documents from the Ensemble message archives).
To access this page:
-
Click Ensemble.
-
Click Interoperate.
-
Click ASC X12
-
Click ASC X12 Document Viewer and then click Go.
Selecting Options
To specify the document to display:
-
For Document Source, select File, Message Header ID, or Message Body ID.
-
Specify the document to display:
-
If you selected File, use Browse to choose a file. For Document Number in File, type the number of the document to display.
-
If you selected Message Header ID or Message Body ID, type the ID of the message header or message body to display.
-
-
Specify how to parse the document. To do so, select one of the following options for Document Structure or Schema:
-
As received by a Business Service — Use the schema as assigned by a business service. If you select this, select a business service from the drop-down list.
This option enables you to determine the DocType to which a particular business service would assign this document.
-
Use a specific Schema Category/Version — Choose a document category from the drop-down list.
-
Use a specific DocType — Enter the name of an document structure (<MessageStructure>) in the format category:structure. The parser uses this document structure.
-
Use content-declared Version:Name — Use the document structure associated with the document type declared in the document.
-
Use object's stored DocType — Use the DocType as declared in the document body object. (This option does not apply to stored documents loaded from a file.)
-
None — Do not use any DocType to parse the document. Instead, display the raw segments without transforming any of them into links.
This option enables you to try interpreting documents from a particular data source as different schema category types to determine which DocType is the right one to use when handling documents from that source. There are a variety of reasons why you might need to do this. For example, you might find when you update an external application that it has changed the actual version of the documents it sends, but has neglected to update the type declaration that it sends in these documents. It is also useful in determining which of the built-in categories to use as a schema base, when a document uses a custom document structure.
-
-
Optionally click Transform Document? and specify the transformation details. See Testing a Transformation.
-
Click OK.
Parsing the Document
To parse the document, set the options described above and click OK. The Document Viewer displays the following on the right side of the screen:
-
A summary of the document which contains following basic information:
-
The Data Transformation applied, if applicable
-
The Document ID
-
The DocType
-
The DocType description, if available
-
The number of segments
-
The Document ID of parent documents, if applicable
-
-
The document data, which has one row for each segment in the document structure. Each row contains:
-
Segment number
-
Segment name, such as ISA or DN1
-
Element contents and separators, as contained in the document
-
If the document matches the schema you have selected, segments and elements will appear as links to the relevant structure page.
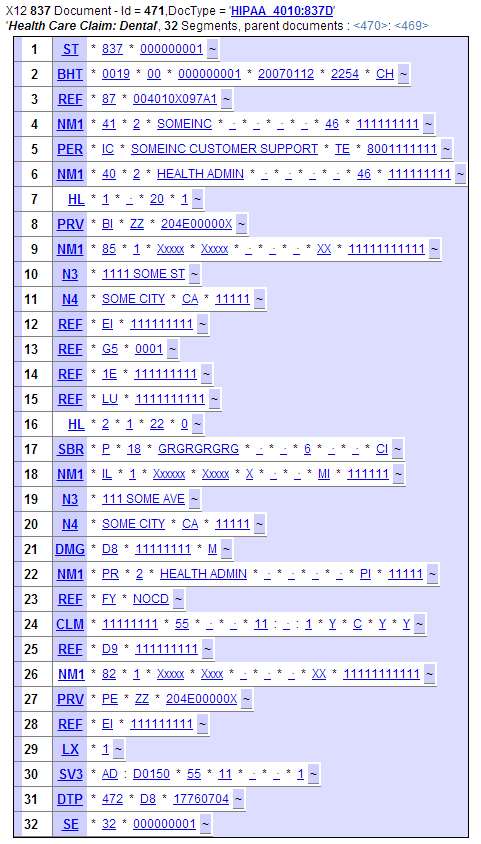
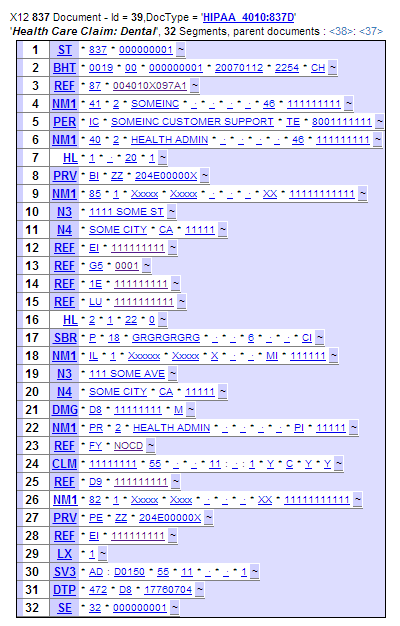
Due to the multiplicity of X12 DocType structures that use the same transaction set identifier code (ST:1), Ensemble uses the reference identification number (REF:2) — see Implementation Guide — to uniquely identify document types. For example, examine HIPAA_4010:837P and HIPAA_4010:837D. Both documents have a transaction set identifier of 837, however each has a distinct reference identification number.
Displaying the Segment Address
To display a segment address, hover the cursor over a segment name in the shaded column. The tooltip displays the following:
-
Segment address to use in a virtual property path
-
Descriptive name of this segment

Displaying the Element Address
To display the Element address, hover the cursor over a field within the document structure. The tooltip displays the following:
-
The element address to use in a virtual property path (as a number)
-
The element address to use in a virtual property path (as a name)

Viewing X12 Interchanges
When viewing Transaction Sets nested in Groups and Interchanges the X12 Document allows you to walk through the document structure one level at a time.
The following display is the result of using the X12 document viewer to view a 4010:Interchange document.
The Document Viewer assigns the group document the identifier <38>.

When you click on a group document link in an X12 Interchange document display, a new browser window opens to display the group document. The document Viewer window, with the top-level parent, remains open in the original browser window.
The next display is the result of clicking the link to Group document <38>.
If there are more than 10 Groups in an Interchange or more than 10 Transaction Sets in a Group, the Document Viewer displays links to the first five and last five documents. Between the lists is a text field, into which you can enter any identifier number between the first and last numbers. After you enter a number, click Other. A new browser window opens to display the document.

The next display is the result of clicking the Transaction Set <39>. You can return to either the Group or the Interchange by clicking their respective Document ID number links.
When you are done viewing documents in the batch document hierarchy, you can close all the pop-up browser windows until the top-level parent document remains in the original document Viewer window. From here, you may return to other Management Portal activities.
Testing a Transformation
To test a transformation:
-
Check Transform Document?.
-
For Choose Data Transformation, select a data transformation.
-
For Choose Display Option, select one of the following:
-
Transformation Result Only — Display only the transformed document.
-
Original Message and Result Together — Display both the original document and the transformed document.
-
-
Now do either or both of the following:
-
Click OK to display the transformed document.
-
Click Save Result To File? to save the transformed document to a file. In this case, also specify a path and filename.
The default directory is the management directory for the active namespace. For example, if you installed Ensemble into the directory C:\MyCache and your current namespace is ENSDEMO, the file is saved as C:\MyCache\Mgr\ENSDEMO\filename
-
X12 Classes
For reference, this section lists the classes that Ensemble provides to enable you to work with X12 documents.
| Item | Classes | Notes |
|---|---|---|
| X12 business services* | Each of these X12 business service classes uses a different adapter, as indicated by the class name. | |
| X12 business process* | EnsLib.MsgRouter.VDocRoutingEngineOpens in a new tab | This class is the standard virtual document business process. |
| X12 business operations* | Each of these X12 business operation classes uses a different adapter, as indicated by the class name. | |
| Messages | EnsLib.EDI.DocumentOpens in a new tab (automatically used by the business host classes) | This is a specialized message class to carry X12 documents as Ensemble virtual documents. |
| Search table | EnsLib.EDI.X12.SearchTableOpens in a new tab | This is a specialized search table class for X12 documents. |
*When you configure a production to work with X12 documents, the Management Portal automatically selects the appropriate business host class.
You can also create and use subclasses of these classes.
The business host classes include configurable targets. The following diagram shows some of them:
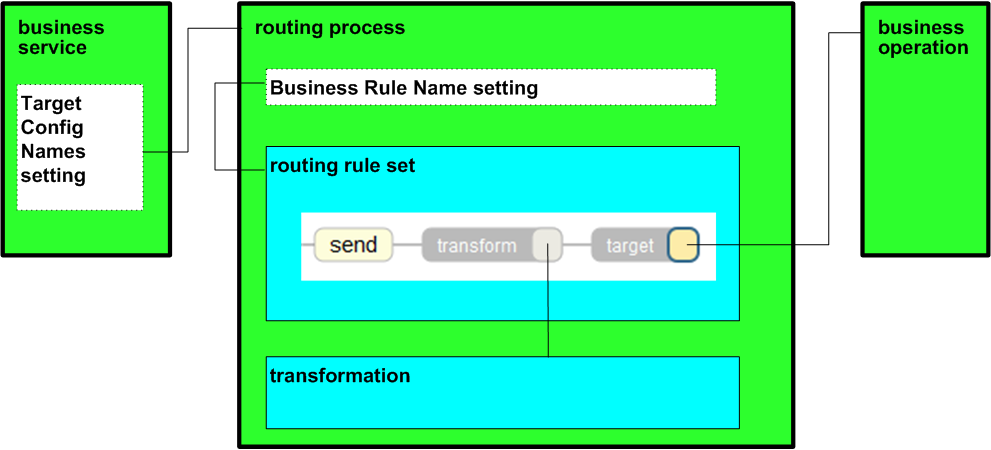
For information on other configurable targets, see “Reference for Settings.”
Creating Custom X12 Schemas
To create custom X12 schemas, do the following in Studio:
-
From the File menu, choose New.
-
The New dialog displays. Select the Custom tab.
-
Select the HL7 Schema icon and click OK.
-
Enter a New Schema Name. This is the <Category> name of the new schema.
-
Enter a Base Schema Name. Specify the <Category> name of the schema base.
-
Click OK.
You are now ready to edit your new file to add and remove XML statements from the <Category> block. The basic editing steps are as follows:
-
Define custom segments using <SegmentStructure> elements.
-
Define custom <MessageStructure> elements that contain the custom segments.
-
Define custom <MessageType> elements that contain the custom message structures.
-
From the File menu, choose Save. This action both saves and compiles the new category definition.
-
Try viewing the new category definition from the Management Portal. See Portal Tools.
For information on creating custom schema categories, see “Creating Custom Schema Categories” in Ensemble Virtual Documents.
Defining X12 Search Tables
The X12 search table class, EnsLib.EDI.X12.SearchTableOpens in a new tab, automatically indexes the X12 document ID, which it gives the name Identifier.
If you need more items to search, you can create a subclass. The subclass inherits the Identifier property, plus the infrastructure that makes search tables work. For details, see “Defining a Search Table Class” in Ensemble Virtual Documents.
Be sure to perform all tasks in the same namespace that contains your production. Do not use reserved package names; see “Reserved Package Names” in Developing Ensemble Productions. Also see “Overriding the Validation Logic” in Ensemble Virtual Documents.