Useful Skills to Learn
The purpose of this chapter is to briefly describe the Caché-specific tasks with which you should familiarize yourself. If you are familiar with how, when, and why to perform the tasks described in this chapter, you will be able to save yourself some time and effort. It discusses the following topics:
-
How to view a query plan, which helps you determine how to speed up the query
-
How to build indices for a class if you add an index after creating records
Finding Definitions of Code Elements
This section describes how to find the actual code that defines code elements of different types. It discusses:
-
How to find a class member in the InterSystems Class Reference
-
How to find subclasses of a class in the InterSystems Class Reference
Also see the appendix “What’s That?”
Finding a Class Member in Studio
For a class member (property, method, parameter, and so on) to see its definition, you must find the class in which it is defined. To find the class quickly in Studio:
-
Press Ctrl+Shift+f
-
For Find what, type the member name.
-
For File types, choose .cls
-
Select Find.
Usually this returns a small number of classes to look at. You can determine which is the appropriate class by closer examination.
Finding a Class Member in the InterSystems Class Reference
To find a class member in the InterSystems Class Reference:
-
Select Search.
-
For Search for, select All classes that define.
-
For Type, select Method or other kind of class member.
-
For Name, type the name of the class member to find. The search is case-sensitive.
-
Select Search.
Usually this returns a small number of classes to look at. You can determine which is the appropriate class by closer examination.
Finding Subclasses in the InterSystems Class Reference
Sometimes you need to find all the subclasses of a certain class (for example, if you are rearranging the inheritances among your classes). The quickest way to do so is to open the class in the InterSystems Class Reference. The summary area displays a list of all the subclasses of your class.
Finding a Macro in Studio
The macro could be defined within the code you are currently looking at or it could be defined in an INC file that your code uses (including the system include files provided by Caché). An INC file can include other INC files, and a class inherits all the INC files used by any superclass.
To find the INC file that defines a macro, right-click the macro and select Goto macroname.
If the macro is not defined in an include file, do the following in Studio:
-
Press Ctrl+Shift+f
-
For Find what, type the macro name, without the preceding $$$
Some of the macros supplied by Cache are documented in “System-supplied Macro Reference” in Using Caché ObjectScript.
Defining Databases
To create a local database:
-
Access the Management Portal.
-
Select System Administration > Configuration > System Configurations > Local Databases.
-
Select Create New Database to open the Database Wizard.
-
Enter the following information for the new database:
-
Enter a database name in the text box. Usually this is a short string containing alphanumeric characters; for rules, see “Configuring Databases” in the Caché System Administration Guide.
-
Enter a directory name or select Browse to select a database directory. If this is the first database you are creating, you must browse to the parent directory in which you want to create the database; if you created other databases, the default database directory is the parent directory of the last database you created.
-
-
Select Finish.
For additional options and information on creating remote databases, see “Configuring Cache” in the Caché System Administration Guide.
Defining Namespaces
To create a namespace that uses local databases:
-
Access the Management Portal.
-
Select System Administration > Configuration > System Configurations > Namespaces.
-
Select Create New Namespace.
-
Enter a Name for the namespace. Usually this is a short string containing alphanumeric characters; for rules, see “Configuring Namespaces” in the Caché System Administration Guide.
-
For Select an existing database for Globals, select a database or select Create New Database.
If you select Create New Database, the system prompts you with similar options as given in the previous topic.
-
For Select an existing database for Routines, select a database or select Create New Database.
If you select Create New Database, the system prompts you with similar options as given in the previous topic.
-
Select Save.
For additional options, see “Configuring Cache” in the Caché System Administration Guide.
Mapping a Global
When you map a global to database ABC, you configure a given namespace so that Caché writes this global to and reads this global from the database ABC, which is not the default database for your namespace. When you define this global mapping, Caché does not move the global (if it already exists) to the designated database; instead the mapping instructs Caché where to read and write the global in the future.
To map a global:
-
If the global already exists, move it to the desired database. See “Moving Data from One Database to Another,” later in this chapter.
-
Access the Management Portal.
-
Select System Administration > Configuration > System Configurations > Namespaces.
-
Select Global Mappings in the row for the namespace in which you want to define this mapping.
-
Select New Global Mapping.
-
For Global database location, select the database that should store this global.
-
Enter the Global name (omitting the initial caret from the name). You can use the * character to choose multiple globals.
The global does not have to exist when you map it (that is, it can be the name of a global you plan to create).
Note:Typically you create mappings for data globals for persistent classes, because you want to store that data in non-default databases. Often you can guess the name of the data globals, but remember that Caché automatically uses a hashed form of the class name if the name is too long. It is worthwhile to check the storage definitions for those classes to make sure you have the exact names of the globals that they use. See “Storage,” earlier in this book.
-
Select OK.
-
To save the mappings, select Save Changes.
For more information, see the Caché System Administration Guide.
You can also define global mappings programmatically; see the “Globals” entry in the InterSystems Programming Tools Index.
The following shows an example global mapping, as seen in the Management Portal, which does not display the initial caret of global names:
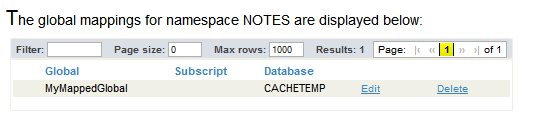
This mapping means the following:
-
Within the namespace DEMONAMESPACE, if you set values of nodes of the global ^MyTempGlobal, you are writing data to the CACHETEMP database.
This is true whether you set the nodes directly or indirectly (via object access or SQL).
-
Within the namespace DEMONAMESPACE, if you retrieve values from the global ^MyTempGlobal, you are reading data from the CACHETEMP database.
This is true whether you retrieve the values nodes directly or indirectly (via object access or SQL).
Mapping a Routine
When you map a routine to database ABC, you configure a given namespace so that Caché finds this routine in the database ABC, which is not the default database for your namespace. When you define this routine mapping, Caché does not move the routine (if it already exists) to the designated database; instead the mapping instructs Caché where to find the routine in the future.
To map a routine:
-
If the routine already exists, move it to the desired database as described in “Moving Code from One Database to Another,” later in this chapter.
-
Access the Management Portal.
-
Select System Administration > Configuration > System Configurations > Namespaces.
-
Select Routine Mappings in the row for the namespace in which you want to define this mapping.
-
Select New Routine Mapping.
-
For Routine database location, select the database that should store this routine.
-
Enter a value for Routine name. You can use the * character to choose multiple routines.
Use the actual routine name; that is, do not include a caret (^) at the start.
The routine does not have to exist when you map it (that is, it can be the name of a routine you plan to create).
-
Select the Routine type.
-
Select OK.
-
Select OK.
-
To save the mappings, select Save Changes.
For more information, see the Caché System Administration Guide.
You can also define this kind of mapping programmatically. You can also define routine mappings programmatically; see the “Routines” entry in the InterSystems Programming Tools Index.
When you map one or more routines, be sure to identify all the code and data needed by those routines, and ensure that all that code and data is available in all the target namespaces. The mapped routines could depend on the following items:
-
Include files
-
Other routines
-
Classes
-
Tables
-
Globals
Use additional routine, package, and global mappings as needed to ensure that these items are available in the target namespaces.
Mapping a Package
When you map a package to database ABC, you configure a given namespace so that Caché finds the class definitions of this package in the database ABC, which is not the default database for your namespace. The mapping also applies to the generated routines associated with the class definitions; those routines are in the same package. This mapping does not affect the location of any stored data for persistent classes in these packages.
Also, when you define this package mapping, Caché does not move the package (if it already exists) to the designated database; instead the mapping instructs Caché where to find the package in the future.
To map a package:
-
If the package already exists, move the package to the desired database, as described in “Moving Code from One Database to Another,” later in this chapter.
-
Access the Management Portal.
-
Select System Administration > Configuration > System Configurations > Namespaces.
-
Select Package Mappings in the row for the namespace in which you want to define this mapping.
-
Select New Package Mapping.
-
For Package database location, select the database that should store this package.
-
Enter a value for Package name.
The package does not have to exist when you map it (that is, it can be the name of a package you plan to create).
-
Select OK.
-
Select OK.
-
To save the mappings, select Save Changes.
For more information, see the Caché System Administration Guide.
You can also define this kind of mapping programmatically. You can also define package mappings programmatically; see the “Packages” entry in the InterSystems Programming Tools Index.
When you map a package, be sure to identify all the code and data needed by the classes in that package, and ensure that all that code and data is available in all the target namespaces. The mapped classes could depend on the following items:
-
Include files
-
Routines
-
Other classes
-
Tables
-
Globals
Use additional routine, package, and global mappings as needed to ensure that these items are available in the target namespaces.
Generating Test Data
Caché includes a utility for creating pseudo-random test data for persistent classes. The creation of such data is known as data population, and the utility for doing this is known as the Caché populate utility. This utility is especially helpful when testing how various parts of an application will function when working against a large set of data.
The populate utility consists of two classes: %Library.PopulateOpens in a new tab and %Library.PopulateUtilsOpens in a new tab. These classes provide methods that generate data of different typical forms. For example, one method generates random names:
Write ##class(%Library.PopulateUtils).Name()You can use the populate utility in two different ways.
Extending %Populate
In this approach, you do the following:
-
Add %PopulateOpens in a new tab to the superclass list of your class.
-
Optionally specify a value for the POPSPEC parameter of each property in the class.
For the value of the parameter, specify a method that returns a value suitable for use as a property value.
For example:
Property SSN As %String(POPSPEC = "##class(MyApp.Utils).MakeSSN()"); -
Write a utility method or routine that generates the data in the appropriate order: independent classes before dependent classes.
In this code, to populate a class, execute the Populate() method of that class, which it inherits from the %PopulateOpens in a new tab superclass.
This method generates instances of your class and saves them by calling the %Save() method, which ensures that each property is validated before saving.
For each property, this method generates a value as follows:
-
If the POPSPEC parameter is specified for that property, the system invokes that method and uses the value that it returns.
-
Otherwise, if the property name is a name such as City, State, Name, or other predefined values, the system invokes a suitable method for the value. These values are hardcoded.
-
Otherwise, the system generates a random string.
For details on how the %PopulateOpens in a new tab class handles serial properties, collections, and so on, see “The Caché Populate Utility” in Using Caché Objects.
-
-
Invoke your utility method from the Terminal or possibly from any applicable startup code.
This is the general approach used for Sample.PersonOpens in a new tab in the SAMPLES database.
Using Methods of %Populate and %PopulateUtils
The %PopulateOpens in a new tab and %PopulateUtilsOpens in a new tab classes provide methods that generate values of specific forms. You can invoke these methods directly, in the following alternative approach to data population:
-
Write a utility method that generates the data in the appropriate order: independent classes before dependent classes.
In this code, for each class, iterate a desired number of times. In each iteration:
-
Create a new object.
-
Set each property using a suitable random (or nearly random) value.
To do so, use a method of %PopulateOpens in a new tab or %PopulateUtilsOpens in a new tab or use your own method.
-
Save the object.
-
-
Invoke your utility method from the Terminal.
This is the approach used for the two DeepSee samples in the SAMPLES database, contained in the DeepSee and HoleFoods packages.
Removing Stored Data
During the development process, it may be necessary to delete all existing test data for a class and then regenerate it (for example, if you have deleted the storage definition).
Here are two quick ways to delete stored data for a class (additional techniques are possible):
-
Call the following class method:
##class(%ExtentMgr.Util).DeleteExtent(classname)Where classname is the full package and class name.
-
Delete the globals in which the data for the class and the indices for the class are stored. You may be more comfortable doing this through the Management Portal:
-
Select System Explorer > Globals.
-
Select Delete.
-
On the left, select the namespace in which you are working.
-
On the right, select the check box next to the data global and the index global.
-
Select Delete.
The system prompts to confirm that you want to delete these globals.
-
These options delete the data, but not the class definition. (Conversely, if you delete the class definition, that does not delete the data.)
Resetting Storage
It is important to be able to reset storage during development, but you never do this on a live system.
The action of resetting storage for a class changes the way that the class accesses its stored data. If you have stored data for the class, and if you have removed, added, or changed property definitions, and you then reset storage, you might not be able to access the stored data correctly. So if you reset storage, you should also delete all existing data for the class and regenerate or reload it, as appropriate.
To reset storage for a class in Studio:
-
In Studio, display the class.
-
Scroll to the end of the class definition.
-
Select the entire storage definition, starting with <Storage name= and ending with </Storage>. Delete the selection.
-
Save and recompile the class.
Or do this:
-
In Studio, display the class.
-
If the Inspector is not currently displayed, select View > Inspector.
-
In the upper left box of the Inspector, select Storage. Then Studio displays any defined storage definitions:
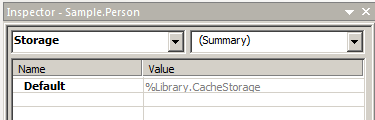
Typically there is only one storage definition, named Default as shown here.
-
Right-click the line for the storage definition and then select Delete.
-
Select OK to confirm.
-
Save and recompile the class.
Browsing a Table
To browse a table, do the following in the Management Portal:
-
Select System Explorer > SQL.
-
If needed, select Switch in the header area to select the namespace in which you are interested.
-
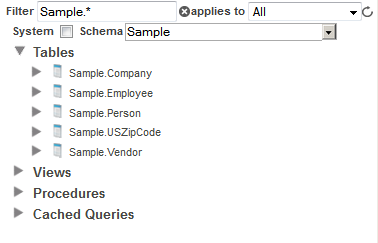
Optionally select an SQL schema from the Schema drop-down list. This list includes all SQL schemas in this namespace. Each schema corresponds to a top-level class package.
-
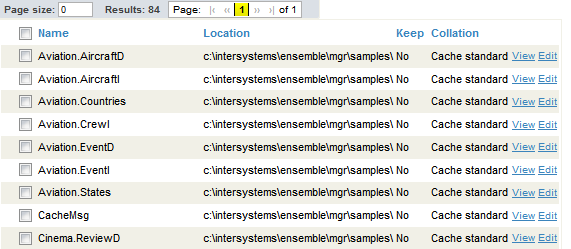
Expand the Tables folder to see all the tables in this schema. For example:
-
Select the name of the table. The right area then displays information about the table.
-
Select Open Table.
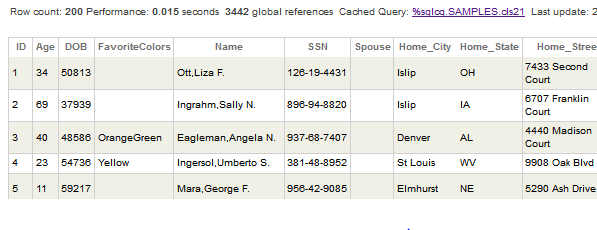
The system then displays the first 100 rows of this table. For example:

Note the following points:
-
The values shown here are the display values, not the logical values as stored on disk.
-
The first column (#) is the row number in the display.
-
The second column (ID) is the unique identifier for a row in this table; this is the identifier to use when opening objects of this class. (In this class, these identifiers are integers, but that is not always true.)
These numbers happen to be the same in this case because this table is freshly populated each time the SAMPLES database is built. In a real application, it is possible that some records have been deleted, so that there are gaps in the ID values and the numbers here do not match the row numbers.
-
Executing an SQL Query
To run an SQL query, do the following in the Management Portal:
-
Select System Explorer > SQL.
-
If needed, select Switch in the header area to select the namespace in which you are interested.
-
Select Execute Query.
-
Type an SQL query into the input box. For example:
select * from sample.person -
For the drop-down liist, select Display Mode, Logical Mode, or ODBC Mode.
This controls how the user interface displays the results.
-
Then select Execute. Then the Portal displays the results. For example:
Examining Object Properties
Sometimes the easiest way to see the value of a particular property is to open the object and write the property in the Terminal:
-
If the Terminal prompt is not the name of the namespace you want, then type the following and press return:
ZN "namespace"Where namespace is the desired namespace.
-
Enter a command like the following to open an instance of this class:
set object=##class(package.class).%OpenId(ID)Where package.class is the package and class, and ID is the ID of a stored object in the class.
-
Display the value of a property as follows:
write object.propnameWhere propname is the property whose value you want to see.
Viewing Globals
To view globals in general, you can use the ObjectScript ZWRITE command or the Globals page in the Management Portal. If you are looking for the global that stores the data for a class, it is useful to first check the class definition to make sure you know the global to view.
-
If you are looking for the data global for a specific class and you are not sure which global stores the data for the class:
-
In Studio, display the class.
-
Scroll to the end of the class definition.
-
Find the <DefaultData> element. The value between <DefaultData> and </DefaultData> is the name of the global that stores data for this class.
Caché uses a simple naming convention to determine the names of these globals; see “Globals Used by a Persistent Class,” earlier in this book. However, global names are limited to 31 characters (excluding the initial caret), so if the complete class name is long, the system automatically uses a hashed form of the class name instead.
-
-
In the Management Portal, select System Explorer > Globals.
-
If needed, select Switch in the header area to select the namespace in which you are interested.
The Portal displays a list of the globals available in this namespace (notice that this display omits the initial caret of each name). For example:
Usually most non-system globals store data for persistent classes, which means that unless you display system globals, most globals will have familiar names.
-
Select View in the row for the global in which you are interested.
The system then displays the first 100 nodes of this global. For example:
-
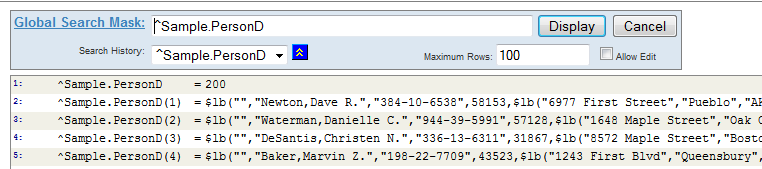
To restrict the display to the object in which you are interested, append (ID) to the end of the global name in the Global Search Mask field, using the ID of the object. For example:
^Sample.PersonD(45)Then press Display.
As noted earlier, you can also use the ZWRITE command, which you can abbreviate to ZW. Enter a command like the following in the Terminal:
zw ^Sample.PersonD(45)
Displaying INT Code
The system generates INT code for each routine and each class you compile.
To see the INT code for a given routine or class:
-
Make sure that the compiler keeps the INT code rather than discarding it:
-
Go to Tools > Options.
-
Select the Compiler > General Flags tab.
-
Select the Keep Generated Source Code option.
Also see “System Qualifiers and Flags,” earlier in this book.
-
-
Display the routine or class in Studio.
-
If you changed the Keep Generated Source Code option, recompile the routine or class.
-
Select View > View Other Code.
If there are multiple generated routines, Studio displays a dialog box where you choose the routine to view. Otherwise it displays the generated routine.
The generated routine is displayed with a gray background to remind you that you should not edit this code. (The class compiler overwrites it the next time you compile the class.) The following shows an example:
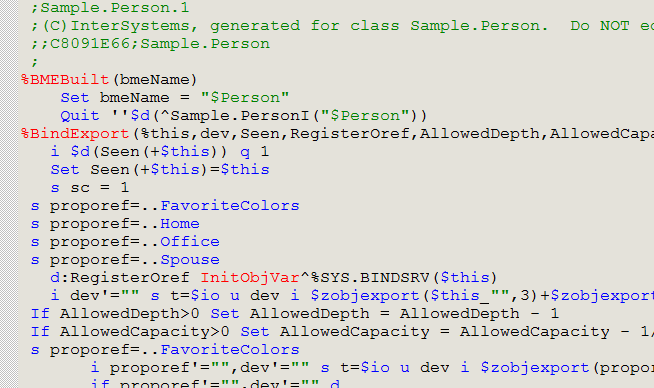
Some methods, routines, and subroutines are simple enough to be implemented in the kernel. There is no generated .INT code for such items.
Also see “Documents (“Files”),” earlier in this book.
Testing a Query and Viewing a Query Plan
In the Management Portal, you can test a query that your code will run. Here you can also view the query plan, which gives you information about how the Query Optimizer will execute the query. You can use this information to determine whether you should add indices to the classes or write the query in a different way.
To view a query plan, do the following in the Management Portal:
-
Select System Explorer > SQL.
-
If needed, select Switch in the header area to select the namespace in which you are interested.
-
Select Execute Query.
-
Type an SQL query into the input box. For example:
select * from sample.person -
For the drop-down list, select Display Mode, Logical Mode, or ODBC Mode.
This controls how the user interface displays the results.
-
To test the query, select Execute.
-
To see the query plan, select Show Plan.
Viewing the Query Cache
For Caché SQL (except when used as embedded SQL), the system generates reusable code to access the data and places this code in the query cache. (For embedded SQL, the system generates reusable code as well, but this is contained within the generated INT code.)
When you first execute an SQL statement, Caché optimizes the query and then generates and stores code that retrieves the data. It stores the code in the query cache, along with the optimized query text. Note that this cache is a cache of OBJ code, not of data.
Later when you execute an SQL statement, Caché optimizes it and then compares the text of that query to the items in the query cache. If Caché finds a stored query that matches the given one (apart from minor differences such as whitespace), it uses the code stored for that query.
The Management Portal groups the items in the query cache by schema. To view the query cache for a given schema, do the following in the Management Portal:
-
Select System Explorer > SQL.
-
If needed, select Switch in the header area to select the namespace in which you are interested.
-
Expand the Cached Queries folder.
-
Select the Tables link in the row for the schema.
-
At the top of the page, select Cached Queries.
The Portal displays something like this:
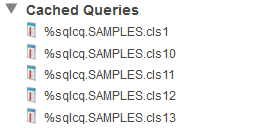
Each item in the list is OBJ code.
By default, Caché does not save the routine and INT code that it generates as a precursor to this OBJ code. You can force Caché to save this generated code as well. See “Settings for Caché SQL,” earlier in this book.
You can purge cached queries (which forces Caché to regenerate this code). To purge cached queries, use Actions > Purge Cached Queries.
Building an Index
For Caché classes, indices do not require any maintenance, with one exception: if you add an index after you already have stored records for the class, you must build the index.
To do so:
-
Select System Explorer > SQL.
-
If needed, select Switch in the header area to select the namespace in which you are interested.
-
In the left area, select the table.
-
Select Actions > Rebuild Indices.
Using the Tune Table Facility
When the Query Optimizer decides the most efficient way to execute a specific SQL query, it considers, among other factors, the following items:
-
How many records are in the tables
-
For the columns used by the query, how nearly unique those columns are
This information is available only if you have run the Tune Table facility with the given table or tables. This facility calculates this data and stores it with the storage definition for the class, as the <ExtentSize> value for the class and the <Selectivity> values for the stored properties.
To use the Tune Table facility:
-
Select System Explorer > SQL.
-
If needed, select Switch in the header area to select the namespace in which you are interested.
-
In the left area, select the table.
-
Select Actions > Tune Table.
For <Selectivity> values, it is not necessary to do this again unless the data changes in character. For <ExtentSize>, it is not important to have an exact number. This value is used to compare the relative costs of scanning over different tables; the most important thing is to make sure that the relative values of ExtentSize between tables are correct (that is, small tables should have a small value and large tables a large one).
Moving Code from One Database to Another
If you need to move code from one database to another, you can do the following:
-
In Studio, go to a namespace that contains the code.
-
Create a new project and add all the code to it:
-
Select File > New Project.
-
Right-click each class, package, or routine that you want to move and select Add to Project.
-
Open the Workspace window and select the Project tab to make sure all the desired items are displayed.
-
-
Export the project:
-
Select Tools > Export.
-
Specify the file into which you wish to export the project. Either enter a file name (including its absolute or relative pathname) in the field or select Browse and navigate to the file.
-
Select OK.
This creates an .xml file. The format of the file is not documented, but it is fairly easy to read.
-
-
In Studio, import the XML file into the desired namespace:
-
Switch to that namespace.
-
Select Tools > Import Local.
-
Navigate to and select the .xml file.
-
Select Open.
Studio now displays a list of the code items in this file.
-
Select each item that you want to import.
-
Select OK.
-
-
Go back to the first namespace and delete the code.
Moving Data from One Database to Another
If you need to move data from one database to another, do the following:
-
Identify the globals that contain the data and its indices.
If you are not certain which globals a class uses, check its storage definition. See “Storage,” earlier in this book.
-
Export those globals. To do so:
-
In the Management Portal, select System Explorer > Globals.
-
If needed, select Switch in the header area to select the namespace in which you are interested.
-
Select the globals to export.
-
Select Export.
-
Specify the file into which you wish to export the globals. Either enter a file name (including its absolute or relative pathname) in the field or select Browse and navigate to the file.
-
Select Export.
The globals are exported to a file whose extensions is .gof.
-
-
Import those globals into the other namespace. To do so:
-
In the Management Portal, select System Explorer > Globals.
-
If needed, select Switch in the header area to select the namespace in which you are interested.
-
Select Import.
-
Specify the import file. Either enter the file name or select Browse and navigate to the file.
-
Select Next to view the contents of the file. The system displays a table of information about the globals in the specified file: the name of each global, whether or not it exists in the local namespace or database, and, if it does exist, when it was last modified.
-
Choose those globals to import using the check boxes in the table.
-
Select Import.
-
-
Go back to the first database and delete the globals, as described in “Removing Stored Data.”
Renaming a Class
Studio does not provide a direct way to rename a class. To rename a class, you can take either of the following approaches:
-
Create a copy of the class and delete the original.
To copy a class:
-
Select Tools > Copy Class...
-
For Copy Class Definition From, select the original class. This value is initialized with the name of the class that you are currently viewing.
-
For To, specify a new full class name.
-
Optionally select Replace instances of Class Name. This replaces instances of the class name within code in the copied class. It does not affect other classes, and it does not affect comments.
-
Select OK.
-
-
Export the class from Studio, edit the XML file, reimport it, and then delete the original class.
To export and import, adapt the technique in “Moving Code from One Database to Another.”
The XML structure of the exported file is not documented, but it is fairly easy to identify what must be changed. The class name is near the top of the file:
<Class name="MyPackage.MyClass">The class definition might include additional references to the class name, which you would also change.
In either case, you should also do the following:
-
If the class is a persistent class, delete or move any data stored with the original class. See “Removing Stored Data.” Or adapt the technique described in “Moving Data from one Database to Another.”
-
Update references to the old class. Use Ctrl+Shift+f to find references to the old name.
For More Information
For more information on the topics covered in this chapter, see the following:
-
Caché System Administration Guide describes how to use most of the Management Portal. This book includes information on configuring the Caché server, creating namespaces and databases, and creating mappings.
-
Using Studio describes how to use Studio.
-
Using the Terminal describes how to use the Terminal.
-
Using Caché SQL includes more information on building indices, building indices programmatically, and using the Tune Table facility.