Development Tools
This chapter introduces the tools you commonly use as a developer. It discusses the following:
Management Portal
The Management Portal is a browser-based tool that you can use to manage data and to configure Caché. System administrators use it later for other tasks.
Accessing the Portal
You can start the Management Portal in the following ways:
-
From your web browser, go to the following URL:
http://localhost:57772/csp/sys/UtilHome.csp
Where localhost is the IP address of your system and 57772 is the port number of the web server installed by Caché.
-
On Microsoft Windows platforms, select the InterSystems Launcher and then select Management Portal.
Microsoft Windows 2003 Users Trusted Site Security Setting — The first time you visit the Management Portal, you may receive a warning about the web site being blocked. When prompted, add the site to the Trusted sites zone. InterSystems also recommends you allow session cookies for portal procedures to function properly.
Enter a Caché username and password if prompted.
The chapter “Useful Skills to Learn” describes many tasks you perform within this tool.
Studio
Studio is a tool that you use to build and debug code in all languages that Caché supports. It runs on Windows-based operating systems. It can connect to any Caché server (compatible with the current version of Studio) regardless of the platform and operating system of the server.
Starting Studio
To start Studio, select the InterSystems Launcher and then select Studio. Enter a Caché username and password if prompted.
Or use other options on the InterSystems Launcher to access remote systems. For details and additional options, see Using the Studio.
You can open multiple Studios at the same time, which is useful if you are working in multiple namespaces.
Orientation
In Studio, you work within a single namespace at one time. To choose a namespace, select File > Change Namespace or press F4.
Studio displays all code to which this namespace has access; see “What Is Accessible in Your Namespace,” earlier in this book. You cannot edit code that is stored in CACHELIB (which is read-only). Some classes provided by InterSystems are shipped in “deployed” mode, and you cannot see their internal details.
Documents (“Files”)
Studio manages units of code that it refers to as files; more accurately, they are simply documents, most of which are stored in the Caché databases used by the namespace that you are currently viewing. The Workspace window. displays names of documents and groups them as follows:
-
Classes folder — Lists class definitions, whose names have the form package.classname.cls
-
Routines folder — Lists the following items:
-
ObjectScript routines, whose names have the form name.mac
-
Caché Basic routines, whose names have the form name.bas
-
Caché MVBasic routines, whose names have the form name.MVB
-
Intermediate code, whose names have the form name.int and name.mvi extensions, corresponding to INT code and MVI code respectively
-
Include files, whose names have the form name.inc
-
-
CSP Files folder — Lists CSP (Caché Server Page) files, which have the form csp.pagename.csp.
Unlike the other documents, these actually reside outside the database, because the web server requires them to be there. When you open one of these in Studio, Studio retrieves the file from disk and displays it. When you save changes, Studio updates the file on disk.
Studio provides syntax coloring and checking for each of these kinds of documents.
If you have multiple Studios at the same time, you can drag a document from one Studio to another. This action imports the document into the other Studio (which is typically using a different namespace).
Integration with Source Control
All routines and class definitions are stored in a Caché database, which is different from most development toolkits. Studio provides a set of source control hooks which InterSystems developers use and which you can also use. See Using Studio.
When you have these configured for your source control system, you can work with other developers like this:
-
Each document is mapped to a file actually on your disk. The file contains an XML representation of the routine or class definition.
-
When you start to make an edit to a routine or a class, Studio prompts you to check out that file from your source control system, and then communicates with the source control system as needed.
-
When you save a change, Studio also exports the routine or class definition to the appropriate file.
-
Studio provides a menu option to enable you to check the file in. This option sends a command to the source control system, which checks the file in and sends your changes to the source control server.
-
Studio typically provides other menu options to interact with the source control system.
You might not need to use these source control hooks immediately, but you should be aware of them.
Other Environmental Options
It is useful to check the options used in Studio to see if they meet your current needs. Select Tools > Options. Some of the options include:
-
Font typeface and size (in Environment > Font)
-
Default display of storage (in Environment > Class)
-
Display of generated INT code in the Workspace window, on the Namespace tab (in Environment > Advanced)
-
Syntax checking options (in Editor > Syntax Check and Assist)
-
Control of indentation (in Editor > Indentation)
-
Compiler flags (in Compiler > Flags & Optimization)
Tip:Keep Generated Source Code controls whether the compiler keeps the INT code rather than discarding it after generating the OBJ code.
Also see “System Qualifiers and Flags,” later in this chapter.
Terminal
The Terminal is a command-line interface for entering Caché commands and displaying current values. It is useful during learning, development, and debugging.
Starting the Terminal
To start the Terminal and use the local database, select the InterSystems Launcher and then select Terminal.
Orientation
In the Terminal, you work within a single namespace at one time. The prompt displayed in this window indicates the namespace in which you are currently working. For example:
USER>
To change to a new namespace, use the ZNSPACE command (which has a short form of ZN):
USER>ZN "SAMPLES"

SAMPLES>
(Note that the ZNSPACE command is intended for use in the Terminal. When you change namespace within your code, InterSystems recommends that you use NEW $NAMESPACE and SET $NAMESPACE as described in the $NAMESPACE reference page.)
Environmental Options
You may find it useful to set up the Terminal for yourself as follows:
-
Specify the namespace that it use every time you log in. To do so, specify the Startup Namespace option for the user that you used when you logged in. See the chapter “Users” in the Caché Security Administration Guide.
-
Enable Windows-style edit accelerators. Select Edit > User Settings and select the Windows edit accelerators option.
Select Save to save your selection for later sessions.
-
Increase the window size. Select Edit > Window Size and specify the number of columns, rows, and scrollback lines.
Select Save to save your selection for later sessions.
-
Change the font size and other font options. Select Edit > Font and make changes.
Select OK to save your selection for later sessions.
-
Change the background and foreground colors. Select Edit > Colors and make changes.
Select Save to save your selection for later sessions.
Then use Edit > Erase to refresh the Terminal window.
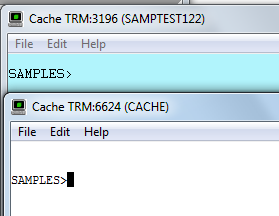
If you have multiple instances of Caché running on your machine, it is useful to customize the colors and fonts for the Terminal so that you can easily distinguish different Terminal windows. For example:
Using the Terminal
In the Terminal, you can enter most Caché commands (and you do not need to include a space at the start of a line). For example:
d ^myroutine
set dirname = "c:\test"
set obj=##class(Test.MyClass).%New()
write obj.Prop1
You cannot use labels, multiline constructs, or macros.
When you exit the Terminal, the system closes any open files and stops any foreground execution.
Common Keyboard Accelerators
It is useful to remember the basic keyboard accelerators:
-
To interrupt the Terminal and stop any foreground execution, use one of the following key combinations:
-
Ctrl+c — Use this if the Windows edit accelerators option is not enabled.
-
Ctrl+Shift+c — Use this if the Windows edit accelerators option is enabled.
To find this option, select Edit > User Settings.
-
-
To pause the Terminal scrolling, press Ctrl+s.
While the scrolling is paused, the Terminal accepts commands and processes them, but it does not write the commands or any output to the screen.
Tip:If the Terminal sometimes appears to be unresponsive, you may have accidentally pressed Ctrl+s.
-
To resume, press Ctrl+q.
-
To repeat a previous command, press the up arrow key repeatedly until the desired command is displayed. To enter the command, press Enter.
System Qualifiers and Flags
There are system qualifiers and flags that affect the import of external sources into Caché, the compilation process, and the export of code to external destinations. These settings are saved in a system global for each namespace, but you can provide overrides as follows:
-
In Studio, you can specify settings that take precedence over what is stored in the system for this namespace.
See “Other Environmental Options,” earlier in this chapter.
-
When you invoke a method to compile, export, and so on, you can specify the qspec argument, which is a concatenation of the flags and qualifiers you want to use. In this case, you are using methods in the class %SYSTEM.OBJOpens in a new tab. See the InterSystems Class Reference for details.
Viewing the Current Default Qualifiers and Flags
To see the current flags and qualifiers used in a namespace, use the following commands:
DO $system.OBJ.ShowFlags()and
DO $system.OBJ.ShowQualifiers()These methods also display help information for the flags and qualifiers.
Changing the Defaults
You can change the defaults for the namespace in which you are working. To do so, use $system.OBJ.SetFlags() and $system.OBJ.SetQualifiers(). For example:
 DO $system.OBJ.SetFlags("ck")
 DO $SYSTEM.OBJ.SetQualifiers("/skipstorage")
Key Flags
The following table lists a few key flags, to highlight them and to give you a sense of what the flags do:
| Flag | Meaning | Default |
|---|---|---|
| b | Include subclasses and classes that reference the current class in SQL usage. | |
| c | Compile the class definitions after loading. | |
| e | Delete extent. | |
| k | Keep source. When this flag is set, source code of generated routines will be kept. | |
| l | Lock classes while compiling. | X |
| r | Recursive. Compile all the classes that are dependency predecessors. | |
| u | Update only. Skip compilation of classes that are already up-to-date. |
Historical Note
Flags have been available for longer. They were modeled on UNIX® command-line parameters and thus are one- or two-character sequences. The qualifiers were added later, as a richer, more extensible set of controls. To preserve backward compatibility, the flag mechanism remains fully supported. In addition, there is an existing qualifier to match each existing flag, and you can use the two in the same specifier.
InterSystems Classes and Routines
In addition to the basic classes introduced earlier (such as %RegisteredObjectOpens in a new tab and %PersistentOpens in a new tab), Caché provides a wide set of useful classes that can reduce your development time if you choose to use them. For example, there are classes you can use for tasks such as these:
-
Executing Caché SQL statements and working with result sets
-
Working with files
-
Creating and sending HTTP requests
-
Working with XML files
-
Programmatically compiling your code
-
Managing system processes
Caché also provides routines for specific purposes (typically debugging or management), as well as language bindings and other tools. To find tools for a particular purpose, see the InterSystems Programming Tools Index.
InterSystems Class Reference (Documatic)
Caché provides a set of web pages called the InterSystems Class Reference or (informally) Documatic. These pages provide information on all classes provided by InterSystems, as well as all classes you create. The reference information shows the definitions of all class members, apart from their actual implementations. That is, you can see method signatures but not their internal definitions. It includes links between elements so that you can rapidly follow the logic of the code; in some cases, this is quicker than using Studio. There is also a search option.
To locate classes quickly, see the InterSystems Programming Tools Index. This book is organized into high-level topics of interest to programmers and provides an extensive set of links to specific classes in the InterSystems Class Reference.
Accessing the InterSystems Class Reference
To view the InterSystems Class Reference, do any of the following:
-
Start the online documentation system. On the main page, select InterSystems Class Reference.
-
Enter the following URL into a browser page on the local InterSystems server, where 57772 is the web server port number configured for the server:
http://localhost:57772/csp/documatic/%25CSP.Documatic.clsOpens in a new tab
-
In Studio, select View > Show Class Documentation.
-
When viewing code in Studio, select the name of a class and press F1. The InterSystems Class Reference opens at the description of the class.
A Quick Look at the InterSystems Class Reference
In these examples, to prevent confusion when you are reading this book online, the InterSystems Class Reference is shown with a gray background instead of the default color, which is white.
The following shows the left area, which you use for overall navigation:
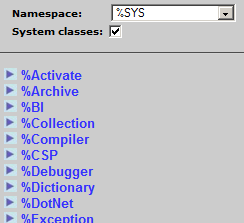
Here you can do the following:
-
Choose the namespace of interest.
-
Hide or display the system classes.
-
Expand packages, which displays their classes.
-
Select a package or class to see details for it. The system then displays a reference page on the right.
The next picture shows the reference page for %Library.StringOpens in a new tab:
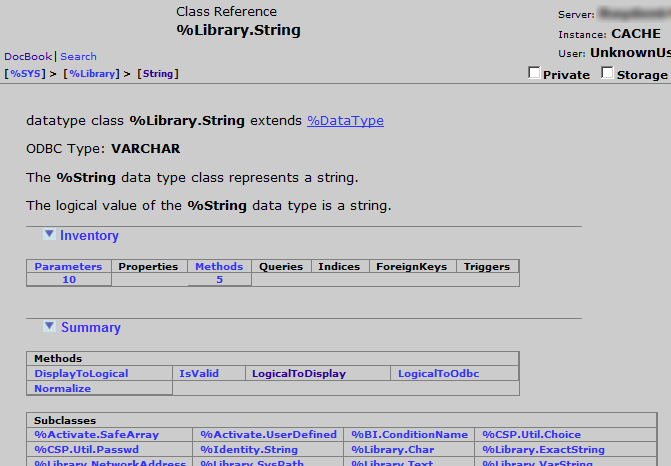
Notice the following:
-
DocBook is a link to the DocBook application.
-
Search displays a search page.
-
The first line shows the class from which %Library.StringOpens in a new tab inherits. This class name is a link to the reference page for that classes.
-
The area below that shows the comments contained in the class definition, for the class itself. The system finds any comments that start with three slashes (///) and treats them as the description of the item that follows them.
-
The Summary area shown here lists parameters, properties, and methods in this class. If you select any of these items, the page scrolls down to that element.
-
If you select the Private check box, the page also displays any class members that are marked private. The Private keyword marks a class member as private, so that it can be used only by other members of the same class.
-
If you select the Storage check box, the page also displays any storage information.
The lower area of the reference page shows details for the class members as in the following example:
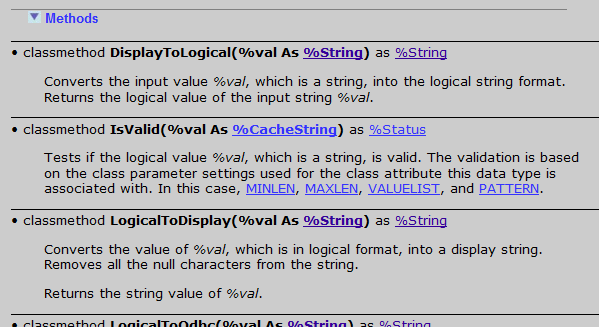
If you select the links in the method signature or in the comments, the system displays the referenced class.
Tools for Debugging
This section summarizes the main tools for debugging in Caché.
Also see the chapter “Command-line Routine Debugging” in Using Caché ObjectScript, which lists some additional tools.
Studio Debugger
The Studio debugger lets you step through the execution of programs running on a Caché server. Programs that can be debugged include INT files, BAS files, MAC files, methods within CLS files, CSP classes responding to HTTP requests, server-side methods invoked from Java or ActiveX clients, or server-hosted applications. To step through, or set breakpoints within classes or CSP pages, open the corresponding INT or BAS file and use the debugging commands in it. To view INT source code files, go to the Tools > Options dialog, Compiler, General Flags tab and enable the Keep Generated Source Code option.
You can connect the debugger to a target process in either of the following ways:
-
Define a debug target by using Debug > Debug Target. Then select Debug > Go to start the target program and connect to its server process.
-
Select Debug > Attach and choose a running process on a Caché server.
For details, see “Using the Studio Debugger” in Using Studio.
ZBREAK
Sometimes you have better control if you perform command-line debugging with the Caché Debugger and the ZBREAK command.
The Caché Debugger enables you to run debugging commands as if they were directly contained in your routine code. When you run the code, you can issue commands to test the conditions and the flow of processing within your application. Its major capabilities are:
-
Set breakpoints with the ZBREAK command at code locations and take specified actions when those points are reached.
-
Set watchpoints on local variables and take specified actions when the values of those variables change.
-
Interact with Caché during a breakpoint/watchpoint in a separate window.
-
Trace execution and output a trace record (to a terminal or other device) whenever the path of execution changes.
-
Display the execution stack.
-
Run an application on one device while debugging I/O goes to a second device. This enables full screen Caché applications to be debugged without disturbing the application’s terminal I/O.
For details, see “Debugging with the Caché Debugger” in Using Caché ObjectScript.
^%STACK
The ^%STACK routine lets you examine the process execution stack. You can use it to:
-
Display the values of local variables, including values that have been “hidden” with the NEW command or through parameter passing.
-
Display the values of process state variables, such as $IO and $JOB.
For details, see “Using %STACK to Display the Stack” in Using Caché ObjectScript.
Trace Statements
As with any programming language, you can edit the code to include statements that generate output about the current state of any variables of interest. In other languages, you might write output to the current device or print to a file, and you can do these things in Caché if desired.
Caché provides an alternative: set nodes of your own global. Use the $INCREMENT function to create a set of nodes that have integer keys. For example:
 if (myval=mytestval) {
    //do stuff
    set ^CacheTempUserMyTrace($increment(^CacheTempUserMyTrace))="main branch"
    } else {
        //do other stuff
        set ^CacheTempUserMyTrace($increment(^CacheTempUserMyTrace))="else branch"
        }
Another possibility is as follows:
set ^CacheTempUserMyTrace($increment(^CacheTempUserMyTrace))=$LISTBUILD("message",data)For your global, use a name of the form ^CacheTempUser*, which is written to the CACHETEMP database. Then if there is a transaction that gets rolled back, your global is not rolled back and thus contains an accurate record of the sequence of events.
Audit Log
When debugging code, sometimes it is useful to enable auditing and to view the audit log, if you have access to this administrative tool.
Caché allows you to monitor events and add entries to the audit database when those events occur. Auditable events fall into two categories:
-
System events — Events that monitor actions within Caché, such as startup, shutdown, logins, and so on; system events also monitor security-related events, such as changes to security or audit settings. These events also include <PROTECT> errors and abnormal terminations.
-
User events — Custom events that you define.
For information on enabling auditing and viewing the audit log, see the chapter “Auditing” in the Caché Security Administration Guide.
System Logs
The system manager’s directory, typically installdir\mgr, contains several log files that may be helpful in debugging, including the console log (cconsole.log), System Monitor log (SystemMonitor.log), and initialization log (cboot.log). For information about these log files, see “Monitoring Log Files” in the Caché Monitoring Guide.
For More Information
For more information on the topics covered in this chapter, see the following:
-
Caché System Administration Guide describes how to use most of the Management Portal.
-
Using Studio describes how to use Studio and includes information on using its source control hooks.
-
Using the Terminal describes how to use the Terminal, including how to launch different shells, such as the MV shell and the TSQL shell.
-
Caché ObjectScript Reference provides reference information for the operators, commands, functions, special variables, and other parts of ObjectScript.
-
InterSystems Programming Tools Index is a directory of the InterSystems classes, routines, bindings, and other programming tools, grouped by topic.