Formatting Zen Report Pages
The previous chapter, “Gathering Zen Report Data,” explained how to generate and organize the XML data upon which the Zen report is based. This chapter explains how to write a specification for displaying this data. The specification consists of an XData ReportDisplay block in the Zen report class.
For the most part, styles in the XData ReportDisplay block are independent of the output format. You can specify the format in the report class, in a browser URI string or at the Terminal command line. For details about invoking reports and specifying the output format, see the chapter “Running Zen Reports.”
Topics in this chapter include:
XData ReportDisplay
An XData ReportDisplay block contains a single <report> element. <report> contains additional elements that define the report display. You can omit the XData ReportDisplay block entirely, if you provide a valid value for the HTMLSTYLESHEET and XSLFOSTYLESHEET class parameters. For details, see the section “Class Parameters for Zen Reports.” If you provide both an XData ReportDisplay block and parameter values, the parameter values take precedence.
You can also omit XData ReportDisplay if you only plan to use this Zen report class to generate XML data files.
In order to write an XData ReportDisplay block you must understand XPath expressions. Many reference books and user guides for XPath are available on the Web and through commercial publishers.
Finding Data with XPath Expressions
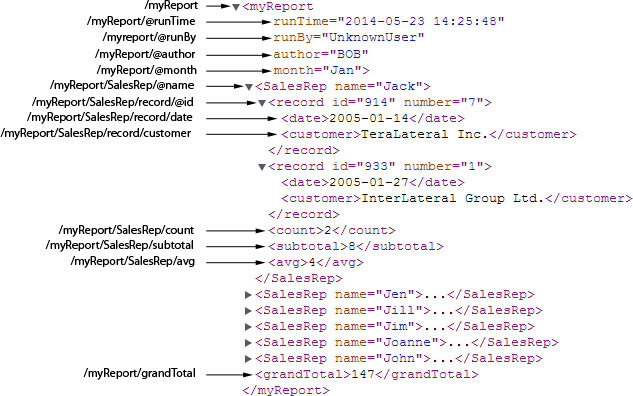
Elements in the XData ReportDisplay block specify the formatting of data on the page. The display elements use XPath expressions to identify the data they are formatting. The following figure shows the XML data source on the right, and the XPath expressions required to access the data on the left. The XML in this figure is that generated by the XData ReportDefinition block of ZenApp.MyReport in the SAMPLES database. You can see the XML output if you run the report with the output mode set to XML using $MODE. See the chapter, “Gathering Zen Report Data,” for more information on generating XML from data in the Caché database.
This example uses a small subset of available XPath expressions. The XPath syntax used here is:
-
/nodename – Selects the root element named nodename.
-
/nodename/subnode – Selects all child elements of nodename named subnode.
-
/nodename/subnode/@attrname – Selects all attributes of /nodename/subnode/ named attrname.
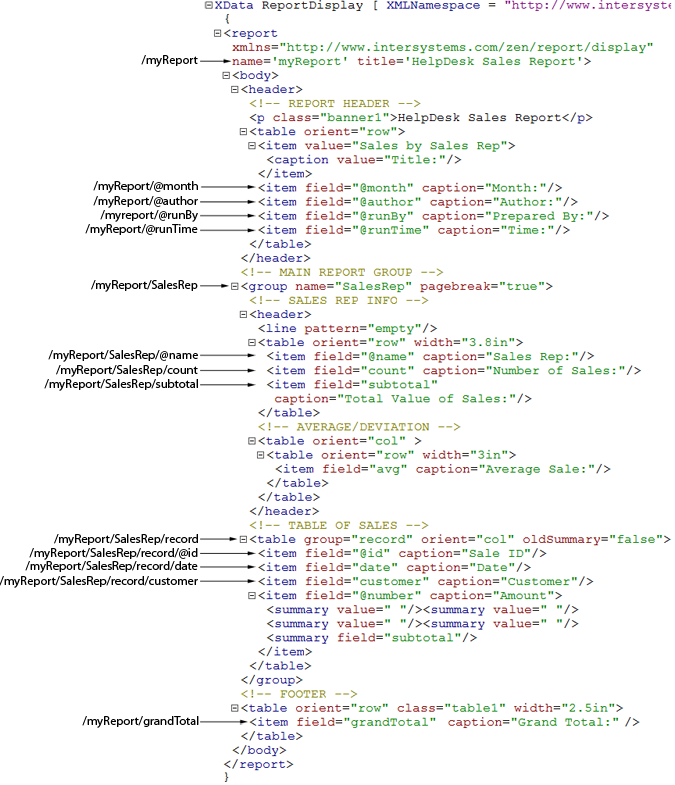
The next figure continues the example by showing how you can use XPath expressions in an XData ReportDisplay block to retrieve the data from the XML and format it in a report. The code shown here is from ZenApp.MyReport in the SAMPLES database, edited for compactness. A detailed explanation follows the figure:
-
The name attribute of the top-level <report> element provides the root node for all other XPath expressions in the report. In this example, the value of the attribute is:
myReport
All other XPath expressions in the report are evaluated in the context of this root node.
-
Inside the <body>, the first <table> contains <item> elements whose field attributes provide second-level node names that use the XPath syntax for attributes, for example:
@month
Evaluated in the context of the root node, the effective expression here is:
/myReport/@month
This identifies the data value of the month attribute of <myReport> in the XML.
-
The <group> element adds a level of hierarchy. Its name attribute provides the second-level node name for all XPath expressions within that <group>. The value is:
SalesRep
Evaluated in the context of the root node, the effective expression is:
/myReport/SalesRep
This identifies all the <SalesRep> elements which are children of <myReport>. <SalesRep> is a container for attributes and elements.
-
The first <table> inside the <group> container contains several <item> elements.
-
The first <item> element has a field attribute value that identifies an attribute:
@name
Evaluated in the context of the root and the group nodes, the effective expression is:
/myReport/SalesRep/@name
This identifies the data value of the name attribute of <SalesRep>, a child of <myReport>.
-
The next two <item> elements have field attribute values that identify elements. For example:
count
Evaluated in the context of the root and the group nodes, the effective expression is:
/myReport/SalesRep/count
This identifies the data value of the <count> element, a child of <SalesRep>, which is in turn a child of <myReport>.
-
-
The second <table> inside the <group> container contains a group attribute that identifies a node in the XML. The value is:
record
Evaluated in the context of the root node and the group, the effective expression is:
/myReport/SalesRep/record
This identifies all the <record> elements which are children of <SalesRep>. <record> is a container for attributes and elements. The items in this table have field attributes that identify attributes and elements in the <record> container. They are evaluated in the full context established at this point, resulting in effective XPath expressions like:
/myReport/SalesRep/record/date
-
The last <table> follows the closing </group> so it is not a contained by the <group>. This <table> contains an <item> element whose field attribute provides a node name:
grandTotal
Evaluated in the context of the root node, the effective expression is:
/myReport/grandTotal
This identifies the data value of the <grandTotal> element, a child of <myReport>.
The id Attribute
Every element in the XData ReportDisplay block supports the id attribute. If you set a value for an element’s id attribute in XData ReportDisplay, you can later access the element programmatically on the server side before displaying the report.
To do this, make your server-side code call the class method %GetComponentById(id) to retrieve a pointer to the object. Then you can access the properties of the object to change them as needed. This can be especially useful to make last-minute adjustments to the value of the content property, whose value is the text contents of elements that contain text, such as <link>, <inline>, <p>, or <write>.
For example, suppose a Zen report class has this XData ReportDisplay block:
XData ReportDisplay
  [ XMLNamespace = "http://www.intersystems.com/zen/report/display" ]
{
  <report xmlns="http://www.intersystems.com/zen/report/display"
   name="myReport">
  <html>
    <write id="A1"/>
    <write id="A2"/>
    <write id="A3"/>
  </html>
</report>
}
An OnAfterCreateDisplay() method in this class could adjust the values of these <write> elements prior to displaying them:
ClassMethod OnAfterCreateDisplay()
{
  set write1=..%GetComponentById("A1")
  set write2=..%GetComponentById("A2")
  set write3=..%GetComponentById("A3")
  set write1.content="<h1>Hello</h1>"
  set write2.content="<h1>Hello "_%report.Month_"</h1>"
  set write3.content="<h1>Hello "_%report.GetMonth()_"</h1>"
}
For details about callback methods like OnAfterCreateDisplay(), see “Executing Code Before or After Report Generation” in the chapter “Building Zen Report Classes”.
Dimension and Size
An XData ReportDisplay block allows you to specify sizes (widths, heights, lengths, etc.) in a variety of units, just as you would in HTML or XSL-FO syntax. "2in", "5cm", "12px", "14pt", "3em", or "75%" are all valid formats for length values in Zen reports. This chapter uses the term HTML length value to describe length values that use these formats.
Generally, Zen measures percentages with respect to the parent container for the element whose size is being specified as a percentage. In Zen report tables, using percentage values to specify proportional column widths works only for PDF output. Percentages do not work as width specifications for tables in Zen report HTML output.
If you are taking advantage of any automatic Zen calculations for portions of your page layout, do not use "%", "em", or "px" in the HTML length values that you provide for height, margin, or extent attributes in your <document> element.
International Number Formats
Rather than the default North American number format (76,543,212,345.67), it is possible to set output conventions to a European number format (76.543.212.345,67) or any other alternative that you prefer. To accomplish this, you need to add a simple XSLT instruction to your Zen report as described in the “<init>” section, later in this chapter.
Default Format and Style
If you set style="none" for the top-level <report> element in XData ReportDisplay, the standard Zen stylesheet is ignored and there are no predefined styles for Zen reports. However, if you omit the style attribute for <report>, your reports use the standard stylesheet for Zen reports. This stylesheet is a collection of predefined style classes. The appendix “Default Format and Style” describes the default styles for HTML and XSL-FO output in detail.
Pagination and Layout
Zen reports creates report output in both HTML and PDF. When you produce reports in PDF, you may want to control how the report is formatted on the printed page. The section “The <document> element and Page Layout” describes how to use the <document> element to format Zen reports for PDF output, and includes a description of some of the underlying XSL-FO syntax. For many reports, the <document> element, with the <pageheader> <pagefooter>, <pagestartsidebar>, and <pageendsidebar> elements, provides sufficient formatting capability.
Zen reports supports additional XSL-FO features that provide additional formatting capability. The following sections describe features you can use if you need more sophisticated report formatting than you can achieve using <document>. These advanced formatting capabilities include:
Zen reports also supports the XSL-FO writing-mode attribute, which is necessary for creating appropriate page layout for languages such as Arabic and Hebrew which are written in a right-to-left direction. See the section “Writing Mode”.
The <document> element and Page Layout
The Zen reports <document> element lets you set the values of XSL-FO attributes that control the layout of PDF output pages.
You can omit <document> element from a <report>, even if you intend to produce PDF output. The result is a default PDF page layout: an 8.5 x 11 inch page, in portrait mode, with 1.25 inch left and right margins and 1 inch top and bottom margins. If you want to include <class>, <cssinclude>, and <xslinclude> elements to define styles, you must provide a <document> element to contain them, even if you are not providing any <document> attributes to define page layout. If you include more than one <document> element in the <report>, Zen uses the contents of the first <document> element and ignores any others.
To understand how <document> attributes work, you must first understand XSL-FO. There are excellent sources of XSL-FO information available on the Web and in bookstores. However, a few basic elements and concepts are critically important and deserve a brief overview here.
XSL-FO Syntax for Page Layout
<fo:simple-page-master> defines a page layout template. Zen reports adds a single <fo:simple-page-master> element to the generated XSL-FO, which applies the same layout to all pages in the report. There are additional Zen reports elements that allow you to add multiple <fo:simple-page-master> elements to a report, providing multiple layouts in a single report. See the section “Multiple Display Layouts”.
The following <fo:simple-page-master> attributes define basic properties of the page layout:
-
page-height: Sets the height of the page. For printing on US letter size paper, this value is 11 inches.
-
page-width : Sets the width of the page. For printing on US letter size paper, this value is 8.5 inches.
-
margin-top: Sets the margin at the top of the page.
-
margin-bottom: Sets the margin at the bottom of the page.
-
margin-left: Sets the margin at the left of the page.
-
margin-right: Sets the margin at the right of the page.
-
margin: Sets all four margins to the same value.
The page size attributes and the page margins together define the area of the page that contains printed content. For example, a 8.5 by 11 inch page with a 1 inch margin on all four sides, defines a print area of 6.5 by 9 inches. This area is described by the element <fo:region-body>, which is a child element of <fo:simple-page-master>. The <fo:region-body> has its own margin properties, which define the area within the <fo:region-body> where the printed content of the body region is placed:
-
margin-top: Sets the margin at the top of the region-body.
-
margin-bottom: Sets the margin at the bottom of the region-body.
-
margin-left: Sets the margin at the left of the region-body.
-
margin-right: Sets the margin at the right of the region-body.
-
margin: Sets all four margins to the same value.
Four additional child elements of <fo:simple-page-master> can be used to place content in other areas of the region-body:
-
<fo:region-before>: Places content before the region-body content. On a page in portrait orientation, this is a page header.
-
<fo:region-after>: Places content after the region-body content. On a page in portrait orientation, this is a page footer.
-
<fo:region-start>: Places content on the side of the region-body content where reading of that content starts. On a page in portrait orientation, formatted for a language read left to right. this is a left sidebar.
-
<fo:region-end>: Places content on the side of the region-body content where reading of that content ends. On a page in portrait orientation, formatted for a language read left to right. this is a right sidebar.
The extent property determines the width of <fo:region-start> and <fo:region-end>. Their height is the is the height of <fo:region-body>. The width of <fo:region-before> and <fo:region-after> is the distance between <fo:region-start> and <fo:region-end>. Their height is determined by the extent property. Content printed in these regions occupies space allocated for it by the margin attributes of <fo:region-body>. For this reason, the margins applied to <fo:region-body> must be at least as large as the extent attribute of the corresponding region. If they are not, the printed content can overlap.
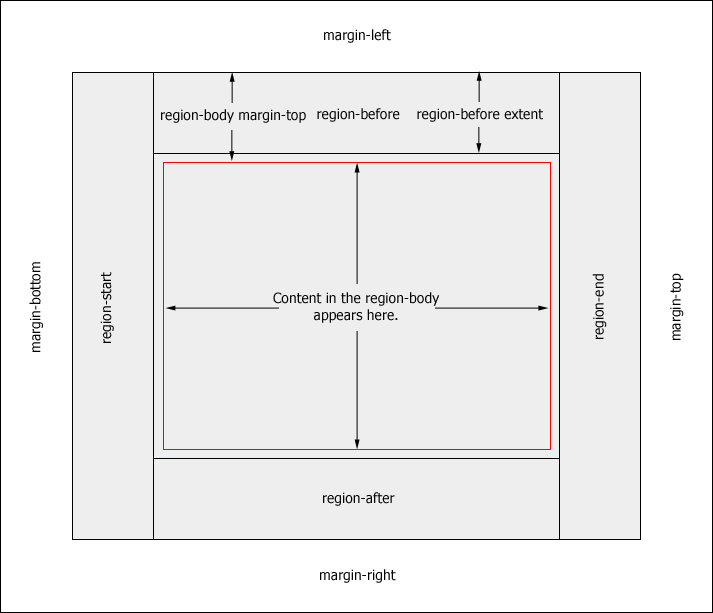
The following diagram shows how various XSL-FO elements and attributes shape the layout of a PDF output page in portrait mode. Note the following points about this diagram:
-
The image represents an 8.5 by 11 inch page.
-
The gray area represents the <fo:region-body> area of the page. Its dimension are determined by the margins set on <fo:simple-page-master>.
-
The <fo:region-body> area also has margins, represented by the red lines in this diagram. These margins define the portion of <fo:region-body> that contains content.
-
The <fo:region-*> areas are arranged within the <fo:region-body>. The distance these areas extend into the region-body area is determined by their extent properties.
-
For the <fo:region-before> element, the diagram shows how the region-body margin and the region-before extent interact. You can see that the margin must be at least a large as the extent, or else content in <fo:region-before> overlaps with content in <fo:region-body>

The next diagram shows the same page layout, with orientation="landscape" or referenceOrientation="90". Note the following points about this page layout:
-
The page has rotated 90 degrees clockwise, so that the top edge is now at the right.
-
The before, after, start, and end region elements are repositioned so that they maintain their relationship to the content in the body region.
-
The page margins are not repositioned.
<document> Attributes for Page Layout
You use attributes of the <document> element in a Zen report to set attribute values for <fo:simple-page-master> and its child elements in the generated XSL-FO stylesheet that Zen uses to transform the Zen report into PDF output format. The table of attributes in the section “<document> ” describes these attributes in detail, including which XSL-FO attribute they control. The following diagram provides a visual overview of how <document> attributes control page layout:
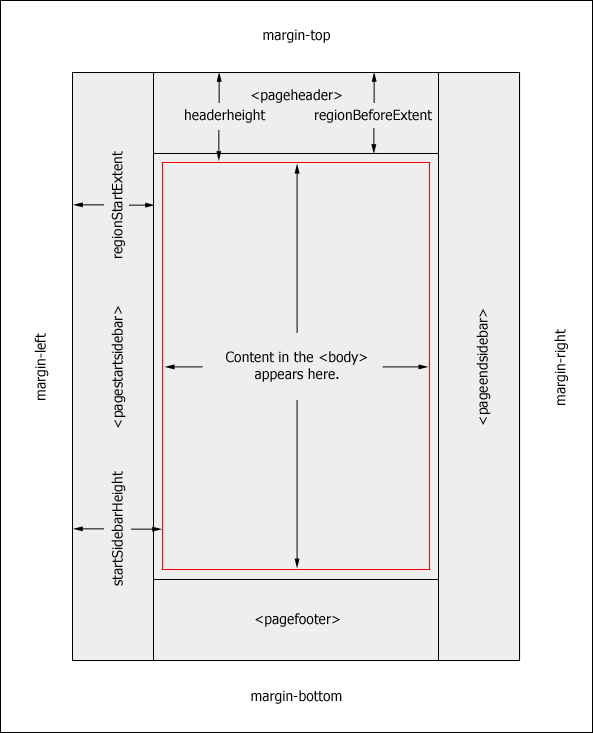
Note the following points:
-
<pageheader>>, <pagefooter>, <pagestartsidebar>, and <pageendsidebar> place content in <fo:region-before>, <fo:region-after>, <fo:region-start>, and <fo:region-end>
-
headerHeight and footerHeight supply the top and bottom margin values for <fo:region-body>
-
regionBeforeExtent and regionAfterExtent supply the extent values for <fo:region-before> and <fo:region-after>
-
startSidebarHeight and endSidebarHeight supply the left and right margin values for <fo:region-body>
-
regionBeforeExtent and regionAfterExtent supply the extent values for <fo:region-before> and <fo:region-after>
The following <document> element generates a page layout with a 2.5 inch header, a 1.5 inch footer, a region-after with a 1 inch extent, and a region-before with a 2 inch extent:
<document
  width="8.5in" height="11in"
  marginLeft="1in" marginRight="1.5in"
  marginTop="1.25in" marginBottom="1.0in"
  footerHeight="1.5in"
  headerHeight="2.5in"
  regionAfterExtent="1in"
  regionAfterColor="silver"
  regionBeforeExtent="2in"
  regionBeforeColor="silver"
  orientation="landscape" />
It generates the following XSL-FO page layout definition:
<fo:simple-page-master master-name="main"
    margin-right="1.5in" margin-left="1in"
    margin-top="1.25in" margin-bottom="1.0in"
    reference-orientation="0"
    page-width="8.5in" page-height="11in">
   <fo:region-body margin-bottom="1.5in" margin-top="2.5in"/>
   <fo:region-before extent="2in" display-align="inherit"
       background-color="silver"/>
   <fo:region-after extent="1in" display-align="after"
       background-color="silver"/>
</fo:simple-page-master>
The XSL-FO page layout definition produces a page that looks like this:
For an important note about viewing design changes as you work on PDF layout, see the introduction to the <document> section.
Conditional Page Margins and Regions
You may need to create a report that has different page margins or regions for the first page, last page, and intervening pages of the report. To achieve this, you add a <pagemaster> element as an immediate child of <report>, and add a <masterreference> element for each page position in the report that needs different formatting. The <masterreference> element contains the <document>, <pageheader> <pagefooter>, <pagestartsidebar>, and <pageendsidebar> elements that would otherwise be direct children of <report>.
The following example is based on the report ZENApp.MyReportOpens in a new tab in the SAMPLES namespace. Given the ReportDefinition section as defined in ZENApp.MyReportOpens in a new tab, the following ReportDisplay creates a report that has a header height of 2 inches on the first page, and .75 inches on subsequent pages. The report header information, which should appear only on the first page, is located in the <masterreference> element for the first page. The key steps are:
-
Add a <pagemaster> element to the report. It must be an immediate child of <report>.
-
Add a <masterreference> element for each separately formatted section of the report. In this example, two <masterreference> elements are required, one for the first page, and one for the remaining pages.
-
The <masterreference> for the first page sets the properties masterReference and pagePosition to “first”. masterReference could have any string value, but “first” is a useful mnemonic.
-
The <masterreference> for the first page contains a <document> element with headerHeight specified as “2.0in”, which provides a larger header on the first page to accommodate the title and general information.
-
It also contains a <pageheader> element that contains the title banner, and the table of general information about the report.
-
The <masterreference> for the second page sets both masterReference and pagePosition to “rest”. masterReference could have any string value, but “rest” is a useful mnemonic.
-
The <masterreference> for the second page contains a <document> element with headerHeight specified as “.75in”. This is sufficient for the single line header containing “Sales Report” and the page numbers. Note that this configuration puts page numbers only the pages identified as “rest”.
The following code sample provides the initial part of the ReportDisplay section for a report that formats the first page differently from the following pages:
<report xmlns="http://www.intersystems.com/zen/report/display"
name='myReport' title='HelpDesk Sales Report' style='standard'>
<pagemaster>
<masterreference masterReference="first" pagePosition="first">
<document width="8.5in" height="11in" marginLeft="1.25in"
marginRight="1.25in" marginTop="1.0in"
marginBottom="1.0in" headerHeight="2.0in"></document>
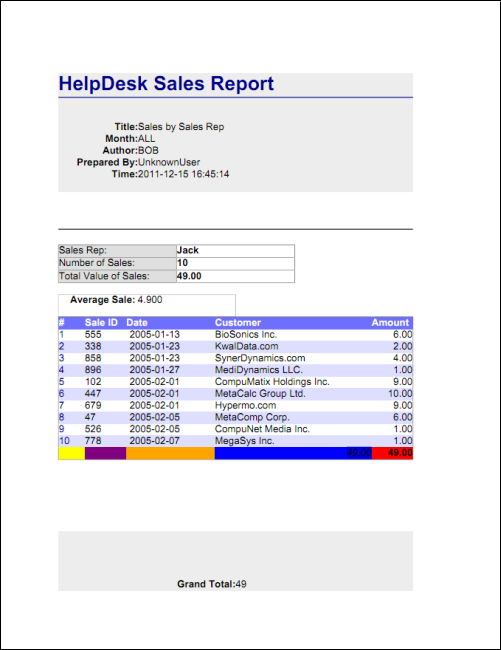
<pageheader>
<p class="banner1">HelpDesk Sales Report</p>
<fo><line pattern="empty"/><line pattern="empty"/></fo>
<table orient="row" width="3.45in" class='table1'>
<item value="Sales by Sales Rep" width="2in">
<caption value="Title:" width="1.35in"/></item>
<item field="@month" caption="Month:"/>
<item field="@author" caption="Author:"/>
<item field="@runBy" caption="Prepared By:"/>
<item field="@runTime" caption="Time:"/>
</table>
</pageheader>
</masterreference>
<masterreference masterReference="rest" pagePosition="rest">
<document width="8.5in" height="11in" marginLeft="1.25in"
marginRight="1.25in" marginTop="1.0in"
marginBottom="1.0in" headerHeight=".75in"></document>
<pageheader>
<table orient="col" layout="fixed" width="6in">
<item style="text-align:left" value="Sales Report" />
<item style="text-align:right" special="page-number-of" />
</table>
</pageheader>
</masterreference>
</pagemaster>
<body >
<!-- MAIN REPORT GROUP -->
<group name="SalesRep" pagebreak="true" line='1px'>
.
.
.
</group>
</body>
</report>Resetting the Page Count for Each Element of a Group
You may need to create a report that displays page numbers, and starts page numbering from 1 for each element of a group.
The following example is based on the report ZENApp.MyReportOpens in a new tab in the SAMPLES namespace. Given the ReportDefinition section as defined in ZENApp.MyReportOpens in a new tab, the following ReportDisplay creates a report that starts page numbering at 1 when the name of the sales representative changes, and determines the total page count of the report section for each sales person. The key steps are:
-
In the <report> element, set the attribute primaryGroup to the name of the group defined in the ReportDisplay that contains the elements you want to use to restart numbering. In this case, the group is “SalesRep”. See this line in the following code sample:
<report xmlns="http://www.intersystems.com/zen/report/display" name='myReport' title='Sales Report' primaryGroup="SalesRep"> . . . </report> -
Use one of the "-with-xpath" values of the <item> attribute special to add page numbers to the report. These values tell the report that the page numbering is going to be controlled by the XPath value provided in the field attribute of this <item> element. This example uses "page-number-of-with-xpath", and the XPath value is “@name”, so page numbering starts at 1 when the value of “@name” changes. See this line in the following code sample:
<item field="@name" special="page-number-of-with-xpath" width="1in"/> -
In the <body> element, set the attribute genLastPageIdOn to the XPath value that controls numbering. This is the same XPath expression used in the field attribute in the previous step. See this line in the following code sample:
<body genLastPageIdOn="@name"> . . . </body> -
In the <group> element whose name matches the group set as primaryGroup in the <report> element, set the attribute primaryGroup to “true”. This boolean value states that this is the ReportDisplay group that contains the elements that control numbering. See this line in the following code sample:
<group name="SalesRep" primaryGroup="true">
. . .
</group>
The following code sample provides the entire ReportDisplay section for a report that restarts page numbering for each sales representative:
<report xmlns="http://www.intersystems.com/zen/report/display"
    name='myReport' title='Sales Report' primaryGroup="SalesRep">
  <document marginBottom=".75in" marginLeft=".5in"
    marginRight=".5in" marginTop=".5in"
    height="11in" width="8.5in"/>
  <pagefooter>
    <line pattern="solid" thickness="1px" width="7.5in"/>
    <table orient="col" width="7.5in" layout="fixed">
      <item field="@name" width="6in"/>
      <item value="Page:" width=".5in"/>
      <item field="@name" special="page-number-of-with-xpath" width="1in"/>
    </table>
  </pagefooter>
  <body genLastPageIdOn="@name">
  <!-- MAIN REPORT GROUP -->
    <group name="SalesRep" primaryGroup="true">
    <!-- SALES REP INFO -->
      <header>
        <table orient="row" width="3in" class='table2'>
          <item field="@name" width="1in">
            <caption value="Sales Rep:" style="width:2in"/></item>
          <item field="count">
            <caption value="Number of Sales:" /></item>
          <item field="subtotal" formatNumber='###,###,##0.00;(#)'>
            <caption value="Total Value of Sales:" /></item>
          <item field="avg" formatNumber='###,###,##0.000;(#)'>
            <caption value="Average Sale:" /></item>
        </table>
        <line pattern="empty" thickness="1px" width="7.5in"/>
      </header>
      <!-- TABLE OF SALES -->
      <table orient="col" group="record" width="6in" class="table4" altcolor="#DFDFFF">
        <item special="number" width=".45in" style="color: darkblue;">
          <caption value="#" /></item>
        <item field="@id" width=".7in" style="border:none;padding-right:4px">
          <caption value="Sale ID"/></item>
        <item field="date" width="1.5in" style="padding-left: 4px;">
          <caption value="Date"/></item>
        <item field="customer" width="2.65in">
          <caption value="Customer"/></item>
        <item caption="Amount" width=".7in" style="text-align:right;"
          field="@number" formatNumber='###,###,##0.00;(#)'>
          <caption value="Amount"/>
        <summary field="subtotal" style="font-weight:bold;text-align:right"
          formatNumber='###,###,##0.00;(#)'/></item>
      </table>
    </group>
  </body>
</report>
Multiple Display Layouts
The <section> element lets you specify multiple report formats in a single report. <section> must be an immediate child of <report>, and shares many characteristics with <report>. The SAMPLES namespace provides a Zen report class called PageLayouts.cls in the ZENReports package that illustrates the use of multiple display layouts in a single Report. This example first defines an XData ReportDefinition block that produces XML data in sections:
-
<Sales> organizes information by SalesRep.
-
<ByNumber> organizes sales data by number of sales.
-
<ByDate> organizes sales data by date of sale.
The XData ReportDisplay block uses <section> elements to provide different page formatting for each data section. The following discussions describe the sections of the report:
The <Sales> Section
The display section for the <Sales> element in the generated XML is similar to the report that resets the page count, described in the section Resetting the Page Count for Each Element of a Group, but there are some differences worth noting.
The key points are:
-
This is one of several <section> elements in the report. The <section> element is similar to <report> but requires a string value for the attribute sectionName. This string ensures unique values for XSL-FO tags generated in this section. In this example, the value is “Sales”, which helps identify this section. Each section in this report sets a value for primaryGroup, which specifies XML <group> formatted by this section. Setting primaryGroup makes it possible to restart page numbering for each element in the primary group. The primary group is “SalesRep” for this report section, but because <SalesRep> is contained in <Sales>, you need to specify “Sales/SalesRep”. See this line in the sample report:
<section name="myReport" sectionName="Sales" primaryGroup="Sales/SalesRep"> . . . </section> -
A <pagemaster> element contains <masterreference> elements that specify page formatting. The value of the attribute pagePosition indicates the page or pages the <masterreference> is formatting, in this case, first and rest. See these lines in the sample report:
<masterreference masterReference="first" pagePosition="first">
. . .
</masterreference>
and
<masterreference masterReference="rest" pagePosition="rest"> . . . </masterreference> -
Inside each <masterreference> element, the same <document>, <pageheader>, and <pagefooter> elements you use to format pages in a <report>, format the pages controlled by the <masterreference>. This part of the example uses only <document> and <pageheader>.
Note that because the primaryGroup you set in the <section> establishes the XML context as Sales/SalesRep, you must specify an XPath from the root to access attributes of myReport or Sales. See these lines in the sample report:
<item field="/myReport/Sales/@month" caption="Month:" /><item field="/myReport/@author" caption="Author:" />Note also that page numbering uses one of the “*-with-xpath” values of the <item> attribute special. This generates page numbers dynamically in response to changes in the value of the field attribute. In this example, field is set @name, which is an attribute of the primary group, <SalesRep>. This report section restarts numbering at 1 each time the value of SalesRep/@name changes. See this line in the sample report:
<item style="text-align:right" special="page-number-of-with-xpath" field="@name" /> -
Total page count for each section is controlled by the genLastPageIdOn value @name.
<body genLastPageIdOn="@name">
. . .
</body>
The <ByNumber> Section
The display section for the <ByNumber> element in the generated XML is similar to the section for <Sales>. Some important differences are:
-
The primaryGroup for this section is <ByNumber>. This means that page numbering starts at one at the beginning of the <ByNumber> group in the generated XML, and continues to the end of the group, rather than restarting for each element of the group as the report for the <Sales> section did.
-
The <pagemaster> element contains <masterreference> elements for the first, last, and rest page positions.
-
The layouts for the last, and rest page positions do not include a page header. Note that the <pageheader> element must be present, even if it is empty. This is also true for the <document> element.
-
Page numbering is controlled by the XPath value NumbRecs, which is an element of the primary group <ByNumber>.
<item style="text-align:right" special="page-number-of-with-xpath" field="NumbRecs" /> -
Total page count is controlled by the genLastPageIdOn value NumbRecs.
<body genLastPageIdOn="NumbRecs">
. . .
</body>
The <ByDate> Section
The display section for the <ByDate> element in the generated XML is similar to the section for <ByNumber>. Some primary difference is that no page breaks are generated within the section, so the keepCondition attribute of <foblock> keeps the table containing the sales date together with the table containing the corresponding list of sales. The keepCondition attribute is discussed in Keeping Display Components Together.
Keeping Display Components Together
Sometimes you want to ensure that pieces of information in a report, for example, the title of a table and the table it refers to, are not separated by a page break. The XSL-FO standard provides properties of the <fo:block> object, such as keep-together, keep-with-next, and keep-with-previous, that let you control page breaks. The Zen reports element <foblock> and the keepCondition attribute let you use these features in Zen reports.
The <foblock> element simply groups elements. You can use the keepCondition attribute to specify a keep condition for the contents of the block.
The following example is based on the report ZENApp.MyReportOpens in a new tab in the SAMPLES namespace. This example assumes you do not want to insert a page break for each new “SalesRep”, but you also do not want a page break in the table of “SalesRep” information. You can put the <header> element in an <foblock> with the keepCondition set to keep-together.within-page='always', which forces the table onto a new page if it would otherwise span the page break.
<group name="SalesRep" line='1px'>

<!-- SALES REP INFO -->
<foblock keepCondition="keep-together.within-page='always'">
 <header>
  <line pattern="empty"/>
  <table orient="row" width="3.8in" class='table2'>
   <item
    field="@name" width="2in"><caption value="Sales Rep:" width="2in"/>
   </item>
   <item
        field="count"><caption value="Number of Sales:"/>
   </item>
   <item
        field="subtotal" formatNumber='###,###,##0.00;(#)'>
        <caption value="Total Value of Sales:"/>
   </item>
  </table>
  <line pattern="empty"/>

  <!-- AVERAGE/DEVIATION -->
  <table orient="col" width="6in"
   style="border:thin solid gray;" class="invisible">
   <table orient="row" width="3in"
    style="margin-bottom:1em;padding-left:0;"
    class="table1" align="left">
    <item
        field="avg" class="table1"
        style="margin-bottom:1em;padding-left:3px;" width="1.7in"
        formatNumber='###,###,##0.000;(#)'>
        <caption value="Average Sale:" style="width:1.3in"/>
    </item>
   </table>
  </table>
 </header>
 </foblock>
Zen reports also supports the <table> attribute rowAcrossPages, which controls whether table rows can split across a page break. You can use this attribute when you have a <table> with a column that contains data long enough to wrap in the table cell, or has cell content that is a <table> that returns multiple rows. These conditions can cause a row to split between the bottom of one page and the top of the next page. To prevent the row from splitting, define the <table> element with the rowAcrossPages attribute set to “false”, as in the following example:
<table
  group="Projects/Details" orient="col"
  width="10.5in" layout="fixed"
  class="table5"  altcolor="#DCF9FF"
  style="border:1pt solid black;font-size:9;"
  rowAcrossPages="false">
      .
      .
      .
</table>
Conditionally Including a Group’s Elements
Zen reports supports functionality that allows a report to include or exclude elements in a group based on an XPath condition. This approach is different from other methods of conditionally including information, which include all elements in a group, or none of them. Note that you should not include calculations performed on the whole set of elements in the group, because the result does not reflect the selection performed by the ReportDisplay.
The attributes primaryGroup, primaryGroupifxpath, and testEachifxpath support both HTML and PDF output. However, pagination, page breaks, and page numbering are not supported in HTML.
Using primaryGroup and primaryGroupifxpath
One approach uses the primaryGroup and primaryGroupifxpath attributes of <report>. The following example is based on the report ZENApp.MyReportOpens in a new tab in the SAMPLES namespace. Given the ReportDefinition section as defined in ZENApp.MyReportOpens in a new tab, the following ReportDisplay creates a report that includes only the specified sales people. The key steps are:
-
The <report> attribute primaryGroup establishes that the group under consideration is "SalesRep". The attribute primaryGroupifxpath sets the condition that members of the group “SalesRep” must satisfy to be included in the report. See this line in the following code sample:
<report xmlns="http://www.intersystems.com/zen/report/display" name='myReport' title='HelpDesk Sales Report' style='standard' primaryGroup="SalesRep" primaryGroupifxpath="@name != 'Jack'"> . . . </report> -
The <item> attribute special uses the value "page-number-of-with-xpath" to add page numbers to the report that restart numbering at 1 when there is a change in the value of “@name”, specified in the attribute field. See this line in the following code sample:
<item field="@name" special="page-number-of-with-xpath" width="1in"/> -
The <body> attribute genLastPageIdOn specifies that the report should use the value of "@name" to generate a unique last page identifier for each item in “SalesRep” included in the report. This makes it possible to start page numbering at 1 for each sales person. See this line in the following code sample:
<body genLastPageIdOn="@name"> . . . </body> -
When you set a primaryGroup for the report, the report processes each of the elements of the primary group, which makes the primaryGroup, rather than the name, the XML context for elements contained by the report. This changes the way you address elements and attributes in the XML. The following lines show how you need to supply a full path to attributes of <myReport>, but not to the name attribute of <SalesRep>.
<item field="/myReport/@author" caption="Author:"/>
<item field="/myReport/@runBy" caption="Prepared By:"/>
<item field="/myReport/@runTime" caption="Time:"/>
<item field="@name" caption="Name:"/>
The following code sample provides the initial part of the ReportDisplay section for a report that uses primaryGroupifxpath to include elements in <SalesRep> conditionally:
<report xmlns="http://www.intersystems.com/zen/report/display"
    name='myReport'
    title='HelpDesk Sales Report' style='standard'
    primaryGroup="SalesRep" primaryGroupifxpath="@name != 'Jack'" >
  <document width="8.5in" height="11in"
   marginLeft="1.25in" marginRight="1.25in"
   marginTop="1.0in" marginBottom="1.0in">
  </document>
  <pagefooter>
    <line pattern="solid" thickness="1px"
     color="green" width="7.5in"/>
    <table orient="col" width="7.5in" layout="fixed">
      <item field="@name" width="6in"/>
      <item value="Page:" width=".5in"/>
      <item field="@name"
       special="page-number-of-with-xpath" width="1in"/>
    </table>
  </pagefooter>
  <body genLastPageIdOn="@name">
  <header>
  <!-- REPORT HEADER -->
    <p class="banner1">HelpDesk Sales Report</p>
    <fo><line pattern="empty"/><line pattern="empty"/></fo>
    <table orient="row" width="3.45in" class='table1'>
      <item value="Sales by Sales Rep" width="2in">
        <caption value="Title:" width="1.35in"/>
      </item>
      <item field="../@month" caption="Month:"/>
      <item field="/myReport/@author" caption="Author:"/>
      <item field="/myReport/@runBy" caption="Prepared By:"/>
      <item field="/myReport/@runTime" caption="Time:"/>
      <item field="@name" caption="Name:"/>
    </table>
  </header>
   . . .
 </body>
</report>
Using testEachifxpath
Another approach uses the testEachifxpath attribute of <group>. The following example is based on the report ZENApp.MyReportOpens in a new tab in the SAMPLES namespace. Given the ReportDefinition section as defined in ZENApp.MyReportOpens in a new tab, the following ReportDisplay creates a report that includes only the specified sales people. The key steps are:
-
The <group> attribute testEachifxpath sets the condition that members of the group “SalesRep” must satisfy to be included in the report. See this line in the following code sample:
<group name="SalesRep" testEachifxpath="@name != 'Jack'" > . . . </group> -
The XML context of the report has not been altered by setting a primaryGroup, so you access elements and attributes in the report in the usual way.
The following code sample provides the initial part of the ReportDisplay section for a report that uses testEachifxpath to include elements in <SalesRep> conditionally:
<report xmlns="http://www.intersystems.com/zen/report/display"
    name='myReport' title='HelpDesk Sales Report' style='standard'>
 <document width="8.5in" height="11in"
    marginLeft="1.25in" marginRight="1.25in"
    marginTop="1.0in" marginBottom="1.0in">
 </document>
 <body>
    <header>
    <!-- REPORT HEADER -->
      <p class="banner1">HelpDesk Sales Report</p>
      <fo><line pattern="empty"/><line pattern="empty"/></fo>
      <table orient="row" width="3.45in" class='table1'>
      <item value="Sales by Sales Rep" width="2in">
        <caption value="Title:" width="1.35in"/></item>
      <item field="@month" caption="Month:"/>
      <item field="@author" caption="Author:"/>
      <item field="@runBy" caption="Prepared By:"/>
      <item field="@runTime" caption="Time:"/>
    </table>
  </header>
  <!-- MAIN REPORT GROUP -->
  <group name="SalesRep" testEachifxpath="@name != 'Jack'" >
   . . .
  </group>
 </body>
</report>
Writing Mode
The writing-mode attribute controls aspects of page layout that are relevant to the direction in which text is read. For example, in a language read left to right, the first column of a table should be on the left side of the page, but in a language read right to left, it should be on the right side.
The ordering of characters in text is controlled by the Unicode Bidirectional Algorithm, which interprets the directional information encoded in the characters, not by the writing-mode attribute. writing-mode does contribute to the proper positioning and orientation of weakly directional characters such as parenthesis and quote marks. Where necessary, the ordering of characters can be fine-tuned with the <bidioverride> element.
The following table summarizes the Zen reports elements that support the writing-mode attribute.
| Zen Reports Element | Generated XSL-FO Element |
|---|---|
|
Adds the writing-mode attribute to the <fo:page-sequence> element, where it sets the writing mode for the entire report. If the report contains multiple <section> elements, adds the writing-mode attribute to the <fo:page-sequence> element generated by each <section>. |
|
|
Adds the writing-mode attribute to the <fo:page-sequence> element generated by the <section>. |
|
|
Adds the writing-mode attribute to the <fo:simple-page-master> element. writing-mode on <document> controls the placement of sidebars. If writing-mode="lr" <pagestartsidebar> is a left side bar and <pageendsidebar> is a right sidebar. If writing-mode="rl" the positions are reversed. |
|
|
Adds the writing-mode attribute to the <fo:block-container> element generated by the <container>. |
|
|
Adds the writing-mode attribute to the <fo:inline-container> element. |
|
|
Adds the writing-mode attribute to the <fo:table> element generated by the <table>. |
Supported Fonts for Complex Scripts
The following two sections list the fonts supported for complex scripts supported for PDF rendering with the supplied FOP rendering engine.
Arabic
-
Arial Unicode MSOpens in a new tab (arialuni.ttf)
-
Version 1.01Opens in a new tab (Word 2007)
-
50377 glyphs
-
includes limited GPOS support
-
-
-
LateefOpens in a new tab (LateefRegOT.ttf)
-
Version 1.0
-
1147 glyphs
-
includes GPOS for advanced position adjustments
-
language specific features for Kurdish (KUR), Sindhi (SND), Urdu (URD)
-
-
-
ScheherazadeOpens in a new tab (ScheherazadeRegOT.ttf)
-
Version 1.0
-
1197 glyphs
-
includes GPOS for advanced position adjustments
-
language specific features for render (KUR), Sindhi (SND), Urdu (URD)
-
-
-
Simplified ArabicOpens in a new tab (simpo.ttf, simpbdo.ttf)
-
Version 1.01Opens in a new tab (Windows XP)
-
not supported - contains invalid, out of order coverage table entries
-
-
Version 5.00Opens in a new tab (Windows Vista)
-
414 glyphs
-
lacks GPOS support
-
-
Version 5.92 (Windows 7)
-
473 glyphs
-
includes GPOS for advanced position adjustments
-
-
-
Traditional ArabicOpens in a new tab (trado.ttf, tradbdo.ttf)
-
Version 1.01Opens in a new tab (Windows XP)
-
530 glyphs
-
lacks GPOS support
-
-
Version 5.00Opens in a new tab (Windows Vista)
-
530 glyphs
-
lacks GPOS support
-
-
Version 5.92 (Windows 7)
-
589 glyphs
-
includes GPOS for advanced position adjustments
-
-
Devanagari
-
AparajitaOpens in a new tab (aparaj.ttf, aparajb.ttf, aparajbi.ttf, aparaji.ttf)
-
Version 1.00Opens in a new tab (Windows 7)
-
706 glyphs
-
-
-
KokilaOpens in a new tab (kokila.ttf, kokilab.ttf, kokilabi.ttf, kokilai.ttf)
-
Version 1.00Opens in a new tab (Windows 7)
-
706 glyphs
-
-
-
MangalOpens in a new tab (mangal.ttf, mangalb.ttf)
-
Version 5.01Opens in a new tab (Windows 7)
-
885 glyphs
-
UI font
-
-
-
UtsaahOpens in a new tab (utsaah.ttf, utsaahb.ttf, utsaahbi.ttf, utsaahi.ttf)
-
Version 1.00Opens in a new tab (Windows 7)
-
706 glyphs
-
-
Conditional Expressions for Displaying Elements
Every XData ReportDisplay element except <document> allows its output to be controlled using conditional expressions. If the specified expression evaluates to true, the report displays the element; if the expression evaluates to false, the report does not display the element.
The attributes described in this topic apply to all elements contained within the element that uses them. So, for example, if you use ifexpression or ifxpath with a <table> element, the result is to display or conceal the entire <table>, including every element that <table> contains, depending on the value of the expression. The following is an example using ifexpression. For more about the special variable %report shown in the example, see the detailed discussion of ifexpression later in this section:
<table orient="row" width="3.45in" class="table1"
       ifexpression="%report.Month=1">
  <item value="Sales by Sales Rep" width="2in">
    <caption value="Title:" width="1.35in"/>
  </item>
  <item field="@month" caption="Month:"/>
  <item field="@author" caption="Author:"/>
  <item field="@runBy" caption="Prepared By:"/>
  <item field="@runTime" caption="Time:"/>
</table>
Every XData ReportDisplay element except <document> supports the following attributes. You can use one of these attributes to supply a conditional expression that controls output of the element:
ifexpression
The value of the ifexpression attribute is an ObjectScript expression that controls output of the element. If true, the element is output to the report; if false, the element is suppressed.
The expression may not contain private variables. However, you may use the special variable %report to indicate the report class, and dot syntax with %report to reference properties or methods of the Zen report class. For example:
 <p ifexpression="%report.Month=1">
  This is January! Cold! Yea!
 </p>
 <p ifexpression="%report.Month>1">
  This is later than January! Spring is around the corner!
 </p>
The previous example references the Month property in the Zen report class using this syntax:
%report.Month
Do not use following syntax convention, which does not work in this context:
..Month
Similarly, you can reference the myMethod() method in the Zen report class using this syntax:
%report.myMethod()
Do not use the following syntax conventions, which do not work in this context:
..myMethod()
##class(myClass).myMethod()
If you use %report in an ifexpression in a way that relies on a property value passed as a ZENURL in the URI that invokes the report, you may see unexpected results if XSLT processing takes place in the browser. See the section “Setting Zen Report Class Properties from the URI” for more information on this issue.
A general knowledge of ObjectScript is helpful in knowing how to construct these expressions. See Using Caché ObjectScript, particularly the “String Relational Operators” section in the chapter “Operators and Expressions.”
ifxpath
The value of the ifxpath attribute is an XPath expression that controls output of the element. If true, the element is output to the report; if false, the element is suppressed.
The expression is based on the XML data source for the report and uses XPath syntax, as follows:
<p ifxpath='SalesRep[@name="Jack"]'>Oh boy, Jack is here!</p>
Because ifxpath is an XPath expression, it must conform to XPath and XML syntax rules. You cannot use the < (less-than) character in comparisons; instead use &lt; which is the XML-escaped XML entity that represents <.
The following example shows the correct syntax for an ifxpath expression that tests whether the attribute called id has a value less than 100:
<item field="@id" ifxpath="@id&lt;100" />includeColIfExpression
The value of the includeColIfExpression attribute is an ObjectScript expression that controls output of a specific column of data to the report. If true, the column is output; if false, the column is suppressed.
The expression may not contain private variables. However, you may use the special variable %report to indicate the report class, and dot syntax with %report to reference properties or methods of the Zen report class.
If you use %report in an includeColIfExpression in a way that relies on a property value passed as a ZENURL in the URI that invokes the report, you may see unexpected results if XSLT processing takes place in the browser. See the section “Setting Zen Report Class Properties from the URI” for more information on this issue.
includeColUnlessExpression
The value of the includeColUnlessExpression attribute is an ObjectScript expression that controls output of a specific column of data to the report. includeColUnlessExpression is the logical opposite of includeColIfExpression: If false, the column is output; if true, the column is suppressed.
The expression may not contain private variables. However, you may use the special variable %report to indicate the report class, and dot syntax with %report to reference properties or methods of the Zen report class. For example:
<item field="@LocationCode"
      includeColUnlessExpression=
      '%report.GroupOption="Unit"'>
  <caption value="Unit"
           includeColUnlessExpression=
           '%report.GroupOption="Unit"'/>
</item>
If you use %report in an includeColUnlessExpression in a way that relies on a property value passed as a ZENURL in the URI that invokes the report, you may see unexpected results if XSLT processing takes place in the browser. See the section “Setting Zen Report Class Properties from the URI” for more information on this issue.
includeColIfXPath
The includeColIfXPath attribute is similar to includeColIfExpression, except that its value is an XPath expression rather than an ObjectScript expression. It is also similar to the ifxpath attribute, which controls output of an element rather than a column of data in the report. If the XPath expression evaluates to true, the column is output; if false, the column is suppressed.
includeColUnlessXPath
The includeColUnlessXPath attribute is similar to includeColUnlessExpression, except that its value is an XPath expression rather than an ObjectScript expression. If the XPath expression evaluates to false, the column is output; if true, the column is suppressed.
unlessexpression
The value of the unlessexpression attribute is an ObjectScript expression that controls output of a specific column of data to the report. unlessexpression is the logical opposite of ifexpression: If false, the column is output; if true, the column is suppressed.
In the following example, the item is always output except when GroupOption is null; then it is suppressed. Note that you cannot enclose string arguments to concat and other XPath functions, in single quotes. You need to use double quotes or the " entity.
<item
  field='concat(/CurrAdm/LeftGroup,Adm/groupby,"
  Comment: ", Adm/groupbydesc)'
  unlessexpression='%report.GroupOption=""' />
If you use %report in an unlessexpression in a way that relies on a property value passed as a ZENURL in the URI that invokes the report, you may see unexpected results if XSLT processing takes place in the browser. See the section “Setting Zen Report Class Properties from the URI” for more information on this issue.
Conditional Expressions for Displaying Values
The <item>, <p>, and <inline> elements support the attributes if and expression. These attributes allow you to conditionally display the value of the element, as explained in following the table:
| Attribute | Description |
|---|---|
| expression |
ObjectScript expression whose result appears in the report output if the if condition is true. |
| if |
ObjectScript expression that controls output of the expression result. If the if expression evaluates to true (any non-zero value in ObjectScript), the expression result is output to the report; otherwise the expression result is not output. The default value for if is 1 (true). If you do not specify a value for if, the element always outputs the expression result. |
The <p> and <inline> elements behave differently from the <item> element when they combine the content from the expression attribute with other content. For a <p> or <inline> element, content can be provided by text contained in the element, by the field attribute, and conditionally by the expression attribute. Content from all three sources is output at the same time. The order in which the contents are arranged is: field, followed by expression, followed by the text content.
For an <item> element, content can be provided by the field, special, expression, and value attributes, but <item> outputs content from only one of these attributes to the report. If content is available from multiple attributes, <item> selects the one to output based on the following order of precedence, from highest to lowest: field, special, expression, and value. If an <item> has both an expression, and a value attribute, but the if attribute evaluates to false, the expression still takes precedence over the value, and nothing is output to the report.
The if or expression values may not contain private variables. However, you may use the special variable %report to reference properties in the Zen report class. So, to refer to the property called employeeId in the Zen report class, you can use this syntax:
<item expression='%report.employeeId' if='1' /> Given a report class definition that starts as follows:
Class my.SimpleReport Extends %ZEN.Report.reportPage
{
Parameter REPORTNAME = "SimpleReport";
Parameter XSLTMODE = "server";
Property Title As %String (ZENURL="TITLE");
//... and so on
}
The following are some expression examples using Title. These URIs contain line breaks for typesetting purposes only; a correct URI is all on one line. The %20 character sequence provides a space character in the output. In these examples, 57772 is the Web server port configured for Caché:
http://localhost:57772/csp/mine/my.SimpleReport.cls
?$MODE=html&$EMBEDXSL=1&TITLE=My%20Title%20Example
http://localhost:57772/csp/mine/my.SimpleReport.cls
?$MODE=pdf&TITLE=My%20Title%20Example
The following example runs the report from the command line rather than the browser.
 ZN "MINE"
 SET %request=##class(%CSP.Request).%New()
 SET %request.URL = "/csp/mine/SimpleReport.xml"
 SET %request.CgiEnvs("SERVER_NAME")="127.0.0.1"
 SET %request.CgiEnvs("SERVER_PORT")=57777
 SET rpt=##class(my.SimpleReport).%New()
 SET rpt.Title="My Title Example"
 SET tSC=rpt.GenerateReport("C:\TEMP\SimpleReport.html",1)
 IF 'tSC DO $system.Status.DecomposeStatus(tSC,.Err) WRITE !,Err(Err) ;'
 WRITE !,tSC
If the goal is to display the expression only if the property is non-null, this requires extra effort to process quotation marks, which are special characters in both XML and ObjectScript. The following example correctly shows " for escaping the straight double quote character, and '= to indicate “not equals” in ObjectScript:
<item expression='%report.Title' if="%report.Title'="""/> The following example uses the ObjectScript function $TRANSLATE ($TR) to strip out space characters, and displays the expression result only if it is non-null:
<item expression='$TR(%report.Title," ")'
if="%report.Title'=""'" />
If you use %report in a way that relies on a property value passed as a ZENURL in the URI that invokes the report, you may see unexpected results if XSLT processing takes place in the browser. See the section “Setting Zen Report Class Properties from the URI” for more information on this issue.
<report>
The <report> element is the required top level container within an XData ReportDisplay block.
A different <report> element is the required top level container within an XData ReportDefinition block. For details, see “Gathering Zen Report Data.”
Within an XData ReportDisplay block, <report> may contain the following elements:
-
<init> — Executes XSLT instructions at the top level of the stylesheet
-
<section> — An element similar to <report> that lets you create multiple report display definitions in a single <report>. If a report contains a <section>, it should not contain elements, such as <document> or <body> outside of a <section>. <section> can contain:
-
<pagemaster> — Lets you specify formatting for the first page, last page, the rest of the pages, or any page in a report.
-
<document> — Sets page layout for PDF and other styling for HTML and PDF output.
-
<pageheader> — Page header, used in PDF and optionally in HTML.
-
<pagefooter> — Page footer, used in PDF only.
-
<pagestartsidebar> — Page sidebar, on the side of the document where text starts. In languages read left to right, this is a left sidebar. Used in PDF only.
-
<pageendsidebar> — Page sidebar, on the side of the document where text ends. In languages read left to right, this is a right sidebar. Used in PDF only.
-
<body> — The container for elements that control layout, style, and appearance. This element is required.
-
<call> — Calls a method that returns a stream, and inserts the stream into the report definition at the place where the element occurs. This capability lets you create a report from separately-developed subreports.
-
A <report> element that appears in an XData ReportDisplay block has the following attributes.
| Attribute | Description |
|---|---|
| Conditional expressions for display | For descriptions of the attributes that allow you to conditionally output the <report> element, see the section “Conditional Expressions for Displaying Elements.” |
| id | Optional identifier. If present, it can be used to retrieve this element in server-side code, by calling the %GetComponentById(id) method. |
| primaryGroup |
Identifies the group in the XData ReportDefinition block that should be used to control page numbering. Set it with the name of the group from the ReportDefinition section as follows:<report xmlns="http://www.intersystems.com/zen/report/display" name=”SalesReport" title="Sales Report" primaryGroup="SalesRep"> Use it In conjunction with the “*-with-xpath” values for the <item> attribute special and the <body> attribute genLastPageIdOn. Note also that a <group> element with the attribute primaryGroup set to “true” does not need the attribute pagebreak set to “true” since the page break happens automatically when the page number resets to 1. |
| primaryGroupifxpath |
An XPath that provides a condition that is applied to each element of the primary group to determine whether the element is included in the report. |
| name |
The report name, which should match the top-level element name in the XML data for the report. If the XData ReportDefinition block from the same Zen report class is used to generate this XML, then the name attribute for the <report> element in XData ReportDisplay should match the name attribute for the <report> element in XData ReportDefinition. If the supplied name is an invalid string for use as an XML identifier, the report does not work correctly. The most obvious characters to avoid are any white space characters, plus the five standard XML entity characters &'<>" |
| style |
If you omit the style attribute, your reports use the standard stylesheet for Zen reports. If you set style="none" the standard Zen stylesheet is ignored and there are no predefined styles for Zen reports. For details about the default styles see the section “Default Format and Style.” |
| terminateIfEmpty |
If true, if there is no data for the report, instead of displaying a blank page print the message “No Data!” This attribute has the underlying data type %ZEN.Datatype.booleanOpens in a new tab. See “Zen Reports Attribute Data Types.” |
| title |
The report title, used for items such as the PDF filename or HTML page title. Although you can enter ordinary text for this attribute, it has the underlying data type %ZEN.Datatype.captionOpens in a new tab. See “Zen Reports Attribute Data Types.” |
The special variable %display represents the <report> container in XData ReportDisplay. Properties of the %display object correspond to attributes of the <report> element. Also see the description of %display in the section “Using Runtime Expressions in Zen Reports ” in this document.
<init>
The <init> element, if present in the <report>, must occur before the <document> element. <init> provides a way to insert custom XSLT instructions at the top level of the generated XSLT stylesheet for the Zen report, before any other stylesheet processing occurs.
Generally, <init> contains only <xslt> elements.
In the following example, <init>, <xslt>, and a custom XData block work together to set output conventions to a European number format (76.543.212.345,67) rather than the default North American number format (76,543,212,345.67).
As described in the detailed “<xslt>” section that follows this topic, <xslt> works with a custom XData block. This XData block contains the XSLT instructions to insert. To set European number format conventions, the XData block would need to contain the following xsl:decimal-format instruction:
XData EuropeanNumberFormat
{
<zenxslt>
  <xsl:decimal-format name="euro"
                      decimal-separator=","
                      grouping-separator="."/>
</zenxslt>
}
The <xslt> element that references this custom XData block would need to appear inside an <init> element in the XData ReportDisplay block for the same Zen report class. In the following example, the <xslt> element uses its all attribute to reference the custom XData block called EuropeanNumberFormat. The all attribute tells Zen that the XSLT instructions in this XData block apply to stylesheets for both HTML and PDF report output.
XData ReportDisplay
  [ XMLNamespace = "http://www.intersystems.com/zen/report/display" ]
{
  <report xmlns="http://www.intersystems.com/zen/report/display"
          name="myReport" style="standard" >
    <init>
      <xslt all="EuropeanNumberFormat"/>
    </init>
    <document width="8.5in" height="11in"
              marginLeft="1.25in" marginRight="1.25in"
              marginTop="1.0in" marginBottom="1.0in">
    </document>
    <body>
      <!-- Contents of report here -->
    </body>
  </report>
}
<xslt>
The great advantage of Zen reports is that they generate XSLT for you. However, Zen reports also offer an <xslt> element that enables you to contribute custom XSLT instructions to the generated XSLT.
The <xslt> element can appear anywhere within an XData ReportDisplay block, but if you want the resulting XSLT instructions to apply at the top level of the generated stylesheet, place the <xslt> element in the <init> block. For example, <init> is the appropriate container to use when you want your <xslt> element to define values for XSLT global variables.
An <xslt> element must identify a custom XData block in your Zen report class. This XData block has its own name, and is distinct from XData ReportDefinition or XData ReportDisplay. This custom XData block contains the XSLT instructions that you want to add to the XSLT stylesheet for your Zen report.
Once you have created a custom XData block, your <xslt> syntax must use one of the attributes all, html, or xslfo to identify this XData block. The choice of attribute determines the type of output to which your XSLT instructions apply: all forms of output, HTML only, or PDF only.
The next several sections provide details:
<xslt> and its Attributes
<xslt> has the attributes described in the following table.
| Attribute | Description |
|---|---|
| all | Name of an XData block in the Zen report class that defines XSLT instructions to be used in the generated XSLT stylesheet for all types of output. These XSLT instructions apply to all forms of Zen report output, both XHTML and PDF. For alternatives to the all attribute, see html and xslfo. |
| expressions | Semicolon-separated list of one or more expressions that give values to the corresponding variables listed in vars. expressions may be XSLT or ObjectScript expressions. If ObjectScript, the ! (exclamation point) operator must precede them, as in the example. |
| html | Name of an XData block in the Zen report class that defines XSLT instructions to be used in the generated XSLT stylesheet for XHTML output only. For alternatives to the html attribute, see all and xslfo. |
| id | Optional identifier. If present, it can be used to retrieve this element in server-side code, by calling the %GetComponentById(id) method. |
| vars | A semicolon-separated list of one or more XSLT variables. The expressions attribute provides values for these variables. |
| xslfo | Name of an XData block in the Zen report class that defines XSLT instructions to be used in the generated XSLT stylesheet for PDF output only. For alternatives to the xslfo attribute, see all and html. |
In the following example, the <xslt> element has its all attribute set to setsize. setsize is the name of a custom XData block in the Zen report class, as shown in the next section, “XData Blocks for <xslt>.”
XData ReportDisplay
[ XMLNamespace = "http://www.intersystems.com/zen/report/display" ]
{
  <report xmlns="http://www.intersystems.com/zen/report/display"
          name="Container">
    <init>
      <xslt all="setsize" vars="orientation"
            expressions="!%report.Orientation"/>
    </init>
    <document width="{$width}" height="{$height}"
              margin="10mm" size="{$orientation}" />
    <!-- Other elements for the report -->
  </report>
}
This example uses <init> and <xslt> to pass the value held in the Zen report class Orientation property to an XSLT global variable called orientation. This value can subsequently be referenced using the normal XSLT syntax for global variables, as shown for $orientation, $width, and $height in this and other examples in this section.
XData Blocks for <xslt>
The following example shows an XData block called setsize that works with the <xslt> element shown in the previous section, “<xslt> and its Attributes.”
This XData block example uses a root element called <zenxslt> to contain the XSLT statements. A <zenxslt> container is required when there is no single root for the XSLT statements that you want to provide in the XData block for <xslt>. This allows the complete XData block to contain only one root element, as is appropriate for well-formed XML. At compile time, Zen strips out the <zenxslt> container and adds the XSLT statements to the generated stylesheet for your Zen report.
XData setsize
{
<zenxslt>
  <xsl:variable name="height">
    <xsl:choose>
      <xsl:when test="$orientation='landscape'">
        <xsl:value-of select="'210mm'"/>
      </xsl:when>
      <xsl:otherwise>
        <xsl:value-of select="'297mm'"/>
      </xsl:otherwise>
    </xsl:choose>
  </xsl:variable>
  <xsl:variable name="width">
    <xsl:choose>
      <xsl:when test="$orientation='landscape'">
        <xsl:value-of select="'297mm'"/>
      </xsl:when>
      <xsl:otherwise>
        <xsl:value-of select="'210mm'"/>
      </xsl:otherwise>
    </xsl:choose>
  </xsl:variable>
</zenxslt>
}
This sample XData block conditionally defines values for XSLT global variables height and width based on the value of the XSLT global variable orientation. The previous topic, “<xslt> and its Attributes,” shows how you could use <init> and <xslt> elements to give the XSLT variable orientation the current value of the Orientation property of the Zen report class. However, there is no restriction on how the Orientation property gets its value. It might have a default value, or the Zen report class might contain code that sets the value. The next section provides information about how a user might set the value of the Orientation property such dynamically, from the browser URI, when invoking the Zen report.
Setting XSLT Global Variables with <xslt>
Suppose you define Orientation in the Zen report class as a ZENURL property:
Property Orientation As %ZEN.Datatype.string(ZENURL="ORIENT");Regardless of any other conventions described in this section, this ZENURL statement means you can use a URI query parameter called ORIENT when invoking the Zen report. When you do this, the Zen report class Orientation property gets the value that you assign to ORIENT in the URI. Remember that URI query parameters do not use quotes around their values. For example:
http://localhost:57772/csp/hs/ZR.SDA.cls?ORIENT=portrait
Now suppose you have the <xslt> element shown in “<xslt> and its Attributes” and the XData block shown in “XData Blocks for <xslt>.” These work together to set the XSLT global variable orientation to the value of the Zen report class property Orientation and to set appropriate values for the XSLT global variables height and width based on the value of orientation.
The following are four examples of URI strings that could set the Orientation property of the Zen report class when the Zen report is invoked.
http://localhost:57772/csp/hs/ZR.SDA.cls?$MODE=pdf&ORIENT=portrait
http://localhost:57772/csp/hs/ZR.SDA.cls?$MODE=pdf&ORIENT=landscape
http://localhost:57772/csp/hs/ZR.SDA.cls?$MODE=html&ORIENT=portrait
http://localhost:57772/csp/hs/ZR.SDA.cls?$MODE=html&ORIENT=landscape
<section>
The <section> element lets you create multiple report display definitions in a <report>. It must be an immediate child of <report> And must contain a <pagemaster> element for page formatting. In addition to <pagemaster>, a <section> must contain a <body> element, which in turn contains anything valid in the body of a report. <section> supports most of the same properties as <report>. The additional property sectionName is required, and is used to generate identifiers that are unique in the generated XSL-FO.
<pagemaster>
The <pagemaster> element lets you specify formatting for different pages in the report. It can be a direct child of a <report> or a <section> element. It contains one or more <masterreference> elements.
<masterreference>
The <masterreference> element lets you specify formatting for specific pages. It must be a direct child of <pagemaster>. <masterreference> can contain <document>, <pageheader> <pagefooter>, <pagestartsidebar>, and <pageendsidebar> elements. The elements must be in order, and you cannot skip any element. For example, if you need to specify only the <document> element, you need not include <pageheader> and <pagefooter>, but if you need to specify only <pagefooter>, you must include both <document> and <pageheader> even if they are empty.
<masterreference> has the following attributes:
| Attribute | Description |
|---|---|
| masterReference |
Can be an arbitrary string. It is used to create unique identifiers for objects in the sections of the report. |
| pagePosition |
Supplies the value of the page-position attribute of the <fo:conditional-page-master-reference> XSL-FO object. Valid values are, “first”, “last”, “rest”, “any”. |
<document>
The <document> element specifies page layout and style characteristics for PDF output. For an overview of PDF page layout, see the section “The <document> element and Page Layout”.
<document> can contain multiple <class>, <cssinclude>, and <xslinclude> elements. These elements provide custom style specifications. Their results can apply to XHTML or PDF output, separately or equally, depending on your choices within these elements. The corresponding sections in this topic describe <class>, <cssinclude>, and <xslinclude>.
Note that as you design a PDF output page, you might try different layouts in rapid succession. If you edit your <document> element to change margin values, adjust headers, or switch from portrait to landscape mode, the next time you view your Zen report, your changes might not display in the PDF output. You might draw incorrect conclusions when your changes do not appear. This can happen due to caching of previously displayed pages, especially in Firefox. To overcome this problem you must fully exit Firefox and start a new Firefox session before viewing the revised Zen report. It is not necessary for you to restart Caché, but you must exit and restart Firefox.
The <document> element supports a number of attributes that control aspects of page layout. The following tables present them grouped according to their function.
The following attributes control the margins of the page:
| Attribute | Description |
|---|---|
| margin |
Provides an HTML length value for the margin attribute of the <fo:simple-page-master> element in the generated XSL-FO stylesheet. When you supply a margin value, Zen replaces any values supplied for marginBottom, marginLeft, marginRight, or marginTop with the value supplied for margin. |
| marginBottom |
Provides an HTML length value for the margin-bottom attribute of the <fo:simple-page-master> element in the generated XSL-FO stylesheet. When you supply a margin value, it replaces any values supplied for marginBottom, marginLeft, marginRight, or marginTop. |
| marginLeft | Sets the left margin, as marginBottom sets the bottom margin. |
| marginRight | Sets the right margin, as marginBottom sets the bottom margin. |
| marginTop | Sets the top margin, as marginBottom sets the bottom margin. |
The following attributes control the margins of the <fo:region-body> element in the generated XSL-FO:
| Attribute | Description |
|---|---|
| endSidebarLength |
Provides an HTML length value for the margin-right attribute of the <fo:region-body> element in the generated XSL-FO. It defines the area occupied by <fo:region-end>, which contains page footer text. If your report has a <pageendsidebar>, you must specify a endSidebarLength and this endSidebarLength must be greater than the regionEndExtent to ensure that text does not overlap. If your report has no <pageendsidebar>, regionEndExtent and endSidebarLength are optional. The default value of endSidebarLength is 0. The property startSidebarLength performs the same function for <fo:region-start>. "2in", "5cm", "12px", "14pt", "3em", or "75%" are all valid formats for HTML length values. A percentage is relative to the container for the element specifying the length. If you are taking advantage of any automatic Zen calculations for portions of your page layout, do not use "%", "em", or "px" in the HTML length values that you provide for the height, margin, or extent attributes of <document>. |
| footerHeight |
Provides an HTML length value for the margin-bottom attribute of the <fo:region-body> element in the generated XSL-FO. It defines the area occupied by <fo:region-after>, which contains page footer text. If your report has a <pagefooter>, you must specify a footerHeight and this footerHeight must be greater than the regionAfterExtent to ensure that text does not overlap. If your report has no <pagefooter>, regionAfterExtent and footerHeight are optional. The default value of footerHeight is 0. headerHeight performs the same function for <fo:region-before> "2in", "5cm", "12px", "14pt", "3em", or "75%" are all valid formats for HTML length values. A percentage is relative to the container for the element specifying the length. If you are taking advantage of any automatic Zen calculations for portions of your page layout, do not use "%", "em", or "px" in the HTML length values that you provide for the height, margin, or extent attributes of <document>. |
| headerHeight | Sets the header height as footerHeight sets the footer height. |
| startSidebarLength | Defines the area occupied by <fo:region-start> in the <fo:region-body> asendSidebarLength defines <fo:region-end>. |
Each content area in the <fo:region-body>, the page headers, footers, and sidebars, have a set of similarly-named attributes that control styling and other characteristic of the area. The following table lists the attributes that control the <pagefooter>, which corresponds to the <fo:region-after> element in the generated XSL-FO. Attributes controlling other areas behave similarly.
| Attribute | Description |
|---|---|
| regionAfter |
Style to assign to the <fo:region-after> area of the page as shown in the diagrams at the beginning of this section. You can also use the more specific attributes regionAfterColor, regionAfterDisplayAlign, regionAfterExtent, regionAfterName, and regionAfterOrientation. regionBefore, regionStart, and regionEnd perform the same function for <fo:region-before>, <fo:region-start>, and <fo:region-end>. |
| regionAfterColor |
Provides a value for the background-color attribute of the <fo:region-after> element in the generated XSL-FO stylesheet. This can be useful for diagnostic purposes. regionBeforeColor, regionStartColor, and regionEndColor perform the same function for <fo:region-before>, <fo:region-start>, and <fo:region-end>. |
| regionAfterDisplayAlign |
Provides a value for the display-align attribute of the <fo:region-after> element in the generated XSL-FO stylesheet.
regionBeforeDisplayAlign, regionStartDisplayAlign, and regionEndDisplayAlign perform the same function for <fo:region-before>, <fo:region-start>, and <fo:region-end>. |
| regionAfterExtent |
Provides an HTML length value for the extent attribute of the <fo:region-after> element in the generated XSL-FO. The <fo:region-after> element contains the page footer content. The default value is 0. If your report has a <pagefooter>, you must specify a footerHeight and this footerHeight must be greater than the regionAfterExtent or content may overlap. Make sure the regionAfterExtent is large enough to contain the content you plan for your footer. If your report has no <pagefooter>, regionAfterExtent and footerHeight are optional. regionBeforeExtent, regionStartExtent, and regionEndExtent perform the same function for <fo:region-before>, <fo:region-start>, and <fo:region-end>. |
| regionAfterName |
Provides a name for the region-after area in the region-body. If supplied, this name and the name supplied for the regionName of <pagefooter> should be the same. regionBeforeName, regionStartName, and regionEndName perform the same function for <fo:region-before>, <fo:region-start>, and <fo:region-end>. Supplied named should match regionName on the relevant page element. |
| regionAfterOrientation |
Controls how content is oriented on the <fo:region-after>.
regionBeforeOrientation, regionStartOrientation, and regionEndOrientation perform the same function for <fo:region-before>, <fo:region-start>, and <fo:region-end>. |
The remaining attributes control other aspects of the document:
| Attribute | Description |
|---|---|
| column-count |
Specifies number of columns in PDF output. The default value is 1. When the value is greater than one, output is formatted into columns such that content flows from the bottom of the first column to the top of the second and so forth until all columns on the page are filled. |
| column-gap |
Used if column-count is greater than 1. Specifies the space between columns. The value is an explicit length, specified with units such as “cm” or “in”. |
| height |
Provides an HTML length value for the page-height attribute of the <fo:simple-page-master> element in the generated XSL-FO. Defines the height dimension of the printed page. |
| id | Optional identifier. If present, it can be used to retrieve this element in server-side code, by calling the %GetComponentById(id) method. |
| orientation |
Controls how page content is oriented on the page. The orientation of the page itself does not change.
|
| referenceOrientation |
Controls how page content is oriented on the page. The orientation of the page itself does not change.
|
| size |
Value for the <fo:simple-page-master> size attribute in the generated XSL-FO stylesheet. |
| width |
Provides an HTML length value for the page-width attribute of the <fo:simple-page-master> element in the generated XSL-FO stylesheet. Defines the width dimension of the printed page. |
| writing-mode |
Adds the writing-mode attribute to the <fo:simple-page-master> element in the generated XSL. writing-modecontrols aspects of page layout relevant to the direction in which text is written. See the section “Writing Mode” for additional discussion of thewriting-mode attribute. Possible values are:
Note that not all XSL-FO renderers support all possible values. |
| writing-mode-region-after |
Adds the writing-mode attribute to the <fo:region-after> element in the generated XSL. For details, see the writing-mode property in this table. writing-mode-region-before, writing-mode-region-body, writing-mode-region-end, and writing-mode-region-start perform the same function for <fo:region-before>, <fo:region-body>, <fo:region-end>, and <fo:region-start>. |
| writing-mode-region-before |
See writing-mode-region-after in this table. |
| writing-mode-region-body |
See writing-mode-region-after in this table. |
| writing-mode-region-end |
See writing-mode-region-after in this table. |
| writing-mode-region-start |
See writing-mode-region-after in this table. |
<class>
The <class> element renders style information into a CSS class in the XHTML report, and into equivalent XSLT stylesheet information for the PDF report. <class> elements can only occur as children of <document>. Multiple <class> elements may be present. Each <class> element has attributes described in the following table.
| Attribute | Description |
|---|---|
| Conditional expressions for display | For descriptions of the attributes that allow you to conditionally output the <class> element, see the section “Conditional Expressions for Displaying Elements.” |
| id | Optional identifier. If present, it can be used to retrieve this element in server-side code, by calling the %GetComponentById(id) method. |
| name |
Identifies a style class. The name value must use the following syntax: tagName.className Where tagName may be the name of one of the following HTML tags only:
The className portion of the tagName.className value can be any name of your choosing that uniquely identifies this style. The following are some examples of valid name syntax: name="th.myTable" name="td.myTable" name="a.myLink" name="inline.myFormat" |
The <class> element contains the following elements that specify the styling information for the class. These elements can only occur as children of <class>.
-
<att> specifies a piece of style information that applies to all types of output
-
<atthtml> specifies a piece of style information that applies to XHTML output only
-
<attxslfo> specifies a piece of style information that applies to PDF output only
<att>, <atthtml>, and <attxslfo> have the following attributes.
| Attribute | Description |
|---|---|
| Conditional expressions for display | For descriptions of the attributes that allow you to conditionally output the <att>, <atthtml>, or <attxslfo> elements, see the section “Conditional Expressions for Displaying Elements.” |
| name | The attribute name. This corresponds to a CSS attribute name (color, background-color, font-size, font-family, width, etc). Zen simply passes the <att> attributes on to CSS or XSL-FO, so the user can specify anything; it is up to the browser or PDF rendering tool to be able to interpret the attribute. |
| value | The value to assign to the attribute. |
To provide the equivalent of the CSS document fragment given here:
th.myTable {
  background-color: blue;
  color: white;
}
Use the following <class> element:
<class name="th.myTable">
  <att name="background-color" value="blue" />
  <att name="color" value="white" />
</class>
To apply this custom style to a <td> element, you would apply the class attribute to the <td> element, its parent <table> element, or its parent <body> element. When specifying a value for the class attribute, do not include the element name, such as <td>, <table>, or <body>. Just use the style name. For example, if you have a style class named th.myTable that you want to use, in the <report> you may specify:
<table class="myTable">
The following <table> element uses the class attribute to apply the table.grid style to a table in a Zen report:
<table class="grid" group="Step">
 <item width="0.8in" field="@Number" />
 <item width="0.8in" field="./AllSet" />
 <item field="./DemoText" />
</table>
Parent elements propagate their class attribute values to children that do not have a class specified. So if you define table.myTable, th.myTable, and td.myTable, you only need to give the <table> element a class attribute. You can even put a class attribute on the <body> element to give a class for every element in the report.
For more about class, see the “Report Display Attributes” section in the chapter “Displaying Zen Report Data.”
For descriptions of the default Zen report styles that you can override or supplement using <class>, <att>, <atthtml>, and <attxslfo>, see the following topics in the appendix “Default Format and Style”:
<cssinclude>
The <cssinclude> element applies to XHTML output only. When producing the XSLT stylesheet for PDF output, the class simply ignores any <cssinclude> elements.
Multiple <cssinclude> elements may be present within a <document> element. Each <cssinclude> element has the attribute listed in the following table.
| Attribute | Description |
|---|---|
| Conditional expressions for display | For descriptions of the attributes that allow you to conditionally output the <cssinclude> element, see the section “Conditional Expressions for Displaying Elements.” |
| href |
URI of an external CSS stylesheet to include in the HTML stylesheet. The href string can be a comma-separated list of URIs, and each is included; this the same as providing multiple <cssinclude> elements. Some browsers struggle when the file referenced does not end in .css. |
| id | Optional identifier. If present, it can be used to retrieve this element in server-side code, by calling the %GetComponentById(id) method. |
| makeAbsoluteURL |
If true, and %request is not defined, convert the filename supplied by href to an absolute URL that points to a file in csp/namespace in the Caché installation directory. This attribute has the underlying data type %ZEN.Datatype.booleanOpens in a new tab. See “Zen Reports Attribute Data Types.” |
<xslinclude>
The <xslinclude> element applies to the XSLT stylesheet for PDF output only. When producing the HTML version of the report, the class simply ignores any <xslinclude> elements.
Multiple <xslinclude> elements may be present within a <document> element. Each <xslinclude> element has the attribute listed in the following table.
| Attribute | Description |
|---|---|
| Conditional expressions for display | For descriptions of the attributes that allow you to conditionally output the <xslinclude> element, see the section “Conditional Expressions for Displaying Elements.” |
| href |
Filename of an external XSLT file to include in the to-XSLFO stylesheet. This feature is potentially very powerful, but XSLT can be difficult to write. In practice, the main purpose of the <xslinclude> element is for the external XSLT stylesheet to contain <xsl:attribute-set> elements, which can do the same work as CSS classes. |
| id | Optional identifier. If present, it can be used to retrieve this element in server-side code, by calling the %GetComponentById(id) method. |
| makeAbsoluteURL |
If true, and %request is not defined, convert the filename supplied by href to an absolute URL that points to a file in csp/namespace in the Caché installation directory. This attribute has the underlying data type %ZEN.Datatype.booleanOpens in a new tab. See “Zen Reports Attribute Data Types.” |
To continue the previous <class> example, to import the th.myTable class from external files, the <document> element would look something like this:
<document ....>
  <cssinclude href="myStyle.css" />
  <xslinclude href="myStyle.xsl" />
</document>
With myStyle.css containing:
th.myTable {
  background-color: blue;
  color: white;
}
And myStyle.xsl containing:
<xsl:attribute-set name="th.myTable">
  <xsl:attribute name="background-color">blue</xsl:attribute>
  <xsl:attribute name="color">white</xsl:attribute>
</xsl:attribute-set>
<pageheader>
The <pageheader> element puts content into a header at the top of each printed page. You must place it before the <body> element in the XData ReportDisplay block.
<pageheader> can contain the same layout and display elements as <body>. See the list of elements in the chapter “Displaying Zen Report Data.” However, everything contained within the <pageheader> is rendered in the blank space provided by the <document> element headerHeight and regionBeforeExtent attributes. To add a page header to the PDF report output, the XData ReportDisplay block must contain:
-
A <document> element with headerHeight and regionBeforeExtent values. The headerHeight must be greater than the regionBeforeExtent. Make sure the regionBeforeExtent is large enough to contain the content you plan for your header.
-
A <pageheader> element
XHTML reports do not support page-by-page headers, so in XHTML reports the contents of <pageheader> are simply rendered at the beginning of the report.
The <pageheader> element supports the attributes listed in the following table.
| Attribute | Description |
|---|---|
| Conditional expressions for display | For descriptions of the attributes that allow you to conditionally display the <pageheader> element, see the section “Conditional Expressions for Displaying Elements.” |
| Display attributes | For descriptions of style, width, class, and other attributes, see the “Report Display Attributes” section in the chapter “Displaying Zen Report Data.” |
| id | Optional identifier. If present, it can be used to retrieve this element in server-side code, by calling the %GetComponentById(id) method. |
| regionName |
A name for the <pageheader>. If supplied, this name and the name supplied for regionBeforeName in <document> must be the same. |
<body>
The <body> element is the required child of <report>. It contains the Zen report elements that control layout and style.
The <body> element supports the attributes listed in the following table.
| Attribute | Description |
|---|---|
| Conditional expressions for display | For descriptions of the attributes that allow you to conditionally output the <body> element, see the section “Conditional Expressions for Displaying Elements.” |
| appendIdToZenLastPage |
In order to calculate a total page count, Zen reports generates a last-page marker. A report that has multiple, independently numbered sections, effectively has more than one ‘last’ page. This attribute instructs the report to use the value supplied by the <body> attribute id to generate a unique last-page marker. Use it in conjunction with the <item> attribute appendToZenLastPage. The value of appendToZenLastPage must match the value supplied for <body> id. This attribute has the underlying data type %ZEN.Datatype.booleanOpens in a new tab. See “Zen Reports Attribute Data Types.” See the section Page Numbering in Multi-section Reports for more information on using the appendIdToZenLastPage attribute. |
| blockZENLastPage |
Boolean flag to block last page reference creation. Default value is “false”. It provides a useful ‘shortcut’ to avoid the necessity of generating unique last-page markers if you are not using page numbering in your report. This attribute has the underlying data type %ZEN.Datatype.booleanOpens in a new tab. See “Zen Reports Attribute Data Types.” |
| genLastPageIdOn |
In order to calculate a total page count, Zen reports generates a last-page marker. A report that has multiple, independently numbered sections, effectively has more than one ‘last’ page. This attribute provides an XPath that is used to generate unique last-page markers. Use it in conjunction with the “*-with-xpath” values for the <item> attribute special, and the <report> or <section> attribute primaryGroup. |
| foStyle |
Allows an XSL-FO style to be defined for PDF generation. The following entry in the Zen report XData ReportDisplay block: <body foStyle="font-family='Arial' font-size='9pt'"> Produces the following output in the generated XSL-FO stylesheet for the report: <fo:flow flow-name="xsl-region-body" font-family="Arial" font-size="9pt"> The foStyle attribute does not apply to output in XHTML format. When the output mode is XHTML, foStyle is ignored. |
| id | Optional identifier. If present, it can be used to retrieve this element in server-side code, by calling the %GetComponentById(id) method. |
The <body> element for a <report> may contain any number of elements to control positioning and layout of data items in the report. For a list and full details, see the next chapter, “Displaying Zen Report Data.”
The <body> element may also contain the following elements to control style for the <report>:
<call>
The <call> element allows a report display to include XSLT created by the XData ReportDisplay block of another report. It is useful if you want to create a report from separately developed sub-reports, or if a report becomes too large to compile. The <call> element must be a direct child of the <body> element. A called subreport cannot contain a <call> element. The report property suppressRootTag can be useful with <call> if the included XSLT has its own root tag.
The <call> element has the following attributes when used in the XData ReportDisplay block:
| Attribute | Description |
|---|---|
| method |
A class or instance method which returns a stream. This method must be defined in the Zen report. The stream is inserted into the report definition at the place where the call element occurs. The method can return the output of the XData ReportDisplay block of a subreport, or it can perform other functions. If used with a subreport, the method must create a new instance of the subreport, and use GenerateStream to return a stream. You must write the method to accept a mode argument even though the <call> element does not pass this argument explicitly. The value of mode is handled automatically by Zen reports, and is determined by the output mode of the report. If the method is also called from a ReportDefinition block, mode is not set automatically, and you must set it to 0 in the method. |
| subreport |
Provides a string used in the generated XSLT to identify a set of formatting instructions. It enables the generated XSLT to process the same XML more than once, and produce different results each time. The method must set the SubReport property to the same string as subreport. The subreport attribute must be unique in the report, so that each set of formatting instructions is uniquely identified. |
| subreportname |
The value of this attribute is the value of the name attribute of the report element of the XData ReportDisplay block of the subreport called by this <call> element. This value enables the generated XSL to select the correct nodes in the generated XML. If the report also calls subreports in the XData ReportDefinition block, <report> element in the ReportDefinition block of those subreports must also use this name. If the first character in the subreportname string is a ! (exclamation point) then Zen reports interprets the remainder of the string as an ObjectScript expression that provides the string. You can set the report name from a property in the report, and define the property as a ZENURL and set it at runtime from the URL that invokes the report. Because the ObjectScript is evaluated in the context of the <call> element, if the expression involves executing a method in the main report, you must prefix the method name with %report. |
For help resolving problems with the <call> element, see Troubleshooting the <call> element.
Example using the <call> element in ReportDisplay
The SAMPLES namespace provides a code example in the ZENApp package that illustrates the use of <call> in the ReportDisplay block. The Zen report class ZENApp.MyReportMain.cls generates the same XML as ZENApp.MyReport.cls. It then uses the <call> element in the XData ReportDisplay block to display that XML in two different ways:
XData ReportDisplay
  [ XMLNamespace = "http://www.intersystems.com/zen/report/display" ]
{
<report xmlns="http://www.intersystems.com/zen/report/display"
    name='myReport' title='HelpDesk Sales Report' style='standard'>

  <body>
    <header>
    <!-- Combined REPORT HEADER -->
        <p class="banner1"HelpDesk: Summary and Detail Reports</p>
        <fo><line pattern="empty"/><line pattern="empty"/></fo>
    </header>

    <call method="GetSummary" subreport="SummaryReport" />

    <call method="GetDetail" subreport="DetailReport" />

  </body>
</report>
}
The method attribute specifies a method that returns a stream. The method GetSummary produces a summary of sales for each sales representative, and GetDetail produces the same detailed report as ZENApp.MyReport.cls. The following code shows GetSummary as an example:
Method GetSummary(mode) As %GlobalCharacterStream [ ProcedureBlock = 0 ]
 {
  set (tSC,rpt,stream)=""
  set rpt=##class(ZENApp.MyReportSummary).%New()
  if rpt
  {
    set rpt.SubReport="SummaryReport"
    set tSC=rpt.GenerateStream(.stream,mode)
  }
  if $$$ISERR(tSC) {set stream=""}
  quit stream
 }
The method used to call a subreport from the ReportDisplay block is essentially the same as the method used with <call> in the ReportDefinition block. Methods called from the ReportDisplay block must take a mode argument, and must pass mode to GenerateStream. Zen reports automatically provides the value of mode. In this example, the method GetSummary calls the report ZENApp.MyReportSummary.cls, and GetDetail calls ZENApp.MyReport.cls You can include mode in the signature of methods called from the ReportDefinition block, but the method must provide a default value, because none is supplied automatically by Zen reports.
The subreport attribute provides a character string used by the XSLT to identify the formatting commands generated by each subreport. It enables the Zen report to process the XML more than once, generating different output each time. In the method, you must also set the property SubReport of %ZEN.Report.reportPage to the same value as subreport.
Example using <call> in ReportDefinition and ReportDisplay
The SAMPLES namespace provides a code example in the ZENApp package that illustrates the use of <call> in both the ReportDefinition block and the ReportDisplay block. The Zen report class ZENApp.MyReportBoth.cls creates a composite report from the subreports ZENApp.MyReportByDay.cls and ZENApp.MyReportByRep.cls. The ReportDefinition block of ZENApp.MyReportBoth.cls calls the methods GetSubDaily and GetSubRep, which each call a subreport to generate the XML for the report. The previous section “Example using the <call> element” discusses this type of call.
The ReportDisplay block of ZENApp.MyReportBoth.cls calls the methods GetSubDailyDspl and GetSubRepDspl. The way <call> is used here is similar to what you saw in the section “Example using the <call> element in ReportDisplay”, but with an additional attribute called subreportname. The value of this attribute is a string that must match the name attribute of the <report> element of the ReportDisplay block in the subreport. Zen reports uses this name to locate nodes in the XML generated by the subreport.
XData ReportDisplay [ XMLNamespace = "http://www.intersystems.com/zen/report/display" ]
{
<report xmlns="http://www.intersystems.com/zen/report/display"
name='myReport' title='HelpDesk Combined Sales Report' style='standard'>
  <document width="8.5in" height="11in" marginLeft="1.25in"
      marginRight="1.25in" marginTop="1.0in" marginBottom="1.0in">
  </document>
  <body>
    <header>
      <!-- COMBINED REPORT HEADER -->
      <p class="banner1">HelpDesk Combined Sales Report </p>
      <fo> <line pattern="empty"/>  <line pattern="empty"/> </fo>
        <table orient="row" width="3.45in" class='table1'>
        <item value="Combined Sales" width="2in">
          <caption value="Title:" width="1.35in"/>
        </item>
        <item field="@month" caption="Month:"/>
        <item field="@author" caption="Author:"/>
        <item field="@runBy" caption="Prepared By:"/>
        <item field="@runTime" caption="Time:"/>
        </table>
    </header>
    <call method="GetSubDailyDspl" subreport="DailyReport"
        subreportname="myReportByDay" />
    <call method="GetSubRepDspl" subreport="RepReport"
        subreportname="myReportByRep" />
  </body>
</report>
}
The methods GetSubDailyDspl and GetSubRepDspl also set the value of %ZEN.Report.reportPage.MainReport to the name of the main report, which is also the top-level element in the generated XML. The following code shows GetSubDailyDspl with MainReport set.
Method GetSubDailyDspl(mode) As %GlobalCharacterStream [ ProcedureBlock = 0 ]
{
 set (tSC,rpt,stream)=""
 set rpt=##class(ZENApp.MyReportByDay).%New()
 if rpt {
   set rpt.SubReport="DailyReport"
   set rpt.MainReport="myReport"
   set tSC=rpt.GenerateStream(.stream,mode)
 }
 if $$$ISERR(tSC) {set stream=""}
 quit stream
}
The subreportname attribute and the value of MainReport provide the generated XSLT by the information required to find elements in this two-level structure. The following figure shows how the MainReport property of the report, and the subreportname attribute of <call> correspond to the top and second level elements in the generated XML.

<fo>
The <fo> element can contain the same elements as <body>. See the list of elements in the next chapter, “Displaying Zen Report Data.”
The difference is that everything contained within <fo> is rendered in the XSL-FO (that is, PDF) report only. <fo> is useful for correcting issues where the XHTML report and PDF report do not look alike due to inherent page differences, such as page breaks.
<fo> has the following attributes:
| Attribute | Description |
|---|---|
| Conditional expressions for display | For descriptions of the attributes that allow you to conditionally output the <fo> element, see the section “Conditional Expressions for Displaying Elements.” |
| Display attributes | For descriptions of style, width, class, and other attributes, see the “Report Display Attributes” section in the chapter “Displaying Zen Report Data.” |
| caption |
(Optional) Caption text for this block. Although you can enter ordinary text for this attribute, it has the underlying data type %ZEN.Datatype.captionOpens in a new tab. See “Zen Reports Attribute Data Types.” |
| id | Optional identifier. If present, it can be used to retrieve this element in server-side code, by calling the %GetComponentById(id) method. |
<foblock>
The <foblock> element becomes an <fo:block> in generated XSL-FO. You can use it to group elements in a report for formatting, such as applying block-level styling to a group of <inline> components.
<foblock> has the following attributes:
| Attribute | Description |
|---|---|
| Conditional expressions for display | For descriptions of the attributes that allow you to conditionally output the <foblock> element, see the section “Conditional Expressions for Displaying Elements.” |
| Display attributes | For descriptions of style, width, class, and other attributes, see the “Report Display Attributes” section in the chapter “Displaying Zen Report Data.” |
| keepCondition |
(Optional) String that specifies an XSL-FO keep condition. You can use any valid keep condition, but the following is often the most useful: "keep-together.within-page='always'" It keeps all content within the <foblock> together on a single page. |
| id | Optional identifier. If present, it can be used to retrieve this element in server-side code, by calling the %GetComponentById(id) method. |
<html>
The <html> element supports the same elements and attributes as <fo>, but <html> renders its contents in the XHTML report only.
<write>
The <write> element writes directly to the stylesheet, instead of to the report. The <write> element may legally appear anywhere within a <body>, <pageheader> <pagefooter>, <pagestartsidebar>, and <pageendsidebar> element. However, <write> can be most useful within <fo> or <html>. For example:
<html>
  <write>
    <![CDATA[ <span>This is HTML!</span> ]]>
  </write>
</html>
<fo>
  <write>
    <![CDATA[ <fo:block>This is XSL-FO</fo:block> ]]>
  </write>
</fo>
The <write> element supports the attributes listed in the following table.
| Attribute | Description |
|---|---|
| Conditional expressions for display | For descriptions of the attributes that allow you to conditionally output the <write> element, see the section “Conditional Expressions for Displaying Elements.” |
| id | Optional identifier. You can use the id to access the <write> element to change its contents programmatically. For details, see the discussion of the content property following this table. |
The <write> element is an XML projection of the Zen report class %ZEN.Report.Display.writeOpens in a new tab. If you view the description of this class in the online Class Reference Information, you see that it has a property called content. This is where Zen stores the text that you place in between the <write> and </write> elements in XData ReportDisplay. If you have a reason to programmatically change the text of a <write> element on the server side before displaying a report, call the class method %GetComponentById(id) to retrieve a pointer to the %ZEN.Report.Display.writeOpens in a new tab object. Then you can access the content property of this object to change it as needed. For an example, see “The id Attribute” in the chapter “Formatting Zen Report Pages.”
If you manipulate the content property programmatically, keep in mind that this text string actually has the underlying data type %ZEN.Datatype.captionOpens in a new tab. See “Zen Reports Attribute Data Types.”