Authentication
Authentication Basics
Authentication verifies the identity of any user attempting to connect to Caché. Once authenticated, a user has established communications with Caché, so that its data and tools are available. There are a number of different ways that a user can be authenticated; each is known as an authentication mechanism. Caché is typically configured to use only one of them. The supported authentication mechanisms are:
Caché supports authentication using user-defined code, which is known as delegated authentication. It also supports authentication using LDAP, the Lightweight Directory Access Protocol. Finally, for those sites that prefer no authentication at all, Caché supports unauthenticated access.
The authentication mechanism is used by what are called connection tools. These specify the means by which users establish their connection with Caché. Each connection tool (such as the Terminal, Java, or CSP) uses a Caché service that allows the administrator to specify the supported authentication mechanism(s). (A Caché service is a gatekeeper for connecting to Caché; for more information on services, see the chapter “Services.”)
There are three categories of connection tools, each of which is known as an access mode. Each access mode has its own characteristics and has its own supported services. The access modes are:
-
Local — The user interacts directly with the Caché executable on the machine where that executable is running.
-
Client/Server — The user is operating a separate executable that connects to Caché.
-
Web — The user has a Web browser and is interacting with Caché through a Web-based application.
An end-user uses a connection tool to interact with Caché in a particular access mode using a particular authentication mechanism. Remember that the processes described in this chapter do not themselves establish authenticated access. Rather, they establish the infrastructure that an application uses when authenticating users via a particular mechanism in a particular access mode.
It is recommended that each instance of Caché use only one authentication mechanism and that you choose the instance’s authentication mechanism prior to installing Caché. Once installation has occurred, you can then begin configuring Caché to use the selected mechanism. This involves several steps:
-
With Kerberos, ensure that all Caché users are listed in the Kerberos KDC (Key Distribution Center) or Windows Domain Controller.
-
With operating-system–based authentication, ensure that all Caché users appear in the operating system list.
-
For all authentication mechanisms, configure all supported services to use only the selected authentication mechanism.
-
For all authentication mechanisms, disable all unsupported services.
-
For all authentication mechanisms, configure all applications to use only the selected authentication mechanism.
Regardless of the selected authentication mechanism, during start-up and shut-down, operating system authentication is always used.
Here’s how to use this chapter:
-
If you have already chosen an authentication mechanism, read about it; if you have not chosen an authentication mechanism, read about them all and choose one. The relevant section for this is “About the Different Authentication Mechanisms.”
-
Read about those access modes that are relevant for your situation in the section “About the Different Access Modes.”
-
Configure your environment according to the instructions in “Configuring for Kerberos Authentication,” “Configuring for Operating-System–Based Authentication,” or “Configuring for Authentication with Caché Login.” To use an external mechanism for authentication, Caché includes support for LDAP authentication and delegated (user-defined) authentication.
-
For all authentication mechanisms, Caché supports two-factor authentication. If you want to implement two-factor authentication, configure the instance according to the instructions in the section “Configuring Two-factor Authentication.”
About the Different Authentication Mechanisms
Caché has several ways in which it can authenticate a user, that is, verify the identity of a user. These are:
A site may also be configured for unauthenticated access.
Kerberos Authentication
Where strong authentication is required, Caché can use the Kerberos protocol to enable users and Caché itself to identify each other and to ensure the validity of communications within a session. For a brief overview of Kerberos, see the “About Kerberos” section in the “Introduction” chapter of this book; for more detailed information, see the MIT Kerberos Web siteOpens in a new tab and its list of available documentationOpens in a new tab.
In the Kerberos model, there are several different actors. All the different programs and people being authenticated by Kerberos are known as principals. The Kerberos system is administered by a Kerberos Key Distribution Center (KDC); on Windows, the Windows Domain Controller performs the tasks of a KDC. The KDC issues tickets to users so that they can interact with programs, which are themselves represented by service principals. Once a user has authenticated and has a service ticket, it can then use a program.
Specifically, Kerberos authentication involves three separate transactions:
-
The client receives what is called a “ticket-granting ticket” (“TGT”) and an encrypted session key.
-
The client uses the TGT and session key to obtain both a service ticket for Caché as well as another encrypted session key.
-
The client uses the service ticket and second session key to authenticate to Caché and optionally establish a protected connection.
Aside from a possible initial password prompt, this is designed to be invisible to the user.
In order for strong authentication to be meaningful, all Caché services that support it must have Kerberos enabled and those that don’t support it must be disabled. The exception to this is that services intended to operate within the Caché security perimeter, such as ECP, do not support Kerberos; you can simply enable or disable these services, since they are designed for use in an externally secured environment.
Operating-System–Based Authentication
With operating-system–based authentication, Caché uses the operating system’s user identity to identify the user for Caché purposes. Specifically, the process is:
-
Caché obtains the process’ operating-system user identity.
-
Caché checks if the operating system identity matches a Caché username. If so, then the user is automatically authenticated for Caché as well.
Caché Authentication
Caché has its own algorithms for providing password-based authentication. This mechanism is listed in the Management Portal as “Password” authentication. Since Kerberos and OS-based authentication both typically use passwords, this documentation refers to the native Caché mechanism as Caché login.
For password authentication, Caché maintains a password value for each user account and compares that value to the one provided by the user at each log in. (In actuality, Caché does not store the password value itself but a hashed version of it. When the user logs in, that entered password value is hashed and the two hashed versions are compared.) The system manager can establish certain password criteria, such as minimum length, to ensure a certain degree of robustness in the passwords selected by users; the criteria are described in the section “Password Strength and Password Policies” in the chapter “System Management and Security.”
Caché stores only irreversible cryptographic hashes of passwords. The hashes are calculated using the PBKDF2 algorithm with the HMAC-SHA-1 pseudorandom function, as defined in Public Key Cryptography Standard #5 v2.1: “Password-Based Cryptography Standard.” The current implementation uses 1024 iterations, 64 bits of salt, and generates 20 byte hash values. There are no known techniques for recovering original passwords from these hash values.
LDAP Authentication
Caché supports authentication based on LDAP (the Lightweight Directory Access Protocol). With LDAP authentication, Caché retrieves user information from a central LDAP repository. Because an environment may already support LDAP authentication, such as with Windows Active Directory, an instance of Caché may be able to use LDAP for its authentication and simply fit into this larger infrastructure. For more details about LDAP authentication, see the chapter “Using LDAP Authentication.”
Delegated Authentication
Caché supports the use of custom authentication mechanisms through what is known as “delegated authentication.” Delegated authentication occurs if an instance of Caché has a ZAUTHENTICATE routine in its %SYS namespace. If such a routine exists, Caché uses it to authenticate users, either with calls to new or existing code. For more details about delegated authentication, see the chapter “Using Delegated Authentication.”
Unauthenticated Access
You can configure any Caché service to operate without any authentication mechanism. This is known as unauthenticated access. Generally, if you configure Caché services to allow unauthenticated access, it is recommended there be unauthenticated access exclusively. If there is support for an authentication mechanism and then unauthenticated access if authentication fails, this is what is called cascading authentication, which is described in the section “Cascading Authentication”; the circumstances for using more than one authentication mechanism are described in the section “Using Multiple Authentication Mechanisms.”
About the Different Access Modes
Caché supports three access modes:
About Local Access
With local access, the end-user is on the same machine as the Caché server. To gain access to the data, the user runs a private image of Caché that is reading from and writing to shared memory. If there are multiple local users, each has an individual copy of the Caché executable and all the executables point to the same shared memory. Because the user and the executable are on the same machine, there is no need to protect or encrypt communications between the two, since nothing is being passed from one executable to another. Because communications between the user and Caché go on within a single process, this is also known as in-process authentication.
Local access is available for:
-
The terminal — The Terminal uses the %Service_Console service on Windows and the %Service_Terminal service on other operating systems.
-
Callin — Callin uses the %Service_CallIn service.
About Client/Server Access
With client/server access, the Caché executable is the server and there is a client executable that can reside on a separate machine. Caché accepts a connection, possibly over a wire, from the client. This connection can use any language or protocol that Caché supports. These include:
-
ActiveX — Uses %Service_Bindings
-
C++ — Uses %Service_Bindings
-
Caché Direct — Uses %Service_CacheDirect
-
ComPort — Uses %Service_ComPort
-
Java — Uses %Service_Bindings
-
JDBC — Uses %Service_Bindings
-
ODBC — Uses %Service_Bindings
-
Perl — Uses %Service_Bindings
-
Python — Uses %Service_Bindings
-
Telnet — Uses %Service_Telnet
All connection tools support authentication through Kerberos or Caché login except %Service_ComPort, which only supports authentication through Caché login.
In each case, the server specifies the supported authentication type(s). When the client initiates contact with the server, it must attempt to use one of these supported types; otherwise, the connection attempt is rejected. Not all authentication types are available for all connection tools.
About Web Access
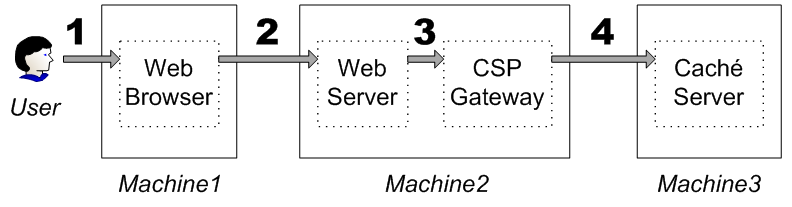
The web access mode supports connections of the following form:
-
A user requests content or an action in a Web browser.
-
The Web browser passes along the request to the Web server.
-
The Web server is co-located with the CSP Gateway and passes the request to the Gateway.
-
The Gateway passes the request to the Caché server.
When the Caché server provides content for or performs an action relating to the user, the entire process happens in the other direction.
For the user to authenticate to Caché, a username and password must be passed down the line. Hence, this access mode is also known as a proxy mode or proxy connection. Once the information reaches the Caché machine, the arrangement between user and server is similar to that in the local access mode. In fact, the web access mode also uses in-process authentication.
Configuring for Kerberos Authentication
To configure a Caché instance for Kerberos authentication, the process is:
-
Ensure that Caché is set up to run as a Kerberos service.
The procedure varies, depending on the operating system of the Caché server and the type of environment; see the “Preparing the Security Environment for Kerberos” section of the “Preparing for Caché Security” appendix of the Caché Installation Guide for more information.
-
Enable the relevant Kerberos mechanisms on the Authentication/CSP Session Options page (System Administration > Security > System Security > Authentication/CSP Session Options).
-
Determine which services will be used to connect to Caché and disable all other services. For a list of which services are used by what connection tools, see the table “Connection Tools, Their Access Modes, and Their Services.”
-
For client/server connections, specify what Kerberos connection security level the server requires. This is how you determine which Kerberos features are to be part of connections that use the service. See the section “Specifying Connection Security Levels” for more information.
-
For client/server connections, perform client-side setup. This ensures that the application has access to the information it needs at runtime. This information includes:
-
The name of the service principal representing Caché.
-
The allowed connection security levels.
Setting up this information may involve configuring a Windows preferred server or some other configuration mechanism. See the section “Setting Up a Client” for more information.
-
-
Specify how the authentication process obtains user credentials. This is either by checking the user’s Kerberos credentials cache or by providing a Kerberos password prompt for the user. See the section “Obtaining User Credentials” for more information.
-
To maximally secure web connections, set up secure channels for the following connections:
-
Web browser to Web server
-
CSP Gateway to Caché server
-
On Windows, when logged in using a domain account, OS-based and Kerberos authentication are the same. When logged on locally, Kerberos is subject to a KDC spoofing attack and is therefore neither secure nor recommended.
About Kerberos and the Access Modes
Each connection tool uses a service to establish communications with Caché. It also uses a particular access mode. To ensure maximum protection, determine which services you need, based on which connection tools you are using. If you are not using a service, disable it.
The following is a list of connection tools, their access modes, and their services:
| Connection Tool | Access Mode | Service |
|---|---|---|
| ActiveX | Client/Server | %Service_Bindings |
| C++ | Client/Server | %Service_Bindings |
| Caché Telnet | Client/Server | %Service_Telnet |
| CallIn | Local | %Service_CallIn |
| Console | Local | %Service_Console |
| CSP | Web | %Service_CSP |
| Java | Client/Server | %Service_Bindings |
| JDBC | Client/Server | %Service_Bindings |
| ODBC | Client/Server | %Service_Bindings |
| Terminal | Local | %Service_Terminal |
| Zen | Web | %Service_CSP |
Local
Kerberos authentication for a local service establishes that the user and Caché are both valid Kerberos principals. There is only one machine in use and only one process on that machine; hence, the configuration pages for these services in the Portal allow you to specify whether to use Kerberos prompting (labeled simply as Kerberos in the Management Portal) or Kerberos credentials cache.
In this scenario, there is no connection between the user and Caché, since both are using the same process on the same machine. Because the two are sharing a process, there is no information being passed through an insecure medium and therefore no need to offer special protections for this data. (This situation is known as in-process authentication.)
Client/Server
Client/server applications include connections from ActiveX, C++, Java, JDBC, ODBC, Perl, Python, and through Caché Direct and Telnet. For a client/server application using Kerberos authentication, the user needs credentials to interact with Caché via the application.
The server and client each require configuration. Server configuration specifies which type of connections are accepted; client configuration specifies what type of connection is attempted and may also specify how to obtain the user’s credentials.
With client/server connections, Kerberos supports various connection security levels, which are configured on the Caché server machine:
-
Kerberos — Kerberos manages the initial authentication between the user and Caché. Subsequent communications are not protected.
-
Kerberos with Packet Integrity — Kerberos manages the initial authentication between the user and Caché; each subsequent message has a hash that provides source and content validation. This provides verification that each message in each direction is actually from its purported sender; it also provides verification that the message has not been altered in transit from sender to receiver.
-
Kerberos with Encryption — Kerberos manages initial authentication, ensures the integrity of all communications, and also encrypts all communications. This involves end-to-end encryption for all messages in each direction between the user and Caché.
Web
When running a web application (using either CSP or Zen), the user does not interact directly with the Caché server. To protect all information from monitoring, you need to encrypt the connections between the user and Caché as follows:
-
Configure the Web server so that it uses SSL to secure browser connections to it.
-
Co-locate the Web server and the CSP Gateway, so there is no need to secure the connection between them.
-
Configure the CSP Gateway to use Kerberos authentication and encryption. Use the Gateway’s Kerberos principal to establish such a connection.
This applies to both CSP and Zen, since Zen uses CSP for its underlying connection.
The architecture is:
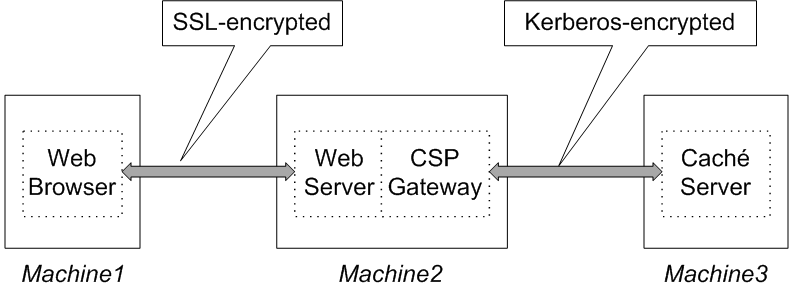
Any communications between the end-user and Caché occurs through SSL-encrypted or Kerberos-encrypted pipes. For Kerberos-secured connections, this includes the end-user’s Kerberos authentication.
Because the Caché server cannot prompt the end-user for a password, it invokes an API that sends HTML content to the browser to prompt. The user completes this form that has been sent; it travels back to the Web server, which hands it to the CSP Gateway, which then hands it to the CSP server (which is part of Caché itself). The CSP server acts as a proxy on behalf of the user at the browser; this is why this kind of a connection is known as a proxy connection. At the same time, all information related to the user resides on the server machine (as with the local access mode); hence a web connection is also a form of in-process authentication.
Specifying Connection Security Levels
Client/server connections to Caché use one of the following services:
-
%Service_Bindings — ActiveX, C++, Java, JDBC, ODBC, Perl, Python
-
%Service_CacheDirect — Caché Direct
-
%Service_Telnet — Telnet
For any Kerberos connection using one of these services, you must specify the connection security levels which the server accepts. To configure the service’s supported connection security levels, the procedure is:
-
On the Authentication/CSP Session Options page (System Administration > Security > System Security > Authentication/CSP Session Options), specify which connection security levels to enable for the entire Caché instance, where these can be:
-
Kerberos — Initial authentication only
-
Kerberos with Packet Integrity — Initial authentication and packet integrity
-
Kerberos with Encryption — Initial authentication, packet integrity, and encrypting all messages
For more information on the Authentication Options page, see the section “Authentication Options” in the chapter “System Management and Security.”
-
-
On the Services page (System Administration > Security > Services), click the service name (in the Name column); this displays the Edit Service page for the service.
-
On the Edit Service page, specify which connection security levels to require as part of a Kerberos connection. After making this selection, click Save.
If a client attempts to connect to the server using a lower level of security than that which is specified for the server, then the connection is not accepted. If a client attempts to connect to the server using a higher level of security than that which is specified for the server, then the server connection attempts to perform authentication using the level of security that it specified.
Setting Up a Client
When using the client/server access mode, you need to configure the client. The particulars of this process depend on the connection technology being used.
Telnet and Caché Direct: Setting Up the Preferred Server for Use with Kerberos
With a Windows client, when establishing a connection using Caché Direct or Caché telnet for Windows, the client uses configuration information that has been stored as part of a remote server.
Caché has its own telnet server for Windows. When connecting to a non-Windows machine, there is no Caché telnet server available — you simply use the telnet server that comes with the operating system. Once you have established the connection to the server machine, you can then start Caché using the %Service_Terminal service.
To configure a client connection coming in through telnet or Caché Direct, go to the client machine. On that machine, the procedure is:
-
Click on the Caché cube and select Preferred Server from the menu (the Preferred Server choice also displays the name of the current preferred server).
-
From the submenu that appears, choose Add/Edit.
-
To create a new remote server, click the Add button; to configure an already-existing server, choose the Caché server to which you are connecting and click the Edit button.
-
This displays the Add Connection dialog. In the Authentication Method area on that dialog, click Kerberos. This expands the dialog to display a number of additional fields.
-
If you are editing the values for an already-existing server, there should be no need to change or add values for the more general fields in this dialog, as they are determined by the server that you chose to edit.
If you are adding a new server, the fields to complete are described in the section “Define a Remote Server Connection” of the “Connecting to Remote Servers” chapter of the Caché System Administration Guide.
-
In the dialog’s Kerberos-related fields, specify values for the following fields:
-
The connection security level, where the choices are Kerberos authentication only; Kerberos authentication with packet integrity; or Kerberos authentication, packet integrity, and encryption
-
The service principal name. For information on setting up service principal names, see the section “Names and Naming Conventions” in the appendix “Preparing for Caché Security” of the Caché Installation Guide.
-
If you are configuring a telnet connection to a Windows machine, check the box specifying that the connection use the Windows Caché Telnet server.
-
-
Click OK to save the specified values and dismiss the dialog.
Setting Up an ODBC DSN for Use with Kerberos
Caché supports Kerberized ODBC connections from clients on Windows, UNIX®, and Mac to DSNs (Data Source Nodes) on all platforms. The ways of configuring client behavior vary by platform:
-
On all platforms, the SQLDriverConnect function is available, which accepts a set of name-value pairs. SQLDriverConnect is a C call that is part of the ODBC API and is documented at the Microsoft Web siteOpens in a new tab. Its name-value pairs are the same as those for the initialization file available on non-Windows platforms.
-
On non-Windows platforms, use the Caché ODBC initialization file to specify name-value pairs that provide connection information. This file is described generally in Using Caché ODBC. The file has the following Kerberos-related variables:
-
Authentication Method — Specifies how the ODBC client authenticates to the DSN. 0 specifies Caché login; 1 specifies Kerberos.
-
Security Level — For Kerberos connections, specifies which functionality is used to protect the connection. 1 specifies that Kerberos is used for authentication only; 2 specifies that Kerberos is used for authentication and to ensure the integrity of all packets passed between client and server; and 3 specifies that Kerberos is used for authentication, packet integrity, and to encrypt all messages.
-
Service Principal Name — Specifies the name of Caché service that is serving as the DSN. For example, the service principal might have “cache/localhost.domain.com” as its name.
The names of these variables must have spaces between the words. They are not case-sensitive.
-
-
On a Windows client, you can specify connection information through a GUI: the ODBC DSN configuration dialog. Caché provides options on the System DSN tab. This screen has associated help that describes its fields. The path on the Windows Start menu to display this screen varies by version of Windows; it may be listed under Administrative Tools.
Important:On 64-bit Windows, there are two versions of odbcad32.exe: one is located in the C:\Windows\System32\ directory and the other is located in the C:\Windows\SysWOW64\ directory. If you are running 64-bit Windows, configure DSNs through the one in C:\Windows\SysWOW64\.
Setting Up a Java or JDBC Client for Use with Kerberos
Caché provides a Java class that serves as a utility to assist with Java client configuration. Run it when you are ready to configure the client. The procedure is:
-
Make sure that the path to cachejdbc.jar and cachedb.jar is available to the CLASSPATH variable on the client. By default, this file is in the <cache-install-dir>/dev/java/lib/JDK16 directory. (For general information on setting up Java clients, see the “Installation and Configuration” section of “The Caché Java Binding” chapter of Using Java with Caché; for a description of the jar files, see “The Caché Java Class Packages” in the same chapter.)
-
To configure the client, issue the Java Configure command:
> java com.intersys.jgss.ConfigureNote:This command is case-sensitive.
This program uses Java Generic Security Services (JGSS) to perform the following actions:
-
If necessary, modifies the java.security file.
-
Creates or modifies the isclogin.conf file.
Note:The parameters to the login module that appear in the isclogin.conf file depend on whether the server is using the Sun Java implementation or the IBM Java implementation. IBM AIX® and SUSE Linux use the IBM implementation; all other supported Caché platforms use the Sun implementation.
-
-
The program then prompts you to create and configure the krb5.conf file. If the file exists, the command prompts if you wish to use the existing krb5.conf or replace it; if you choose to replace it, it prompts for the following information:
-
Kerberos realm — It offers the local domain in lowercase as a default value for the domain.
-
Primary KDC — You only need include the local machine name, as the program appends the Kerberos realm name to the machine name for you.
-
Secondary KDC(s) — You can specify the names of zero or more KDCs to replicate the content of the primary KDC.
-
-
After receiving this information, run the command a second time. (It instructs you to do this.)
-
When prompted to replace krb5.conf, choose to leave the existing file. The command then tests the connection by prompting for the username and password of a principal in the specified Kerberos realm.
If this succeeds, then client configuration is complete.
Setting Up a Client on C++, Perl, Python, and ActiveX for Use with Kerberos
To be able to establish a Kerberized connections through these bindings, you need only configure the Caché server to accept Kerberos connections. Once the server is properly configured, the application then can establish the connection by using the appropriate calls. For information on the appropriate language-specific calls, see the Caché Language Bindings books.
Obtaining User Credentials
For all access modes, you need to specify whether the application obtains the user’s credentials from an existing credentials cache or by prompting for a username and password.
Obtaining Credentials for Local Access Mode
For the local access mode, the user’s credentials reside on the same machine as Caché. In this situation, the application is using a service to connect to Caché. This includes the following services:
-
%Service_CallIn
-
%Service_Console
-
%Service_Terminal
To specify how to get credentials, the procedure is:
-
On the Services page (System Administration > Security > Services) and select the service from the Name column. This displays the Edit Service page for the service.
-
On the Edit Service page, specify how to get credentials. Either select prompting (the Kerberos check box) or by using a credentials cache (the Kerberos Credentials Cache check box). Do not mark both.
Click Save to use the settings.
If you enable both Kerberos (prompting) and Kerberos credentials cache authentication for the service, then the credentials cache authentication takes precedence. This is behavior specified by Kerberos, not Caché.
On Windows with a Domain Controller (the likely configuration for Windows), logging in establishes a Kerberos credentials cache. On UNIX®, Linux, and macOS, the typical default condition is to have no Kerberos credentials, so that Caché is then configured to use Kerberos prompting; on these systems, the user can obtain credentials in either of the following ways:
-
Running kinit before invoking the Terminal
-
Logging in to a system where the login process performs Kerberos authentication for the user
In these situations, Caché can be configured to use the credentials cache.
Obtaining Credentials for Client/Server Access Mode
For client/server access mode, the user’s credentials reside on the machine that hosts the client application. In this case, the manner in which you specify how to obtain credentials varies according to how the client is connecting:
-
ActiveX, Caché Direct, C++, ODBC, Perl, Python, and Telnet
-
Java and JDBC
ActiveX, Caché Direct, C++, ODBC, Perl, Python, and Telnet
The underlying Caché code used by these connection tools assumes that end-users already have their credentials; no prompting is necessary.
On Windows, every user logged on in the domain has a credentials cache.
On other operating systems, a user has a credentials cache if the operating system has performed Kerberos authentication for the user, or if the user has explicitly run kinit. Otherwise, the user has no credentials in the cache and the connection tool fails authentication.
Not all connection tools are available on all operating systems.
Java and JDBC
When using Java and JDBC, there are two different implementations of Java available — either Sun or IBM. These have several common behaviors and several differing behaviors.
Both implementations store information about a connection in properties of an instance of the java.util.Properties class. These properties are:
-
user — The name of the user who is connecting to the Caché server. This value is only set for certain connection behaviors.
-
password — That user’s password. This value is only set for certain connection behaviors.
-
service principal name — The Kerberos principal name for the Caché server. This value is set for all connection behaviors.
-
connection security level — The type of protection that Kerberos provides for this connection. 1 specifies that Kerberos is used for authentication only; 2 specifies that Kerberos is used for authentication and to ensure the integrity of all packets passed between client and server; and 3 specifies that Kerberos is used for authentication, packet integrity, and to encrypt all messages. This value is set for all connection behaviors.
In the following discussions, the instance of the java.util.Properties class is referred to as the connection_properties object, where the value of each of its properties is set with a call to the connection_properties.put method, such as
 String principalName = "MyCacheServer";
 connection_properties.put("service principal name",principalName);
For both implementations, credentials-related behavior is determined by the value of a parameter in the isclogin.conf file (see “Setting Up a Java or JDBC Client for Use with Kerberos” for more information on this file).
There are two differences between the behavior of the two Java implementations:
-
To specify credentials-related behavior, the parameter name to set in the isclogin.conf file differs for each implementation:
-
For IBM, it is useDefaultCcache.
-
For Sun, it is useTicketCache.
-
-
There are different behaviors available on each implementation. These are described in the following sections.
Specifying Behavior on a Client Using the IBM Implementation
The options are:
-
To use a credentials cache, set the value of the useDefaultCcache parameter to TRUE and do not set the values of the user or password properties. Note that if no credentials cache is available, then an exception is thrown.
-
To use a username and password that are passed in programmatically, set the value of the useDefaultCcache parameter to FALSE and set the values of the user and password properties.
-
To prompt for a username and password, set the value of the useDefaultCcache parameter to FALSE and do not set the values of the user or password properties. Because these properties do not have values set, classes from libraries supplied with Caché can be used to generate prompts for them.
Specifying Behavior on a Client Using the Sun Implementation
The options are:
-
To exclusively use a username and password that are passed in programmatically, set the value of the useTicketCache parameter to FALSE and set the values of the user and password properties.
-
To exclusively prompt for a username and password, set the value of the useTicketCache parameter to FALSE and do not set the values of the user or password properties. Because these properties do not have values set, classes from libraries supplied with Caché can be used to generate prompts for them.
-
To exclusively use a credentials cache, set the value of the useTicketCache parameter to TRUE. To prevent any further action, set the values of the user and password properties to bogus values; this prevents prompting from occurring and ensures the failure of any authentication attempt based on the properties’ values.
-
To attempt to use a credentials cache and then fall through to using a username and password that are passed in programmatically, set the value of the useTicketCache parameter to TRUE and set the values of the user and password properties. If there is no credentials cache, then the properties’ values are used.
-
To attempt to use a credentials cache and then fall through to prompting for a username and password, set the value of the useTicketCache parameter to TRUE and do not set the values of the user or password properties. If there is no credentials cache, then classes from libraries supplied with Caché can be used to generate prompts for them.
Obtaining Credentials for Web Access Mode
With a Web-based connection that uses Kerberos, there is always a username and password prompt. If these result in authentication, the user’s credentials are placed in memory and then discarded when no longer needed.
Setting Up a Secure Channel for a Web Connection
To maximally secure a web connection, it is recommended that the two legs of communication — both between the browser and the Web server and then between the CSP Gateway and Caché — use secure channels. This ensures that any information, such as Kerberos usernames and passwords, be protected in transmission from one point to another. To secure each communications channel, the procedure is:
Securing the Connection between a Web Browser and Web Server
The typical means of securing a connection between a Web browser and a Web server is to use SSL (Secure Sockets Layer) or TLS (Transport Layer Security), its successor. While Caché does not provide implementations of these technologies to accomplish this, various third-party products provide this capability.
Setting Up a Kerberized Connection from the CSP Gateway to Caché
To set up a secure, encrypted channel between the CSP Gateway and the Caché server, you need a Kerberos principal that represents the Gateway. This principal establishes an encrypted connection to Caché, and all information is transmitted through the connection. This allows an end-user to authenticate to Caché and prevents any snooping during that process.
For information on setting up a connection between the CSP Gateway and the Caché server that is protected by SSL/TLS, see the “Configuring the CSP Gateway to Connect to Caché Using SSL/TLS” section of the “Using SSL/TLS with Caché” chapter.
The procedure is:
-
Determine or choose the name of the Kerberos principal that represents the Gateway.
For Windows, this is the principal name representing the Gateway host’s network service session (that is, the name of the machine hosting the Gateway with the “$” appended to it — machine_name$, , such as Athens$). For other platforms, this is any valid principal name entered as the username in the Gateway configuration screen; this identifies the appropriate key in the key table file.
-
Create a user in Caché with the same name as the Gateway’s Kerberos principal. To do this, follow the instructions in the section “Creating a New User” in the “Users” chapter.
-
Give that user permissions to use, read, or write any required resources (these are also known as privileges). This is done by associating those privileges with a role and then associating the user with the role.
-
Configure the %Service_CSP service. To do this, complete the fields described in the section “Service Properties” in the “Services” chapter.
-
Configure the Gateway so that it can contact the server. The procedure is:
-
From the Management Portal home page, go to the Web Gateway Management page (System Administration > Configuration > CSP Gateway Management).
-
On the Web Gateway management page, there are a set of choices on the left. Under Configuration, click Server Access. This displays the Server Access page.
-
On the Server Access page, you can add a new configuration or edit an existing one. To add a new configuration, click the Add Server button; to edit an existing one, select it from the list on the left, select the Edit Server radio button, and click Submit. This displays the page for editing or configuring server access parameters. In addition to the general parameters on this page (described on its help screen), this page allows you to specify security-related parameters for the Gateway. For Kerberos connections, these are:
-
Connection Security Level — Choose the kind of protection that you would like Kerberos to attempt to provide this connection. (Note that this must match or exceed the type of security specified for the CSP service in the previous step.)
-
User Name — The name of the Kerberos principal that represents the Gateway. (This must be the same principal as was used in the first step of this process.)
-
Password — Do not specify a value for this. (This field is used when configuring the Gateway for use with Caché login.)
-
Product — Caché or Ensemble, depending on which product you are using.
-
Service Principal Name — The name of the principal that represents the Caché server. This is typically a standard Kerberos principal name, of the form “cache/machine.domain”, where cache is a fixed string indicating that the service is for Caché, machine is the machine name, and domain is the domain name, such as “intersystems.com”.
-
Key Table — When connecting to an instance of Caché on Windows, leave this field blank; for other operating systems, provide the name of the keytab file containing the permanent key belonging to the CSP Gateway, including the full path.
After entering all these values, click the Save Configuration button to save them.
-
-
The CSP service is now ready to configured. This means that it can now provide the necessary underlying infrastructure to support a web application.
When creating a secured web application, the application developer needs to:
-
Choose an authentication method.
-
Configure the roles for the application.
-
If required, make sure the browser-to-Web server connection uses SSL.
Configuring for Operating-System–Based Authentication
Operating-system–based authentication (sometimes called “OS-based authentication”) is only available for local processes, namely:
-
Callin (%Service_Callin)
-
Console (%Service_Console)
-
Terminal (%Service_Terminal)
To set up the use of this type of authentication, the procedure is:
-
On the Authentication/CSP Session Options page (System Administration > Security > System Security > Authentication/CSP Session Options), select Allow Operating System authentication.
-
On to the Services page (System Administration > Security > Services) and select the service from the Name column. This displays the Edit Service page for the service.
-
On the Edit Service page, choose operating-system–based (the Operating System check box).
Click Save to use the settings.
This type of authentication requires no other configuration actions.
On Windows, when logged in using a domain account, OS-based and Kerberos authentication are the same.
A Note on %Service_Console
Since the console (%Service_Console) is a Windows-based service and Windows domain logins typically use Kerberos, console’s OS-based authentication provides authentication for local logins.
A Note on %Service_Callin
With callin (%Service_Callin), OS-based authentication is only available from an OS-level prompt. When using callin programmatically, OS-based authentication is not supported — only unauthenticated access is available.
Configuring for Authentication with Caché Login
The services available for authentication with Caché login are:
-
%Service_Binding
-
%Service_CSP
-
%Service_CacheDirect
-
%Service_CallIn
-
%Service_ComPort
-
%Service_Console
-
%Service_Telnet
-
%Service_Terminal
For a service to use Caché login, you must configure it as follows:
-
On the Authentication/CSP Sessions Options page (System Administration > Security > System Security > Authentication/CSP Session Options), enable authentication with Caché login by selecting Allow Password authentication).
-
For the particular service, go to the Services page (System Administration > Security > Services) and select that service, such as %Service_Bindings, in the Name column; this displays the Edit Service page for the service.
-
On this page, choose Caché login, listed simply as Password from the list of authentication types.
-
Click Save to save this setting.
-
In addition to this basic procedure, certain services require further configuration. This is described in the following sections:
Web
For web access, you can optionally require that the CSP Gateway authenticate itself to the Caché server through Caché login. To perform this configuration, the procedure is:
-
From the Management Portal home page, go to the Web Gateway Management page (System Administration > Configuration > CSP Gateway Management).
-
On the Web Gateway management page, there are a set of choices on the left. Under Configuration, click Server Access. This displays the Server Access page.
-
On the Server Access page, you can add a new configuration or edit an existing one. To add a new configuration, click the Add Server button; to edit an existing one, select it from the list on the left, select the Edit Server radio button, and click Submit. This displays the page for editing or configuring server access parameters. In addition to the general parameters on this page (described on its help screen), this page allows you to specify security-related parameters for the Gateway. For Caché login connections, these are:
-
Connection Security Level — Choose Password from the drop-down list to use Caché login.
-
User Name — The user name under which the Gateway service runs (the installation process creates the CSPSystem user for this purpose). This user (CSPSystem or any other) should have no expiration date; that is, its Expiration Date property should have a value of 0.
-
Password — The password associated with the user account just entered.
-
Product — Caché or Ensemble, depending on which product you are using.
-
Service Principal Name — Do not specify a value for this. (This field is used when configuring the Gateway for use with Kerberos.)
-
Key Table — Do not specify a value for this. (This field is used when configuring the Gateway for use with Kerberos.)
After entering all these values, click the Save Configuration button to save them.
-
It is important to remember that the authentication requirements for the Gateway are not directly related to those for an application that uses the Gateway. For example, you can require Caché login as the authentication mechanism for a web application, while configuring the Gateway to use Kerberos authentication — or no authentication at all. In fact, choosing a particular authentication mechanism for the Gateway itself makes no technical requirement for the web application, and vice versa. At the same time, some pairings are more likely to occur than others. If a web application uses Kerberos authentication, then using any other form of authentication for the Gateway means that Kerberos authentication information will be flowing through an unencrypted channel, thereby potentially reducing its effectiveness.
With a web application that uses Caché login, the username and password of the end-user are passed from the browser to the Web server, which then hands them to the co-located CSP Gateway. Since the Gateway has its own connection to the Caché server, it then passes the username and password to the Caché server. To establish its connection to the Caché server, the Gateway uses the CSPSystem account, which is one of the Caché predefined accounts.
By default, all these transactions are unencrypted. You can use SSL to encrypt messages from the browser to the Web server. You can use Kerberos to encrypt messages from the Gateway to the Caché server as described in the section “Setting Up a Secure Channel for a CSP Connection”; if you are not using Kerberos, you may prefer to physically secure the connection between the host machines, such as by co-locating the Gateway and Caché server machines in a locked area with a direct physical connection between them.
ODBC
Caché supports Caché login for ODBC connections among all its supported platforms. This requires client-side configuration. The ways of configuring client behavior vary by platform:
-
On non-Windows platforms, use the Caché ODBC initialization file to specify name-value pairs that provide connection information . This file is described generally in Using Caché ODBC. The file has the following variables relevant to Caché login:
-
Authentication Method — Specifies how the ODBC client authenticates to the DSN. 0 specifies Caché login; 1 specifies Kerberos.
-
UID — Specifies the name for the default user account for connecting to the DSN. At runtime, depending on application behavior, the end-user may be permitted to override this value with a different user account.
-
Password — Specifies the password associated with the default user account. If the end-user has been permitted to override the UID value, the application will accept a value for the newly specified user’s password.
-
-
On a Windows client, you can specify connection information either through a GUI or programmatically:
-
Through a GUI, there is an ODBC DSN configuration dialog. Caché provides options on the System DSN tab. This screen has associated help that describes its fields. The path from the Windows Start menu to display this screen varies by version of Windows; it may be listed in the Windows Control Panel, under Administrative Tools, on the screen for Data Sources (ODBC).
-
Programmatically, the SQLDriverConnect function is available, which accepts a set of name-value pairs. SQLDriverConnect is a C call that is part of the ODBC API and is documented at the Microsoft Web siteOpens in a new tab. Its name-value pairs are the same as those for the initialization file available on non-Windows platforms, except that the password is identified with the PWD keyword.
-
Telnet and Caché Direct
When establishing a connection using Caché Direct and the Caché Telnet server for Windows, the client uses configuration information that has been stored as part of a Caché remote server. To configure a remote server, go to the client machine. On that machine, the procedure is:
-
Click on the Caché cube and select Preferred Server from the menu (the Preferred Server choice also displays the name of the current preferred server).
-
From the submenu that appears, choose Add/Edit.
-
To create a new remote server, click the Add button; to configure an already-existing server, choose the Caché server to which you are connecting and click the Edit button.
-
This displays the Add Connection dialog. In the Authentication Method area on that dialog, click Password for Caché login.
-
If you are editing the values for an already-existing server, there should be no need to change or add values for the more general fields in this dialog, as they are determined by the server that you chose to edit.
If you are adding a new server, the fields to complete are described in the section “Define a Remote Server Connection” of the “Connecting to Remote Servers” chapter of the Caché System Administration Guide.
-
Click OK to save the specified values and dismiss the dialog.
When connecting to a non-Windows machine using telnet, there is no Caché telnet server available — you simply use the telnet server that comes with the operating system. Once you have established the connection to the server machine, you can then connect to Caché using the %Service_Terminal service.
Configuring Two-Factor Authentication
In addition to the authentication mechanism in use, Caché supports the use of two-factor authentication. This means that Caché authentication can require the end-user to possess two separate elements or “factors.” From the end-user’s perspective, the first factor is something that you know — for example, a password; the second factor is something that you have — for example, a smart phone. Caché performs two-factor authentication on its end-users using either of two mechanisms:
-
SMS text authentication — Caché sends a security code to the end-user’s phone via SMS. The end-user enters that code when prompted.
-
Time-based one-time password (TOTP) — The end-user initially receives a secret key from Caché. That key is a shared secret between Caché and the end-user’s application (such as an app on a mobile phone) or physical authentication device; both use the key and other information to generate a TOTP that serves as a verification code and that the end-user enters at a Caché prompt. The TOTP expires after 60 seconds and the end-user can only use it a single time, which is why it is called time-based and one-time.
This section covers the following topics:
Overview of Setting Up Two-Factor Authentication
The major steps to setting up two-factor authentication are:
-
Enable and configure two-factor authentication for the instance as a whole. You can configure the instance to use SMS text authentication, TOTP authentication, or both. For details about TOTP authentication, see the “Two-Factor TOTP Overview” section.
-
For SMS text authentication, configure the mobile phone service provider(s), if necessary. This includes:
-
Adding any mobile phone service providers if any are required and are not included in the list of default providers.
-
Changing configuration information as necessary for any existing providers (default or added).
-
-
Configure the service, as appropriate:
-
%Service_Bindings — Enable two-factor authentication for the service and continue to the next step.
-
%Service_Console and %Service_Terminal — Simply enable two-factor authentication for the service. This is all that is required.
-
%Service_CSP — There is no central means of enabling two-factor authentication for %Service_CSP. Continue to the next step.
You can enable either or both types of authentication for each service. For more information about services, see the “Services” chapter.
-
-
Configure client/server applications and web applications, as appropriate:
-
For client/server applications (those that use %Service_Bindings), add the appropriate calls into the client application to support it; this is a programming task that varies according to the client-side component in use (for example, ODBC, JDBC, C++, Java, .NET, Python, or Perl).
Important:Two-factor authentication is designed to receive a response from a human end-user in real time. If what the end-user considers a single session actually consists of multiple, sequential sessions, then the repeated prompting for the second factor may result in an unexpectedly difficult user experience. With client/server applications, the underlying protocol often causes clients to establish, disconnect, and reestablish connections repeatedly; such activity makes the use of two-factor authentication less desirable for this type of application.
-
For web applications (those that use %Service_CSP), configure each application to support it.
Note:For the Caché Terminal, which uses the %Service_Console service on Windows and the %Service_Terminal service on other operating systems, there is no configuration required other than server-side setup; since Caché controls the prompting in these, it simply follows the standard prompt (regardless of the authentication mechanism) with the two-factor authentication prompt and processes end-user input accordingly.
-
-
If you are using delegated authentication, modify the ZAUTHENTICATE.mac routine as required. See “Using Delegated Authentication” for more information.
-
Configure each end-user to enable SMS text authentication or TOTP authentication. An end-user can be configured to use both mechanisms, but cannot have both mechanisms enabled simultaneously.
Two-Factor TOTP Overview
Two-factor authentication using a time-based one-time password (TOTP) authentication works as follows:
-
As a requirement, each end-user must have either an authentication device or an application that generates such passwords. For example, end-users can use one of the following apps for mobile phones:
-
Google AuthenticatorOpens in a new tab, for Android, BlackBerry, or iPhone
-
Duo MobileOpens in a new tab, for Android or iPhone
-
-
When you configure an end-user for two-factor TOTP authentication, the system generates a secret key, which is displayed as a base-32 encoded randomized bit string. Caché and the end-user share this secret key (which is why it is known as a shared secret). Both Caché and the end-user’s authentication device or application use it to generate the TOTP itself, which serves as a verification code. The TOTP, which the end-user enters into a Verification code field or prompt, is a string of six digits, and a new one is generated at a regular interval (thirty seconds, by default).
-
At login time, after the end-user provides Caché with a password, Caché then additionally prompts for the TOTP. The end-user provides the TOTP, and then completes the login process.
The end-user can get the secret key from Caché in several ways:
-
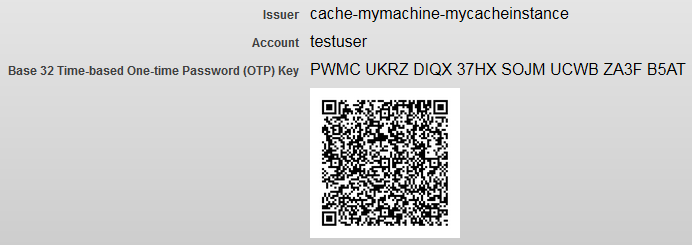
When you configure the end-user’s account to support two-factor TOTP authentication, the Edit User page for the end-user displays the end-user’s secret key, as well as the name of the issuer and the end-user’s account name. It also displays a QR code that includes all this information (a QR code is a machine-readable code such as the one pictured below). The end-user can then enter the information into an authentication device or an application by scanning the code or entering the information manually.
-
If you choose to show the end-user their secret key during the login to a web application or the Terminal session (using %Service_Console or %Service_Terminal), you can enable this behavior by selecting the Display Time-Based One-time Password QR Code on next login field on the Edit User page. The Terminal session will then display the end-user’s issuer, account, and secret key. A web application will display the end-user’s issuer, account, and secret key, along with a QR code; here, the end-user can then scan the code or enter the information manually.
Important:InterSystems does not recommend this option. See the following caution for more details.
The following are critical security concerns when using two-factor TOTP authentication:
-
Do not transmit the secret key or QR code in an unsecured environment. Out-of-band transmission is preferable to transmission even on a secure network. (The secret key gives an end-user the means to log into Caché or a Caché application. If you and your end-users do not ensure the secret key’s safety, then an attacker may gain access to it, which renders it useless for security.)
-
When configuring two-factor TOTP authentication for your organization, InterSystems strongly recommends that you provide the secret key to each end-user in person or by phone, or that you have the end-user scan the QR code in the physical presence of an administrator. This provides the opportunity to authenticate the individual who obtains the secret key.
Delivering the secret key over the network increases the possibility of exposing it. This includes displaying the secret key to the end-user when they first log into a web application, console, or the Terminal; this also includes displaying the QR code to the end-user when they first log into a web application.
If you are using two-factor TOTP authentication and wish to generate QR codes, Java 1.7 or higher must be running on the Caché server. Without Java, Caché can use two-factor TOTP authentication, but the end-user enters the values for the issuer, account, and key manually on the authentication device or in the application.
Configuring Two-Factor Authentication for the Server
The steps in configuring two-factor authentication for the Caché server are:
-
Enable and configure two-factor authentication for the instance as a whole. You can configure the instance to use SMS text authentication, TOTP authentication, or both.
-
For SMS text authentication, configure the mobile phone service provider(s), if necessary. This includes:
-
Adding any mobile phone service providers if any are required and are not included in the list of default providers.
-
Changing configuration information as necessary for any existing providers (default or added).
-
Enabling and Configuring Two-Factor Authentication Settings for an Instance
When setting up two-factor authentication for a Caché instance (server), you can enable one or both of:
-
Two-factor time-based one-time password authentication (TOTP authentication)
-
Two-factor SMS text authentication
To enable either form of two-factor authentication, the procedure is:
-
From the Management Portal home page, go to the Authentication/CSP Session Options page (System Administration > Security > System Security > Authentication/CSP Session Options).
-
To enable two-factor TOTP authentication, on the Authentication/CSP Session Options page, select the Allow Two-Factor Time-Based One-Time Password Authentication check box. This displays the Two-Factor Time-Based One-Time Password Issuer field; here, enter a string to identify this instance of Caché.
-
To enable two-factor SMS text authentication, on the Authentication/CSP Session Options page, select the Allow Two-Factor SMS Text Authentication check box. This displays the following fields:
-
Two-Factor Timeout (secs) — Optional timeout in seconds for entering the one-time security token.
-
DNS name of SMTP server — The DNS (Domain Name Service) name of the SMTP (Simple Mail Transfer Protocol) server that this instance of Caché is using to send SMS text messages, such as smtp.example.com (required).
-
From (address) — Address to appear in the “From” field of message (required).
-
SMTP username — Optional username for SMTP authentication (if the SMTP server requires it).
-
SMTP Password and SMTP Password (confirm) — Optional password (entered and confirmed) for SMTP authentication (if the SMTP server requires it).
-
-
Click Save.
-
If the instance is supporting SMS text authentication, configure mobile phone service providers as required. These procedures are described in the next section.
After completing this process for the instance itself, you may need to perform other configuration, such as for the instance’s services, web applications, and client/server applications; you will need to configure the instance’s users. “The Overview of Setting Up Two-Factor Authentication” provides general direction about this.
Configuring Mobile Phone Service Providers
The topics related to configuring mobile phone service providers are:
Creating or Editing a Mobile Phone Service Provider
To create or edit a mobile phone service provider, the procedure is:
-
From the Management Portal home page, go to the Mobile Phone Service Providers page (System Administration > Security > Mobile Phone):
-
To create a new provider, click Create New Provider.
-
To edit an existing provider, click Edit on the provider’s row in the table of providers.
This displays the Edit Phone Provider page for the selected mobile phone service provider.
-
-
On the Edit Phone Provider page, enter or change the value for each of the following fields:
-
Service Provider — The name of the mobile phone service provider (typically, its company name).
-
SMS Gateway — The address of the server that the mobile phone service provider uses to dispatch SMS (short message service) messages.
-
Deleting a Mobile Phone Service Provider
To delete a mobile phone service provider, the procedure is:
-
From the Management Portal home page, go to the Mobile Phone Service Providers page (System Administration > Security > Mobile Phone).
-
On the Mobile Phone Service Providers page, in the row of the provider, click Delete.
-
When prompted to confirm the deletion, click OK.
Predefined Mobile Phone Service Providers
Caché ships with a predefined list of mobile phone service providers, each with its SMS (short message service) gateway preset. These are:
-
AT&T Wireless — txt.att.net
-
Alltel — message.alltel.com
-
Cellular One — mobile.celloneusa.com
-
Nextel — messaging.nextel.com
-
Sprint PCS — messaging.sprintpcs.com
-
T-Mobile — tmomail.net
-
Verizon — vtext.com
Enabling or Disabling Two-Factor Authentication for a Service
For %Service_CSP, there is no central location for enabling or disabling two-factor authentication. Enable or disable it for each application as described in “Configuring Web Applications for Two-factor Authentication.”
To enable or disable two-factor authentication for %Service_Bindings, %Service_Console, and %Service _Terminal, procedure is:
-
From the Management Portal home page, go to the Services page (System Administration > Security > Services).
-
On the Services page, click the name of the service for which you wish to enable either form of two-factor authentication. This displays the Edit Service page for the service.
-
On the service’s Edit Service page, select or clear the Two-factor SMS check box, Two-factor Time-based One-time Password check box, or both. Note that each of these check boxes only appear if two-factor authentication is enabled for the instance.
-
Click Save.
Configuring Web Applications for Two-Factor Authentication
Once you have enabled two-factor authentication for an instance, you must enable it for all web applications that will use it. The procedure to enable it for an application is:
-
From the Management Portal home page, go to the Web Applications page (System Administration > Security > Applications > Web Applications).
-
On the Web Applications page, for the application you wish to enable two-factor authentication, click the name of the application, which displays its Edit page.
-
On the Edit page, in the Security Settings section of the page, select or clear the Two-factor SMS check box, Two-factor Time-based One-time Password check box, or both. Note that each of these check boxes only appear if two-factor authentication is enabled for the instance.
For general information about the Edit Web Application page, see the “CSP Application Options” section of the “CSP Architecture” chapter of the Using Caché Server Pages (CSP) book.
A web application cannot simultaneously support both two-factor authentication and web services.
Configuring an End-User for Two-Factor Authentication
To configure an end-user to receive a one-time security token for two-factor authentication, the procedure is:
-
From the Management Portal home page, go to the Users page (System Administration > Security > Users):
-
For an existing user, click the name of the user to edit; for a new user, begin creating the user by clicking Create New User (for details about creating a new user, see the “Creating a New User” section of the “Users” chapter). Either of these actions displays the Edit page for the end-user.
-
On the Edit User page, select SMS text enabled or Time-based One-time Password enabled, as appropriate.
-
If you select SMS Text, you must complete the following fields:
-
Mobile phone service provider — The company that provides mobile phone service for the user. Either select a provider from those listed or, if the provider does not appear in the list, click Create new provider to add a new provider for the Caché instance. (Clicking Create a new provider displays the Create a New Mobile Phone Provider window, which has fields for the Service Provider and the SMS Gateway, the purpose of which are identical to those described in the section Creating or Editing a Mobile Phone Service Provider.)
-
Mobile phone number — The user’s mobile phone number. This is the second factor, and is where the user receives the text message containing the one-time security token.
-
-
If you select Time-based One-time Password enabled, the page displays the following fields and information:
-
Display Time-Based One-time Password QR Code on next login — Whether or not to display a QR code when the user next logs in. If selected, Caché displays the code at the next login and prompts the user to scan it into the authentication device or application, and then to provide the displayed token to complete the authentication process. By default, this option is not selected. InterSystems recommends that you do not use this option.
-
Generate a new Time-based One-time Password Key — Creates and displays both a new shared secret for the end-user and a new QR code.
Important:If you generate a new time-based one-time password key for a user, the current key in the user’s authenticator application will no longer work. Before logging in, the user must enter the new key into the authenticator, either by scanning the QR code or by manually entering it. (This does not affect existing sessions.)
-
Issuer — The identifier for the Caché instance, which you established when configuring two-factor TOTP authentication for the instance.
-
Account — The identifier for the Caché account, which is the account’s username.
-
Base-32 Time-Based One-Time Password (OTP) Key — The secret key that the end-user enters into the authentication device or application.
-
QR Code — A scannable code that contains the values of the issuer, account, and secret key.
-
-
Click Save to save these values for the user.
If a service uses two-factor authentication and an end-user has two-factor authentication enabled, then authentication requires:
-
For SMS text authentication, a mobile phone that is able to receive text messages on that phone.
-
For TOTP authentication, an application or authentication device that can generate verification codes.
Otherwise, the end-user cannot authenticate:
-
For SMS text authentication, the end-user must have a mobile phone and be able to receive text messages on that phone. This is the phone number at which the user receives a text message containing the one-time security token as an SMS text.
-
For TOTP authentication, the user must have an authentication device or application that can either scan a QR code or that can accept the secret key and other information required to generate each TOTP (which serves as a verification code).
Configuring Bindings Clients for Two-Factor Authentication
Client/server connections use %Service_Bindings. For these connections, the code required to use two-factor authentication varies by programming language. (Note that Console, the Terminal, and web applications do not require any client-side configuration.) Supported languages include:
Client-side code performs three operations:
-
After establishing a connection to the Caché server, it checks if two-factor authentication is enabled on the server. Typically, this uses a method of the client’s connection object.
-
It gets the one-time security token from the user. This generally involves user-interface code that is not specifically related to Caché.
-
It provides the one-time security token to the Caché server. This also typically uses a connection object method.
When a user logs in through %Service_Bindings, Caché does not present a QR code to scan. The user must have previously set up the authentication device or application.
Studio, which connects to the Caché server using %Service_Bindings, does not support two-factor authentication.
C++
With C++, support for two-factor authentication uses two methods of the tcp_conn class:
-
bool tcp_conn::is_two_factor_enabled()This method checks if two-factor authentication is enabled on the server. It returns a boolean; true means that two-factor authentication is enabled.
-
bool tcp_conn::send_two_factor_token(const wchar_t* token, Conn_err* err)This method provides the two-factor authentication token to the server. It returns a boolean; true means that the user has been authenticated. It takes two arguments:
-
token, the two-factor authentication token that the user has received. Note that the client application is responsible for obtaining the value of the token from the user.
-
err, an error that the method throws if the user does not successfully authenticate.
-
If two-factor authentication is enabled on the server and the client code does not implement two-factor authentication calls, then the server will drop the connection with the client.
The following example uses an instance of a connection called conn:
-
It uses that instance’s methods to check if two-factor authentication is enabled.
-
It attempts to provide the token to the server and performs error processing if this fails. Note that the sample code here assumes that the application code has stored the one-time security token in a variable of type std::string; it then uses the c_str method of the string class to extract the one-time security token as a null-terminated string to pass to the server.
// Given a connection called "conn"
if (conn->is_two_factor_enabled()) {
  // Prompt the user for the one-time security token.
  // Store the token in the "token" variable of type std::string.
  Conn_err err;
  if (!conn->send_two_factor_token(token.c_str(), &err;))
      // Process the error from a invalid authentication token here.
}
The light C++ binding does not support two-factor authentication.
Java and JDBC
With Java, support for two-factor authentication uses two methods of the CacheConnection class:
-
public boolean isTwoFactorEnabled() throws ExceptionThis method checks if two-factor authentication is enabled on the server. It returns a boolean; true means that two-factor authentication is enabled.
-
public void sendTwoFactorToken(String token) throws ExceptionThis method provides the one-time security token to the server. It takes one argument, token, the one-time security token that the user has received.
The following example uses an instance of a connection called conn:
-
It uses that instance’s methods to check if two-factor authentication is enabled.
-
It attempts to provide the token to the server and performs error processing if this fails.
If two-factor authentication is enabled on the server and the client code does not implement two-factor authentication calls, then the server will drop the connection with the client.
// Given a connection called "conn"
if (conn.isTwoFactorEnabled()) {
  // Prompt the user for the two-factor authentication token.
  // Store the token in the "token" variable.
  try {
    conn.sendTwoFactorToken(token);
  }
  catch (Exception ex) {
    // Process the error from a invalid authentication token here.
  }
}
.NET
For .NET, Caché supports connections with two-factor authentication with the managed provider and with ADO.NET. Support for two-factor authentication uses two methods of the tcp_conn class:
-
bool CacheConnection.isTwoFactorEnabledOpen()This method opens a connection to the Caché server and checks if two-factor authentication is enabled there. It returns a boolean; true means that two-factor authentication is enabled.
-
void CacheConnection.sendTwoFactorToken(token)This method provides the one-time security token to the server. It has no return value. It takes one argument, token, the one-time security token that the user has received. If there is a problem with either the token (such as if it is not valid) or the connection, then the method throws an exception.
A client application makes a call to isTwoFactorEnabledOpen instead of a call to CacheConnection.Open. The isTwoFactorEnabledOpen method requires a subsequent call to sendTwoFactorToken.
Also, if two-factor authentication is enabled on the server and the client code does not implement two-factor authentication calls, then the server will drop the connection with the client.
The following example uses an instance of a connection called conn:
-
It uses that instance’s methods to check if two-factor authentication is enabled.
-
It attempts to provide the token to the server and performs error processing if this fails.
// Given a connection called "conn"
try {
  if (conn.isTwoFactorEnabledOpen()) {
    // Prompt the user for the two-factor authentication token.
    // Store the token in the "token" variable.
    conn.sendTwoFactorToken(token);
  }
}
catch (Exception ex) {
  // Process exception
}
ODBC
With ODBC, support for two-factor authentication uses two standard ODBC function calls (which are documented in the Microsoft ODBC API ReferenceOpens in a new tab):
-
SQLRETURN rc = SQLGetConnectAttr(conn, 1002, &attr, sizeof(attr), &stringLengthPtr);The SQLGetConnectAttrOpens in a new tab function, part of the Microsoft ODBC API, returns the current value of a specified connection attribute. The Caché ODBC client uses this function to determine if the server supports two-factor authentication. The value of the first argument is a handle to the connection from the client to the server; the value of the second argument is 1002, the ODBC attribute that specifies whether or not two-factor authentication is supported; the values of the subsequent arguments are for the string containing the value of attribute 1002, as well as relevant variable sizes.
-
SQLRETURN rc = SQLSetConnectAttr(conn, 1002, unicodeToken, SQL_NTS);The SQLSetConnectAttrOpens in a new tab function, also part of the Microsoft ODBC API, sets the value of a specified connection attribute. The Caché ODBC client uses this function to send the value of the two-factor authentication token to the server. The values of the four arguments are, respectively:
-
The connection from the client to the server.
-
1002, the ODBC attribute that specifies whether or not two-factor authentication is supported.
-
The value of the one-time security token.
-
SQLNTS, which indicates that the one-time security token is stored in a string.
-
If two-factor authentication is enabled on the server and the client code does not implement two-factor authentication calls, then the server will drop the connection with the client.
The following example uses an instance of a connection called conn:
-
It uses SQLGetConnectAttr to check if two-factor authentication is enabled.
-
It attempts to provide the token to the server with the SQLSetConnectAttr call and performs error processing if this fails. If SQLSetConnectAttr fails, the server drops the connection, so you need to reestablish the connection before you can attempt authentication again.
// Given a connection called "conn"
SQLINTEGER stringLengthPtr;
SQLINTEGER attr;
SQLRETURN rc = SQLGetConnectAttr(conn, 1002, &attr, sizeof(attr), &stringLengthPtr);
if attr {
  // Prompt the user for the two-factor authentication token.
  wstring token;
  SQLRETURN rc = SQLSetConnectAttr(conn, 1002, token, SQL_NTS);
    if !rc {
      // Process the error from a invalid authentication token.
    }
}
Perl
With Perl, support for two-factor authentication uses two methods of the Intersys::PERLBIND::Connection class:
-
is_two_factor_enabled()This method checks if two-factor authentication is enabled on the server. It returns a integer; 1 means that two-factor authentication is enabled and 0 means that it is disabled.
-
send_two_factor_token($token)This method provides the two-factor authentication token to the server. It returns a integer; 1 indicates success and 0 indicates failure. Its argument, $token, is the two-factor authentication token that the user has received and then entered at the client prompt. Note that the client application is responsible for obtaining the value of the token from the user.
If two-factor authentication is enabled on the server and the client code does not implement two-factor authentication calls, then the server will drop the connection with the client.
The following example uses an instance of a connection called conn:
-
It uses that instance’s methods to check if two-factor authentication is enabled.
-
It attempts to provide the token to the server and performs error processing if this fails.
// Given a connection called "conn"
if ($conn->is_two_factor_enabled()) {
  # Prompt the user for the one-time security token.
  # Store the token in the "token" variable of type std::string.
  if (!$conn->send_two_factor_token($token)) {
    # Process the error from a invalid authentication token here.
  } else {
    # two-factor authentication succeeded
}
else {
  # Handle if two-factor authentication is not enabled on the server.
}
Caché comes with sample programs that demonstrate two-factor authentication with Perl. These programs are in the install-dir\dev\perl\ directory, and are samples\two_factor.pl. For more information on Perl sample programs for use with Caché, see the “Sample Programs” section of the “Caché Perl Binding” chapter of Using Perl with Caché.
Python
With Python, support for two-factor authentication uses two methods of the intersys.pythonbind.connection class:
-
is_two_factor_enabled()This method checks if two-factor authentication is enabled on the server. It returns a boolean; true means that two-factor authentication is enabled.
-
send_two_factor_token(token)This method provides the two-factor authentication token to the server. It returns a boolean; true means that the user has been authenticated. It takes one argument, token, the two-factor authentication token that the user has received. Note that the client application is responsible for obtaining the value of the token from the user.
Note:Python leaves carriage returns in input. This means that, when processing the one-time security token, it is necessary to strip any carriage returns out of it.
If two-factor authentication is enabled on the server and the client code does not implement two-factor authentication calls, then the server will drop the connection with the client.
The following example uses an instance of a connection called conn:
-
It uses that instance’s methods to check if two-factor authentication is enabled.
-
It attempts to provide the token to the server and performs error processing if this fails.
// Given a connection called "conn"
if conn.is_two_factor_enabled():
  # Prompt the user for the one-time security token.
  # Store the token in the "token" variable of type std::string.
  # Make sure that the carriage returns are stripped from the string.
  if !conn.send_two_factor_token(token):
    # Process the error from a invalid authentication token here.
  else:
    # two-factor authentication succeeded
else:
  # Handle if two-factor authentication is not enabled on the server.
Caché comes with sample programs that demonstrate two-factor authentication with Python. These programs are in the install-dir\dev\Python\ directory; they are samples\two_factor.py for Python 2.6 and samples3\two_factor.py for Python 3.0. For more information on Python sample programs for use with Caché, see the “Sample Programs” section of the “Caché Python Binding” chapter of Using Python with Caché.
Other Topics
Areas covered in this section are:
System Variables and Authentication
After authentication, two variables have values:
-
$USERNAME contains the username
-
$ROLES contains a comma-delimited list of the roles held by the user
The $ROLES variable allows you to manage roles programmatically. For more information on this, see the section “Programmatically Managing Roles” in the “Roles” chapter.
Using Multiple Authentication Mechanisms
The one situation in which InterSystems recommends the use of multiple authentication mechanisms is when moving from a less rigorous mechanism to a more rigorous one. For example, if an instance has been using no authentication and plans to make a transition to Kerberos, the following scenario might occur:
-
For the transition period, configure all supported services to allow both unauthenticated and Kerberos-authenticated access. Users can then connect using either mechanism.
-
If appropriate, install new client software (which uses Kerberos for authentication).
-
Once the list of Caché users has been synchronized with that in the Kerberos database, shut off unauthenticated access for all services.
The use of multiple authentication mechanisms is often in conjunction with cascading authentication, described in the next section.
Cascading Authentication
While Caché supports for a number of different authentication mechanisms, InterSystems recommends that you do not use any other password-based authentication mechanism along with Kerberos. Also, there are limited sets of circumstances when it is advisable for an instance to have multiple authentication mechanisms in use.
If a service supports multiple authentication mechanisms, Caché uses what is called “cascading authentication” to manage user access. With cascading authentication, Caché attempts to authenticate users via the specified mechanisms in the following order:
-
Kerberos cache (includes Kerberos with or without integrity-checking or encryption)
-
OS-based
-
LDAP (with checking the LDAP credentials cache second)
-
Delegated
-
Caché login
-
Unauthenticated
If a service specifies Kerberos prompting and this fails, there is no cascading authentication. If a service specifies both Kerberos prompting and Kerberos cache, then Caché uses Kerberos cache only.
For example, if a service supports authentication through:
-
Kerberos cache
-
OS-based
-
Unauthenticated
If a user attempts to connect to Caché, then there is a check if the user has a Kerberos ticket-granting ticket; if there is such a ticket, there is an attempt to obtain a service ticket for Caché. If this succeeds, the user gets in. If either there is no initial TGT or a Caché service cannot be obtained, authentication fails and, so, cascades downward.
If the user has an OS-based identity that is in the Caché list of users, then the user gets in. If the user’s OS-based identity is not in the Caché list of users, then authentication fails and cascades downward again.
When the final option in cascading authentication is unauthenticated access, then all users who reach this level gain access to Caché.
If an instance supports cascading authentication and a user is authenticated with the second or subsequent authentication mechanism, then there have been login failures with any mechanisms attempted prior to the successful one. If the %System/%Login/LoginFailure audit event is enabled, these login failures will appear in the instance’s audit log.
Establishing Connections with the UnknownUser Account
If Caché login and unauthenticated mode are both enabled, then a user can simply press Enter at the Username and Password prompts to connect to the service in unauthenticated mode, using the UnknownUser account. If only Caché login is enabled, then pressing Enter at the Username and Password prompts denies access to the service; Caché treats this as a user attempting to log in as the UnknownUser account and providing the wrong password.
Programmatic Logins
In some situations, it may be necessary for a user to log in after execution of an application has begun. For example, an application may offer some functionality for unauthenticated users and later request the user to log in before some protected functionality is provided.
An application can call the Caché log in functionality through the Login method of the $SYSTEM.Security class with the following syntax:
set success = $SYSTEM.Security.Login(username,password)where
-
success is a boolean where 1 indicates success and 0 indicates failure
-
username is a string holding the name of the account logging in
-
password is a string holding the password for the username account
If the username and password are valid and the user account is enabled and its expiration date has not been reached, then the user is logged in, $USERNAME and $ROLES are updated accordingly, and the function returns 1. Otherwise, $USERNAME and $ROLES are unchanged and the function returns 0.
No checking of privileges occurs as a result of executing $SYSTEM.Security.Login. As a result, it is possible that the process has lost privileges that were previously held.
There is also a one-argument form of $SYSTEM.Security.Login:
set success = $SYSTEM.Security.Login(username)It behaves exactly the same as the two-argument form except that no password checking is performed. The single-argument form of $SYSTEM.Security.Login is useful when applications have performed their own authentication and want to set the Caché user identity accordingly. It can also be used in situations where a process is executing on behalf of a specific user but is not started by that user.
The JOB Command and Establishing a New User Identity
When a process is created using the JOB command, it inherits the security characteristics (that is, the values of $USERNAME and $ROLES) of the process that created it. Note that all roles held by the parent process, User as well as Added, are inherited.
In some cases, it is desirable for the newly created process to have $USERNAME and $ROLES values that are different from its parent’s values. For example, a task manager might be created to start certain tasks at certain times on behalf of certain users. While the task manager itself would likely have significant privileges, the tasks should run with the privileges of the users on whose behalf they are executing, not with the task manager’s privileges.
The following pseudocode illustrates how this can be done:
WHILE ConditionToTest {
    IF SomeThingToStart {
        DO Start(Routine, User)
    }
}

Start(Routine, User) {
    NEW $ROLES    // Preserve $USERNAME and $ROLES

    // Try to change username and roles
    IF $SYSTEM.Security.Login(User) {
        JOB ...
        QUIT $TEST
    }
    QUIT 0       // Login call failed
}