

Connect a Workspace to Your InterSystems Server
Once you have defined a connection profile for your InterSystems® server, you can connect the server to your workspace using the InterSystems ObjectScript extension for Visual Studio Code (VS Code).
The procedures for connecting vary depending on whether you are setting up your workspace for client-side editing or server-side editing. Compare Client-Side and Server-Side Workflows helps you decide which workflow and workspace configuration are appropriate for your use case. You can then proceed to the instructions which correspond to your chosen workspace configuration.
Regardless of the workflow you choose, the InterSystems Server Manager provides a common mechanism for authenticating the connection to your InterSystems server. Sign into a Server describes that mechanism.
You cannot create a connection to an InterSystems IRIS server if the InterSystems IRIS server is not running.
Compare Client-Side and Server-Side Workflows
All editing in VS Code takes place within a workspace. However, the structure and contents of your workspace will vary depending upon whether you intend to perform client-side or server-side edits.
-
With client-side editing, you create, update or delete source code files in a location other than the InterSystems server where the code is deployed—often, in a folder within the client machine’s local filesystem. To edit existing code on the server, it must first be exported from the server to the client-side location. Edited code is then imported back into a server, where it can be compiled, run, and debugged. InterSystems recommends client-side editing when:
-
You are using a client-side source control or version control solution.
-
You are developing code using one or more local test servers (running within containers, perhaps) with the intention of importing the code into one or more production servers at a later time.
-
-
With server-side editing, you edit source code files directly on the InterSystems IRIS server where the code is deployed. Edits made on the server-side can be run and debugged on the server immediately. A server-side editing configuration is recommended if your source code is managed by a server-side source control solution (see Integrating InterSystems IRIS with Source Control SystemsOpens in a new tab for more information).
Note:If you are migrating from InterSystems Studio, you may prefer to use server-side editing in VS Code, which mirrors Studio’s editing workflow.
Do not edit code on the client-side and the server-side within the same workspace. Doing so introduces considerable risks: client-side and server-side changes may conflict; client-side edits may not be tracked by server-side source control solutions, or vice versa.
Client-Side: Single-Root, Local or Remote File System Folder
When you edit code on the client-side, you maintain a working copy of your source code files in a location other than the InterSystems server where you are deploying and testing it. Often, this location is a folder within your client machine’s local filesystem (hence the name, “client-side”). However, the ObjectScript extension also supports the use of non-local folders in a client-side editing workspace, making it compatible with remote file system solutions such as VS Code Remote DevelopmentOpens in a new tab.
With this workflow, it usually makes the most sense to organize (and source control) all files associated with a project within a single client-side directory. Accordingly, a VS Code workspace which is configured for client-side editing usually consists of a single root folder, corresponding to that directory. You define the connection to the InterSystems IRIS server where you are testing the project at the folder level. That way, you can export files from the server to the folder as needed, edit files within the folder using VS Code, and then import the edited code from the folder into the server so that you can compile, run, and debug it.
You can define the settings which determine how the ObjectScript extension connects this single root folder to your server within two files, stored in a /.vscode/ subfolder:
-
/.vscode/settings.json, for general settings. If you connect a server using the ObjectScript extension’s server connection wizard and this file does not already exist, the extension creates this file for you. Refer to Editing the settings.json File for further details.
-
/.vscode/launch.json, for debugging configurations. See Run and Debug Your ObjectScript Code for information about how to use this file.
It is also possible to configure a multi-root workspace for client-side editing. For example: if you are working on multiple projects using multiple development servers, you may wish to configure a single workspace which provides access to all of them simultaneously. To accomplish this, define the connection settings for each individual project folder within that folder’s /.vscode/ subfolder (as if it was its own, single-root workspace), and then create a .code-workspace file which collects the folders into a multi-root workspace.
When you open a folder in VS Code (using the File > Open Folder... menu option, for example), VS Code checks for the existence of a /.vscode/ subfolder and attempts to initialize settings from any settings files which it finds within it. This means that once you have defined an active connection to an InterSystems server within a local workspace folder’s /.vscode/settings.json file, that connection is available whenever that folder is open as part of the current VS Code workspace.
See Edit Code from a Client File System to connect a local workspace folder to an InterSystems server and get started with client-side editing.
Server-Side: Multi-Root, Virtual isfs Folders
On the other hand, server-side editing involves enacting changes to code directly on the server. This may be preferable in situations where your source control solution interfaces directly with your server.
An InterSystems server provides access to a set of code documents at a URI which uses either the isfs:// or isfs-readonly:// protocol. Leveraging VS Code’s multi-root workspace feature, the InterSystems ObjectScript extension represents this access to server-side documents as a virtual root folder within the workspace. By defining a multi-root workspace with multiple virtual folders, it is possible to access code from different namespaces—and even different servers—simultaneously.
Information about the virtual folder or virtual folders which comprise a given server-side workspace can be saved locally as a file with the .code-workspace extension, so that the workspace can be recreated in a latter session (using the File > Open Workspace from File... menu option, for example). Other workspace settings are also stored within the .code-workspace file. See Editing the Workspace Settings File for further details.
It is still possible to define folder-scoped settings within a multi-root workspace by defining /.vscode/settings.json or /.vscode/launch.json files within a folder. However, keep in mind that folder-scoped settings will override settings in a workspace-scoped .code-workspace file, and conflicts between related settings may lead to unexpected behavior.
If you wish to configure folder-scoped settings for a server-side virtual folder, additional steps are required: see Configure an InterSystems Server for Folder-Specific Settings.
See Edit Code Directly on an InterSystems Server to add a virtual folder to your workspace and get started with server-side editing.
Sign into a Server
Whether you are editing on the client-side or server-side, the InterSystems Server Manager brokers the process of authenticating and connecting to your InterSystems servers through the authentication provider it implements, InterSystems Server Credentials.
You can initiate a connection with an InterSystems server by performing any of the following actions:
-
Expand a server entry within the InterSystems Servers tree view to view its available namespaces
-
(If no workspace is open:) select the Choose Server and Namespace button from VS Code’s Explorer view container to add a virtual folder to a new workspace for server-side editing.
-
(If no workspace is open:) select Add Server Namespace to Workspace from the InterSystems Projects Explorer to add a virtual folder to a new workspace for server-side editing.
-
(If an open workspace contains a local directory but it is not currently connected to a server:) select Choose Server and Namespace from the InterSystems ObjectScript Explorer.
-
Use the Command Palette to invoke any of the commands which are analogous to any of the preceding actions.
Having performed any of these actions, you must respond to a series of prompts, as follows:
-
VS Code displays a dialog requesting permission to connect, such as the one illustrated in the following image:
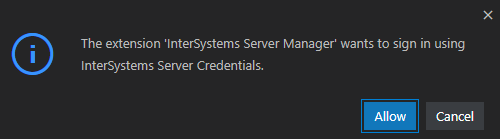
Select Allow to allow the extension to connect. (Note that depending on the action which initiated the connection attempt, this dialog may name a different ObjectScript extension pack extension.)
-
Next, InterSystems Server Credentials prompts you to provide a username if the connection profile for the server which you are connecting to does not already specify one. Provide the username for a suitably authorized account to continue.
-
If you have not previously saved the password for the specified user, InterSystems Server Manager prompts you to provide it, as illustrated in the following image:

Type in the user’s password and complete either of the following actions to submit it:
-
Select the key
 button if you wish to store the password securely within your workstation’s operating system keychain. This allows InterSystems Server Credentials to retrieve the password and authenticate your connection to the InterSystems server during subsequent VS Code sessions; it will not be necessary to reenter it.Important:
This is the recommended method for storing and managing your InterSystems server passwords. While InterSystems Server Manager also supports storing passwords as plaintext within the user-level settings.json file’s server connection profiles, this method is insecure.
-
Press Enter to authenticate your connection to the InterSystems server for this session without saving your password. InterSystems Server Manager will prompt you to reenter the password the next time you perform an action that requires reauthorization.
-
Once you have connected to your server, you can complete the process of adding a virtual folder to your workspace (for server-side editing) or connecting a namespace to your local workspace folder (for client-side editing).
Manage Signed-In Accounts
Select the Accounts  button in the VS Code Activity Bar to manage currently signed-in InterSystems server accounts.
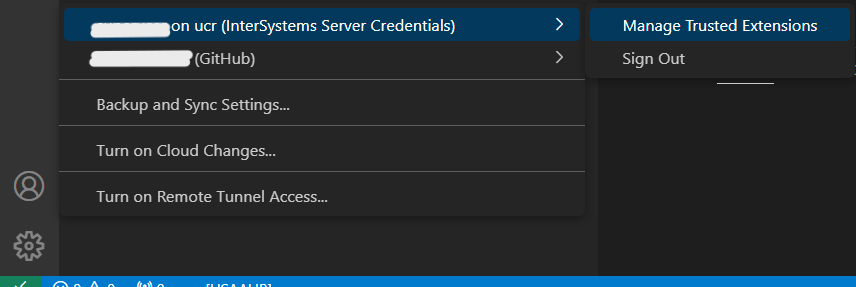
For each currently signed-in account, the Accounts menu provides you with the following options:
-
Select Manage Trusted Extensions to remove an extension from the list of extensions which you have previously allowed to use these account credentials.
-
Select Sign Out allows you to sign out of this account.
Note:By default, InterSystems Server Credentials provides you the option to delete the password for an account when you sign out. To modify this behavior, change theintersystemsServerManager.credentialsProvider.deletePasswordOnSignout setting.

