
Edit Code Directly on an InterSystems Server
This page describes how to configure a Visual Studio Code (VS Code) workspace for editing code directly on an InterSystems® server. (It assumes that you have already defined a connection profile for the target server.) Compared with client-side editing, server-side editing may be preferable when your source control solution interfaces directly with your server.
To access code directly on an InterSystems server, you must add a virtual folder to a workspace which corresponds to a set of code documents on that server. Add a Virtual Folder to Your Workspace describes the convenient interfaces that the InterSystems ObjectScript extension for VS Code provides for adding a virtual folder for the full non-system contents of a server’s namespace or for a filtered subset of those contents. You can configure a virtual folder to allow its contents to be edited, or (when desired) to allow read-only access.
Editing the Workspace File describes how to further configure a server-side workspace’s virtual folders (as well as other settings) by editing the workspace settings file directly.
In situations where it is necessary to define settings for specific server-side folders independently, Configure an InterSystems Server to Maintain Folder-Specific Settings outlines the additional server-side configuration required to support this.
Once you have configured a virtual folder for your workspace, any edits you make to code within the virtual folder are saved and compiled directly on the server, For instructions on how to test and debug your code using the InterSystems ObjectScript Extension Pack for VS Code, refer to the Develop ObjectScript Unit Tests page and the Run and Debug Your ObjectScript Code page, respectively.
If you decide to edit the code for your project on the server side, remain consistent. Do not make edits using client-side copies of source code files as well, as doing so introduces considerable risks: client-side and server-side changes may conflict and result in lost work; client-side edits may not be tracked by your server-side source control solution.
Add a Virtual Folder to Your Workspace
To quickly create a virtual folder in your current workspace which accesses all the user-created classes and routines within a single namespace on your server, perform the following steps:
-
Navigate to the InterSystems view container by selecting the InterSystems button
 in the Activity Bar.
 -
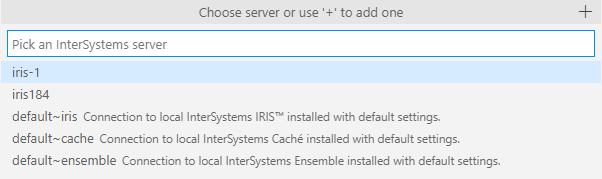
In the InterSystems Servers view, expand the server you want to connect to. If necessary, sign into the server.
-
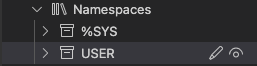
Expand your target server’s Namespaces directory.
-
-
To view or edit source code across an entire namespace:
-
Hover over the target namespace. If the server supports server-side editing, command buttons appear, as illustrated in the following image:
-
-
To view or edit source code for a single project only:
-
Expand the directory for the namespace which contains the target project.
-
Expand the Projects directory for that namespace.
-
Hover over the target project. If the server supports server-side editing, command buttons appear, as illustrated in the following image:
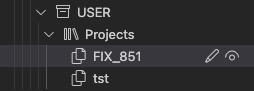
For more information about projects, see Work with Projects.
-
-
-
Select the appropriate command button for your use case:
-
Select the edit (pencil) button to add a virtual isfs:// folder to your workspace. The isfs protocol allows you to make direct edits to the code on the server.
-
Select the view (eye) button to add a virtual isfs-readonly:// folder to your workspace. The isfs-readonly protocol allows you to view code on the server, but prevents you from making any changes to it.
-
Hold the Alt or Option key while selecting the edit or view button to add a folder that also gives you access to server-side web application files (such as .csp files).
For an entire namespace, the virtual folder has a URI with the form isfs://server:namespace/ or isfs-readonly://server:namespace. For a virtual project folder, the URI has the form isfs://server:namespace/?project=projectName or isfs-readonly://server:namespace/?project=projectName.
Note:The string isfs which appears in the URI for folders configured for server-side editing stands for InterSystems File Service. It is a simple protocol which was created by InterSystems to implement the VS Code FileSystemProvider APIOpens in a new tab. This API allows a remote location to be represented as a local one. It works well for making artefacts in an InterSystems IRIS namespace look like local files.
-
If you require more granular control over the contents of your virtual folder, see Configure a Custom Virtual Folder.
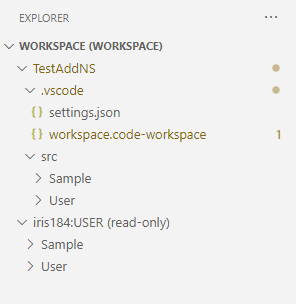
Once you have added a virtual folder, VS Code opens the Explorer view showing the added namespace. In the following image, the workspace includes the Sample and User packages in the src folder on the client, and the Sample and User packages in the USER namespace on the server, with read-only access:
When you add a virtual folder to an empty or unsaved workspace, VS Code stores configuration settings for this virtual folder within a temporary file. You can save these workspace settings for later access in an arbitrarily-named file with a .code-workspace extension. You can also configure workspace settings by modifying this .code-workspace file directly, as described in Editing the Workspace File.
If you are editing your code on the client-side (for example, to use Git for source control), InterSystems strongly recommends that you avoid using isfs:// to perform server-side editing within the same workspace. Where it is necessary to access server-side code within a workspace which is configured for client-side editing, use isfs-readonly (as in the preceding example) to avoid introducing conflicts between server-side and client-side code.
Configure a Custom Virtual Folder
If you want more granular control over how your server-side workspace is organized, you can configure a virtual folder which accesses a subset of documents within a server’s namespace, filtered by various criteria. You can add a filtered virtual folder by performing the following steps:
-
From any view container, invoke the ObjectScript: Add Server Namespace to Workspace command from the Command Palette.
Note:If you have one or more client-side folders open in the current workspace, this command only allows you to open read-only (isfs-readonly://) virtual folders.
Alternatively, if you do not currently have a workspace open, you can navigate to the Explorer
 view and select the Choose Server and Namespace button, as shown in the following image:
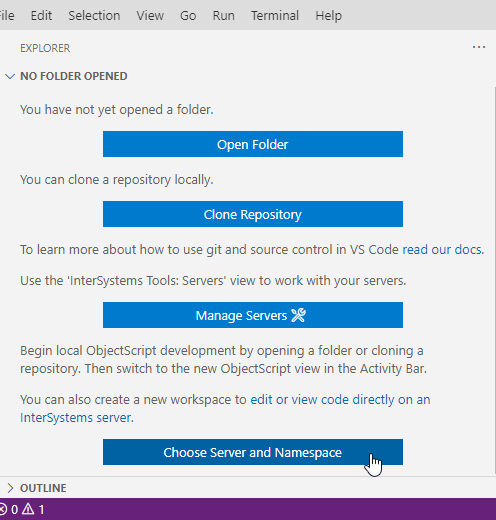
-
Pick the name of an existing server connection profile from the list, or click the + (plus) button to add a new server connection profile.
-
If necessary, sign into the server.
-
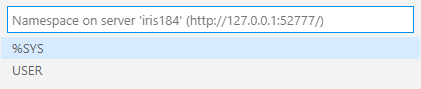
Choose a namespace from the list retrieved from the target server.
-
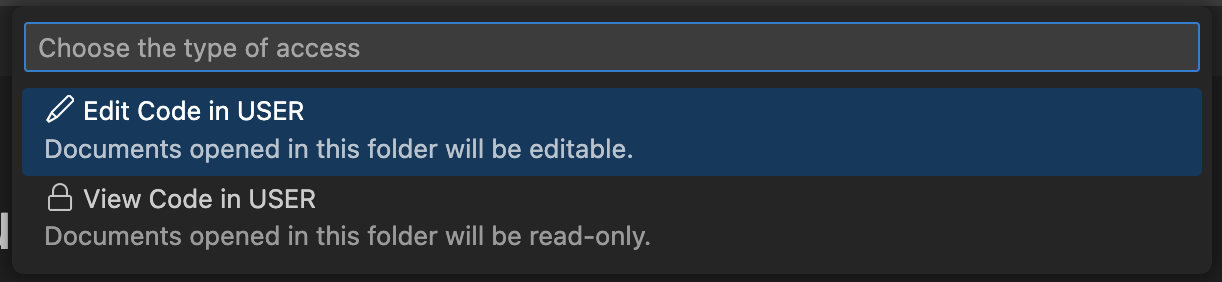
Choose an access mode—editable (isfs://) or read-only (isfs-readonly://) from the list.
-
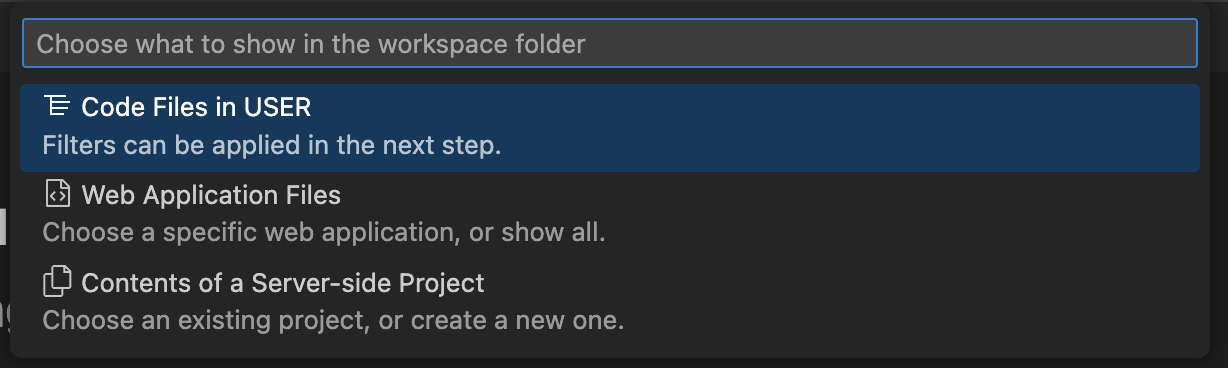
Choose the category of files to display (code files, web application files, or contents of a server-side project).
-
If you choose to show web application files, you have the option to specify which web application you want to display files for:

-
If you choose to show the contents of a project, select the project (see Work with Projects for more information about working with projects):

-
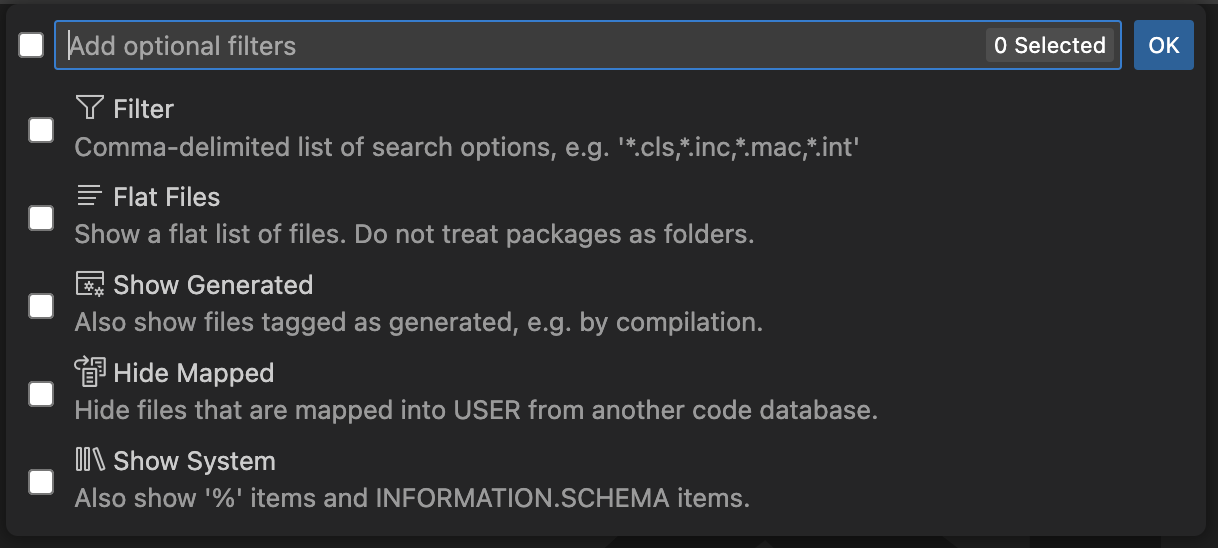
If you choose to create your own filter of files to display, select your desired filter options:
-
VS Code adds the virtual folder which you have configured to your current workspace.
Edit Workspace Settings (the .code-workspace File)
When you use the ObjectScript extension to add a server-side virtual folder to an empty or unsaved VS Code workspace, the extension stores the configuration details in a temporary file. If you want to save a workspace configuration for later access, you can do so in an arbitrarily-named file with the .code-workspace extension.
The .code-workspace file is a JSON file which you can edit directly. What follows is a simple example:
{
  "folders": [
    {
      "name": "iris184:USER",
      "uri": "isfs://iris184:user"
    }
  ],
  "settings": {}
}
-
The "name" property provides a name for this server-side folder.
-
The "uri" property indicates the location of documents on the server. The supplied value has three components:
-
The first component can be either isfs or isfs-readonly. These values specify that the folder is on an InterSystems IRIS server. isfs-readonly specified read-only access.
-
The value following the / (forward slash) specifies the name of the server.
-
The value following the : (colon) specifies the namespace in lowercase characters.
-
-
The "settings" object can contain any other settings you wish to configure for your workspace.
To add more root folders to your workspace, giving you access to code in a different namespace, or on a different server, use the context menu on your existing root folder to invoke the Add Server Namespace to Workspace... command. This command is also available in the Command Palette. You can also modify the .code-workspace folder directly following the conventions demonstrated in the examples in this section.
The example which follows describes a two-folder workspace in which the second folder gives read-only access to the %SYS namespace:
{
  "folders": [
    {
      "name": "iris184:USER",
      "uri": "isfs://iris184:user"
    },
    {
      "name": "iris184:%SYS (read-only)",
      "uri": "isfs-readonly://iris184:%sys"
    }
  ],
  "settings": {}
}
Root folders can be re-sequenced using drag/drop in the Explorer view, or by editing the order their definition objects appear within the "folders" array in the JSON.
Advanced Workspace Configurations
The following is a more complex example of a .code-workspace file:
{
  "folders": [
    {
      "name": "myapp",
      "path": ".",
    },
    {
      "uri": "isfs://myapp",
      "name": "server",
    },
    {
      "uri": "isfs://myapp:user",
      "name": "user",
    },
    {
      "uri": "isfs://myapp:%sys",
      "name": "system",
    },
    {
      "uri": "isfs://user@hostname:port?ns=%SYS",
      "name": "system (alternative syntax)",
    }
  ],
  "settings": {
    "files.exclude": {},
    "objectscript.conn": {
      "active": true,
      "username": "_system",
      "password": "SYS",
      "ns": "MYAPP",
      "port": 52773,
    }
  }
}
This example defines a workspace with the following features:
-
The workspace contains multiple virtual folders, corresponding to multiple namespaces on the same InterSystems IRIS server.
-
The connection settings for the server are defined within the scope of the workspace, in the "settings" section. Any other workspace-scoped settings would also be defined in this section.
-
The workspace includes a local folder with "myapp" defined as the root display name (the "name" property). This matches the "myapp" query in the isfs:// URI for one of the virtual folders. This correspondence allows you to maintain specialized folder-scoped settings for the virtual folder in a /.vscode/settings.json file in the local folder. See Configure an InterSystems Server to Maintain Folder-Specific Settings for more information.
InterSystems strongly discourages users from combining server-side virtual folders and client-side local folders within the same workspace.
Web Application (CSP) Files
To edit web application files (also known as CSP files) on a server, configure the URI as follows:
isfs://server:namespace{csp_application}?csp
For example, the following URI gives you access to the server-side files of the /csp/user application. The csp query parameter is mandatory and the suffix on the server name must specify the correct namespace for the web application. For example:
"uri": "isfs://myserver:user/csp/user?csp"
Changes you make to files opened from this root folder of your VS Code workspace will be saved onto the server.
If your VS Code workspace contains a virtual folder for a server namespace and you have configured folder-specific settings for it, any virtual folders that you create for web applications within that namespace inherit the folder-specific settings for the server namespace folder by default. You can override this behavior by configuring folder-specific settings for the web application’s virtual folder as well.
Other Filter and Display Options
The query string of the "uri" property accepts several parameters that control filtering and display of the server-side entities. The examples below access the USER namespace on the server whose definition is named ‘myserver’.
-
isfs://myserver:user/?generated=1 shows generated files in addition to not generated files.
-
isfs://myserver:user/?system=1 shows files from % packages and the INFORMATION.SCHEMA package, in addition to other files.
-
isfs://myserver:user/?project=prjname shows only files in project prjname. Cannot be combined with any other parameter.
-
isfs://myserver:user/?mapped=0 hides files that are mapped from a non-default database.
-
isfs://myserver:user/?filter=%Z*.mac,%z*.mac — a comma-delimited list of search options, ignoring type. The default is *.cls, *.inc, *.mac, *.int. To see all files, use *.
-
isfs://myserver:user/Utils?filter=*.cls shows only .cls files within the Utils package and its sub-packages.
Note:As suggested by the preceding example, the wildcard character (*) cannot be used in a medial position within a filter string (for example, to filter by both an initial package name string and a file type). In other words, isfs://myserver:user/?filter=Utils*.cls would filter for files with the literal name Utils*.cls.
The options generated and mapped can be combined with each other, and with filter.
To modify the query parameters or name of an existing workspace folder, run the Modify Server-Side Workspace Folder... command from the Command Palette or the Explorer context menu.
Configure an InterSystems Server to Maintain Folder-Specific Settings
Within a VS Code workspace, settings which apply to a single root folder are defined in a settings.json file, placed in a /.vscode/ subfolder. These settings take precedence over settings defined .code-workspace for actions within that folder.
If you want to configure folder-specific settings for a server-side virtual folder (including code snippets and debugging configurations), you must configure the InterSystems server to serve a /.vscode/settings.json file.
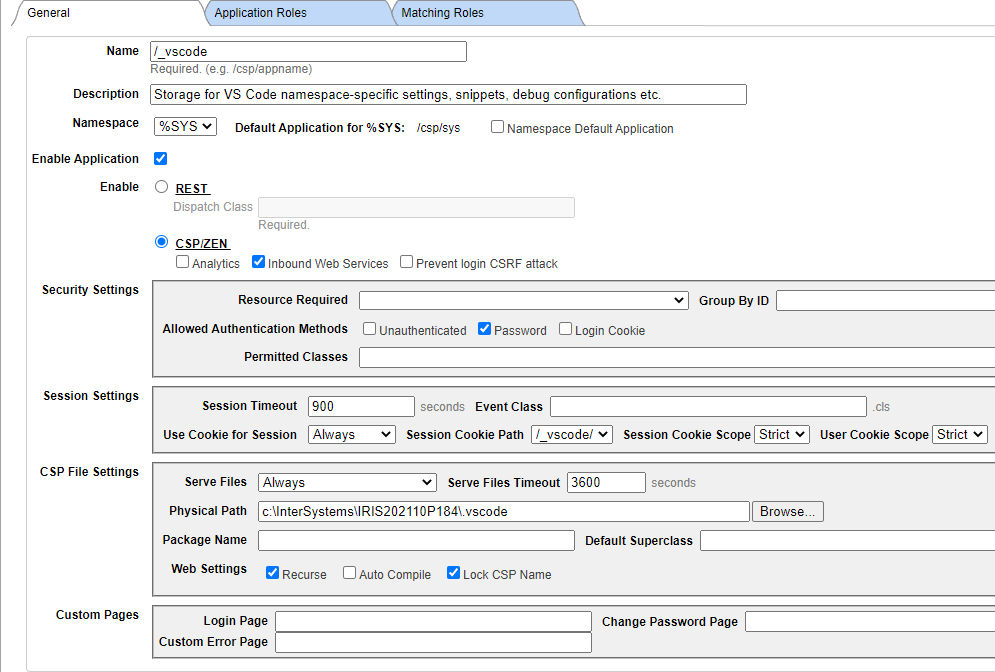
Use the Management Portal for your target InterSystems IRIS server to create a web applicationOpens in a new tab named _vscode by performing the following steps:
-
Navigate to the Create New Web Application page (illustrated in the image below) from the Management Portal home page by selecting System Administration > Security > Applications > Web Applications, then Create New Web Application.
-
Enter the following values:
-
Name: —enter /_vscode
-
Description — a brief description
-
Namespace — select %SYS
-
Enable Application — select
-
Enable — select CSP/ZEN
-
Allowed Authentication Methods — select Password
-
CSP File Settings: Physical Path — enter a physical path appropriate for your platform and your installation folder
-
CSP File Settings: Web Settings — clear the Auto Compile option
-
-
Save the configuration.
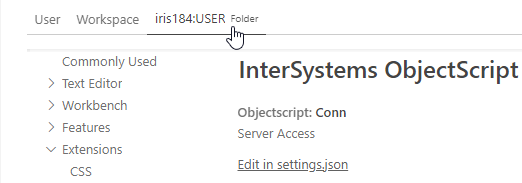
If you have an isfs-type workspace root folder that connects to a namespace on this server as a user with the %DB_IRISSYS:READ privilege, you can now write and read folder-specific settings. You can review and edit folder-specific settings in the VS Code Settings Editor by selecting the tab which corresponds to the folder, as illustrated in the following image:
If you want to define and edit settings for a folder using the VS Code Settings Editor exclusively, simply create a /.vscode/settings.json file which consists of an empty JSON object ({}) within the folder. This adds a tab in the Settings Editor for the folder; you can make all subsequent edits to the folder’s folder-specific settings there.
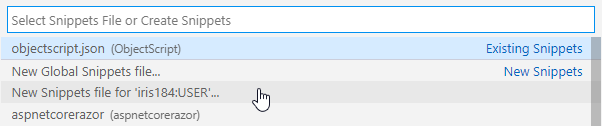
To create a folder-specific snippets file by selecting the Preferences: Configure User Snippets command:
To edit the server-side namespace-specific files for all namespaces directly through VS Code, add an isfs-type root folder with the following URI:
isfs://servername:%sys/_vscode?csp
For a single namespace (for example, USER) the URI would be as follows:
isfs://servername:%sys/_vscode/USER?csp