Details of Defining Levels
This chapter provides details on defining levels. It discusses the following topics:
-
How to override the default null replacement string for level
-
How to configure a level to use the DISPLAYLIST values of a class property
-
How to make member names localizable in the same way as other cube elements
-
How to define dependencies between levels in different hierarchies
See the previous chapter for basic information, including information on specifying the source values.
Ensuring Uniqueness of Member Keys
If a level has a parent level, it is possible for member keys not to be unique. For details, see “Defining Member Keys and Names Appropriately,” earlier in this book. InterSystems recommends that you ensure that member keys are unique for each level, so that you can easily access any member directly. Also, member keys must be unique within the first 113 characters.
If it is possible, considering your source values and your hierarchies, to have duplicate member keys, do the following:
-
Instead of using just the source value alone, concatenate the source value with some other value that is unique to the parent member. For example, suppose that you want to base the level on a source property called CityName, but you could have multiple cities with the same name in different countries. Instead of specifying Property, specify Expression. Use an expression like the following:
%source.CountryName_%source.CityName -
If you do not want to use these concatenated strings as member names, use a unique value (such as the ID) as the source value. Then add a property to the level and use the property values as the member names. See “Using Property Values as the Member Names,” later in this chapter.
Specifying the Null Replacement String for a Level
For a level, the Null replacement string option specifies a string to use in place of any null values. This string takes precedence over the null replacement string that you specify for the cube.
Defining a List-Based Level
You can define a level that is based on a list, an array, or a Caché class relationship. Each distinct list item is indexed as a separate member of the level. (For such levels, be sure to read “Using List-Based Levels,” earlier in this book.)
DeepSee can directly use a source value that has the type %ListOpens in a new tab, that is in the format returned by the $List function, or that is a character-delimited list. For other formats, you must convert the source value and then use it.
A list-based level must be contained in its own hierarchy; there cannot be another level in this hierarchy.
Defining a Level When the Source Value Is in a Standard Format
If the source value is available in $List format, in %ListOpens in a new tab format, or in a character-delimited list, define the level as described earlier, with the following additional steps:
-
For Source value list type, select one of the following:
-
$List structure — Use this if the source value is in the format returned by the $List function or has the type %ListOpens in a new tab.
-
Comma delimited — Use this if the source value is a comma-separated list.
-
Other delimited — Use this if the source value is a list where the delimiter is some other character.
-
-
If you selected Other delimited, then for List delimiter, specify the character used to delimit the list.
Defining a Level When the Source Value Is in Another Format
If the source value is not available in $List format or as a character-delimited list, use the following approach:
-
Create a utility method that converts it into one of the required formats. For example:
ClassMethod GetAllergies(ID As %Numeric) As %List
{
    Set allergies=##class(DeepSee.Study.Patient).%OpenId(ID,0).Allergies
    If (allergies.Count()=0) {Quit $LISTFROMSTRING("No Data Available")}
    Set list=""
    For i=1:1:allergies.Count() {
        Set $LI(list,i)=allergies.GetAt(i).Allergen.Description
        }
    Quit list
}
Notice the following points:
-
The %ListOpens in a new tab class is equivalent to the $List format.
-
The second argument to %OpenId() specifies concurrency locking. If this argument is zero, you are opening the object without checking for other users of the object, for speed. Because you are only reading a value from the object, this technique is safe even in a multi-user environment.
-
If there are no allergies, this method returns the string No Data Available, which becomes a member of the level, in exactly the same way as other returned strings.
Tip:You can place this utility method within the cube class. Also, you can easily test the method within the Terminal.
-
-
Within the Architect, when defining the level, do the following:
-
For Expression, invoke the utility method and pass %source.%ID to it as an argument. For example:
##class(Cubes.StudyPatients).GetAllergies(%source.%ID) -
Select List.
-
If the source value is a character-separated list, then for List delimiter, specify the character used to delimit the list.
If this is null, DeepSee assumes that the source value is in $List format.
-
Examples
In the SAMPLES namespace, the Patients cube provides the following examples of list-based levels:
-
The Allergies level is based on a source expression that uses a utility method to return a list.
-
The Allergy Severities level is based on a source expression that uses a utility method to return a list.
-
The Diagnoses level uses a property that is in $List format.
Defining a Time Level
A time level groups the data according to a date/time value in the data (such as a birth date, order date, response date, and so on). This section describes how to create this type of level. It discusses the following topics:
Introduction
A time level is a level defined within a time dimension. For an example of a set of time levels, see the BirthD dimension in the Patients cube. The BirthD dimension is based on the BirthDate property in the source class. This property contains the patient’s birth date.
Each level in this dimension uses an option called Time function to extract a specific part of the birth date. For example, the Year level extracts the year part of the date.
As a result:
-
The Decade level has members such as 2010s, 2000s, 1990s, and so on.
-
The Year level has members such as 2009, 2008, and so on.
-
The Quarter Year level has members such as Q1 2009, Q2 2009, and so on.
-
The Period level has members such as 2009–01, 2009–02, and so on.
-
The Date level has members such as Jan 1 2009, Jan 2 2009, and so on.
-
The order of levels within the hierarchy H1 establishes that the Decade level is the parent of the Year level. For example, the member 1990s is the parent of the members 1990, 1991, 1992, and so on.
Similarly, the Year level is the parent of the Quarter Year level. For example, the member 2009 is the parent of the members Q1 2009, Q2 2009, and so on.
With time levels, you can use a special member called NOW, which uses the current date (runtime) and accesses the appropriate member of the level.
By default, DeepSee uses the Gregorian calendar. You can instead use a Hijri calendar. In that case, the member names are different from those listed here (and the records are assigned to members as suitable for that calendar).
Using the Locale to Control the Names of Time Members
When you build a cube, DeepSee can use the current server locale to determine the names of members of any time dimensions. It is useful to check the relevant option, as follows:
-
In the Management Portal, select System Administration > Configuration > National Language Settings > Locale Definitions.
This page displays the current server locale.
-
Examine the setting of the option Use locale date/time/number formats and change it if needed.
If this option is Yes, then DeepSee considers the locale shown on this page when it builds or synchronizes the members of time dimensions.
If you later change the locale, it is necessary to recompile and rebuild the cube.
Also, see “Locale Definitions” in the Caché Additional Configuration Settings Reference.
Defining a Time Level
To define a time level:
-
Define a dimension as described earlier, with two changes:
-
For Dimension Type, choose time.
-
For Calendar, choose gregorian (the default) , hijri (tabular), or hijri (observed).
This option specifies the calendar to use when assigning source records into members of levels of this dimension.
-
Specify either Property or Expression.
If you specify Property, the property should be one of the following types: %DateOpens in a new tab, %MV.DateOpens in a new tab, %TimeOpens in a new tab, %TimeStampOpens in a new tab, %FilemanDateOpens in a new tab, %FilemanTimeStampOpens in a new tab, or a custom data type that meets the requirements given in the second subsection.
If you specify Expression, the source expression must return data in $Horolog format. The value can be null but cannot equal 0 (the value 0 causes a validation error when the cube is built).
When you define the dimension, the system creates the dimension and a hierarchy.
-
-
Define a level within this hierarchy.
In this case, you will see different options than you saw for a data dimension.
-
For Extract value with function, choose a function that extracts the desired part of the date/time value. Use one of the values in the following table. Note that for a Hijri calendar, not all functions are supported.
Time function How Value Is Stored How Value Is Displayed Available in Hijri Time Dimensions? MinuteNumber 60958,5083 01:24 Yes HourNumber 60958,5083 1am Yes DayMonthYear 60958 Nov 24 2007 Yes DayNumber 24 24 Yes WeekYear 2007W47 2007W47 No WeekNumber 47 47 No MonthNumber 11 November Yes MonthYear 200711 November 2007 Yes QuarterNumber 4 Q4 Yes QuarterYear 20074 Q4 2007 Yes Year 2007 2007 Yes Decade 1950 1950s Yes DayOfWeek 1 Sunday No -
For Time Format, optionally specify a format string that describes how the dates should be displayed. For details, see the first subsection.
-
If you are using the Hijri (observed) calendar, use the class %Calendar.HijriOpens in a new tab to add lunar observations.
For details, see the class reference for %Calendar.HijriOpens in a new tab.
For the WeekYear and WeekNumber functions, DeepSee follows the ISO 8601Opens in a new tab standard, which assigns a week number (from 1 to 53) for every date within a year. Because 7 is not a factor of 365 or 366, some years have 53 weeks. The first week of a year is defined as the week that contains the first Thursday of the year. That means for some years, January 1 is in the last week of the prior year. Similarly, December 31 may be in the first week of the next year.
Specifying a Time Format
For a level within a time-type dimension, the Time Format specifies the format of the display names of the members of the level. DeepSee applies this formatting at query execution time. There is no effect on how values are stored or indexed.
For the Time Format attribute, you specify a string that consists of the following case-sensitive date pieces and other pieces:
| Piece | Replaced By |
|---|---|
| y | Year number |
| q | Quarter number |
| mmmm | Full month name |
| mmm | Short month name |
| mm | Month number with leading 0 if needed |
| m | Month number without a leading 0 |
| dddd | Full day name |
| ddd | Short day name |
| dd | Day number of the month with leading 0 if needed |
| d | Day number of the month without a leading 0 |
| \x | x |
| period (.), slash (/), hyphen (-). space | Unchanged |
| other characters | Ignored |
All names are based on the current server locale. See “Using the Locale to Control the Names of Time Members,” earlier in this chapter.
For time levels, member display names must be unique. Also, a member can have exactly one display name. These rules mean that not all the preceding date pieces are appropriate for all time levels.
The following table lists the date pieces that are suitable for different time levels.
| Kind of Level (Setting for Extract value with function) | Suitable Date Pieces | Default timeFormat | Other Examples |
|---|---|---|---|
| Year | y | y (2004) | \F\Y y (FY 2004)
\F\Y (FY2004) |
| QuarterYear | y, q | \Qq y
(Q3 2004) |
\Qq \F\Y y (Q1 FY 2004)
\Qq \F\yy (Q1 FY2004) |
| QuarterNumber | q | \Qq (Q3) | |
| MonthYear | y, mmmm, mmm, mm, m | mmmm y (February 2004) | mmm y (Feb 2004)
y-mm (2004–02) mm/y (02/2004) m/y (2/2004) \F\Yy-mm (FY2004-02) |
| MonthNumber | mmmm, mmm, mm, m | mmmm (February) | mmm (Feb)
mm (02) m (2) |
| DayMonthYear | y, mmmm, mmm, mm, m, dddd, ddd, dd, d | mmm dd y
(Feb 1 2004) |
mmmm dd y (February 03 2010) y-mm-dd (2010-02-03) mm/dd/y (02/03/2010) m/d/y (2/3/2010) dddd, mmmm dd y (Wednesday, February 03 2010) ddd, mmm dd y (Wed, Feb 03 2010) |
| DayNumber | dd, d | d (1) | dd (01) |
| DayOfWeek | dddd, ddd, dd, d | dddd (Tuesday) |
dd (03) d (3) |
Using a Custom Data Type
You can base a time level directly on a property that uses a custom data type, in any of the following scenarios:
-
In the first scenario, the data type stores data as $Horolog date (that is, as the first part of a $Horolog string). The results depend on the ClientDataType of the data type class:
-
If ClientDataType is DATE or is unspecified, DeepSee does not convert the value.
-
If ClientDataType is MVDATE, DeepSee treats the value as an MV date and converts it to a $Horolog date (with no time).
-
If ClientDataType is FDATE, DeepSee treats the value as a Fileman date (%Library.FilemanDateOpens in a new tab) and converts it to a full $Horolog date.
-
If ClientDataType is FTIMESTAMP, DeepSee treats the value as a Fileman timestamp (%Library.FilemanTimeStampOpens in a new tab) and converts it to a full $Horolog date.
-
-
In the second scenario, the data type stores data in ODBC date format. The ClientDataType of the data type class must be TIMESTAMP. DeepSee converts the value to a full $Horolog date.
-
In the third scenario, the data type stores data as a $Horolog time (that is, as the second part of a $Horolog string). The ClientDataType of the data type class must be TIME. DeepSee converts the value to a full $Horolog date. (The date is arbitrarily chosen, so you should use this data only for hour and minute levels.)
See the implementation of %ConvertDate() in %DeepSee.UtilsOpens in a new tab.
Time Levels and Hierarchies
As noted earlier, the order of levels in a hierarchy affects how the members of the levels are created. For any two adjacent levels in the same hierarchy, the first level (level A) becomes the parent of the second level (level B). The hierarchy is a parent-child hierarchy, which means the following:
-
Any member of level A is the parent of one or more members of level B.
-
Any member of level B is the child of exactly one member of level A.
-
Any record that belongs to a given member of level B must always belong to the same member of level A.
Therefore, a level based on Year cannot be the parent of a level based on Quarter, for example. Consider two patients, one born in Q3 2007 and one born in Q3 1982. These two patients both belong to the same member (Q3) of the Quarter level but belong to different members (2007 and 1982, respectively) of the Year level.
As another example, a level based on Month cannot be the parent of a level based on WeekNumber. Since a week can fall between two months, any record that belongs to a week member does not necessarily belong to the same month member.
The following table lists time levels and their typical child levels. For reference, it also shows example members of each level:
| A Level Based on the Time Function... | Has Members Like This... | Child Level Is Typically Based on the Time Function... | Notes |
|---|---|---|---|
| Decade | 1950s | Year, QuarterYear, MonthYear, or DayMonthYear | These levels use all parts of the date |
| Year | 2007 | QuarterYear, MonthYear, or DayMonthYear | |
| QuarterYear | Q4 2007 | MonthYear or DayMonthYear | |
| MonthYear | November 2007 | DayMonthYear | |
| WeekYear | 2007W47 | WeekNumber | |
| DayMonthYear | Nov 24 2007 | No typical child level | |
| QuarterNumber | Q4 | MonthNumber | These levels are independent of the year |
| MonthNumber | November | No typical child level | |
| WeekNumber | 47 | No typical child level | |
| DayNumber | 24 | No typical child level | These levels are independent of the year and independent of the part of the year |
| DayOfWeek | Wednesday | No typical child level | |
| HourNumber | 1am | MinuteNumber | These levels are independent of the day |
| MinuteNumber | 01:24 | No typical child level |
Handling a Calendar That Has a Date Offset
In some cases, you may need a time level to match a financial calendar that includes a date offset. For example, in many companies, the financial year starts 1 Oct. Consider the following pivot table:
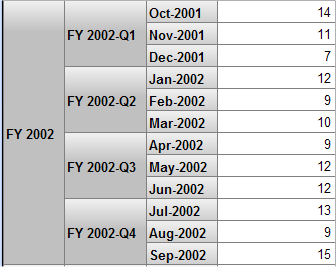
In the innermost grouping, this pivot table groups the records by the actual period (year and month, combined). For example, there are 14 records associated with the actual period October 2001. The periods are grouped into fiscal quarters, and the fiscal quarters are grouped into fiscal years. Note that the quarter FY 2002–Q1 includes October, November, and December of 2001.
For such a time level, edit the cube class in Studio and specify the timeOffset and timeFormat properties of the <level> element. For the example shown here:
-
For the first two levels (the levels with members such as FY 2002 and FY 2002–Q1), timeOffset is "-3m" (which subtracts three months from the date values used by these levels).
-
For the third level (the level with members such as Oct-2001), timeOffset is not specified, and thus this level uses the actual date values.
For information, see “Specifying a Date Offset” in the appendix “Reference Information for Cube Classes.”
Examples
The SAMPLES namespace provides the following examples of time levels:
-
In the Patients cube, see the BirthD, BirthQD, and BirthTD dimensions.
-
In the HoleFoods Sales cube, see the DateOfSale level.
Defining Custom Time Levels
You can define custom levels that use time in other ways. To do so:
-
Create a dimension whose Type is data (not time).
-
For each level, specify a value for Expression that returns the desired value.
-
See “Specifying the Sort Order for the Members,” later in this chapter.
By default, the members are sorted alphabetically.
Example
In the Patients cube in the SAMPLES namespace, see the BirthWeekdayD dimension. For this dimension, Expression is as follows:
$system.SQL.DAYNAME(%source.BirthDate)
This method executes the DAYNAME() method in the %SYSTEM.SQLOpens in a new tab class. That class provides a large set of methods that handle date values.
With this dimension, you can create pivot tables like this:
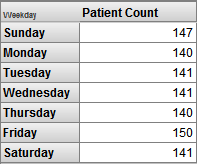
This sample dimension defines only a single level. With the appropriate logic, you can define a hierarchy with weeks, months, and quarters in a 4–4–5 calendarOpens in a new tab, for example.
Defining an Age Level
An age level groups the records according to an age value in the data, relative to the cube build date. For example, it could group patients by their ages (as computed at cube build time).
To keep age levels accurate, it is necessary to rebuild the cube; the DeepSee cube synchronization feature has no effect on them. Thus, age levels are not generally recommended. If you need to group records by age, InterSystems recommends that you instead define calculated members; see “Defining Age Members,” later in this book.
To define an age level:
-
Define a dimension as described earlier, with two changes:
-
For Type, choose age.
-
Specify either Property or Expression.
Important:If you specify Property, the property must be in $Horolog format or must be of type %TimeStampOpens in a new tab (or a subclass).
If you specify Expression, the source expression must return data in $Horolog format.
When you define the dimension, the system creates the dimension and a hierarchy.
-
-
Define a level within this hierarchy.
In this case, you will see different options than you saw for a data dimension.
-
For Extract value with function, choose a function that extracts the desired part of the time value. Use one of the following values:
-
"Days" – Use this to determine the age in days.
-
"Months" – Use this to determine the age in months.
-
"Years" – Use this to determine the age in years.
-
Note that the Patients sample does not demonstrate this type of level; the Age, Age Bucket, and Age Group levels group patients in the fictitious study according to their ages at the date of the study; this is common practice with retrospective studies.
Specifying a Range Expression
For any level in a data dimension, you can use the Range expression option. This option lets you use new values in the place of the actual source values. For numeric data, this transformation can replace source values with discrete bins. For any data, this transformation can specify replacement strings.
In either case, the new values become the names of the members of the level. The values also become the keys for the members.
To specify a range expression:
-
Click the Find button
 next to the Range expression field.
The Architect displays a page like the following:
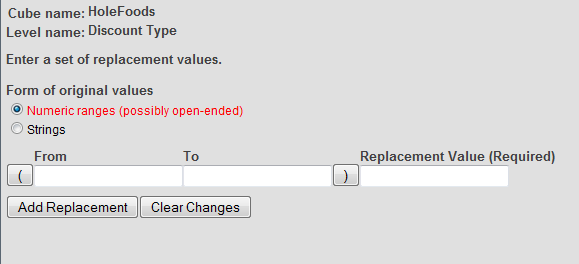
-
For Form of original values, choose either Numeric or Strings.
This choice affects the form of this page.
-
Add a series of replacements as follows:
-
To add a row to the end of the table, click Add Replacement.
Then enter details as given in the following subsections.
-
To remove a row, click the X button for that row.
The order of the rows determines the default sort order of the members of this level.
-
-
Click OK to close this page.
The Range expression field now shows something like this (for numeric bins):
(,0]:None;(0,0.2):1-19%;[0.2,0.5):20-49%;[0.5,1]:50%+;Or this (for string data):
NONE:None;MINR:Minor;SERS:Serious;FATL:Fatal;UNK:Unknown;
To make member names localizable, see “Manually Specifying the Members of a Level,” in the chapter “Using Additional Advanced Features of Cubes and Subject Areas” in the Advanced DeepSee Modeling Guide.
Defining Numeric Bins
When you define numeric bins, the Range Expression editor looks like this:
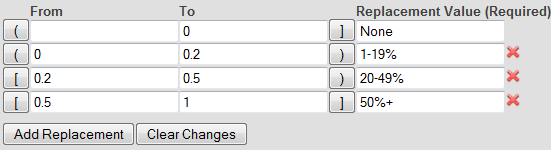
Each row in this table defines a numeric bin as follows:
-
The button at the left end of the line indicates the form of the lower limit — inclusive
 or exclusive
  .
.When there is no lower limit, this option has no effect.
If the lower limit is inclusive, that means that exact value of From is included in the range. If the lower limit is exclusive, that means that From is not in the range.
-
From indicates the lower limit of the bin, if any.
-
To indicates the upper limit of the bin, if any.
-
The button at the right end of the line indicates the form of the upper limit — inclusive
 or exclusive
  .
.When there is no upper limit, this option has no effect.
-
Replacement Value specifies the string to use as a member name for this level. Any record whose source value falls within the defined range is assigned to this member.
This value is also the key for the member.
For this level, DeepSee ignores records whose source values do not fall into any of the given bins.
Defining String Replacements
When you define string replacements, the Range Expression editor looks like this:
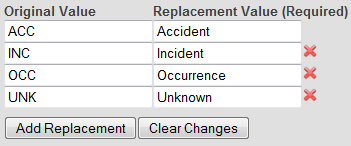
Each row in this table defines a string replacement as follows:
-
Original Value specifies a possible value of the source property or source expression of this level.
-
Replacement Value specifies the string to use as a member name for this level. Any record whose source value matches the given Original Value is assigned to this member.
This value is also the key for the member.
For this level, DeepSee ignores records whose source values do not match any of the given original values.
Examples
The SAMPLES namespace provides the following examples of range expressions:
-
In the Patients cube, see the Age Group level.
-
In the HoleFoods Sales cube, see the Discount Type level.
Configuring a Level to Use Display Values
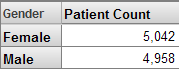
A Caché class property can have both a stored value and a displayed value, via the VALUELIST and DISPLAYLIST property parameters. For example:
Property Gender As %String(VALUELIST = ",F,M", DISPLAYLIST = ",Female,Male");When you use such a property as a level, by default, the system uses the value given in the VALUELIST parameter.
In the level definition, if you select the Use value in DISPLAYLIST option, the system uses the value given in the DISPLAYLIST parameter instead. For example:
Examples
The SAMPLES namespace provides the following examples of levels that use the Use value in DISPLAYLIST option:
-
The Gender level in the Patients cube.
-
The Channel Name level in the HoleFoods Sales cube.
Using Property Values as the Member Names
By default, the source values for a level become the names for the members of the level.
You can instead specify the member names by defining a property for this level and using the values of that property as the member names. This is useful in the following scenarios:
-
To enable member names to be accessed at runtime — Values of properties can be accessed at runtime (the same is not true for levels).
-
To provide user-friendly member names for members — In some cases, you must base a level on a unique value that is not user-friendly. For example, suppose that you have a level based on the patient’s primary care physician. People’s names are not reliably unique, so you would have to base the level on a unique doctor identifier instead, which might have no meaning for the users. In this case, you would also define a property that accesses the doctor’s name, and you would use that property as the name of the member.
To use property values as the names for members of a level:
-
Define a property for this level, as described in the next chapter.
Each member of the level has a value for this property.
-
For this property, select the Use as member names option.
-
Optionally, to retrieve the property value at runtime, select the Get value at run time option.
If you use this option, note the following requirement: For the parent level (the level that contains the property), the source property or source expression of that level must evaluate to an ID. The system assumes that (at least for this level), the source data is normalized. That is, for the level, the data is in a different table and the source table contains a link to that table.
Examples
The SAMPLES namespace provides the following examples of levels that have properties with Use as member names, Get value at run time, or both:
-
The DxDoc level in the Patients cube. This level has the property Name, which is configured with Use as member names. The DxDoc level is based on the unique ID of the doctor. Depending on the number of patients you generate, you may see multiple doctors with the same name. Because of how this level is defined, those doctors are not combined with each other.
-
The City level in the Patients cube. This level has the property Name, which is configured with Use as member names and with Get value at run time.
-
The City and Channel Name levels in the HoleFoods Sales cube. These levels have properties that are configured with Use as member names.
-
The Product Name level in the HoleFoods Sales cube. This level has a property that is configured with Use as member names and with Get value at run time.
Specifying Tooltips for Members
When a user hovers the cursor near a member name in the Analyzer, DeepSee displays a tooltip. By default, the member name is the tooltips. You can specify additional information to display in these tooltips for any level. To do so:
-
Add a property to that level. For the source value, use a value that contains the desired tooltips.
-
In Studio, edit the cube definition and modify the newly added property. For this property, specify the isDescription attribute as "true". See <property> in the appendix “Reference Information for Cube Classes.”
Now the tooltip is the member name, followed by a hyphen, followed by the value of the specified property. For example:
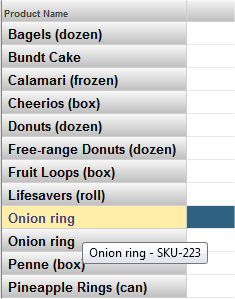
This is useful when you want to use short member names, for reasons of space, but also need to provide a fuller description of each member.
Specifying the Sort Order for Members
This section describes how to control the sort order for members of a level.
For a Data Level
For a data level, by default, members are sorted as follows:
-
If the level does not use a range expression, the members are sorted in increasing order by name (using alphabetic sort, no matter what form the names have).
-
If the level uses a range expression, the members are sorted in the order determined by the range expression. That is, the first member is determined by the first replacement in the range expression, the second member is determined by the second replacement, and so on.
To change the sort order for the members of a data level, use any of the techniques described in the following subsections.
Specifying the Level Sort Option
The simplest way to specify the sort order for members of a level is to set the Sort option for the level. Select asc, asc numeric, desc, or desc numeric.
asc and desc sort members alphabetically, in ascending or descending order, and asc numeric and desc numeric sort numerically, in ascending or descending order.
Sorting Members by Property Values
To sort the members of a level in order by property values:
-
Define a property for this level, as described in the next chapter.
Each member of the level has a value for this property.
-
For this property, select asc, asc numeric, desc, or desc numeric for Sort members by property value.
asc and desc sort members alphabetically, in ascending or descending order; asc numeric and desc numeric sort numerically, in ascending or descending order.
(By default, no value is selected, and the property does not affect the sort order of the members.)
If you specify Sort members by property value within more than one property of a level, the members are sorted by the first of those properties. Then they are subsorted by second of those properties, and so on.
For an example, see the Patients cube in SAMPLES namespace. In this cube, the Allergy Severities level has a property that is configured with Sort members by property value. This property is based on a source expression that returns a numeric value.
Using Property Names as Member Names
An alternative approach, similar to the preceding, is as follows:
-
Use a source expression for the level that forces the members in the desired order, even if the member names are not desirable.
-
Define a property for this level, as described in the next chapter.
-
For this property, specify a source value or source expression that returns a better name for each. For this property, select the option Use as member names.
Listing the Members in the Desired Order
To list the members in the desired order, edit the cube class to add <member> elements to the level. For information, see “Manually Specifying the Members of a Level,” in the chapter “Using Additional Advanced Features of Cubes and Subject Areas” in the Advanced DeepSee Modeling Guide.
For a Time Level
By default, members of a time level as sorted in increasing order by time.
To specify a different sort order for the members, specify Sort option. Choose either asc (ascending in time) or desc (descending in time).
Making the Member Names Localizable
For cubes as well as dimensions, hierarchies, levels, and other cube elements, you can specify the Display name value, for which you can later define translations in different languages. The same technique is available for members of a level, if you know all the members in advance and if you edit the cube class in Studio. See “Manually Specifying the Members of a Level,” in the chapter “Using Additional Advanced Features of Cubes and Subject Areas” in the Advanced DeepSee Modeling Guide.
For a time dimension, the current locale determines the names of members of a time dimension. (See “Using the Locale to Control the Names of Time Members,” earlier in this book.) If you change the locale, it is necessary to recompile and rebuild the cube.
Defining Dependencies Between Levels in Different Hierarchies
In some cases, there is a virtual dependency between levels that are not in a hierarchy with each other. For example, you might have a cube with a Country level and a Product level. These levels are logically independent from each other; theoretically any product could be sold in any country. It would not make sense to put these levels into a hierarchy in the same dimension.
But if specific products are sold only in specific countries, there is a virtual dependency between these levels. When a user selects a country, it is desirable to show only the products appropriate for that country. In such a case, you can add a dependency between the levels as follows:
-
Open the cube class in the Architect.
-
Find the definition of the dependent level.
-
Edit the value of the Depends on option. Use a value like the following:
[dim].[hier].[level]Where dim is the name of the other dimension, hier is the name of the hierarchy, and level is the name of the level. [dim].[hier].[level] is the MDX identifier of the level.
For example:
[Region].[H1].[Country]If the level depends on multiple levels, specify a comma-separated list. For example:
[dim1].[hier1].[level1],[dim2].[hier2].[level2]You could also specify a relationship instead of a level.
This option attribute adds another index to the fact table and consequently consumes more disk space. Use this attribute sparingly. Also, this option is completely unrelated to the DependsOn compiler keyword.
Example
To see how this feature works, try the following demonstration:
-
In the Architect, open the Patients cube.
-
Edit the Patient Group level of the PatGrpD dimension. Specify Depends on as follows:
[HomeD].[H1].[ZIP] -
Save and compile the cube.
-
In the Terminal, execute the ReassignPatients() method in DeepSee.PopulateOpens in a new tab, in the SAMPLES namespace:
d ##class(DeepSee.Populate).ReassignPatients()This method modifies the data for this sample so that there is a virtual dependency between the Patient Group level and the ZIP code level. Patients in specific ZIP codes belong either to Patient Group A or no group; patients in the other ZIP codes belong either to Patient Group B or no group.
The method synchronizes the cube, so there is no need to rebuild this cube after executing this method.
Then open the Basic Dashboard Demo and try the Home ZIP Code and Patient Group filters. When you choose a ZIP code, that affects the list in the Patient Group filter.
Specifying the Field Names in the Fact Table
When you compile a cube class, DeepSee generates a fact table class and some related classes. When you build a cube, DeepSee populates these tables, which are described in “Details for the Fact and Dimension Tables.”
By default, DeepSee generates the names of the fields in the fact table, but you can specify the field names to use instead. To do so, specify a value for the Field name in fact table option for each applicable level. Take care to use unique names. This option is not available for time levels or iKnow levels.
For Field name in fact table, be sure not to use an SQL reserved word. For a list of the SQL reserved words, see “Reserved Words” in the Caché SQL Reference. The name must start with either a letter or a percent sign (%). If the first character is %, the second character must be Z or z. For more details on restrictions, see “Class Members” in the appendix “Rules and Guidelines for Identifiers” in the Caché Programming Orientation Guide. Also, do not use fact or listing, in any combination of lowercase and uppercase characters.