Shadowing
Shadowing enables secondary computers to maintain a “shadow” copy of selected databases as they are updated on a primary machine. By continually transferring journal information from the primary machine to the secondary machines, shadowing enables recovery to a system which is typically within only a few transactions of the source database.
You can use shadowing for many purposes, each with its own set of important considerations depending on your system environment. Some of the most common objectives satisfied by shadowing include the following:
-
Disaster recovery, the most common use; it is simple and inexpensive.
-
Read-only report server where ad hoc reporting tasks can operate on current data without affecting production.
-
Low-budget replication where the databases are replicated on the shadow instance using journaling.
This chapter discusses the following topics:
Shadowing Overview
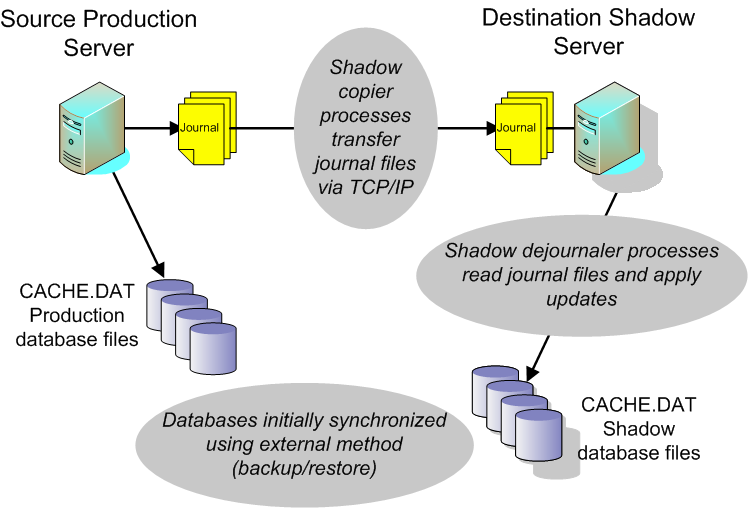
A primary Caché instance may have one or more shadows. Shadowing monitors database activity on a primary system, the source, and causes the same activity to occur on a secondary system, the destination. It does this through a shadow client service running on the destination that continually requests journal file details from a shadow service running on the source. The shadow service responds by sending the details of the actual Set, Kill, and $Bit journal record entries to the destination shadow over a TCP connection.
The source and destination servers can be of different hardware, operating system, or CPU chipset. To avoid data incompatibility, however, the destination shadow Caché instance must use the same character width (8-bit or Unicode; see Caché Character Width in the Caché Installation Guide) and the same locale (see Using the NLS Settings Page of the Management Portal in the “Configuring Caché” chapter of the Caché System Administration Guide) as the source Caché instance. The one exception to this requirement is that an 8-bit instance using a locale based on the ISO 8859 Latin-1 character set is compatible with a Unicode instance using the corresponding wide character locale. For example, an 8-bit instance using the enu8 locale can be configured as the shadow source database server with a Unicode instance using the enuw locale as the destination shadow.
All shadowing uses a fast transmission method which allows more efficient performance by sending the compacted journal file block by block. The shadow applies all transactions to the local databases. The transmission mode requires the data to be written to the journal file, which may introduce a delay of a few seconds. The shadow establishes a TCP connection to the server and receives the journal file. As the journal file downloads, another shadow process applies the journal entries to the local destination copy of the database.
Upon connecting to the data source server, the destination shadow sends the server the name of the journal file and the starting point. The shadow checks for new records periodically. If it does not have the latest records, the shadow downloads them and updates the databases. During these processes, Caché continually stores checkpoints in a shadow global to facilitate rollback and restart capabilities.
Caché purges the destination shadow copies of source journal files automatically. You can configure how long to keep files that are eligible for purging, that is, ones that have been dejournaled and do not contain any open transactions.
Configuring Shadowing
This section explains how to configure and set up shadowing in Caché and includes the following procedures:
If you want to configure both mirroring and shadowing for the same databases, bear in mind the following guidelines:
-
If the mirror has only one failover member, you can configure the failover member as the shadow source; you can also configure an async member as the source.
-
If the mirror has two failover members, you must configure an async member as the shadow source; you cannot configure a failover member as the source.
-
To shadow both mirrored and non-mirrored databases on a mirror member, you must configure separate mirrored and non-mirrored shadows.
-
To shadow databases from two or more different mirrors on an async member, you must configure a separate shadow for each mirror.
See the “Mirroring” chapter of the Caché High Availability Guide for information about configuring mirroring.
Configuring the Source Database Server
Before enabling shadowing on a source database server, ensure that the destination system can make a TCP connection to the source system. If you plan to secure this connection using SSL, a %SuperServer SSL/TLS configuration must exist on the source. See Configuring the Caché Superserver to Use SSL/TLS in the “Using SSL/TLS with Caché” chapter of the Caché Security Administration Guide for details.
A shadow service cannot run on a system with a single-server license.
Use the Management Portal from the Caché instance running on the source system to enable the shadow service, restrict connections, and enable global journaling for the databases you are shadowing. These procedures are described in the following topics:
For information on methods and queries available for interfacing with the data source of a shadow without using the Management Portal, see the SYS.Shadowing.DataSourceOpens in a new tab class documentation in the InterSystems Class Reference.
Also see the Important Journaling Considerations section for issues that may pertain to your environment.
Enable the Shadowing Service
To use shadowing, you must enable the shadowing service using the Security Management portion of the Management Portal. You may also restrict shadowing access by entering the IP addresses of allowed connections:
-
Navigate to the Services page of the Management Portal (System Administration > Security > Services).
-
Click %Service_Shadow in the list of service names to edit the shadow service properties.
-
Select the Service enabled check box. Before clicking Save, you may want to first restrict what IP addresses can connect to this database source. If so, perform the next step, and then click Save.
-
In the Allowed Incoming Connections box, any previously entered server addresses are displayed in the IP Address list. Click Add to add an IP Address. Repeat this step until you have entered all permissible addresses.
You may delete any of these addresses individually by clicking Delete in the appropriate row, or click Delete All to remove all addresses, therefore allowing connections from any address.
Enable Journaling
Verify that you are journaling each database that you wish to shadow.
-
Navigate to the Local Databases page of the Management Portal (System Administration > Configuration > System Configuration > Local Databases) and view the Journal column for each database you wish to shadow.
-
To change the journal state from No to Yes, click Edit in the row of the appropriate database to edit the database properties.
-
In the Global Journal State list, click Yes and then click Save.
By default, the CACHELIB, CACHE, DOCBOOK, and SAMPLES databases are not journaled and, as a result, you cannot shadow them — CACHETEMP is never journaled.
Important Journaling Considerations
Review the following sections for conditions that may affect your system:
Managing Source Journal File Purging
Caché does not do any special handling of journal file purging on the source for shadowing; therefore, it is your responsibility to configure the journal settings on the source to ensure the journal files that the shadow requires remain available until they are transmitted to the destination shadow.
This is usually only a concern if the shadow falls seriously behind the source; for example, if you suspend the shadow or stop it for a prolonged period of time.
Responding to Disabled Source Journaling
If journaling is disabled on the source, you must determine the best course of action to maintain a valid shadow. Most likely, you will have to resynchronize the shadow with the source after you resolve the condition that caused Caché to disable journaling.
See the Journal I/O Errors section of the “Journaling” chapter of this guide for more details.
Shadowing Class Compiles
Caché journals the database that contains the globals used for compiling classes. If you use shadowing and rely on the compile on the source to update the application code on the shadow, ensure that the default qualifier (compile with /journal=1) is not changed, so that each class compile is journaled and the updates transferred to the shadow database. If class compiles are not journaled, you cannot use the shadow for disaster recovery unless you recompile all your classes.
Configuring the Destination Shadow
To configure shadowing on a destination shadow server, first ensure that the destination system can make a TCP connection to the source system.
If you plan to use SSL, an SSL/TLS client configuration must exist on the destination. See A Note on Caché Client Applications Using SSL/TLS in the “Using SSL/TLS with Caché” chapter of the Caché Security Administration Guide for details.
Use the Management Portal from the Caché instance running on the destination system to configure the destination shadow properties, map and synchronize the databases in the shadow, and start shadowing. These procedures are described in the following sections:
For information on methods and queries available for interfacing with the shadow destination without using the Management Portal, see the SYS.Shadowing.ShadowOpens in a new tab class documentation in the InterSystems Class Reference.
Define the Shadow
Navigate to the Shadow Server Settings page of the Management Portal (System Administration > Configuration > Connectivity > Shadow Server Settings) and perform the following steps to define the shadow properties:
-
Click Create Shadow Server to define a shadow on this destination server.
Important:You can shadow a failover mirror member only if it is the only failover member in the mirror; if a mirror has two failover members, you must shadow an async member instead. See Configuring Shadowing for more information about shadowing mirrored databases..
-
Enter an identifying name for this shadow in the Name of the shadow box. This value is also referred to as the shadow ID. The system uses this name to distinguish between shadow instances that may be running on the same system.
Note:Do not use the tilde (~) character in the shadow name; it is used in internal shadow processing.
-
Enter the TCP/IP address or host name (DNS) of the source database server you are shadowing in the DNS name or IP address of the source box.
-
Enter the superserver port number of the source Caché instance you are shadowing in the Port number of the source box.
Important:If you change the IP address or the port number on a suspended shadow, it is your responsibility to ensure the shadow can resume properly.
-
Click Advanced to enter the following optional fields:
-
Journal file directory — Enter the full name, including the path, of the journal file directory on the destination shadow system. Click Browse for help in finding the proper directory. Consider the following when updating this entry:
-
If you are shadowing more than one source instance on this destination, ensure you use a unique journal file directory for each instance.
-
If you change the journal file directory on a cluster shadow, the change only takes affect for journal files from new cluster nodes until you stop and restart the shadow.
-
-
SSL Configuration — Choose from the list of existing client configurations; leave this entry blank if you do not wish to use SSL for the shadow connection. The shadow connection to the source fails if either of the following two conditions exist:
-
The source does not support SSL, but you choose an SSL configuration.
-
The source requires SSL, but you do not choose an SSL configuration.
-
-
Filter routine — Enter the name (omit the leading ^) of an optional filter routine the shadow uses to filter journal records before dejournaling them on the shadow. The routine must be in the %SYS namespace and should take the following format
MyShadowFilter(pid,dir,glo,type,addr,time)Argument Description pid Process ID of the record (If the record has a nontrivial remote system ID, the pid contains two fields delimited by a comma (,): the first field is the process ID and the second is the remote system ID.
dir Source (not shadow) database directory glo Global reference in the form of global(subscripts), without the leading ^ type Type of the record; valid values are: “S” (SET), “s” (BITSET), “K”(KILL), “k” (ZKILL) addr Offset of the record in the journal file time Timestamp of the record In the filter routine logic, return 0 for the dejournaling process to skip the record; otherwise the shadow dejournals the record.
Caution:Perform the New command on any local variable in the filter routine to avoid accidentally overwriting the variables used in the shadow routine.
In the following example, the filter routine skips journal records for globals beginning with X (that is, ^X*, where * is the wildcard) during the dejournaling process and logs each record that is dejournaled; then, if the journal record includes an oldvalue and newvalue, and they are identical, it skips the journal record.
MyShadowFilter(pid,dir,glo,type,addr,time) { ;Sample Shadow Filter Routine // Disclaimer: This routine is for illustration purpose only. If $Extract($Piece(glo,"(",1),1)="X" { Do ##class(%Library.Device).Broadcast("","Skip updating "_glo) ;log Quit 0 } Do ##class(%Library.Device).Broadcast("",pid_","_dir_","_glo_","_type_","_addr_","_time) ;log // To retrieve more information about the record than provided -- Set jrecoref=##class(%SYS.Journal.Record).%OpenId(addr) ;open the record If jrecoref.%IsA("%SYS.Journal.SetKillRecord") && (jrecoref.NumberOfValues=2) && (jrecoref.NewValue=jrecoref.OldValue) { Do ##class(%Library.Device).Broadcast("","Skip applying the SET") ;log Quit 0 } Quit 1 }Important:Your shadow filter function should be simple and quick to prevent shadow latency. Ideally your shadow filter function will be a “pure”function, that is its results will depend only upon its inputs. The preceding example shows how to open and inspect the corresponding journal. This or any other deviation from a “pure”function should be taken with care, from both a performance and error handling perspective. You should take the following precautions:
-
Use a new frame to avoid changing any local variable belonging to your calling frames, and assure that all your local variables are killed when your function exits.
-
Do not use the TSTART, TCOMMIT, or TROLLBACK commands, or any command that indirectly involves transactions; for this reason, do not use dynamic SQL.
-
Avoid XECUTE and indirection, and do not use XECUTE or indirection on untrusted strings.
-
Do not call any routines or use any classes that do not follow these precautions.
Note:If you use dot syntax when referring to a global in your filter routine, you must use the leading ^.
You can specify the use of a filter routine in any of the following ways:
-
From the Shadow Server Settings page (System Administration > Configuration > Connectivity > Shadow Server Settings) when you choose to Add a New Server or Edit an existing shadow, enter the name in the Filter routine box in the Advanced settings.
-
Via ^SHADOW, edit a shadow.
-
-
Days of old copied journals to keep — Enter the number of days to keep the shadow copies of the source journal files. By default, the Caché destination purges its copy of a journal file as soon as it finishes dejournaling as long as it does not contain open transactions. You can keep the shadow copies of the journal files on the destination longer by entering a value in this field.
For example, if you enter 3, the shadow copy of a source journal file is eligible for purging if the source journal file is at least three days old, is completely dejournaled, and does not contain open transactions. The completion date of the source journal file determines its age.
-
Maximum error messages to keep — Enter the number of shadowing errors from 0 to 200 which Caché should retain. The default is 10.
-
Disable journaling of shadow updates — To prevent local journaling of the updates that this shadow applies to the shadow databases, regardless of the journal settings on the databases themselves, change the default setting of No to Yes.
InterSystems recommends that you journal all databases that are the destination of shadowing. This results in the destination shadow maintaining a journal of the shadow updates applied, which provides an additional level of redundancy.
Important:Be careful not to place local journal files in the same directory as the journal files coming from the shadow source.
Caution:If you choose not to journal shadow updates, the recommended method is to set Disable journaling of shadow updates to Yes, rather than disabling journaling for one or more of the destination shadow databases. If you do the latter and do not disable journaling on the destination’s CACHESYS database, there is the possibility that if the shadow crashes and is restarted, the journal checkpoint stored in the ^SYS global in CACHESYS could cause the shadow to be recovered to a point later in the journal stream than the last record committed to the shadow databases, effectively skipping some shadow updates.
-
-
Click Save to return to the Shadow Server Settings page, where the new shadow is now listed. When you click the Edit link to edit the settings, the Add database mapping link is now included on the Edit Shadow Server page; see Map the Databases for details.
Map the Databases
After you successfully save the configuration settings, you can add or delete database mappings from the source to the shadow:
-
Next to Database mapping for this shadow click Add to associate the database on the source system with the directory on the destination system using the Add Shadow Mapping dialog box.
-
In the Source database directory box, enter the physical pathname of the source database file—the CACHE.DAT file. Enter the pathname of its corresponding destination shadow database file in the Shadow database directory box, and then click Save.
-
Verify any pre-filled mappings and click Delete next to any invalid or unwanted mappings. Shadowing requires at least one database mapping to start.
-
Click Close to return to the Shadow Server Settings page (System Administration > Configuration > Connectivity > Shadow Server Settings).
If the source database server is part of a cluster, the configuration settings for the destination shadow differ slightly. For information on shadowing a clustered system, see the Cluster Shadowing section of the “Cluster Journaling” chapter of this guide.
You can use the CACHESYS database as a source database of shadowing, provided that the target (shadow database) is not the CACHESYS database on the shadow. Currently the only way to add a database mapping containing the source manager’s directory (CACHESYS) to a shadow configuration is by using the SYS.Shadowing.ShadowOpens in a new tab class API. For example:
 Set ShadowOref=##class(SYS.Shadowing.Shadow).%OpenId("MyShadow")
 Do ShadowOref.SetDatabaseToShadow("C:\MyCache\Mgr","D:\MyCacheShdw\Shdwsys")
 Set rc=ShadowOref.%Save()
Where C:\MyCache\Mgr is the source manager’s directory for the CACHESYS database and D:\MyCacheShdw\Shdwsys is the directory for a database that is not the CACHESYS database on the destination. See the SYS.Shadowing.ShadowOpens in a new tab entry in the InterSystems Class Reference for details.
Synchronize the Databases
Before you start shadowing, synchronize the databases on the shadow destination with the source databases. Use an external backup on the source data server and restore the databases on the destination shadow. See the “Backup and Restore” chapter of this guide for more information.
If the source and destination instances are on systems of different endianness (see “Platform Endianness” in the “Supported Technologies” section of the online InterSystems Supported PlatformsOpens in a new tab document for this release), the database restored to the destination shadow must be converted to the endianness of the source before being used; see Considering Endianness in the “Backup and Restore” chapter for procedures.
Managing and Monitoring Shadowing
Caché provides an interface to shadow processing through the Management Portal. You can also configure and manage shadow processing using the ^SHADOW utility or the SYS.Shadowing API classes, SYS.Shadowing.DataSourceOpens in a new tab and SYS.Shadowing.ShadowOpens in a new tab. This document describes the procedures using the Management Portal and gives some examples of using the shadowing APIs.
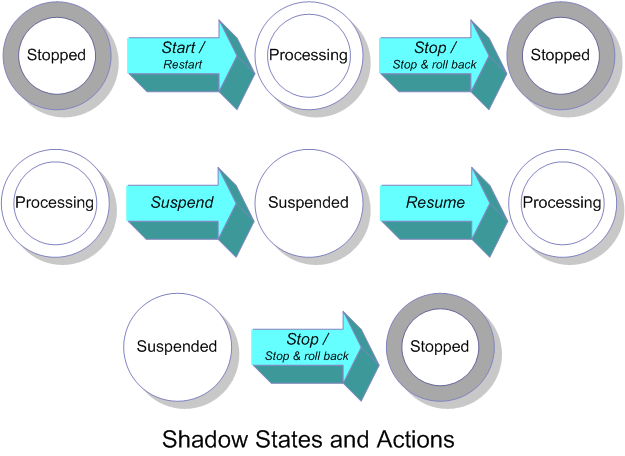
A shadow can be in one of three states; depending on the state, you can perform different actions on the shadow. The following sections describe each state and action including the interrelationships among them.
Shadow States and Actions
A shadow can be in one of these states at any given time:
-
Stopped — When a shadow is stopped, you can modify its properties. This is the initial state of a newly created shadow.
-
Processing — When a shadow is running, it applies database updates and you cannot modify its properties.
-
Suspended — When a shadow is suspended, it does not apply database updates but retains checkpoints (see Shadow Checkpoints). You can modify its properties, though some changes may not take effect immediately.
There are four types of allowable actions you can perform on a shadow, depending on its current state and your user privileges:
-
Start / Restart — Starts a stopped shadow from the starting point specified using Select Source Event or, in the case of a restart, from the appropriate checkpoint.
-
Stop (with or without rollback) — Stops a processing or suspended shadow. When you stop shadow processing, Caché offers you the choice whether or not to roll back any open transactions.
-
Suspend — Suspends a processing shadow. Contrary to stopping a shadow, when you suspend a shadow, Caché maintains its open transactions, journal files, and checkpoints.
-
Resume — Resumes a suspended shadow from where it left off, or from a selected checkpoint. When a fatal error occurs, a shadow aborts, entering the suspended state.
The following diagram shows the permissible actions on a shadow in each state. It indicates the shadow states with circles and shows the actions you can perform on these states with arrows.
Shadow Processing Considerations
Keep the following conditions in mind when deciding when and how to change the state of a shadow:
-
A stopped shadow does not start or restart automatically with a Caché restart; you must start or restart it explicitly as described in this chapter. Conversely, on Caché startup, a shadow that was not in stopped state in the previous Caché session resumes automatically.
-
You cannot start a suspended shadow; you must either resume processing or stop the shadow and then start it.
-
Avoid choosing to restart a shadow after you stop it with rollback. The shadow databases may be in an undetermined state until the shadow reaches the journal location of the last stop.
-
When an individual database in the shadow destination fails or is dismounted, shadowing for other databases in the shadow continues. When this happens, therefore, you must catch up the affected database after restoring or mounting it using the procedures in Synchronizing or Resynchronizing a Destination Database.
There are two places in the Management Portal that you can perform tasks on a defined shadow:
-
The Shadow Administration Tasks require system manager privileges. To get to the Create Shadow Server page, select System Administration > Configuration > Connectivity > Shadow Server Settings.
-
The Shadow Operation Tasks require operator privileges. To get to the Shadows page, select System Operation > Shadow Servers > System as Shadow Server.
See the individual method descriptions in the SYS.Shadowing.ShadowOpens in a new tab entry of the InterSystems Class Reference for details on performing these shadowing tasks programmatically.
Shadow Checkpoints
The system creates checkpoints periodically throughout the shadowing process. A checkpoint for the shadow is a location in the shadow copy of a source journal with the following implications:
-
All records at and prior to it are presumed to have been applied to the shadow databases.
-
It is safe, as far as database integrity is concerned, for the shadow to resume from the checkpoint after being suspended.
You can retrieve checkpoint information using the CheckPointInfo method of the SYS.Shadowing.ShadowOpens in a new tab class.
Shadow Administration Tasks
The Shadow Server Settings page (System Administration > Configuration > Connectivity > Shadow Server Settings) lists each defined shadow with the name, status, source name and port, start point, filter, and choices for performing actions on the shadow configuration. Click the following options to perform the indicated task:
-
Edit — Allows updates to the fields you entered when you added a new shadow. See Define the Shadow for descriptions of these settings. You cannot save edits if the shadow is processing.
-
Start — Starts shadow processing from a start point you select; option available if the shadow is stopped. See Start Shadowing for details.
-
Restart — Starts shadow processing from the appropriate checkpoint depending on whether or not you rolled back any open transactions when you stopped the shadow. See Restart Shadowing for details.
-
Stop — Stops shadow processing; option available if the shadow is processing or suspended. Select the Roll back open transactions check box if you want to roll back any open transactions. See Stop Shadowing for details.
-
Delete — Deletes the entire shadow definition; you must stop the shadow before deleting the shadow definition.
Start Shadowing
Once you add a shadow definition it appears in the list of shadows on the Shadow Server Settings page. You can start a shadow from this page:
-
Before starting the shadowing process, verify you have synchronized the databases you are shadowing on the source and destination and mapped the source databases to the corresponding destination databases.
-
Click Start in the row for the shadow name you want to start.
-
After verifying the location information for the source instance, click Select Source Event to choose where to begin shadowing. A page displays the available source events from the source journal file directory. You must select a source event before you can start shadowing. See Select a Source Event for details.
From the Management Portal, if you attempt to start a shadow that had been processing, you may see the following warning:
*** WARNING ***
There is a checkpoint from previous shadowing session.
You might want to RESTART the shadow from that
checkpoint instead.
If you do START, the checkpoint and any remaining
shadow copies of journal files from previous shadowing
session will be deleted.
Are you sure you want to start shadowing?
As this warning states, if you start a previously processing shadow, Caché clears all checkpoints and stores the start point you select as the first checkpoint. This process also purges any remaining shadow copies of the source journal files and fetches new copies form the source regardless of a possible overlap between the files. Ensure your new start point coincides with the state of the shadow databases.
If you run multiple shadows on an instance of Caché, see the Generic Memory Heap Considerations section for details on adjustments you may have to make.
Dismounting a database that is part of a running shadow (one that is in the Processing state) does not interrupt the shadow, meaning that other databases continue to be updated as the dismounted database falls behind. A dismounted shadow database causes a severe message to be posted to the console log and must be resynchronized with the shadow after being remounted, as described in Synchronizing or Resynchronizing a Destination Database.
Select a Source Event
While starting (or resuming) a destination shadow, you must select a source event from the journal files on the data source server where shadowing of the journaled databases should begin.
Click Select Source Event to display a list of journal events on the source database that are valid starting points for shadowing. From this list, click the time to specify at which source event shadowing starts. Choose the starting point after which you synchronized the databases on the source and destination.
For example, the system automatically switches the journal file after a successful backup. Before starting the shadowing process, synchronize the databases by restoring the successful backup file from the source on the destination shadow databases. On the shadow, click Select Source Event from the Shadow Server Settings page to see events listed similar to those in the following display:
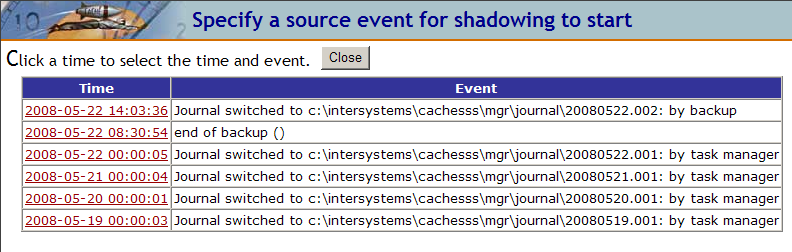
For this example, to start shadowing at the point when the source backup ended successfully (the point of database synchronization), click the Time (2008-05-22 08:30:54), of the Event displaying end of backup ().
Generic Memory Heap Considerations
The journal reader and database update processes on the shadow destination communicate via shared memory allocated from the generic memory heap size (also known as gmheap). Several processes in Caché use this memory and how Caché allocates it involves very complex interactions; therefore, Caché silently increases gmheap allocation during startup when necessary. In most cases, you should not have to manually adjust the allocation.
If you start multiple shadows at or near the same time while Caché is running, you may receive a gmheap allocation error. You can improve the allocation by starting the shadows as a group. If you start (or resume) multiple shadows one by one consecutively, the first shadow to start uses about half of the free gmheap memory; the second, half of what remains; and so on. In contrast, if you start multiple shadows as a group, every shadow in the group uses 1/(N+1) of the free gmheap memory, where N is the number of the shadows in the group. Thus, starting multiple shadows as a group not only avoids the possible error allocating memory from gmheap, but also allocates memory evenly among the shadows.
See the StartGroup method in the SYS.Shadowing.ShadowOpens in a new tab entry of the InterSystems Class Reference for more information.
You can adjust the gmheap size from the Advanced Memory Settings page of the Management Portal (System Administration > Configuration > Additional Settings > Advanced Memory).
Stop Shadowing
When you stop shadowing you can choose to roll back or not to roll back any open transactions by selecting or clearing the Roll back open transactions check box.
If you choose not to roll back, it is similar to suspending a shadow, but requires more privileges. You may choose this option if you want to maintain the current checkpoint, but you do not want Caché to automatically resume the shadow at restart, which does happen to a suspended shadow. For example, if you have to make configuration changes that require a Caché restart and additional changes after Caché is up, but before the shadow should start, use this option.
This option is mainly for disaster recovery. The rollback sets the shadow databases to a logically consistent state, though out of sync with the source. Avoid restarting a shadow that you stopped and rolled back. You have the option open to you so that you can recover if it was a mistake to choose the rollback option; thus avoiding the need to resynchronize the shadow with the source.
Restarting a shadow that you stopped with rollback may leave the shadow in an indeterministic state until the shadow has progressed beyond the point of the pre-rollback state.
Restart Shadowing
If you stopped shadowing, in addition to the choice of starting the shadow, you can restart the shadow. Processing starts from the last checkpoint taken before you stopped the shadow if you chose not to roll back open transactions. If you chose to roll back when you stopped the shadow, shadow processing begins at the checkpoint prior to the earliest open transaction when the shadow stopped. A shadow restart reuses the journal files retained from the last time you stopped the shadow.
Shadow Operations Tasks
You can monitor the shadowing operation status from both the source and destination servers of the shadow. In the Management Portal, navigate to the Shadow Servers page (System Operation > Shadow Servers). On this page you choose the appropriate option depending on whether you are monitoring the shadowing process from the shadow side or the data-source side. The following sections detail the contents of each side:
Managing the Destination Shadow
You can monitor and manage the shadow process from the destination shadow. The Shadows page (System Operation > Shadow Servers > System as Shadow Server) to display a list of source servers for this shadow machine and associated actions you can perform on each item, as described in the following table.
| Field | Description |
|---|---|
| Name | Name of the shadow. |
| Status | One of three shadowing states described previously in this section: stopped, processing, suspended. You may see trying to connect as status when you initiate processing. |
| Checkpoint | Offset location in the shadow copy of the journal where it is safe to resume processing. |
| Errors | Number of errors reported on the shadow destination. |
| Open Transactions | Indicates whether or not there are open transactions on the shadow and, if so, how many. |
| Latency | Estimated time for the shadow to process the journal records that it copied from the source but has not yet applied to the shadow databases. |
Click the following options to perform the indicated task:
-
Details — displays selected details of this shadowing configuration.
-
Resume — resumes shadow processing; option available if you have previously suspended shadow processing.
-
Suspend — suspends shadow processing; option available if the shadow is processing.
-
Errors — displays a list of errors occurring on the destination shadow. Caché retains the details of the number of errors you indicate in the configuration of the shadow. Click Delete to clear these errors and return to the list of shadows.
Monitoring the Data Source
You can also monitor the shadow process on the source system from the Data Source column of the Shadow Servers page (System Operation > Shadow Servers):
-
Click This System as Data Source to display a list of shadows defined for this data source. The Data Source page (System Operation > Shadow Servers > System as Data Source) lists each defined shadow with the details described in the following table.
Field Description Port Superserver port number of the Caché source instance (also shows process ID). Shadow IP IP address of the shadow destination machine. Journal Full directory path and file name of journal file currently being copied. PID Process ID number of the journal copying process. Latency Estimated time for the shadow to catch up copying the source journal file. This is not the latency of shadow dejournaling, which is available on the destination side. Shadowing Rate Rate in KBs per second that the shadow copies the source journal files. -
Display the Data Source Errors page (System Operation > Shadow Servers > Error Log), which lists errors reported on this data source.
You can also obtain this information programmatically. See the SYS.Shadowing.DataSourceOpens in a new tab entry of the InterSystems Class Reference for details.
Synchronizing or Resynchronizing a Destination Database
For a variety of reasons, you may need to resynchronize a database that has fallen behind the other databases in the shadow (for example, because the destination database was dismounted for maintenance, or has been restored from backup). In addition, when you add a database to an existing shadow configuration, you must ensure that it is synchronized with the journal files being dejournaled by shadowing.
There are several options from which to choose depending on your needs.
The simplest way to synchronize a shadow database is to suspend shadowing before making a backup of the source database that require synchronization. A database synchronized in this way will be in an inconsistent state on the shadow destination until the shadow catches up to the journal location corresponding to the creation of the backup; only the database being synchronized is affected. The disadvantage of this approach is that you may need to wait until an appropriate time to perform the backup of the source databases.
To synchronize a database in this way, use the following procedure:
-
Suspend (do not stop) the shadow: navigate to the Shadows page (System Operation > Shadow Servers > System as Shadow Server) as described in Managing the Destination Shadow and click Suspend.
-
If you are adding a new database to the shadow, create it on the destination and the source, then add the source database mapping to the shadow configuration, as described in Map the Databases.
If you are synchronizing an existing source database, create a backup on the source and restore it on the destination. If you are adding an existing database on the source that was not previously included in the shadow, create a backup on the source and restore it on the destination, then add the source database mapping to the shadow configuration, as described in Map the Databases.
Note:If you wish to use an older backup, you must use one of the following procedures.
-
Resume the shadow.
Rather than creating a new backup of the source databases as described in the previous procedure, you may want or need to use an existing copy of the database needing synchronization—that is, a version of the database older than the journal files currently being dejournaled by the shadow. For example, you may be restoring a damaged source database using a backup from an earlier time, adding a database on the source to the shadow under circumstances which prevent you from creating a new backup, or catching up a destination database that fell behind after being dismounted.
When synchronizing databases like these, you have several options. The simplest involves restarting the entire shadow from the source event representing the appropriate journal file—either the journal file corresponding to the backup you are restoring or the journal file that was being dejournaled when the destination database was dismounted. If you are catching up only one or a few databases out of many databases in the shadow, however, this option has the following disadvantages:
-
The operation requires the time needed to dejournal all of the databases in the shadow, not just the databases being synchronized.
-
The destination databases will be in an inconsistent state, and thus cannot be used, until all databases are caught up.
-
If one of the necessary journal files is unavailable or damaged, the shadow will be unable to catch up, which requires that all databases be restored from a new backup of the shadow source.
Even with these disadvantages, if many databases require synchronization or the amount of journal to be applied is relatively modest, restarting the entire shadow from the appropriate journal file is typically preferred for its simplicity.
To synchronize by restarting the entire shadow from the appropriate journal file:
-
Suspend (do not stop) the shadow: navigate to the Shadows page (System Operation > Shadow Servers > System as Shadow Server) as described in Managing the Destination Shadow and click Suspend.
-
Restore the backup or mount the dismounted database.
-
If you restored a backup of a source database that is not yet in the shadow, add the source database mapping to the shadow configuration, as described in Map the Databases.
-
Start the shadow: navigate to the Shadow Server Settings page (System Administration > Configuration > Connectivity > Shadow Server Settings) and start the shadow (as described in Start Shadowing), choosing as the source event (see Select a Source Event) either the journal file corresponding to the backup you restored or the journal file that was being dejournaled when the destination database was dismounted.
The alternative procedures involve more steps, but because journal data is applied only to the databases being synchronized, the disadvantages listed for the previous procedure are minimized. To catch up specific databases without synchronizing the entire shadow:
-
Suspend (do not stop) the shadow: navigate to the Shadows page (System Operation > Shadow Servers > System as Shadow Server) as described in Managing the Destination Shadow and click Suspend.
-
Restore the database(s) from backup, or mount the dismounted database(s).
-
Choose one of the following options:
-
Use the ^JRNRESTO utility to restore the needed journal files to each database, starting with either the journal file corresponding to the backup you restored or the journal file that was being dejournaled when the destination database was dismounted. See Restore Globals from Journal Files Using ^JRNRESTO in the “Journaling” chapter of this guide for information about using this utility.
-
Configure and start an alternate shadow including only the affected databases, using the procedures described in Configuring Shadowing. Once the databases are caught up, stop the alternate shadow and then delete the alternate shadow configuration,
-
-
If you restored a backup of a source database that is not yet in the shadow, add the source database mapping to the shadow configuration, as described in Map the Databases.
-
Resume the shadow.
Using Shadowing for Disaster Recovery
As described in the “Mirroring” chapter of the Caché High Availability Guide, Caché mirroring with automatic failover provides an effective and economical high availability solution for planned and unplanned outages. Mirroring includes a full disaster recovery capability.
When mirroring is not in use, however, Caché shadowing is a good low-cost solution for off site disaster recovery, and may be used in conjunction with one of the numerous Caché-compatible high availability failover strategies provided by the makers of operating systems and computer hardware (see the “System Failover Strategies” chapter of the Caché High Availability Guide). Shadowing’s benefits in disaster recovery include the following:
-
Data loss is typically small.
-
You can locate the shadow far away from the primary location.
-
Time to recovery is typically only minutes.
This section covers the following topics:
Planned Production Transfer to the Shadow Destination
Shadowing is very suitable for planned temporary relocation of the production databases, for example to perform maintenance on the production host system, because it includes built-in mechanisms to allow shadow destinations to catch up when you perform a planned production cutover to a shadow destination.
To perform a planned transfer of production to a shadow destination, use the following procedure:
-
Halt application activity on the production server (shadow source).
-
Gracefully shut down the shadow source Caché instance, for example using the ccontrol stop command (see Controlling Caché Instances in the “Using Multiple Instances of Caché” chapter of the Caché System Administration Guide).
When a shadow source is shutting down, the shutdown process waits for shadow destinations to receive all current journal files from the source before terminating the jobs servicing those shadow destinations. If the source encounters an error attempting to retrieve information about a destination, or does not get confirmation that all journal files have been received by a destination within the waiting period, a message is written to the console log (see Monitoring Log Files in the “Monitoring Caché Using the Management Portal” of the Caché Monitoring Guide). You can, therefore, confirm that the destination you intend to switch to is caught up with the source by checking the source’s console log and confirming that there are no such messages pertaining to it.
-
Confirm that the shadow destination has finished dejournaling all journal data from the shadow source, then follow the procedure for stopping shadowing on the shadow destination.
-
Shut down Caché on the destination and do one of the following:
-
Change the IP address and fully qualified domain name (FQDN) of the shadow destination so that it exactly matches the shadow source your are transferring production from.
-
Change the web application DNS to point to the IP address of the shadow destination.
-
-
Restart Caché on the destination.
-
Resume application activity on the new production server (shadow destination).
If you are certain that all journal data was received from the original shadow source and fully dejournaled on the destination (that is, that there was no data loss) in the previous procedure, you can return to the original configuration when your planned outage is complete and the original production instance has been restarted by reversing the original direction of shadowing—that is, configuring the current production instance (former destination) as the shadow source and the former source as a destination—following the instructions in the Configuring Shadowing section as needed. You can then repeat the previous procedure in the opposite direction.
Disaster Recovery Using the Shadow Destination
Shadowing is a good mechanism for recovery from disk failure, database degradation due to hardware or software failure, or destruction of the primary physical plant. (Shadowing, however, cannot recover from malicious deletion of globals.) A Caché shadow server can apply journals from several dissimilar platforms on a small-scale server over any TCP network. Since shadowing conveys only logical updates to the destination, it eliminates the risk of propagating any structural problem. When deciding if Caché shadowing best suits your disaster recovery strategy, however, you should consider the following limitations when shadowing is interrupted by a failure of the production server:
-
The shadow destination applies source journals asynchronously so as not to affect performance on the production server. This results in possible latency in data applied to the shadow destination, although it is generally seconds behind at most. Consequently, if you use the shadow destination databases, they might be slightly out of date. This latency could increase if the shadow destination connection with the shadow source is lost for any sustained period. Caché provides mechanisms to monitor the state and progress of the shadow destination to help you determine the risk of using the destination databases during disaster recovery.
-
Open transactions may remain. You can choose whether or not to roll back any incomplete transactions when you stop a shadow, which may depend on the state of the source journal files at the time of the disaster.
If your production/shadow source system functions as an application server, install identical applications on your disaster recovery shadow destination to speed recovery.
To use a shadow destination for disaster recovery, you can use the procedure in the previous section, assuming that the shadow source was not gracefully shut down but rather failed or became unavailable, and beginning with the step of confirming that the destination has finished dejournaling all journal data it received from the shadow source before the failure before following the procedure for stopping shadowing on the shadow destination. As previously noted, you can choose to roll back open transactions while stopping shadowing, and once you have stopped shadowing you can evaluate the risk of using the destination databases for disaster recovery.
Because of the near certainty of data loss under unplanned outage circumstances, you cannot simply reverse the direction of shadowing once the original shadow source is restored to operation to catch it up and to return to the original configuration, as described in the previous section. In this situation you must also fully resynchronize all databases, as describe in Synchronizing or Resynchronizing a Destination Database.