Mirroring
Traditional high availability and data replication solutions often require substantial capital investments in infrastructure, deployment, configuration, software licensing, and planning. Caché database mirroring is designed to provide an economical solution for rapid, reliable, robust automatic failover between two Caché instances, providing an effective enterprise high-availability solution.
Traditional availability solutions that rely on shared resources (such as shared disk) are often susceptible to a single point of failure with respect to that shared resource. Mirroring reduces that risk by maintaining independent resources on the primary and backup mirror members. Further, by utilizing logical data replication, mirroring avoids the risks associated with physical replication technologies such as SAN-based replication, including out-of-order updates and carry-forward corruption.
Combining InterSystems Enterprise Cache Protocol (ECP) with mirroring provides an additional level of availability; ECP application servers treat a mirror failover as an ECP data server restart, allowing processing to continue uninterrupted on the new primary, which greatly diminishes workflow and user disruption. Configuring the two failover mirror members in separate data centers offers additional redundancy and protection from catastrophic events.
In addition to providing an availability solution for unplanned downtime, mirroring offers the flexibility to incorporate planned downtimes (for example, Caché configuration changes, hardware or operating system upgrades, and so on) on a particular Caché system without impacting the overall Service Level Agreements (SLAs) for the organization.
Finally, in addition to the failover members, a mirror can include async members, which can be configured to receive updates from multiple mirrors across the enterprise. This allows a single system to act as a comprehensive enterprise data warehouse, allowing enterprise-wide data mining and business intelligence using InterSystems DeepSee™. An async member can also be configured for disaster recovery (DR) of a single mirror, which allows it to seamlessly take the place of one of the failover members should the need arise. A single mirror can include up to 16 members, so numerous geographically dispersed DR async members can be configured. This model provides a robust framework for distributed data replication, thus ensuring business continuity benefits to the organization; for more information, see Mirror Outage Procedures in this chapter.
This chapter discusses the following topics:
Mirroring Architecture and Planning
A mirror is a logical grouping of physically independent Caché instances simultaneously maintaining exact copies of production databases, so that if the instance providing access to the databases becomes unavailable, another can take over. A mirror can provide high availability through automatic failover, in which a failure of the Caché instance providing database access (or its host system) causes another instance to take over automatically and immediately.
This section covers the following topics.
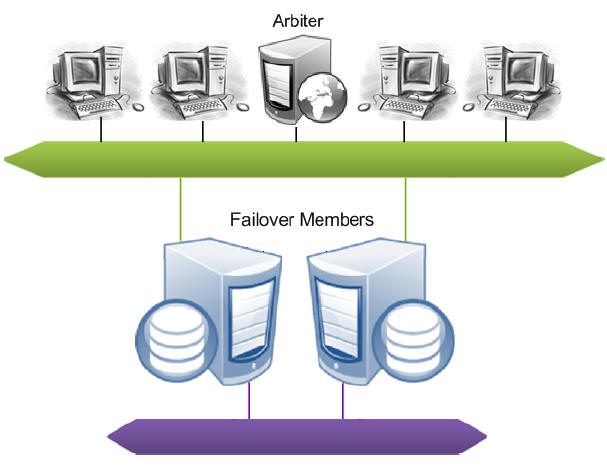
Mirror Components
The system hosting a Caché instance configured as part of a mirror is called a mirror member. (The Caché instance itself is sometimes referred to as a mirror member.) There are two types of mirror member:
Two additional components support automatic failover from one failover member to the other:
Failover Mirror Members
To enable automatic failover, the mirror must contain two failover members, physically independent systems each hosting a Caché instance. At any given time, one failover instance acts as primary, providing applications with access to the databases in the mirror, while the other acts as backup, maintaining synchronized copies of those databases in readiness to take over as primary. When the primary Caché instance becomes unavailable, the backup takes over, providing uninterrupted access to the databases without risk of data loss. See Automatic Failover Mechanics for detailed information about the automatic failover process.
Failover members communicate with each other through several communication channels using several mirror member network addresses. External clients typically connect to the mirror through a virtual IP address (VIP), which is always bound to an interface on the current primary. ECP application server connections are automatically redirected to the new primary following failover, so a VIP is not required for ECP connections.
See Creating a Mirror for information about configuring the failover members of a mirror.
The two failover members in a mirror are assumed to be coequal; neither is preferred as primary. For this reason, primary and backup must be considered temporary designations only. If a problem is detected on the primary and the backup is available to take over it will do so immediately, even if the problem on the primary might resolve on its own given enough time.
Because network latency between the failover members is an important factor in application performance, the relative physical locations of the failover members and the network connection between them should be chosen to minimize latency in the connection; see Network Latency Considerations for more information.
Async Mirror Members
Async members maintain asynchronous copies of mirrored databases. There are two types of async member, disaster recovery and reporting. A single mirror can include up to 16 members, so you can configure a mirror with a failover pair and up to 14 async members of either type in any combination. A mirror can even be configured with a single failover member to utilize async members without automatic failover.
Since the data on an async member is continually asynchronously updated with changes from the mirrors to which it is connected, there is no guarantee of synchronization of updates and synchronization of results across queries on the async member. It is up to the application running against the async member to guarantee consistent results for queries that span changing data.
See Configure Async Mirror Members in this chapter for information about adding an async member to a mirror.
Disaster Recovery Asyncs
A mirror can provide disaster recovery capability through a disaster recovery (DR) async member, which can be manually promoted to failover member and even become primary should both failover members become unavailable due to a disaster. A promoted DR can also be useful in performing planned maintenance on or temporarily replacing a failover member, A DR async member can belong to one mirror only, but you can configure as many as you want in a single mirror, up to the mirror member limit of 16.
A DR async member is never a candidate for automatic failover, which can be from one failover mirror member to another only.
Reporting Asyncs
A reporting async mirror member maintains read-only or read-write copies of selected databases for purposes such as data mining and business intelligence, and cannot be promoted to failover member. A reporting async can belong to up to 10 mirrors, allowing it to function as a comprehensive enterprise-wide data warehouse bringing together sets of related databases from separate locations.
Single Failover Mirror Configuration
A mirror can also consist of a single failover member and one or more asyncs. This configuration does not provide high availability, but can address other needs. For example, a mirror with a single failover member, at least one DR async member, and some number of reporting asyncs can provide data security and disaster recovery while supporting data collection and warehousing. To provide high availability, the failover member can be located in an OS-level failover cluster or some other high-availability configuration (see the “System Failover Strategies” chapter of this guide).
ISCAgent
A process called the ISCAgent runs on each mirror member’s host system, providing an additional means of communication between mirror members. Most importantly, the ISCAgent provides a means by which one failover member can obtain information about the other when normal communication between the two has been interrupted. The ISCAgent can send data to mirror members that have been down or disconnected. The agent is also involved in failover decisions; for example, a backup that has lost contact with both the primary instance and the arbiter can contact the primary’s ISCAgent (assuming the primary’s host system is still operating) to confirm that the primary instance is truly down before taking over.
The ISCAgent is automatically installed with Caché, if not already installed. When multiple Caché instances belonging to one or more mirrors are hosted on a single system, they share a single ISCAgent.
See the sections Automatic Failover Mechanics and Configuring the ISCAgent in this chapter for detailed information about the role and configuration of the ISCAgent.
Arbiter
The arbiter is an independent system hosting an ISCAgent with which the failover members of a mirror maintain continuous contact, providing them with the context needed to safely make failover decisions when they cannot communicate directly. A single arbiter can serve multiple mirrors, but a single mirror can use only one arbiter at a time. Use of an arbiter is not required, but is strongly recommended as it significantly increases the range of failure scenarios under which automatic failover is possible.
The arbiter plays no role in failover mechanics when the backup is not active.
Configuring a system as arbiter involves minimal software installation and does not require that Caché be installed (although any system hosting a Caché instance of 2015.1 or later can be used). The arbiter uses minimal system resources and can be located on a system that is hosting other services, or even a workstation. The primary requirement concerning the arbiter is that it must be located and configured to minimize the risk of unplanned simultaneous outage of the arbiter and a single failover member; see Locating the Arbiter to Optimize Mirror Availability for more information.
Mirror Synchronization
As described in the “Journaling” chapter of the Caché Data Integrity Guide, journal files contain a time-sequenced record of the changes made to the databases in a Caché instance since the last backup. Within a mirror, the journal data that records a change made to a database on the primary becomes the basis for making that same change to the copy of the database on the backup and asyncs. Mirrored databases are therefore always journaled on the primary, while on the backup and on DR asyncs they are always read only to prevent updates from other sources. Typically they are read-only on reporting asyncs as well.
When data recording global update operations (primarily Set and Kill operations) on mirrored databases is written to the journal on the primary, the journal records are transmitted to other mirror members. Once the journal records are received on the backup or async member, the operations recorded in them are performed on the databases on that member. This process is called dejournaling. (See Managing Database Dejournaling for important information about managing dejournaling on async members.)
Transfer of journal records from the primary to the backup is synchronous, with the primary waiting for acknowledgement from the backup at key points. This keeps the failover members closely synchronized and the backup active, as described in detail in Backup Status and Automatic Failover. An async, in contrast, receives journal data from the primary asynchronously. As a result, an async mirror member may sometimes be a few journal records behind the primary.
When a Caché instance becomes a member of a mirror, the following journaling changes to support mirroring occur:
-
When a Caché instance become the primary failover member in a mirror, the following changes occur:
-
A journal switch is triggered, to a new journal file prefixed with MIRROR-mirror_name, for example MIRROR-MIR21-20120921.001. From that point, all journal files are written as mirror journal files and logged to the mirrorjrn-mirror_name.log, for example mirrorjrn-MIR21-20120921.log, as well as to journal.log.
-
The Freeze on error journaling configuration is automatically overridden to freeze all journaled global updates when a journal I/O error occurs, regardless of the current setting. If the current setting is No, behavior reverts to this setting when the instance is no longer a primary failover member. To understand the implications of this, see Configure Journal Settings and Journal I/O Errors in the “Journaling” chapter of the Caché Data Integrity Guide.
-
-
When an instance becomes a backup or async mirror member, mirror journal files received from the primary are written to the configured journal directory along with the local instance’s standard journal files, and a copy of the primary’s mirror journal log (mirrorjrn-mirror_name.log) is created in install-dir\Mgr and continuously updated.
See the “Journaling” chapter of the Caché Data Integrity Guide for general information about journaling.
Automatic Failover Mechanics
Mirroring is designed to provide safe automatic failover to the backup when the primary fails or becomes unavailable. This section describes the mechanisms that allow that to occur, including:
Requirements for Safe Automatic Failover
The backup Caché instance can automatically take over from the primary only if it can ensure that two conditions are met:
-
The backup instance has received the latest journal data from the primary.
This requirement guarantees that all durable updates made to mirrored databases on the primary before the outage have been or will be made to the same databases on the backup, ensuring that no data will be lost.
-
The primary instance is no longer operating as primary and cannot do so without manual intervention.
This requirement eliminates the possibility that both failover members will simultaneously act as primary, which could lead to logical database degradation and loss of integrity.
Automatic Failover Rules
This section describes the rules that govern the automatic failover process and ensure that both automatic failover requirements are met.
The backup does not attempt to become primary under any circumstances unless the following is true:
-
All databases for which Mount Required at Startup is selected, both mirrored and nonmirrored, are mounted.
-
All mirrored database for which Mount Required at Startup is selected are activated and caught up (see Activating and Catching up Mirrored Databases).
For information on Mount Required at Startup, see Edit a Local Database’s Properties in the “Managing Caché” chapter of the Caché System Administration Guide.
Backup Status and Automatic Failover
During normal mirror operation, the journal transfer status of the backup failover member is Active, meaning that it has received all journal data from and is synchronized with the primary. (See Mirror Synchronization for information about how the databases on the failover members are synchronized using journal data and related details; see Monitoring Mirrors for information about monitoring the status of mirror members.) An active backup receives the current journal data as it is written on the primary, and the primary waits for an active backup to acknowledge receipt of journal data before considering that data to be durable. An active backup therefore satisfies the first condition for failover.
If an active backup does not acknowledge receipt of new data from the primary within the Quality of Service (QoS) Timeout, the primary revokes the backup’s active status, disconnects the backup and temporarily enters the trouble state. While in the trouble state, the primary does not commit any new journal data (perhaps causing a pause in the application), allowing time for contact to be restored or for appropriate and safe failover decisions to take place without the two members becoming unsynchronized.
When the backup reconnects to the primary, it first catches up by obtaining all of the most recent journal data from the primary and then becomes active. When the backup has caught up by obtaining the most recent journal data from the primary and acknowledging its receipt, its active status is restored.
Automatic Failover When the Backup is Active
When the backup is active, it is eligible to take over as primary if it can confirm the second condition for failover—that the primary is not operating as primary and can no longer do so without human intervention. The backup can do this in one of three ways:
-
By receiving a communication from the primary requesting that it take over.
This happens during a normal shutdown of the primary instance or when the primary detects that it is hung. Once the primary sends this message it can no longer act as primary and the active backup can safely take over. If the former primary is hung, the new primary forces it down, allowing it to become the new backup when it is restarted.
-
By receiving information from the arbiter that it has lost contact with the primary.
The primary and backup Caché instances maintain continuous contact with the arbiter, which updates each of them whenever contact with the other failover member is broken or restored. When a network event simultaneously isolates the primary from both the backup and the arbiter, it enters the trouble state indefinitely. Thus, if an active backup loses contact with the primary and learns from the arbiter that it too has lost contact with the primary, the backup can safely take over, because the primary must either have failed or be isolated and in a trouble state and thus can no longer act as primary. When connectivity is restored, if the former primary is still operating in trouble state, the new primary forces down.
-
By receiving information from the primary system’s ISCAgent that the primary instance is down or hung.
When the arbiter is unavailable or no arbiter is configured, an active backup that has lost contact with the primary instance can attempt to contact the primary’s ISCAgent (this is possible only when the primary’s host system is still operating) to confirm that the primary instance is down, or to force it down if it is hung. Once the agent confirms that the primary can no longer act as primary and failover is therefore safe, the backup takes over.
When the primary is isolated from an active backup by a network event but the backup cannot confirm safe failover conditions in one of these ways, the backup is no longer active and is subject to the failover mechanics described in the following section.
When the primary is forced down, it will remain down until a person manually restarts the instance.
Automatic Failover When the Backup is Not Active
A backup that is not active can attempt contact the primary’s ISCAgent to confirm that the primary instance is down or force it down if it is hung, and to obtain the primary’s most recent journal data from the agent. If successful on both counts, the backup can safely take over as primary. Following failover, the former primary becomes the new backup after it is restarted.
A backup that is not active and cannot contact the primary’s ISCAgent has no way to ensure that the primary can no longer act as primary and that it has the latest journal updates from the primary, and therefore cannot take over.
The arbiter plays no role in failover mechanics when the backup is not active.
Mirror Response to Various Outage Scenarios
This section summarizes the mirror’s response to outages of the failover members and arbiter in different combinations.
It is possible for an operator to temporarily bring the primary system down without causing a failover to occur (see Avoiding Unwanted Failover During Maintenance of Failover Members). This can be useful, for example, in the event the primary system needs to be brought down for a very short period of time for maintenance. After bringing the primary system back up, the default behavior of automatic failover is restored.
Several of the scenarios discussed here refer to the option of manually forcing the backup to become primary. For information about this procedure, see Unplanned Outage of Primary Failover Member Without Automatic Failover.
Automatic Failover in Response to Primary Outage Scenarios
While circumstances and details vary, there are several main primary outage scenarios under which an active backup failover member automatically takes over, as follows:
-
A planned outage of the primary, for example for maintenance purposes, is initiated by shutting down its Caché instance.
Automatic failover occurs because the active backup is instructed by the primary to take over.
-
The primary Caché instance hangs due to an unexpected condition.
Automatic failover occurs because the primary detects that it is hung and instructs the active backup to take over.
-
The primary Caché instance is forced down or becomes entirely unresponsive due to an unexpected condition.
Under this scenario, the primary cannot instruct the backup to take over. However, an active backup takes over either after learning from the arbiter that it has also lost contact with the primary or by contacting the primary’s ISCAgent and obtaining confirmation that the primary is down.
-
The primary’s storage subsystem fails.
A typical consequence of a storage failure is that the primary instance hangs due to I/O errors, in which case the primary detects that it is hung and instructs the active backup to take over (as in scenario 2). Under some circumstances, however, the behavior described under scenario 3 or scenario 5 may apply.
-
The primary’s host system fails or becomes unresponsive.
Automatic failover occurs if the active backup learns from the arbiter that it has also lost contact with the primary.
If no arbiter is configured or if the arbiter became unavailable prior to the primary host failure, automatic failover is not possible; under these circumstances, manually forcing the backup to become primary may be an option.
-
A network problem isolates the primary.
If an arbiter is configured and both failover members were connected to it at the time of the network failure, the primary enters the trouble state indefinitely.
-
If the active backup learns from the arbiter that it has also lost contact with the primary, automatic failover occurs.
-
If the backup loses contact with the arbiter at the same time as it loses contact with the primary, automatic failover is not possible. If both failover members are up, when the network is restored the backup contacts the primary, which then resumes operation as primary. Alternatively, a primary can be designated manually.
If no arbiter is configured or one of the failover members disconnected from it before the network failure, automatic failover is not possible and the primary continues running as primary.
-
A backup that is not active (because it is starting up or has fallen behind) can take over under scenarios 1 through 4 above by contacting the primary’s ISCAgent and obtaining the most recent journal data. A backup that is not active cannot take over under scenarios 5 and 6 because it cannot contact the ISCAgent; under these circumstances; manually forcing the backup to become primary may be an option.
In versions of Caché prior to 2015.1, the backup Caché instance had no way under scenarios 5 and 6 to ensure that the primary could no longer act as primary and therefore, by default, could not take over automatically under these scenarios. In these older versions, under special conditions, automatic failover could be enabled for these scenarios by adding a user-provided IsOtherNodeDown() entry point to the user-defined ^ZMIRROR routine and clearing the Agent Contact Required for Failover setting. Starting in 2015.1, this mechanism no longer exists and is replaced by the arbiter-based failover mechanics described here. For more information on this change, see the “Mirroring Changes” section in Operational Changes in the Caché 2015.1 Upgrade Checklist.
Effect of Arbiter Outage
An outage of the arbiter has no direct effect on the availability of the mirror. However, if primary outage scenarios 5 or 6 in Automatic Failover in Response to Primary Outage Scenarios occur before the arbiter is restored, the backup cannot take over automatically.
Effect of Backup Outage
Some applications may experience a brief pause (approximately the QoS timeout) before the primary can resume processing. If no arbiter is configured, or if the arbiter became unavailable prior to the backup outage, the pause experienced may be slightly longer (about three times the QoS timeout). If a primary outage occurs before the backup is restored, the result is a total mirror outage.
Effect of Combined Primary and Arbiter Outage
The consequences of this scenario are covered in Automatic Failover in Response to Primary Outage Scenarios. In brief, if the backup can contact the primary’s ISCAgent, it takes over; if not, the result is a total mirror outage, and manual intervention to force the backup to become primary may be an appropriate option.
Effect of Combined Backup and Arbiter Outage
If the backup and arbiter become unavailable simultaneously (or nearly simultaneously), the primary remains in trouble state indefinitely, because it assumes it is isolated and the backup could therefore have become primary. The result is a total mirror outage. When the backup becomes available again it contacts the primary, which then resumes operation as primary. Alternatively, the primary can be forced to resume through manual intervention. If the backup and arbiter fail in sequence, the primary continues operating as primary, after the brief pause described in Effect of Backup Outage, because it knows the backup cannot have become primary.
Effect of Combined Primary and Backup Outage
The result of this combination is always a total mirror outage. See Unplanned Outage of Both Failover Members for available options in this situation.
Locating the Arbiter to Optimize Mirror Availability
Together, the failover members and arbiter provide the mirroring high availability solution (with the arbiter playing the least significant role). The arbiter is not a quorum mechanism, but rather supports each failover member in arbitrating automatic failover by providing context when it loses contact with the other failover member; as long as both failover members are in contact with the arbiter immediately prior to a primary outage of any kind and the backup remains in contact with the arbiter, automatic failover can occur. While failure of the arbiter does eliminate the possibility of automatic failover under some circumstances, it does not prevent the mirror from operating while a replacement is configured, or from providing automatic failover under many primary outage scenarios, for example scenarios 1 through 4 in Automatic Failover in Response to Primary Outage Scenarios.
For these reasons, the arbiter need not be any more highly available than either of the failover members are independently, but only located and configured so that the risk of unplanned simultaneous outage of the arbiter and a single failover member is minimized. (If both failover members fail, the mirror fails and the status of the arbiter does not matter, so risk of simultaneous outage of all three is not a consideration.)
Based on this requirement, InterSystems recommends that, in general, the arbiter be separated from the failover members to the same extent to which they are separated from each other. Specifically,
-
If the failover members are located in one data center, the arbiter can be placed in the same data center. Within that data center, the arbiter should have the same physical separation from the failover members as they have from each other; for example, if you have placed the failover members in separate server racks to avoid power or network problems in one rack affecting both members, you should locate the arbiter separately from those two racks.
If the data center uses an internal network for communication within the mirror, the arbiter should be placed on the public side of the network so that failure of the internal network does not isolate the failover members from the arbiter in addition to each other.
-
If the failover members are located in separate data centers, the arbiter should be placed in a third location. This could be another data center, a location hosted by another party, a public or private cloud service, or even the system administrator's home (assuming she has reliable networking). Placing the arbiter in a location that is representative of the user community supports optimal mirror response to network outages.
A single system can be configured as arbiter for multiple mirrors, provided its network location is appropriate for each.
The arbiter need not be hosted on a newly deployed or dedicated system; in fact, an existing host of well-established reliability may be preferable. A reporting async mirror member (see Reporting Asyncs) can serve as a suitable host. Hosting on a DR async, however, should be avoided, as promotion of the DR async (see Promoting a DR Async Member to Failover Member) under a maintenance or failure scenario could lead to the arbiter being hosted on a failover mirror member, an incorrect configuration.
As noted in Installing the Arbiter, any system with a running ISCAgent of version 2015.1 or later can be configured as arbiter, including one that hosts one or more instance of Caché. However, a system hosting one or more failover or DR async members of a mirror should not be configured as arbiter for that mirror.
Automatic Failover Mechanics Detailed
This section provides additional detail on the mechanics of failover.
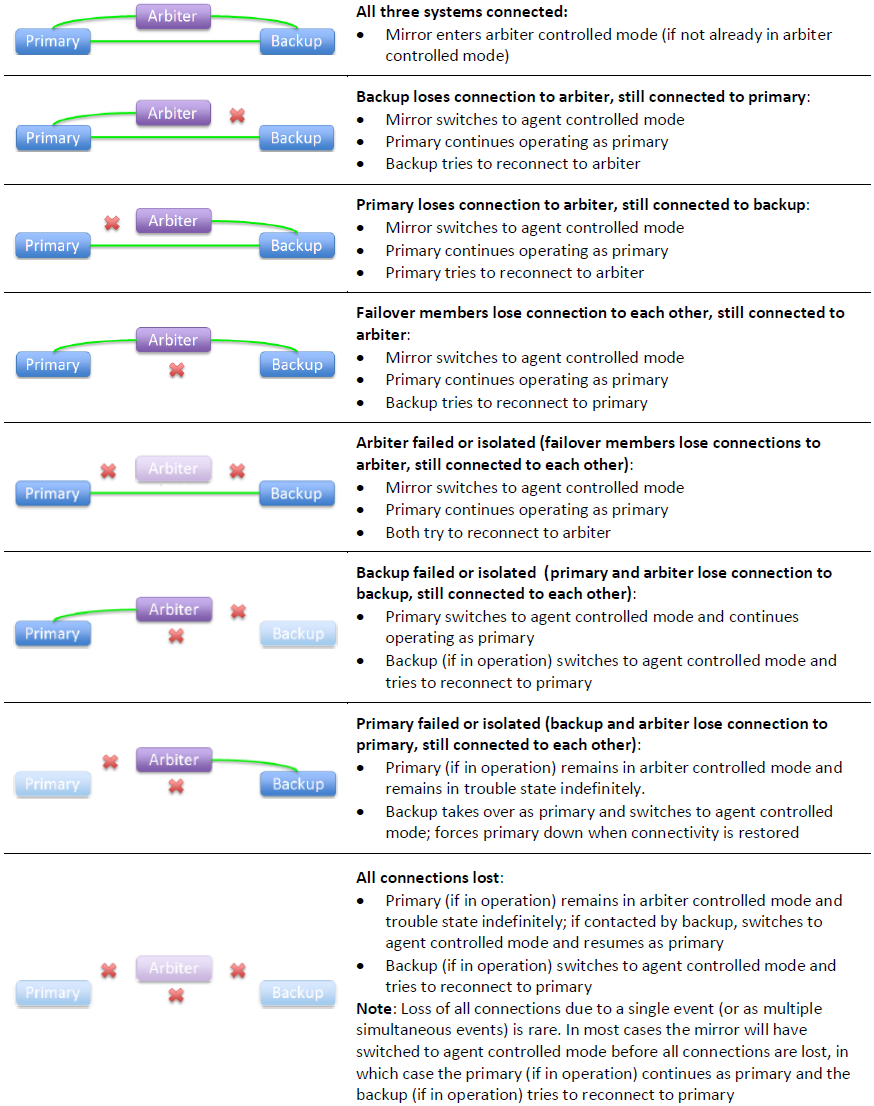
The mirror’s response to loss of contact between the failover members or between a failover member and the arbiter is supported by the use of two different mirror failover modes, as follows:
Agent Controlled Mode
When a mirror starts, the failover members begin operation in agent controlled mode. If the arbiter is not available or no arbiter is configured, they remain in this mode. When in agent controlled mode, the failover members respond to loss of contact with each other as described in the following.
If the primary loses its connection to an active backup, or exceeds the QoS timeout waiting for it to acknowledge receipt of data, the primary revokes the backup’s active status and enters the trouble state, waiting for the backup to acknowledge that it is no longer active. When the primary receives acknowledgement from the backup or the trouble timeout (which is two times the QoS timeout) expires, the primary exits the trouble state, resuming operation as primary.
If the primary loses its connection to a backup that is not active, it continues operating as primary and does not enter the trouble state.
If the backup loses its connection to the primary, or exceeds the QoS timeout waiting for a message from the primary, it attempts to contact the primary’s ISCAgent. If the agent reports that the primary instance is still operating as primary, the backup reconnects. If the agent confirms that the primary is down or that it has forced the primary down, the backup behaves as follows:
-
If the backup is active and the agent confirms that the primary is down within the trouble timeout, the backup takes over as primary.
-
If the backup is not active, or the trouble timeout is exceeded, the backup takes over if the agent confirms that the primary is down and if it can obtain the latest journal data from the agent.
Whether it is active or not, the backup can never automatically take over in agent controlled mode unless the primary itself confirms that it is hung or the primary’s agent confirms that the primary is down (possibly after forcing it down), neither of which can occur if the primary’s host is down or network isolated.
When one of the failover members restarts, it attempts to contact the other's ISCAgent and its behavior is as described for a backup that is not active.
Arbiter Controlled Mode
When the failover members are connected to each other, both are connected to the arbiter, and the backup is active, they enter arbiter controlled mode, in which the failover members respond to loss of contact between them based on information about the other failover member provided by the arbiter. Because each failover member responds to the loss of its arbiter connection by testing its connection to the other failover member, and vice versa, multiple connection losses arising from a single network event are processed as a single event.
In arbiter controlled mode, if either failover member loses its arbiter connection only, or the backup loses its active status, the failover members coordinate a switch to agent controlled mode and respond to further events as described for that mode.
If the connection between the primary and the backup is broken in arbiter controlled mode, each failover member responds based on the state of the arbiter connections as described in the following.
If the primary loses its connection to an active backup, or exceeds the QoS timeout waiting for it to acknowledge receipt of data, and learns from the arbiter that the arbiter has also lost its connection to the backup or exceeded the QoS timeout waiting for a response from the backup, the primary continues operating as primary and switches to agent controlled mode.
If the primary learns that the arbiter is still connected to the backup, it enters the trouble state and attempts to coordinate a switch to agent controlled mode with the backup through the arbiter. When either the coordinated switch is accomplished, or the primary learns that the backup is no longer connected to the arbiter, the primary returns to normal operation as primary.
If the primary has lost its arbiter connection as well as its connection to the backup, it remains in the trouble state indefinitely so that the backup can safely take over. If failover occurs, when the connection is restored the primary shuts down.
The trouble timeout does not apply in arbiter controlled mode.
If the backup loses its connection to the primary, or exceeds the QoS timeout waiting for a message from the primary, and learns from the arbiter that the arbiter has also lost its connection to the primary or exceeded the QoS timeout waiting for a response from the primary, the backup takes over as primary and switches to agent controlled mode. When connectivity is restored, if the former primary is still operating in trouble state, the new primary forces down.
If the backup learns that the arbiter is still connected to the primary, it no longer considers itself active, switches to agent controlled mode, and coordinates with the primary’s switch to agent controlled mode through the arbiter; the backup then attempts to reconnect to the primary.
If the backup has lost its arbiter connection as well as its connection to the primary, it switches to agent controlled mode and attempts to contact the primary’s ISCAgent per the agent controlled mechanics.
The following illustration describes the mirror’s response to all possible combinations of lost connections in arbiter controlled mode. The first three situations represent network failures only, while the others could involve, from a failover member’s viewpoint, either system or network failures (or a combination). The descriptions assume that immediately prior to the loss of one or more connections, the failover members and arbiter were all in contact with each other and the backup was active.
The mirror's response to most combinations of connection losses in arbiter controlled mode is to switch to agent controlled mode. Therefore, once one failure event has been handled, responses to a subsequent event that occurs before all connections are reestablished are governed by the behavior described for agent controlled mode, rather than this illustration.
Preventing Automatic Failover
If you want to prevent a mirror from automatically failing over under any circumstances, the best approach is to configure a single failover member with one or more DR asyncs (see Async Mirror Members). A DR async never takes over automatically but can easily be promoted to failover member, including to primary when desired (see Promoting a DR Async Member to Failover Member).
To temporarily prevent automatic failover to backup during maintenance activity, you can temporarily demote the backup to DR async or use the nofailover option; both are described in Planned Outage Procedures, which provides procedures for performing maintenance on failover members without disrupting mirror operation.
If you require application intervention at various points in the automatic failover process, see Using the ^ZMIRROR Routine.
Mirroring Communication
This section discusses the details of communication between mirror members, including:
Network Configuration Considerations
The following general network configuration items should be considered when configuring the network between two failover members:
-
Reliability — For maximum reliability, an isolated (private) network should be configured for mirror communication between the two failover members (as illustrated in Sample Mirroring Architecture and Network Configurations). Additionally, this network should be configured in a redundant fashion (multiple NICs with failover-bonded ports, multiple redundant switches, and so on).
-
Bandwidth — Sufficient bandwidth must be available to transfer the volume of journal data generated by the application.
-
Latency — Network latency between the failover members is an important factor in application performance; see Network Latency Considerations for more information.
Mirror synchronization occurs as part of the journal write cycle on the primary failover member. It is important to allow the journal write cycle and, therefore, the mirror synchronization process to complete as soon as possible. Any delays in this process can result in performance degradation.
See Configuring a Mirror Virtual IP (VIP) for important networking requirements and considerations when using a VIP.
Network Latency Considerations
There is no hard upper limit on network latency between failover members. The impact of increasing latency differs by application. If the round trip time between the failover members is similar to the disk write service time, no impact is expected. Round trip time may be a concern, however, when the application must wait for data to become durable (sometimes referred to as a journal sync). In non-mirrored environments, the wait for data to become durable includes a synchronous disk write of journal data; in mirrored environments with an active backup, it also includes a network round trip between the failover members. Many applications never wait for data to become durable, while others wait frequently.
The mechanisms by which an application waits can include the following:
-
Transaction commit in synchronous commit mode (nondefault).
-
The Sync() method of %SYS.Journal.SystemOpens in a new tab or equivalent $zu function.
-
An ECP database server waiting for durability before responding to common requests from applications running on application servers (as part of application synchronization actions, such as locks and $increment).
-
Ensemble Business Services SyncCommit capability (default)
Whether the round trip time, even if relatively large, negatively affects application response time or throughput depends on the frequency with which the above occur within the application, and whether the application processes such activity in serial or in parallel.
When network latency between mirror members becomes an issue, you may be able to reduce it by fine-tuning the operating system TCP parameters that govern the maximum values of SO_SNDBUF and SO_RCVBUF, allowing the primary and backup/asyncs to establish send and receive buffers, respectively, of appropriate size, up to 16 MB. The buffer size required can be calculated by multiplying the peak bandwidth needed (see Incoming Journal Transfer Rate) by the round trip time, and roughly doubling the product for protocol overhead and future growth. For example, suppose the following conditions apply:
-
Traffic between the primary mirror site and a DR site is 60 MB per second of journal data at peak,
-
Compression is used to reduce the bandwidth required to about 33% of the journal rate.
-
The round trip time is 50 milliseconds (typical for a distance of 1000 miles).
In this case, 60 MB * 0.05 * .33 * 2 = 2 MB minimum buffer size. There is little reason to keep the buffer size as low as possible, so an even larger minimum could be tried in this situation without concern.
Journal Data Compression
When creating or editing a mirror, you can select one of three compression settings for journal data to be transmitted from the primary to the backup, and separately for journal data to be transmitted from the primary to async members, as follows:
-
System Selected — Use a compression strategy that is optimal for most environments. When transmitting to the backup member, this means assuming a high-bandwidth, low-latency connection and optimizing for response time; that is, journal data is compressed before transmission when this will reduce the time required to synchronize the failover members. When transmitting to async members, it means optimizing for network utilization. System Selected is the default for both the failover members and asyncs.
Currently, for transmission to the backup, this setting causes fast compression to be used only when the mirror requires SSL/TLS, as described in Securing Mirror Communication with SSL/TLS Security; for transmission to asyncs, fast compression is always used. Over time this behavior may change based on improved mechanisms for analyzing the network environment and optimizing compression behavior.
-
Uncompressed — Never compress journal data before transmission.
-
Compressed — Always compress journal data before transmission.
Choosing Uncompressed is desirable if the vast majority of the volume of database updates consist of data that is already highly compressed or encrypted, where the overall efficacy of compression is expected to be very low. In that case, CPU time may be wasted on compression. Examples include compressed images, other compressed media, or data that is encrypted before it is set into the database (using Caché's data element encryption or another encryption methodology). Use of Caché database encryption or journal encryption is not a factor in selecting compression.
Both compression and SSL encryption introduce some computational overhead that affects both throughput and latency. The overhead introduced by each is similar, but when SSL encryption is used, the addition of compression can actually reduce that overhead and improve performance by reducing the amount of data that needs to be encrypted. The specifics vary by operating system, CPU architecture, and the compressibility of application data. More specifically:
-
Use of compression and/or SSL encryption can limit the journal transfer rate due to the computation time required to compress the data; the maximum transfer rate is limited to the maximum compression rate. For most configurations, the maximum transfer rate imposed by compression and SSL encryption is much higher than the actual maximum throughput required by mirroring. As an example, on a typical system as of this writing, the computational rate to compress and encrypt may be in the range of 100 MB per second, which is several times greater than the peak journal creation rate for a large enterprise application.
-
Use of compression and/or SSL encryption introduces a “computational latency” that gets added to the network latency (see Network Latency Considerations). This is negligible for most applications. If a configuration requires higher throughput than can be achieved with compression and/or SSL encryption enabled, then they must be disabled (SSL can still be used for authentication) and sufficient bandwidth for peak transfer without compression must be provided.
Mirror Member Network Addresses
Mirror members use several network addresses to communicate with each other. These are described in this section and referred to in Sample Mirroring Architecture and Network Configurations. Note that the same network address may be used for some or all of the mirror addresses described here.
-
Mirror private address
When a Caché instance is running as the primary failover member, each of the other mirror members uses the mirror private address to establish its mirror data channel, the channel over which it receives journal data from the primary and the most heavily used mirror communication channel. A second failover member attempting to become the backup must connect to this address. This applies to a DR async that is promoted to failover member; if the promoted DR does not have access to the other failover member’s private address, it can still become primary when the other failover member is down, but cannot become backup.
The primary may also use the mirror private address to monitor async members.
Async members attempt to connect to the primary’s mirror private address, but fall back to the primary’s superserver address if they cannot reach the primary at the mirror private address. Because of this and because an ISCAgent can send journal data to other mirror members, journal data does travel over networks other than the mirror private network in some cases.
Note:When adding an async member to a mirror using the management portal (see Configure async mirror members), you enter an Async Member Address; the address you provide at this prompt becomes the async member’s mirror private address and superserver address. If you want these to be different, you can update the async’s addresses on the primary after adding it to the mirror.
-
Superserver address/port
External mirror-aware systems can connect to the primary using this address. Currently the only such external systems are ECP application servers (see Redirecting Application Connections Following Failover or Disaster Recovery), although in the future this may extend to other connections. Other mirror members may also make connections to a member's superserver address for certain control and monitoring purposes; for example, the primary may use this address to monitor async members. An async member attempts to establish its data channel to the primary using this address if the primary’s mirror private address is not accessible, which means that journal data may travel over this network.
-
Mirror agent address/port
When attempting to contact this member’s agent, other members try this address first. Critical agent functions (such as those involved in failover decisions) will retry on the mirror private and superserver addresses (if different) when this address is not accessible. Because the agent can send journal data to other members, journal data may travel over this network.
-
Virtual IP (VIP) address
If you are using a virtual IP (VIP) address as described in Planning a mirror virtual IP (VIP), you must enter the VIP address when creating or editing the primary failover member. The primary registers itself with this address dynamically as part of becoming primary; the two failover members must be on the same subnet of the network associated with the VIP so that the backup can acquire the VIP during failover. Administrators typically give the VIP address a DNS name on the DNS server. This address should never be used elsewhere in the mirroring configuration (nor as an address for ECP clients to connect to; ECP has its own mechanism of finding the primary using superserver addresses).
-
Arbiter address/port (outgoing)
The address used by the failover members to connect to the arbiter; this address is configured when creating or editing the primary failover member. See Locating the Arbiter to Optimize Mirror Availability for important information about the network location of the arbiter.
While it is optional to configure SSL/TLS for mirror communication between the addresses described here, it is highly recommended, because sensitive data passes between the failover members, and SSL/TLS provides authentication for the ISCAgent, which provides remote access to journal files and can force down the system or manipulate its virtual IP address. If an instance has journal or database encryption enabled and you make it the primary failover member of a mirror, you must configure the mirror to use SSL/TLS. For more information, see Securing Mirror Communication with SSL/TLS Security.
Sample Mirroring Architecture and Network Configurations
This section describes and illustrates several sample mirroring architectures and configurations.
-
Mirroring Configurations within a Single Data Center, Computer Room, or Campus
-
Mirroring Configurations For Dual Data Centers and Geographically Separated Disaster Recovery
Some diagrams depict a disaster recovery (DR) async member and a reporting async member in variety of locations. One or both may be omitted, multiples of each are allowed, and in general the locations depicted in different diagrams may be combined.
For purposes of illustration, sample IPv4 addresses on the organization's internal network are shown. Assume that subnets are specified by 24 bits (that is, CIDR notation a.b.c.d/24 or netmask 255.255.255.0) so addresses that are depicted on the same subnet will differ only in the fourth dot-delimited portion.
Equivalent DNS names may also be specified in place of IP addresses in the mirror configuration, except for the mirror virtual IP (VIP) address, which must be an IP address.
Mirroring Configurations within a Single Data Center, Computer Room, or Campus
The following diagrams illustrate a variety of mirroring configurations typical within a data center, computer room, or campus. Each diagram describes the appropriate network topology, and the relationship to the network addresses specified in the mirror configuration. Variations are described, and may be particularly applicable when mirror members reside in multiple locations within the campus.
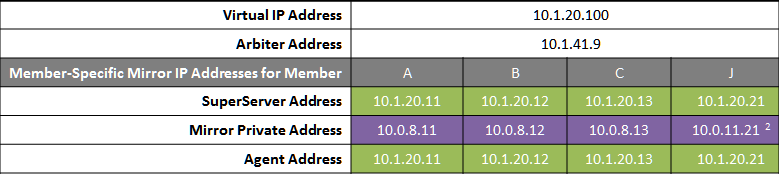
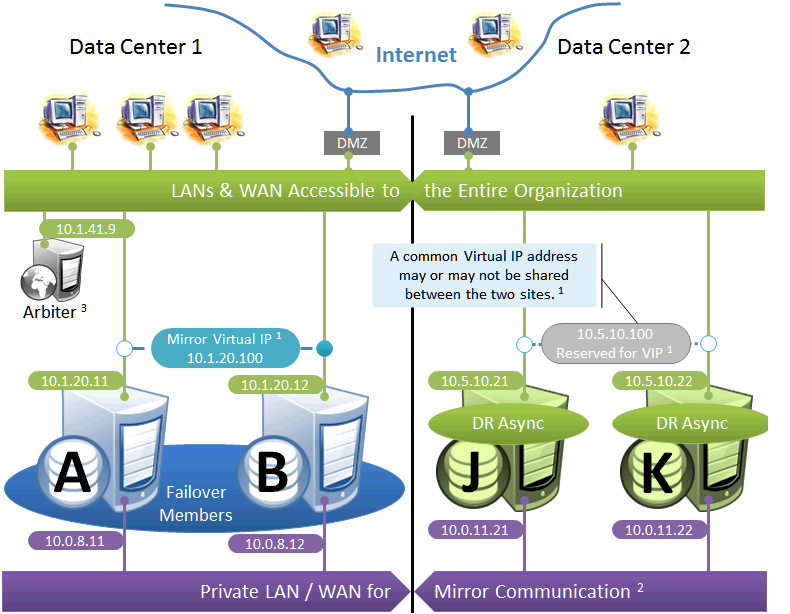
Simple Failover Pair
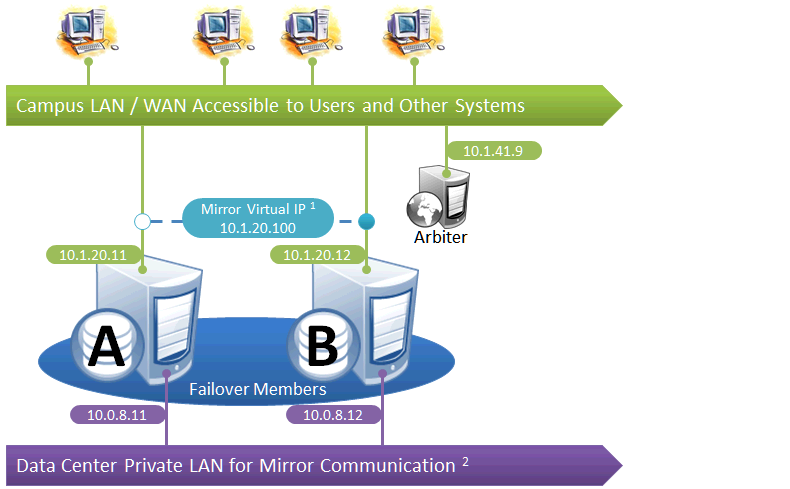
This is the simplest mirror configuration. The failover members communicate with each other over a private network while external connections to them are made over a public network, optionally through a mirror virtual IP (VIP). The arbiter is on the external network (as recommended in Locating the Arbiter to Optimize Mirror Availability), but since it is always the failover members that initiate connections to the arbiter, the VIP is not involved in these connections.
The following IP addresses are used in this configuration:

Notes:
-
A VIP requires both failover members to be on the same subnet.
-
While not required for mirroring, the separate, private LAN for mirror communication depicted here is recommended for optimal control of network utilization. If such a LAN is not used, the mirror private addresses in the mirror configuration should be changed to use the addresses depicted on green backgrounds. Although the mirror private addresses as shown imply that the members are on the same subnet of this network, this is not required.
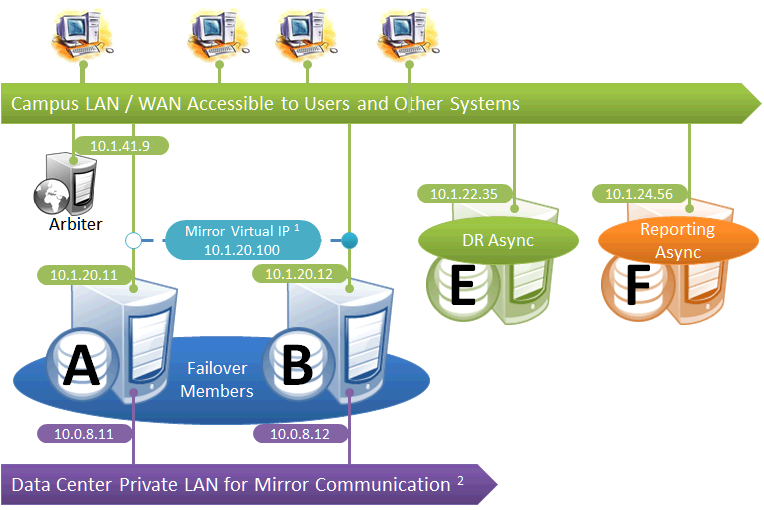
Failover Pair with DR and Reporting Homogeneously Connected
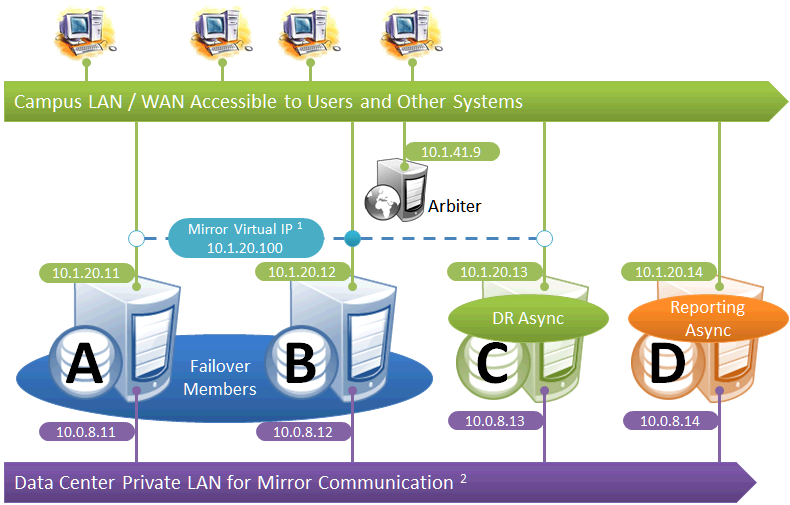
This configuration allows maximum functional flexibility for the DR async, allowing it to be promoted to replace a failover member that is down for maintenance or repair, in addition to providing disaster recovery capability. The promoted DR can function fully as backup or primary and participates in the VIP. The failover members and DR are on the same public-facing subnet for the VIP. Their private network addresses, if used, are accessible to one another (if not the same subnet, then by routing). Network topology and latency may place constraints on the physical separation possible between the DR and the two failover members.
The following IP addresses are used in this configuration:
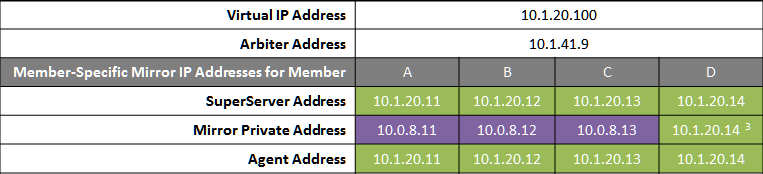
Notes:
-
All members that may hold or acquire the VIP must be on the same subnet.
-
A separate, private LAN for mirror communication as depicted here is not required for mirroring, but is recommended for optimal control of network utilization. If such a LAN is not used, the mirror private addresses should be changed in the mirror configuration to use the addresses depicted in green. Although the depicted mirror private addresses imply that the members are on the same subnet of this network, this is not required.
-
Since reporting members can never become primary, they make only outgoing connections on the mirror private network. Therefore that address need not be separately specified in the mirror configuration.
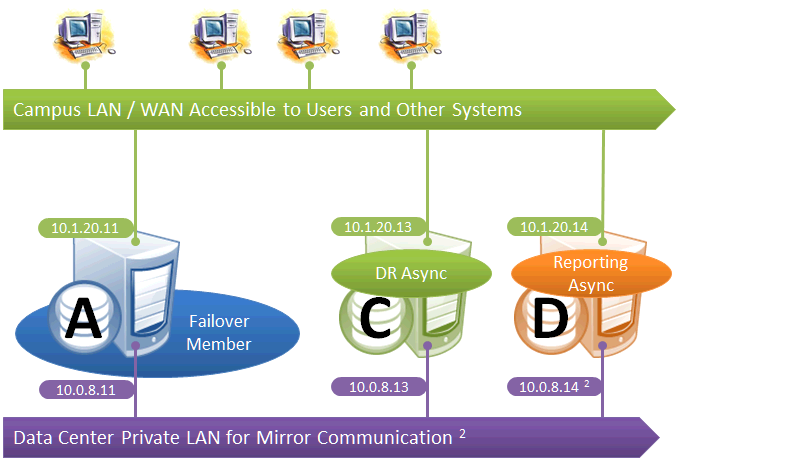
Failover Pair with DR and Reporting Anywhere on Campus
This configuration allows maximum flexibility in the locations of async members and the network connecting them. Since the DR in this configuration is not assumed to be on the VIP subnet, some alternative means must be used to redirect user connections to the DR during disaster recovery; for example, manually updating the DNS name to point to the DR async’s IP instead of the VIP, or configuring one of the mechanisms discussed in Redirecting Application Connections Following Failover. Additionally, since the DR member is not assumed to have connectivity to the mirror private network (if used), it can be promoted only when no failover member is in operation, and only to become primary.
The following IP addresses are used in this configuration:
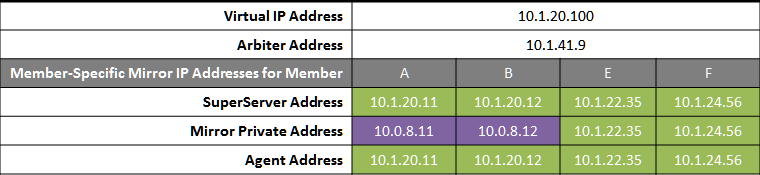
Notes:
-
Any member that is to acquire the Virtual IP must be on the same subnet.
-
A separate, private LAN for mirror communication is depicted here but not required. If such a LAN not used, the mirror private addresses should be changed in the mirror configuration to use the addresses depicted in green. Although the depicted mirror private addresses imply that the failover members are on the same subnet of this network, this is not required.
Mirroring for Disaster Recovery and Reporting Only
This configuration uses mirroring to provide DR and/or reporting capabilities only. High availability is provided for the single failover member using OS failover clustering, virtualization HA or other infrastructure-level options as described in the “System Failover Strategies” chapter of this guide. Since mirroring is not used for automatic failover in this configuration, no VIP is depicted. If desired, a VIP can be configured for use during disaster recovery, but this requires the DR member to be on the same subnet as the failover member. Otherwise, alternative technology or procedures such as those discussed in Redirecting Application Connections Following Failover must be used to redirect user connections to the DR during disaster recovery.
The following IP addresses are used in this configuration:
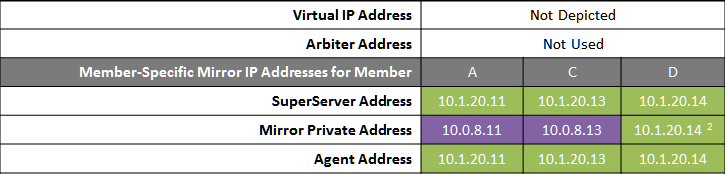
Notes:
-
A separate, private LAN for mirror communication is depicted here but not required. If such a LAN is not used, the mirror private addresses should be changed in the mirror configuration to use the addresses depicted in green. Although the depicted mirror private addresses imply that the failover members are on the same subnet of this network, this is not required.
-
Since reporting members can never become primary, they make only outgoing connections on the mirror private network. Therefore that address need not be separately specified in the mirror configuration.
Mirroring with ECP
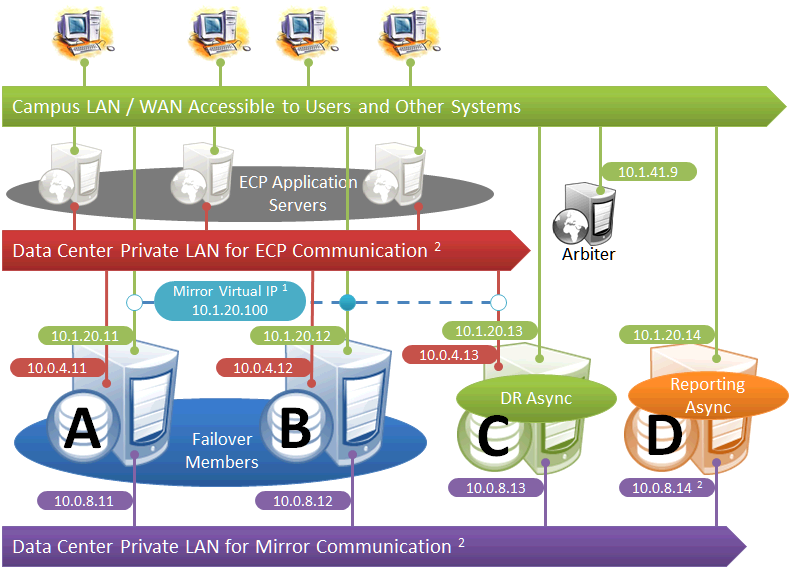
This diagram depicts ECP application servers added to a mirrored environment. While increasing complexity, the ECP tier allows horizontal scalability and preserves user sessions across database server failover.
The following IP addresses are used in this configuration:
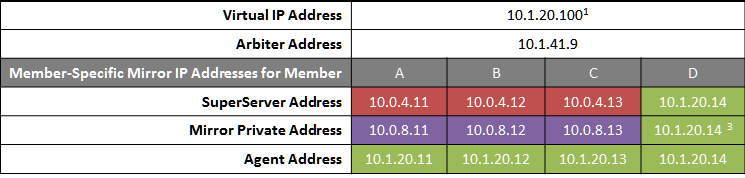
Notes:
-
ECP application servers do not use the VIP and will connect to any failover member or promoted DR member that becomes primary, so the VIP is used only for users' direct connections to the primary, if any. A VIP requires both failover members to be on the same subnet. In order for the DR member to acquire the VIP when promoted, it must also reside on the same subnet; if it does not, see Redirecting Application Connections Following Failover.
-
The private LANs for both ECP and mirror communication shown here, while not required, are recommended for both optimal control of network utilization and ECP data privacy. Configurations with fewer networks are possible by collapsing one of the networks into another. Although the private addresses shown imply that the members are on the same subnets of these networks, the only requirement is that the addresses are routable between one another.
When considering network layout, bear in mind that all async members require connectivity to the primary on either the primary's mirror private address or its superserver address. Thus in the depicted configuration, an async member that has access only to the green user network will not function.
-
Since reporting members can never become primary, they make only outgoing connections on the mirror private network. Therefore that address need not be separately specified in the mirror configuration.
Mirroring Configurations For Dual Data Centers and Geographically Separated Disaster Recovery
The following diagrams depict HA and DR configurations utilizing geographical separation for recovery from disasters affecting a data center, campus, or geographic region. Reporting members are omitted from these diagrams for simplicity of illustration, but may be added in either of the locations just as depicted in the single campus configurations.
All of the following configurations require a strategy for redirecting connections to the primary when a member in the other location becomes primary. For geographically separated locations, a VIP may be difficult or impossible to configure because it requires the subnet to be stretched between the two locations. Even if configured, it may not be sufficient, as described in the paragraphs that follow. Alternative technology, hardware, or procedures, such as those discussed in Redirecting Application Connections Following Failover, provide other means of redirecting connections. Whether utilizing a stretched subnet or not, a VIP is extremely useful for automatic failover between two members within a single data center, and its use is depicted in these diagrams for that purpose.
A stretched subnet for VIP is typically useful for internal intranet applications. With it, users and systems with a connection, or VPN access, to the LAN/WAN depicted in green can access the primary in either location over its VIP.
For Internet-facing applications, on the other hand, a stretched subnet for VIP does not provide a solution for connectivity in a disaster. The main data center’s DMZ presents the application's Internet-facing IP address and/or DNS names as a proxy for the internal mirror VIP; in the event of a disaster, they may need to be externally transferred to the other data center. Solutions involve either sophisticated external routing or one of the techniques described in Redirecting Application Connections Following Failover, any one of which obviates the need for a stretched subnet.
Failover Pair with Local DR and Geographically Separated DR
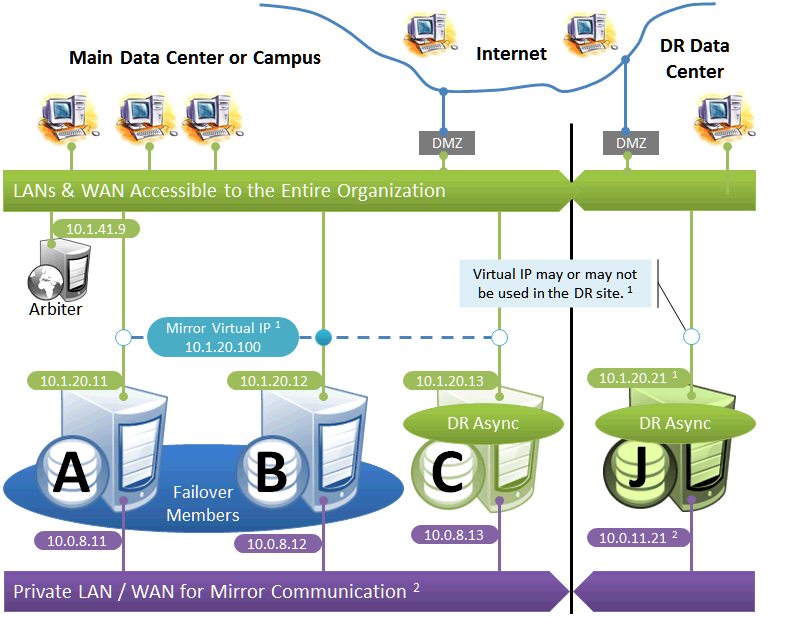
The local DR async provides contingency for events affecting one or both of the failover members. The local DR can be promoted to replace one of the failover members that is down for maintenance or repair, or to recover from a disaster affecting both failover members. The geographically separated DR is used to recover from disasters affecting the entire main data center or campus.
The following IP addresses are used in this configuration:
Notes:
-
See preceding discussion of VIP.
-
When possible, making the mirror private network (if used at all) accessible to the DR data center through the data center interconnect (WAN) offers some additional functional flexibility for member J. This does not require stretching the subnet, only that the traffic on this network is routed between the data centers. In this configuration, when J is promoted, it can connect as backup to the primary in the main data center. If the DR does not have access to the mirror private network, it can be promoted only to function as primary, and that only when no failover member is in operation. The flexibility mentioned here is primarily useful in configurations in which the VIP is stretched and the application is not substantially impacted by latency between the data centers.
Failover Pair with Geographically Separated, Fully Redundant DR Environment
In the event of disaster affecting Data Center 1, two DR members in Data Center 2 are promoted, providing a completely redundant alternate HA environment. The following IP addresses are used in this configuration:

Notes:
-
See preceding discussion of VIP. This illustration does not assume a stretched subnet; instead, upon transitioning to Data Center 2, the mirror is to be reconfigured to use a different VIP for subsequent automatic failovers within that data center. External technology, hardware, or procedures, as discussed in Redirecting Application Connections Following Failover, are then used to redirect connections to the new VIP address.
-
When possible, giving both data centers access to the mirror private network (if used) through the data center interconnect (WAN) adds functional flexibility. This does not require stretching the subnet, only that the traffic on this network is routed between the data centers. In that configuration, a promoted DR member in one data center can connect as backup to the primary in the other. This is useful mainly in configurations in which the VIP is stretched and the application is not substantially impacted by latency between the data centers. (If the DR has no access to the mirror private network, it can be promoted only to function as primary, and that only when no failover member is operating.)
-
In the event that Data Center 1 is completely offline and members J and K are promoted to failover members, a new arbiter can be made available in Data Center 2 and the mirror configuration can be updated with the IP address of the new arbiter. The depicted configuration is not intended to operate for extended periods with two failover members in opposite data centers; if operated in this manner, an arbiter in a separate, third location (the Internet in this depiction) is recommended. See Locating the Arbiter to Optimize Mirror Availability for more details.
Geographically Separated Failover Pair
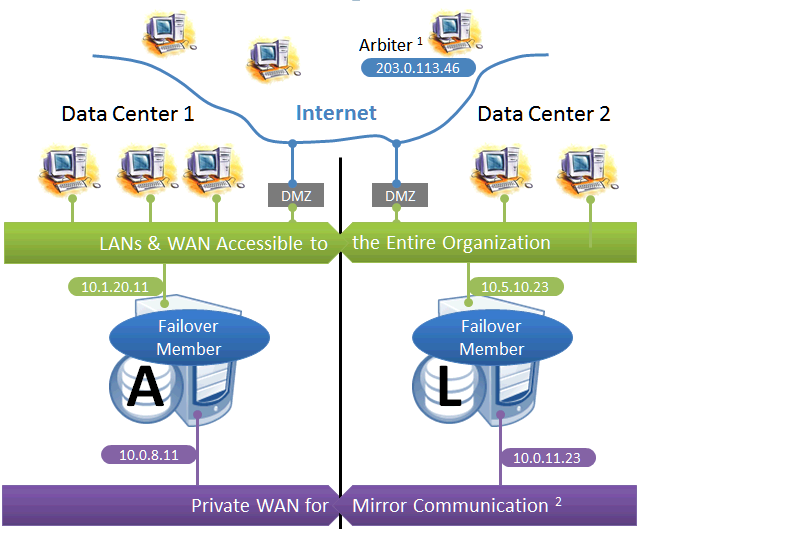
This configuration utilizes two machines in separate locations to achieve both high availability and disaster recovery needs with minimal hardware. Network latency between the failover members is an important consideration, but its impact, if any, depends on the application; see Network latency considerations for more information.
Mirroring does not prefer one failover member over another to act as primary, and a failover may occur as a result of any type of outage, even if the problem on the primary turns out to have been transient. Therefore, this configuration is best used with no implicit preference for the primary running in a particular data center.
Use of a VIP may or may not be possible in this configuration for reasons described in the preceding discussion. Since failover between the two data centers happens automatically, any alternative strategy employed must provide rapid and automatic redirection of users to the new primary; strategies that require manual intervention are typically not sufficient.
The following IP addresses are used in this configuration:
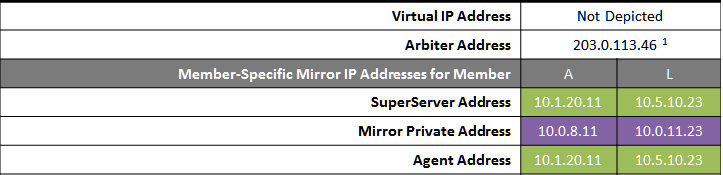
Notes:
-
The arbiter is best placed in a third location in this configuration. See Locating the Arbiter to Optimize Mirror Availability for more details.
-
A private network for mirror communication running over a data center interconnect (WAN) is depicted here but not required.
Redirecting Application Connections Following Failover or Disaster Recovery
When the backup failover member becomes primary through automatic failover or a DR async is manually promoted to primary as part of disaster recovery, some mechanism for redirecting application connections to the new primary is required. There are numerous ways to accomplish this, some of which are discussed in detail in this chapter. One solution may apply to both automatic failover and DR promotion, or solutions may be combined, for example a mirror VIP for automatic failover and DNS update for DR promotion.
Built-in Mechanisms
The following mechanisms can be included in the mirror configuration, as shown in Sample Mirroring Architecture and Network Configurations, to address application redirection:
-
Mirror virtual IP address (VIP)
When a mirror VIP is in use (see Planning a Mirror Virtual IP (VIP)) and a member becomes primary, the VIP is automatically bound to a local interface on the new primary, allowing external clients to continue to connect to the same IP address. The use of a VIP requires that members eligible to become primary be on the same subnet, as described in Sample Mirroring Architecture and Network Configurations.
-
Enterprise Cache Protocol (ECP)
In an ECP mirror deployment (see Configuring ECP Connections to a Mirror), the failover members are configured as ECP data servers and all ECP application server connections are configured specifically as mirror connections. Following failover, application servers reestablish their connections to the new primary failover member and continuing to process their in-progress workload. During the failover process, users connected to the application servers may experience a momentary pause before they are able to resume work. See the “ECP” and “Developing Distributed Applications” chapters of the Caché Distributed Data Management Guide for information about ECP recovery.
Bear in mind that ECP adds complexity and typically requires a load balancer (or other external technology) to direct users to application servers.
-
CSP Gateway
When a CSP Gateway Server Access entry is configured to be mirror aware, the Gateway is initially configured to connect to one of the failover members, from which it obtains a list of the failover and DR async members in the mirror. The Gateway identifies and connects to the current primary based on this list. If the mirror fails over, the Gateway changes the connection to the new primary. If no primary can be found among the failover members, the Gateway attempts to find one among the DR asyncs in the list, which enables it to reestablish the connection when a DR async is promoted to primary. A mirror aware Gateway connection uses the superserver addresses to contact the mirror members (see Mirror Member Network Addresses).
If you have configured a mirror VIP, do not configure a mirror aware CSP gateway, which will cause the Gateway to ignore the VIP. Instead, simply configure the CSP Gateway to connect to the VIP like any other client. In general, use of a mirror aware CSP Gateway is the appropriate choice only in unusual circumstances.
By default, Server Access entries are not mirror aware, as it is not appropriate for many Gateway server configurations, including those supporting the Caché management portal. See Configuring Server Access in the “CSP Gateway Operation and Configuration” chapter of the CSP Gateway Configuration Guide for more information about mirror aware CSP Gateway connections.
External Technologies
The following mechanisms can be implemented in conjunction with mirroring to address application redirection:
-
Hardware load balancers and site selectors
Redirection of application traffic at the network level can be implemented using mechanisms such as hardware-based site selectors.
-
DNS update
Automatic and manual options are available; some may be too slow for use with automatic failover.
-
Application programming
Individual applications can be adapted to maintain knowledge of mirror members and connect to the current primary.
-
User-level procedures
Users can be provided with the means to connect to multiple mirror members, for example a second icon for connection to the disaster recovery site.
Planning a Mirror Virtual IP (VIP)
As described in Built-in Mechanisms, when a mirror VIP is in use and a member becomes primary, the VIP is reassigned to the new primary, which allows all external clients and connections to interact with a single static IP regardless of which failover member is currently serving as primary.
During the failover process, connected clients that experience a network disconnect are able to reconnect once the backup has become primary. If a VIP is configured, the backup completes the failover only if it is successfully able to assign the VIP; otherwise, the failover process is aborted and the mirror requires manual intervention.
In preparing to set up a mirror VIP, consider the following:
-
To use a mirror VIP, both failover members must be configured in the same subnet, and the VIP must belong to the same subnet as the network interface that is selected on each system. A DR async member must have a network interface on the same subnet to be able to acquire the VIP when promoted to primary as part of disaster recovery; if this is not the case, an alternative redirection mechanism must be incorporated into disaster recovery procedures.
-
When failover and/or DR async members are in separate data centers, a VLAN subnet can be extended across the data centers to continue supporting the same VIP address. This requires Layer 2 connectivity between the two sites and may not be sufficient for all cases; see the discussion in Mirroring Configurations For Dual Data Centers and Geographically Separated Disaster Recovery.
-
You should assign a DNS name for the VIP on your DNS server for use by connecting clients.
-
If a VIP is in use and a failover member is removed from the VIP subnet, that member must be demoted to DR async or removed from the mirror, or the VIP configuration must be removed from both failover members. Otherwise, when the failover member attempts to take over as primary it will fail to acquire the VIP and therefore fail to become primary.
If you are configuring a mirror VIP on a Windows Vista, Windows 7, or Windows Server 2008 system, and clients will connect to the failover members from different subnets, you must install and start the NDISISC driver after configuring the VIP. To do so, use the following procedure:
-
Within Windows Control Panel, open Network and Sharing Center, then select Change adapter settings to display the Network Connections panel.
-
Right-click the network adapter (interface) matching the interface name configured for the mirror VIP and select Properties.
-
On the Properties dialog, click Install... then select Protocol and click Add....
-
On the next dialog, select Have Disk, then browse to and select the file install-dir\ndis\ndis.inf. Click OK and confirm that you want to install the driver.
-
As an Administrator, issue the command sc start ndisisc on the command line to start the NDISISC driver.
Contact the InterSystems Worldwide Response Center (WRC)Opens in a new tab with any questions about installing the NDIS driver.
If one or more of a mirror’s members is a nonroot Caché instance on a UNIX® or Linux system, as described in Caché Nonroot Installation in the chapter “Installing Caché on UNIX® and Linux” in the Caché Installation Guide, a mirror VIP cannot be used.
Mirroring in a Virtualized Environment
The use of mirroring in a virtualized environment, in which the Caché instances constituting a mirror are installed on virtual hosts, creates a hybrid high availability solution combining the benefits of mirroring with those of virtualization. While the mirror provides the immediate response to planned or unplanned outages through automatic failover, virtualization HA software automatically restarts the virtual machine hosting a mirror member following an unplanned machine or OS outage. This allows the failed member to quickly rejoin the mirror to act as backup (or to take over as primary if necessary).
When a mirror is configured in a virtualized environment, the following recommendations apply:
-
The failover members’ virtual hosts should be configured so that they will never reside on the same physical host.
-
To avoid a single point of storage failure, the storage used by the Caché instances on the failover members should be permanently isolated in separate datastores on separate disk groups or storage arrays.
-
Some operations performed on the virtualization platform level, such as backup or migration, can cause the failover members to be unresponsive for long enough to result in unwanted failover or an undesirable frequency of alerts. To address this problem, you can increase the QoS timeout setting (see Quality of Service (QoS) Timeout).
-
When conducting planned maintenance operations that cause interruptions in failover member connectivity, you can temporarily stop mirroring on the backup to avoid unwanted failover and alerts.
-
Snapshot management must be used very carefully on mirror members, as reverting a member to an earlier snapshot erases both the most recent status of the member—which may, for example, have been changed from primary to backup since the snapshot was taken—and journal data that is still possessed by other members. In particular,
-
A failover member that has been reverted to an earlier snapshot should be resumed only from a powered-off state; resuming it from a powered-on state creates the possibility of both failover members simultaneously acting as primary.
-
If a failover member that was reverted to an earlier snapshot becomes primary without obtaining all of the journal data created since the snapshot—for example, because it is forced to become primary—all other mirror members must be rebuilt (as described in Rebuilding a Mirror Member).
-
For guidelines concerning configuration, system sizing and capacity planning in general when deploying Caché 2015.1 and later in a VMware ESXi 5.5 and later environment, written by an InterSystems senior technology architect, see InterSystems Data Platforms and performance – Part 9 Caché VMware Best Practice GuideOpens in a new tab on InterSystems Developer Community.
Limiting Access to the Backup Failover Member
While the system hosting the backup failover member of a mirror may have unused resources or capacity, or you may want to run read only queries on its mirrored databases, InterSystems recommends the best practice of dedicating the host to its role as backup mirror member only. Any mirror-related or non-mirror use of the backup can have the following effects:
-
If a reduction in the backup’s performance causes it to be slow to acknowledge receipt of journal data from the primary, users of applications accessing mirrored databases on the primary may experience reduced performance. Any application interaction that must wait for acknowledgement by the primary, including those that involve an explicit journal synchronizations as well as synchronous commit transactions and ECP activity, may be affected in this manner.
-
If acknowledgement by the backup is delayed enough to prevent it from happening within the QoS timeout, the primary revokes the backup’s active status, causing automatic failover to become more difficult or impossible, depending on the nature of the primary outage.
-
If automatic failover does occur, the backup is now supporting both its existing resource usage and the primary’s user application resource usage. If this is a possibility, the backup host must have the capacity to handle both of these loads.
For these reasons, an async member, not the backup, should be used if user activity must be offloaded from the primary.
Installing Multiple Mirror Members on a Single Host
The Caché instances that make up a mirror are typically installed on separate physical or virtual hosts, but this is not a requirement. Assuming the capacity of the system is sufficient to handle the resource loads involved without incurring reduced performance, multiple mirror members can be installed on the same host; individual circumstances will determine whether this is feasible, and how many mirror members can be cohosted.
When cohosting multiple failover members, bear in mind that failover mirroring assumes that the members are coequal; there is no preferred primary member. For this reason, the best practice when placing failover member instances on separate hosts is to make the hosts as similar as possible and roughly equal in capacity. Cohosting failover members has the potential to go outside the bounds of this model. For example, if five mirrors are created on five separate hosts and then five Caché instances on one host are added to the mirrors as second failover members, the mirrors may initially operate with primaries on separate hosts and all backups cohosted on a single system. But if there are two simultaneous or nearly simultaneous outages resulting in failover, the single system is now hosting two primaries and three backups, which may be too large a load for it to handle with adequate performance.
When cohosting multiple mirror members, ensure that each mirror uses a unique set of ports on each machine (see Mirror Member Network Addresses), and ensure that other mirror members that are not cohosted use the same ports. For example, two primaries running on two separate hosts might both use port 1972, but if they are both replaced by cohosted DR asyncs, as described in the previous item, the new primaries cannot do so. If one primary uses port 1972 and another 1973 and these same ports are configured on the asyncs, the asyncs are ready for simultaneous promotion, and when it happens client can access the mirror using the same ports as before the outages. In addition, each mirror must have its own VIP.
When multiple Caché instances belonging to one or more mirrors are cohosted, they share a single ISCAgent.
The cohosting of mirror members has no impact on the network location of the arbiter for each mirror, as described in Locating the Arbiter to Optimize Mirror Availability. The mirrors involved can share an arbiter or use separate arbiters, as long as the failover members and arbiter(s) are appropriately located.
Configuring Mirroring
This section provides information and procedures for setting up, configuring and managing mirrors and mirror members.
Mirror Configuration Guidelines
In order to provide a robust, economical HA solution, mirroring is designed to be adaptable to a wide range of system configurations and architectures. However, InterSystems recommends that you adhere to the following general configuration guidelines:
-
Caché instance and platform compatibility — Before identifying the systems to be added to a mirror, be sure to review the requirements described in Caché Instance Compatibility and Member Endianness Considerations.
-
Coequality of failover members — The two failover members in a mirror are assumed to be coequal. There is no way to configure a preference for one to be primary, and the primary and backup roles are reversed as circumstances require. For this reason, the best practice is for the failover system hosts to be as similar to each other as possible, in particular to be configured with similar computing resources; that is, the CPU and memory configuration as well as the disk configuration on the two systems should be comparable.
-
Primary instance configuration and security settings — The configurations of such elements as users, roles, namespaces, and mappings (including global mappings and package mappings) on the primary failover member are not replicated by the mirror on other mirror members. Therefore, any settings required to enable the backup failover members or DR async members to effectively take over from the primary must be manually replicated on those members and updated as needed.
-
Unmirrored data — Only data in mirrored databases on the primary failover member is replicated and synchronized on the backup failover member and async members. Therefore, any files required to enable the backup or a DR async to effectively take over from the primary (including, for example, those related to SQL gateway and webserver configuration) must be manually copied to those members and updated as needed.
-
ICMP — Do not disable Internet Control Message Protocol (ICMP) on any system that is configured as a mirror member; mirroring relies on ICMP to detect whether or not members are reachable.
-
Network — InterSystems recommends that you use a high-bandwidth, low-latency, reliable network between the two failover members. If possible, it is desirable to create a private subnet for the two failover members such that the data and control-channel traffic can be routed exclusively on this private network. A slow network could impact the performance of both the primary and the backup failover members, and could directly impact the ability of the backup failover member to take over as primary in the event of a failover. See Network Configuration Considerations and Network Latency Considerations for further discussion of networking requirements and configuration. See also Configuring a Mirror Virtual IP (VIP) for important networking requirements and considerations when using a VIP.
-
Disk subsystem — In order for the backup failover member to keep up with the primary system, the disk subsystems on both failover members should be comparable; for example, if configuring a storage array on the first failover member, it is recommended that you configure a similar storage array on the second failover member. In addition, if network-attached storage (NAS) is used on one or both systems, it is highly recommended that separate network links be configured for the disk I/O and the network load from the mirror data to minimize the chances of overwhelming the network.
-
Journaling performance and journal storage — As journaling/dejournaling is the core of mirror synchronization, it is essential to monitor and optimize the performance of journaling on the failover members. In particular, InterSystems recommends that you increase the generic memory heap size on all mirror members. In the interests of both performance and recoverability, InterSystems also recommends placing the primary and alternate journal directories on storage devices that are separated from the devices used by databases and the write image journal (WIJ), as well as separated from each other. See Journaling Best Practices and Restore Journal Files in the “Journaling” chapter of the Caché Data Integrity Guide for details.
-
Virtualization — While using mirroring in a virtualized environment provides a hybrid high availability solution that combines the benefits of both, important recommendations apply; see Mirroring in a Virtualized Environment for more information.
-
Task scheduling — When you create a task on a mirror member using the task manager, you must specify whether the task can run on the primary only, any member other than the primary, or any mirror member. Tasks intended to be run on more than one mirror member must be either created separately on the members or exported from the Task Manager on one member and imported on the others. For more information on creating, importing, and exporting tasks, see Using the Task Manager in the “Managing InterSystems IRIS” chapter of the System Administration Guide.
-
Startup — On the primary failover member, you may want to move code from existing ^ZSTU or ^ZSTART routines to the ^ZMIRROR routine so that it is not executed until the mirror is initialized. See Using the ^ZMIRROR Routine for more information.
Installing the Arbiter
To extend automatic failover to the widest possible range of outage scenarios, as described in Automatic Failover Mechanics, InterSystems recommends that you configure an arbiter for each mirror. As detailed in Locating the Arbiter to Optimize Mirror Availability, the recommended network location for the arbiter depends on the locations of the failover members. A single system can be configured as arbiter for multiple mirrors, provided its location is appropriate for each.
To act as arbiter, a system must have a running ISCAgent process of version 2015.1 or later. Because the ISCAgent is installed with Caché, any system that hosts one or more instances of Caché version 2015.1 or later meets this requirement and can be configured as arbiter without further preparation; however, a system hosting one or more failover or DR async members of a mirror should not be configured as arbiter for that mirror.
Systems that do not host a Caché instance of version 2015.1 or later can be prepared to act as arbiter by installing the ISCAgent using a kit for this purpose; if the system hosts a pre-2015.1 Caché instance, the kit upgrades the existing ISCAgent. To prepare such a system, download the ISCAgent installation kit appropriate to your arbiter system’s platform from InterSystems and then, to install or upgrade the ISCAgent:
-
On Windows systems, simply execute the installation file, for example ISCAgent-2015.2.0.540.0-win_x64.exe.
-
On UNIX®, Linux, and Mac OS X systems, unpack the single file installation kit if necessary, then execute cinstall at the top level of the installation kit, /ISCAgent. For example:
[root@arbiterhost home]# gunzip ISCAgent-2015.1.0.423.0-lnxrhx64.tar.gz
[root@arbiterhost home]# tar -xf ISCAgent-2015.1.0.423.0-lnxrhx64.tar
[root@arbiterhost home]# ./ISCAgent/cinstall
There are ISCAgent installation kits for all platforms on which Caché is supported; see Supported Version Interoperability for a list of supported platforms.
Ensure that the ISCAgent process on the arbiter system is configured to start at system startup; see Starting and Stopping the ISCAgent for more information.
Starting the ISCAgent
A Caché instance cannot be added to a mirror as a failover or DR async member unless the ISCAgent process is running on its host system. The ISCAgent must be configured to start automatically at system startup; see Starting and Stopping the ISCAgent for more information.
Securing Mirror Communication with SSL/TLS Security
To provide security within a mirror, you can configure its members to use SSL/TLS when communicating with each other. When you require the use of SSL/TLS when creating the mirror, all members must use SSL/TLS for all communication between them.
See Creating a Mirror for information about creating a mirror with SSL/TLS security; see Editing or Removing a Failover Member for information about adding SSL/TLS security to an existing mirror.
For a single, comprehensive step-by-step guide to creating a mirror with SSL/TLS security, written by an InterSystems Senior Support Specialist, see Creating SSL-Enabled Mirror Using Public Key Infrastructure (PKI)Opens in a new tab on InterSystems Developer Community.
Use of SSL/TLS with mirroring is highly recommended. Disabling SSL/TLS for a mirror is strongly discouraged.
If an instance has journal or database encryption enabled and you make it the primary failover member of a mirror, you must configure the mirror to use SSL/TLS.
The use of SSL/TLS for mirror communication by a mirror member requires proper SSL/TLS setup on the system hosting the mirror member instance; see Creating and Editing SSL/TLS Configurations for a Mirror in the “Using SSL/TLS with Caché” chapter of the Caché Security Administration Guide for more information.
The use of encrypted journal files in mirroring also requires preparation; for detailed information about journal encryption, see Activating Journal Encryption in a Mirror in this chapter and the “Managed Key Encryption” chapter of the Caché Security Administration Guide.
Using the ^MIRROR Routine
Most mirroring configuration, management and status operations are available in the management portal and also in the ^MIRROR routine, which is executed in the %SYS namespace. However, some operations are available only in the ^MIRROR routine, including forcing the backup failover member to become the primary failover member (see Unplanned Outage of Primary Without Automatic Failover). The procedures provided in this chapter describe the management portal operation if available, but the ^MIRROR option providing the equivalent operation is always noted.
Creating a Mirror
Creating a mirror involves configuring the primary failover member, typically a backup failover member (although this is not required), and optionally one or more async members. After the mirror is created, you can add databases to the mirror.
Before you can add a Caché instance to a mirror as failover member or async, you must ensure that the ISCAgent process has been started as described in the Starting and Stopping ISCAgent section in this chapter.
The procedure for adding backup and async members requires an additional step if, as recommended by InterSystems, you configure the mirror to use SSL/TLS (see Securing Mirror Communication with SSL/TLS Security). When this is the case, each new member must be approved on the primary before joining the mirror.
To create and configure a mirror, use the following procedures:
After you have created the mirror and configured the failover members and optionally one or more async members, add databases to the mirror using the procedures in the Adding databases to a mirror section of this chapter.
Create a Mirror and Configure the First Failover Member
The following procedure describes how to create a mirror and configure the first failover member.
-
On the first failover member, navigate to the Create Mirror page of the Management Portal (System Administration > Configuration > Mirror Settings > Create a Mirror) and click Create a Mirror. If the option is not active, mirroring has not been enabled; first click Enable Mirror Service, then select the Service Enabled check box and click Save, then select the Create a Mirror option.
-
On the Create Mirror page, enter the following information in the Mirror Information section:
-
Mirror Name — Enter a name for the mirror.
Note:Valid names must be from 1 to 15 alphanumeric characters; lowercase letters are automatically replaced with uppercase equivalents.
-
Require SSL/TLS — Specify whether or not you want to require SSL/TLS security for all communication within the mirror (as recommended) by selecting or clearing the check box. If you select Require SSL/TLS and the instance does not already have a valid SSL/TLS configuration for mirroring, before completing the procedure you must click the Set up SSL/TLS link and create the needed SSL/TLS configuration on this member. (Instructions for creating the SSL/TLS configuration are contained in Creating and Editing SSL/TLS Configurations for a Mirror in the “Using SSL/TLS with Caché” chapter of the Caché Security Administration Guide. You can also cancel the Create Mirror procedure and navigate to the SSL/TLS Configurations page (System Administration > Security > SSL/TLS Configurations). If the instance does have a valid SSL/TLS configuration for mirroring, the link is Edit SSL/TLS instead, and you need not use it when selecting Require SSL/TLS unless you want to modify that configuration.
-
Use Arbiter — Specify whether or not you want to configure an arbiter (as recommended) to enable automatic failover for the widest possible range of outage scenarios, as described in Automatic Failover Mechanics. If you select Use Arbiter, you must supply the hostname or IP address of the system you want to configure as arbiter and the port used by its ISCAgent process (2188 by default). See Locating the Arbiter to Optimize Mirror Availability and Installing the Arbiter for additional information about the arbiter.
-
Use Virtual IP — Specify whether or not you want to use a Virtual IP address by selecting or clearing the check box. If you select Use Virtual IP, you are prompted for an IP address, Classless Inter-Domain Routing (CIDR) mask, and network interface.
Important:See Configuring a Mirror Virtual IP (VIP) for requirements and important considerations before configuring a VIP.
-
Compression Mode for Failover Members, Compression Mode for Async Members — Specify whether to compress journal data before transmission from the primary to the backup and to async members, respectively; see Journal Data Compression for more information. The default setting for both is System Selected, which optimizes for response time between the failover members and for network utilization between the primary and asyncs.
-
-
Enter the following information in the Mirror Failover Information Section:
-
Mirror Member Name — A name for the failover member you are configuring on this system (defaults to a combination of the system host name and the Caché instance name). Mirror member names can contain only alphanumeric characters (letters and numbers), underscores, and hyphens; any other characters will cause the name to be rejected. The maximum length of a mirror member name is 32 characters.
-
Superserver Address — The IP address or host name that external systems can use to communicate with this failover member; typically you can accept the default. For information on the Superserver address, see Mirror Member Network Addresses and Updating Mirror Member Network Addresses.
-
Mirror Agent Port — The port number of the ISCAgent on this failover member; default is 2188, which you can typically accept. For information on the agent port, see the Managing the ISCAgent.
-
-
Click Advanced Settings to display and edit additional mirror settings, as follows:
-
Quality of Service Timeout (msec) — The maximum time, in milliseconds, that a failover member waits for a response from the other failover member before taking action; also applies to the arbiter’s wait for a failover member’s response. For information about the QoS timeout, see Configuring the Quality of Service (QoS) Timeout Setting.
-
Mirror Private Address — Enter the IP address or host name that the other failover member can use to communicate with this failover member; see Mirror Member Network Addresses and Updating Mirror Member Network Addresses.
-
Agent Address — Enter the address that other mirror members attempting to contact this member’s ISCagent will try first; see Mirror Member Network Addresses and Updating Mirror Member Network Addresses.
-
-
Click Save.
You can also use the ^MIRROR routine (see Using the ^MIRROR Routine) to create a mirror. When you execute ^MIRROR on a Caché instance without an existing mirror configuration, the Enable Mirror Service option is available if mirroring is not yet enabled. Once mirroring is enabled, the Create a Mirror option is available and provides an alternative means of creating a mirror and configuring the instance as the primary failover member. The SYS.Mirror.CreateNewMirrorSet()Opens in a new tab mirroring API method can also be used for this purpose.
Configure the Second Failover Member
Follow this procedure to configure the second failover member of the mirror.
-
On the second failover member, navigate to Join Mirror as Failover page of the Management Portal (System Administration > Configuration > Mirror Settings > Join as Failover). If the Join as Failover option is not available, mirroring has not been enabled; first click Enable Mirror Service, then select the Service Enabled check box and click Save, then select the Join as Failover option.
-
On the Join Mirror as Failover page, in the Mirror Information section, enter the mirror name you specified when you configured the first failover member.
-
Enter the following information in the Other Mirror Failover Member’s Info section:
-
Agent Address on Other System — Enter the Superserver Address you specified when you configured the first failover member.
-
Mirror Agent Port — Enter the port of the ISCAgent you specified when you configured the first failover member.
-
Caché Instance Name — Enter the name of the Caché instance configured as the first failover member.
-
-
Click Next to retrieve and display information about the mirror and the first failover member. In the Mirror Failover Member Information section:
-
Mirror Member Name — Specify a name for the failover member you are configuring on this system (defaults to a combination of the system host name and the Caché instance name). Mirror member names can contain alphanumeric characters, underscores, and hyphens.
-
Superserver Address — Enter the IP address or host name that external systems can use to communicate with this failover member; see Mirror Member Network Addresses and Updating Mirror Member Network Addresses for information.
-
Mirror Agent Port — Enter the port number of the ISCAgent on this failover member; default is 2188. For information on the agent port, see the Managing the ISCAgent.
-
Network Interface for Virtual IP — Displays the network interface you specified when you configured the first failover member; this setting cannot be changed on the second failover member.
-
SSL/TLS Requirement — Displays the setting you specified when you configured the first failover member. This setting cannot be changed on the second failover member.
If the mirror requires SSL/TLS and the instance does not already have a valid SSL/TLS configuration for mirroring, before completing the procedure you must click the Set up SSL/TLS link and create the needed SSL/TLS configuration on this member. (Instructions for creating the SSL/TLS configuration are contained in Creating and Editing SSL/TLS Configurations for a Mirror in the “Using SSL/TLS with Caché” chapter of the Caché Security Administration Guide. You can also cancel the Join as Failover procedure and navigate to the SSL/TLS Configurations page of the Management Portal (System Administration > Security > SSL/TLS Configurations).
If the instance does have a valid SSL/TLS configuration for mirroring, the link is Edit SSL/TLS instead, and you need not use it when SSL/TLS is required unless you want to modify that configuration.
-
Mirror Private Address — Enter the IP address or host name that the other failover member can use to communicate with this failover member; see Mirror Member Network Addresses and Updating Mirror Member Network Addresses.
-
Agent Address — Enter the address that other mirror members attempting to contact this member’s ISCagent will try first; see Mirror Member Network Addresses and Updating Mirror Member Network Addresses.
-
-
Click Advanced Settings to display the Quality of Service Timeout setting you specified when you configured the first failover member; this setting cannot be changed on the second failover member.
-
Click Save.
If you configured the mirror to require SSL/TLS, you are reminded that you must complete the process of adding the second failover member to the mirror by authorizing the second failover member on the first failover member, as described in the following section.
You can also use the ^MIRROR routine (see Using the ^MIRROR Routine) to configure the second failover member. When you execute ^MIRROR on a Caché instance without an existing mirroring configuration, the Enable Mirror Service option is available if mirroring is not yet enabled. Once mirroring is enabled, the Join Mirror as Failover Member option is available and provides an alternative means of both configuring the backup failover member and adding it to the mirror. The SYS.Mirror.JoinMirrorAsFailoverMember()Opens in a new tab mirroring API method can also be used for this purpose.
Authorize the Second Failover Member or Async (SSL/TLS Mirrors Only)
If you configured the mirror to require SSL/TLS, an additional step is needed after you configure the second failover member or configure an async member. On the system on which you created the mirror and configured the first failover member, you must authorize the new mirror member, as follows:
-
Navigate to the Edit Mirror page of the Management Portal (System Administration > Configuration > Mirror Settings > Edit Mirror).
-
At the bottom of the page, a Pending New Members area lists members that have been added to the mirror. Select the members you want to authorize, click Authorize, and confirm. (The SSL certificate of the second failover member is automatically verified when the member is added.)
-
The information in the Mirror Member Information section of the Edit Mirror page now includes the members you added. (See Mirror Member Network Addresses for information about the addresses displayed in this list.)
If you have added an async of a Caché version earlier than 2015.2, however, you must instead use the Add New Async Member button on the Edit Mirror page on the primary; see Editing or Removing a Failover Member for more information. You can also use the Add Async Member Not In Pending List option on the Mirror Configuration menu of the ^MIRROR routine to authorize an async member of a Caché version earlier than 2015.2. (If one failover member is Caché 2015.2 or later, the other must be as well, as failover members must be of the same version.)
The Authorize/Reject Pending New Members option on the Mirror Configuration menu of the ^MIRROR routine on the first failover member can be also used to authorize new failover or async members in a mirror configured to require SSL/TLS.
The SYS.Mirror.AddFailoverMember()Opens in a new tab mirroring API method can be used to authorize the second failover member in a mirror configured to require SSL/TLS, and the Config.MapMirrors.Create() API method can be used to create an authorized member (failover or backup).
For information about authorizing X.509 DN updates on members of a mirror requiring SSL/TLS (for example when a member’s certificate is replaced), see Authorizing X.509 DN Updates (SSL/TLS Only).
Review Failover Member Status in the Mirror Monitor
As described in Monitoring Mirrors, you can use the Mirror Monitor to see information about the failover members in a mirror, including their current status (role) in the mirror. Use the mirror monitor to confirm that your mirror and its failover members are now set up as intended, as follows:
-
On the first failover member you configured, display the Mirror Monitor page of the Management Portal (System Operation > Mirror Monitor).
-
In the Mirror Failover Member Information area, the mirror member names and network address of the two failover members are listed.
-
The Mirror Member Status area should show the first failover member you configured as Primary in the Status column, and the second as Backup. As discussed in Mirror Member Journal Transfer and Dejournaling Status, the Journal Transfer status of the backup should be Active, and its Dejournaling status should be Caught up.
-
In the Arbiter Connection Status area, if you configured an arbiter, its network address and agent port number are displayed. Failover Mode should be Arbiter Controlled and Connection Status should be Both failover members are connected to the arbiter; if this is not the case, the arbiter may not have been correctly installed, its ISCAgent process may not be running, or the network address or port number you supplied may be incorrect. A network problem preventing contact with the arbiter by one or both failover members could also cause the Failover Mode to be Agent Controlled.
The same information is displayed in the Mirror Monitor on the backup failover member.
Configure Async Mirror Members
For each async member you want to configure, use the following procedure. A mirror with a failover pair can include up to 14 reporting or disaster recovery (DR) async members. A single Caché instance can be a reporting async member of up to 10 mirrors, but an instance can be a DR async in one mirror only. Once you have configured an instance as either a read-only or a read-write reporting async, it can be added to other mirrors only as a reporting async member of that type. (A reporting async member’s type can be changed for all mirrors to which it belongs, however, as described in Editing the Mirror Configuration on an Async Member.)
The procedure for adding an instance to a mirror as a reporting async member is the same whether you are using the Join as Async option as described here or the Join a Mirror button on the Edit Async Configurations page as described in Editing the Mirror Configuration on an Async Member, except that the Join a Mirror button on the Edit Async Configurations page can be used only on reporting async members, as a DR async can belong to one mirror only.
-
Navigate to the Join Mirror as Async page of the Management Portal (System Administration > Configuration > Mirror Settings > Join as Async); if the Join as Async option is not available, choose Enable Mirror Service and enable the service.
-
On the Join Mirror as Async page, enter the mirror name you specified when you created the mirror at the Mirror Name prompt.
-
Select either the primary or the backup failover member, and in the Mirror Failover Member’s Info section, enter the information for the member you selected at each of the following prompts:
-
Agent Address on Failover System — Enter the Superserver Address you specified when you configured the selected failover member.
-
Mirror Agent Port — Enter the ISCAgent port you specified for the selected failover member.
-
Caché Instance Name — Enter the name of the Caché instance you configured as the selected failover member.
-
-
Click Next to verify the failover member’s information and move to the Async Member Information section. In this section, enter the following information:
-
Async Member Name — Specify a name for the async member you are configuring on this system (defaults to a combination of the system host name and the Caché instance name). Mirror member names can contain alphanumeric characters, underscores, and hyphens.
Note:The mirror member name cannot be changed, and will therefore be used when a reporting async member joins additional mirrors in the future.
-
Async Member Address — Enter the IP address or host name that external systems can use to communicate with this async member.
Note:The Async Member Address you provide becomes the async member’s superserver address and mirror private address (see Mirror Member Network Addresses). If you want these to be different, for example when you want to place a DR async’s mirror private address on the mirror private network while leaving its superserver address on the external network, you can update the async’s addresses on the primary after adding it to the mirror; see Updating Mirror Member Network Addresses for more information.
-
Agent Address — Enter the address that other mirror members attempting to contact this member’s ISCagent will try first; see Mirror Member Network Addresses and Updating Mirror Member Network Addresses.
-
Async Member System Type — Select one of the following types from the drop-down list. A single Caché instance can be a reporting async member of multiple mirrors, but can be a DR async member of only one mirror.
-
Disaster Recovery (DR) — This option is for a system on which read-only copies of all of the mirrored databases in a single mirror are maintained, making it possible to promote the DR async member to failover member when one of the failover members fails. See Promoting a DR Async Member to Failover Member in this chapter for more information about DR async promotion.
Important:When the mirror is configured to use VIP, a disaster recovery async member must have direct TCP/IP connectivity to the failover members; see Configuring a Mirror Virtual IP (VIP) for more information.
-
Read-Only Reporting — This option is used to maintain read-only copies of the mirrored databases (or a subset of the mirrored databases) from one or more mirrors for purposes of enterprise reporting and data mining in which there is no requirement for data to be modified or added.
-
Read-Write Reporting — This option is used to maintain read-write copies of the mirrored databases (or a subset of the mirrored databases) from one or more mirrors as data sources for reporting/business intelligence operations in which data modification or the addition of data during analysis must be enabled.
-
-
Set up SSL/TLS — If the mirror requires SSL/TLS and the instance does not already have a valid SSL/TLS configuration for mirroring, an error message and this link are included. Before completing the procedure, you must click the link and create the needed SSL/TLS configuration on this member. (Instructions for creating the SSL/TLS configuration are contained in Creating and Editing SSL/TLS Configurations for a Mirror in the “Using SSL/TLS with Caché” chapter of the Caché Security Administration Guide. You can also cancel the Join as Async procedure and navigate to the SSL/TLS Configurations page of the Management Portal (System Administration > Security > SSL/TLS Configurations).
-
Edit SSL/TLS — If the mirror requires SSL/TLS and the instance does have a valid SSL/TLS configuration for mirroring, this link is displayed instead of Set up SSL/TLS; you can use it to edit the existing SSL/TLS configuration if you wish. The instance’s X.509 Distinguished Name is also displayed.
-
-
Click Save.
If you configured the mirror to require SSL/TLS, you are reminded that you must complete the process of adding the async member to the mirror by authorizing the async member on the first failover member, as described in Authorize the Second Failover Member or Async (SSL/TLS Only).
You can also use the ^MIRROR routine (see Using the ^MIRROR Routine) to configure async mirror members. When you execute ^MIRROR on a Caché instance for which mirroring is enabled, the Join Mirror as Async Member (or Join Another Mirror as Async Member) option on the Mirror Configuration menu is available and provides an alternative means of configuring an async member and adding it to the mirror. The SYS.Mirror.JoinMirrorAsAsyncMember()Opens in a new tab mirroring API method can also be used to configure an async member.
After an instance has been added to one mirror as an async member using the procedure described in this section, you can use the Join a Mirror button on the Edit Async page (see Editing the Mirror Configuration on an Async Member) to add it to additional mirrors, but as the same type of async only.
Adding Databases to a Mirror
Only a local database on the current primary failover member can be added to a mirror; it is added on the primary first, then on the backup, and then on any desired async members. All mirrored databases must be journaled.
You must add the same set of mirrored databases to both the primary and backup failover members, as well as to any DR async members; which mirrored databases you add to reporting async members depends on your reporting needs. The namespaces and global/routine/package mappings associated with a mirrored database must be the same on all mirror members, including all async members on which the database exists. The mirrored databases on the backup failover member must be mounted and caught up (see Activating and Catching up Mirrored Databases) to be able to take over as the primary in the event of a failover; the mirrored databases on a DR async member must be mounted and caught up to make it suitable for promotion to failover member.
The procedure for creating a mirrored database (that is, adding a new database containing no data) is different from that for adding an existing database to the mirror. Global operations on a database created as a mirrored database are recorded in mirror journal files from the beginning, and the mirror therefore has access to all the data it needs to synchronize the database across mirror members. But global operations on an existing database before it was added to a mirror are contained in non-mirror journal files, to which the mirror does not have access. For this reason, an existing database must be backed up on the primary failover member after it is added to the mirror and restored on the backup failover member and on any async members on which it is to be located. Once this is done, you must activate and catch up the database to bring it up to date with the primary.
Mirrored Database Considerations
Bear the following points in mind when creating and adding mirrored databases:
-
Only data in CACHE.DAT files can be mirrored. Data that is external (that is, stored on the file system) cannot be mirrored by Caché.
-
System databases (CACHESYS, CACHELIB, CACHE, CACHETEMP and CACHEAUDIT, and ENSLIB if Ensemble is installed) cannot be mirrored.
-
Because more database directory information is stored for mirrored databases, they reduce the maximum number of databases that can be configured within a Caché instance. For more information, see Configuring Databases in the “Configuring Caché” chapter of the Caché System Administration Guide.
-
If you want to configure both mirroring and shadowing for the same database, you have two options:
-
If the mirror has only one failover member, you can configure the failover member as the shadow source.
-
If the mirror has two failover members, you must configure a reporting async member as the shadow source. (You cannot configure a DR async as the shadow source because it is eligible for promotion and could thereby become the second failover member.)
To shadow both mirrored and non-mirrored databases on a reporting async mirror member, you must configure separate mirrored and non-mirrored shadows; to shadow databases from two or more different mirrors on a reporting async, you must configure a separate shadow for each mirror.
See the “Shadowing” chapter in the Caché Data Integrity Guide for information about configuring shadowing.
-
-
The mirror automatically and continually synchronizes the following properties of a mirrored database on a backup or async with the properties of the database on the primary:
-
Maximum Size
-
Expansion Size
-
Resource Name
-
Collation
For example, when the Maximum Size of a mirrored database is increased on the primary, it is automatically increased for that database on the other members to match the primary, if necessary; if Maximum Size is then reduced on an async, synchronization automatically increases it to the value on the primary. If database properties are changed on either the primary or another mirror member while that member is disconnected, they are automatically synchronized when the member reconnects to the mirror. There are two exceptions to automatic synchronization of these database properties, as follows:
-
The values of the Maximum Size and Expansion Size properties on an async can be increased by synchronization, but never reduced. For example, if the Maximum Size of a database on the primary is reduced, the value of this property is reduced on the backup, but not on any asyncs belonging to the mirror; if the Maximum Size of a database on an async is increased to be larger than on the primary, it is not reduced by synchronization to the value on the primary.
-
The Resource Name property of a database is synchronized with the primary on the backup, but not on async members.
See Edit Mirrored Local Database Properties in the “Configuring Caché” chapter of the Caché System Administration Guide for information about mirrored database properties.
-
Create a Mirrored Database
To create a mirrored database, follow this procedure.
You can also use the ^DATABASE routine to create mirrored databases; see Creating a Mirrored Database Using the ^DATABASE Routine in this chapter.
-
On the current primary failover member, navigate to the Local Databases page of the Management Portal (System Administration > Configuration > System Configuration > Local Databases), and click the Create New Database button.
-
Follow the procedure in the Create a Local Database section of the “Configuring Caché” chapter of the Caché System Administration Guide. On the second panel, select Yes for Mirrored database? and enter a name for the database within the mirror; the default is the local database name you provided. The leading character of the mirror database name must be alphabetic or an underscore, and the rest must be alphanumeric characters, hyphens and underscores. Mirror database names are case-insensitive, thus two names cannot differ only in case; if you enter a mirror database name that is already included in the mirror, the new database cannot be added to the mirror and must be deleted. (Names of mirrored databases created under earlier versions of Caché may be stored in lowercase or mixed case, but the addition of databases with duplicate uppercase names is still precluded.)
On an async member that belongs to more than one mirror, you must also select the mirror the database will belong to.
Note:When you select Yes for Mirrored database, Journal globals is automatically locked to Yes.
-
Confirm the procedure to create the database and add it to the mirror on the primary.
-
On the backup failover member, and on each async member to which you want to add the mirrored database, follow the previous three steps, taking care to enter the correct mirror database name from the primary as the mirror database name on each of the other members. (The local database names do not have to match.)
Note:If you attempt to add a new database to the mirror on a non-primary member that was not created as a mirrored database on the primary, but rather added to the mirror after it was created, an error message notes this and you cannot complete the operation.
If the first mirror journal file for a mirrored database has been purged from the primary, the database can no longer be created as a mirrored database on another member; instead, you must make a backup on the primary and restore it on the backup or async, as described in Add an Existing Database to the Mirror. For this reason, it is best to create the database on the backup and async members as soon as possible after creating it on the primary. (For information about when mirror journal files are purged on the primary, see Purge Journal Files in the “Journaling” chapter of the Caché Data Integrity Guide.)
Add an Existing Database to the Mirror
Use the procedure that follows to add one or more existing databases to a mirror.
The SYS.Mirror.AddDatabase()Opens in a new tab mirroring API method provides an alternative means of adding existing databases to a mirror.
-
On the current primary failover member, navigate to the Local Databases page of the Management Portal (System Administration > Configuration > System Configuration > Local Databases) and click the Add to Mirror button.
-
From the listed databases (non-system databases not already in the mirror) select those you want to add and click Add. You must enter a name for each database within the mirror; the default is the local database name you provided. The leading character of the mirror database name must be alphabetic or an underscore, and the rest must be alphanumeric characters, hyphens and underscores. Mirror database names are case-insensitive, thus two names cannot differ only in case; if you enter a mirror database name that is already included in the mirror, the operation fails. (Names of mirrored databases created under earlier versions of Caché may be stored in lowercase or mixed case, but the addition of databases with duplicate uppercase names is still precluded.)
To run the task in the background, select Run add in the background; if you select five or more databases, the task is automatically run in the background. Confirm the procedure to add the selected databases to the mirror on the primary.
You can also add an individual database to the mirror by clicking its name to edit its properties and clicking the Add to Mirror <mirrorname> link, then clicking Add and confirming the procedure. (If journaling is not enabled on the database, Databases must be journaled to be mirrored is displayed in place of this link; to enable it, select Yes from the Global Journal State drop-down list.) Alternatively, the Add Mirrored Database(s) option on the Mirror Management menu of the ^MIRROR routine also lets you add an individual database. In either case, you can accept the default of a mirror database name the same as the local name, or enter a different one.
Note:If a backup failover member or async member has a different endianness than the primary failover member, you must use the procedure described in Member Endianness Considerations to add the database to the backup or async member after adding it to the primary, rather than adding it on that member as described in the following steps.
-
Once the database has been added to the mirror, back it up on the primary failover member. Review Backup Strategies, Restoring from Backup, and Mirrored Database Considerations in the “Backup and Restore” chapter of the Caché Data Integrity Guide for information about different backup techniques and the corresponding restore procedures.
Important:If the database you are copying is encrypted on the primary, the key with which it is encrypted must also be activated on the backup (and asyncs, if any), or the database must be converted to use a key that is activated on the destination system using the cvencrypt utility (as described in the Converting an Encrypted Database to Use a New Key section of the “Using the cvencrypt Utility” chapter of the Caché Security Administration Guide).
Ensuring that a mirrored database is synchronized after it is restored from backup (see the following step) requires that the journal files from the time of the backup on the primary failover member are available and online; for example, if the relevant journal files have been purged, you must make and restore a more up to date backup. For general information about restoring mirror journal files see Restoring Mirror Journal Files in the “Journaling” chapter of the Caché Data Integrity Guide; for information about purging mirror journal files see Purge Journal Files in the “Journaling” chapter of the Caché Data Integrity Guide.
-
On the backup failover member and each connected async member, do the following:
-
If a local database with the same local name and database directory as the mirrored database you just added on the primary failover member does not already exist, create it.
-
Restore the backup you made of the mirrored database on the primary, overwriting the existing database. The procedure for this depends on the restore method you are using, as follows:
-
Caché online backup restore (^DBREST routine) — This routine automatically recognizes, activates and catches up a mirrored database on the backup and async members. For more information see Mirrored Database Considerations in the “Backup and Restore” chapter of the Caché Data Integrity Guide.
Note:When a mirrored database is restored on a non-primary member, the data to begin the automatic synchronization process may not have been sent yet. If the required data does not arrive within 60 seconds, the process begins anyway; those databases may not catch up if the data does not arrive before it is required, however, in which case a message regarding the database(s) that had the problem is logged in the cconsole.log file. (During database creation this process would affect only one database, but it also applies to catching up in other situations in which multiple databases are involved.)
-
External backup restore or cold (offline) backup restore — Both of these methods require that you manually activate and catch up the mirrored databases after they are restored and mounted on the backup failover member or async member, as described in Activating and Catching up Mirrored Databases, immediately following.
-
-
As an alternative to the previous procedure, after adding an existing database to the mirror on the primary, you can copy the databases’s CACHE.DAT file from the primary to the backup and async members instead of backing up and restoring the database. To do so, use this procedure:
-
Ensure that there is a placeholder target database on the backup and each async member.
-
On both failover members and each aysnc member, make sure the source and target databases are not mounted (see Maintaining Local Databases in the “Managing Caché” chapter of the Caché System Administration Guide).
-
Copy the mirrored CACHE.DAT file from the primary failover member to the database directory of the placeholder target database on the backup and each async member, overwriting the existing CACHE.DAT file.
Note:If the database you are copying is encrypted on the primary, the key with which it is encrypted must also be activated on the backup (and asyncs, if any), or the database must be converted to use a key that is activated on the destination system using the cvencrypt utility (as described in the Converting an Encrypted Database to Use a New Key section of the “Using the cvencrypt Utility” chapter of the Caché Security Administration Guide).
-
Mount the database on the all members.
-
Activate and catch up the mirrored databases on the backup failover member and async member(s) as described in Activating and Catching up Mirrored Databases in this chapter.
When you are adding an existing mirrored database to an async member, you can back up the database on (or copy the CACHE.DAT file from) the backup failover member or another async member, assuming it is fully caught up, instead of the primary. This may be more convenient, for example if the primary is in a different data center than the async on which you will be restoring the backup. Do not use a member as the source, however, unless you have a high degree of confidence in the consistency of its databases.
Activating and Catching Up Mirrored Databases
You can activate and/or catch up mirrored databases on the backup failover member and async members using the Mirror Monitor.
As noted in Add an Existing Database to a Mirror, a newly added mirrored database containing data can be automatically synchronized with the primary through use of the ^DBREST routine to restore the backup from the primary failover member. If some other method is used, it must be activated and caught up on the backup failover member and async members.
To activate and catch up mirrored databases, do the following on the backup failover member and async members:
-
Navigate to the Mirror Monitor page (System Operation > Mirror Monitor).
-
On an async member, click the Details link for the mirror containing the database(s) you want to take action on, if necessary.
-
The Mirrored databases list shows the status of each database, as described in Using the Mirror Monitor. Among other possible statuses, Needs Catchup indicates that the Catchup operation is needed, Needs Activation indicates that both the Activate and Catchup operations are needed, and Catchup Running shows that the Catchup operation is currently running on the database.
-
Select the Activate or Catchup link to perform an operation on a single database, or select Activate or Catchup from the Select an action drop-down and click Go to open a dialog in which you can select multiple databases from a list of all those for which the action is appropriate to apply it to all of them at once. When you do this, the Activate and Catchup tasks are run in the background. When you select Catchup, databases of both Needs Activation and Needs Catchup status are displayed; both Activate and Catchup are applied to any Needs Activation databases you select.
You can also use the Mirrored databases list to mount or dismount one or more mirrored databases, or to remove one or more databases from the mirror as described in Removing Mirrored Databases from a Mirror.
The Activate or Catchup mirrored database(s) option on the Mirror Management menu in the ^MIRROR routine and the SYS.Mirror.ActivateMirroredDatabase()Opens in a new tab and SYS.Mirror.CatchupDB()Opens in a new tab mirroring API methods provide alternative means of activating/catching up mirrored databases.
When you use the Mirrored databases list, the Databases page of the management portal (see the “Managing Caché” chapter of the Caché System Administration Guide), or the ^DATABASE routine (see the “Using Character-based Security Management Routines” chapter of the Caché Security Administration Guide) to mount a mirrored database, you can choose whether or not to catch up the database following the mount operation.
When parallel dejournaling (see Configuring Parallel Dejournaling) is enabled and supported by available resources, it is used in when catching up mirrored databases. However, only one dejournaling job will be used for each database being caught up, up to the maximum of four in total.
Editing or Removing Mirror Members
The following procedures describe how to edit or remove the mirror configuration on a mirror member, including deleting a mirror altogether, and how to remove databases from a mirror when you are not removing a mirror configuration.
-
Clearing the FailoverDB Flag on Reporting Async Mirror Members
-
Removing the Mirrored Database Attribute When Removing a Mirror Member
Several options on the Mirror Configuration menu of the ^MIRROR routine provide alternative means for editing mirror configurations. The specific options available depend on whether the routine is used on a failover member or async member.
Clearing the FailoverDB Flag on Reporting Async Mirror Members
As described in Async Mirror Members, an async member must be of one of three types:
-
Disaster Recovery (DR)—Maintains read-only copies of all mirrored databases on the primary; eligible to be promoted to failover member (see Promoting a DR Async to Failover Member for more information).
-
Read-Only Reporting—Maintains read-only copies of mirrored databases; not eligible to be promoted to failover member.
-
Read-Write Reporting—Maintains read-write copies of mirrored databases; not eligible to be promoted to failover member.
When a mirrored database is added to a DR or read-only reporting async, it is mounted as Read-Only, and the FailoverDB flag, which is set when the database is created on the primary, remains set on the async’s copy to
-
Ensure that the database remains read-only and therefore an exact mirror of the database on the primary (assuming dejournaling is caught up).
-
Indicate that the database can become the primary copy in the mirror in the event that a DR async member is promoted to failover member. A DR async member can be promoted only if includes all of the databases in the mirror and all of those databases have the FailoverDB flag set.
When a mirrored database is added to a read-write reporting async, on the other hand, the FailoverDB flag is cleared to allow Read-Write mounting of the database. A mirrored database with the FailoverDB flag cleared can never be used as the mirror’s primary copy.
On a DR async, the FailoverDB flag can never be cleared. The flag can be manually cleared on reporting asyncs, however.
On a read-only reporting async, clearing the FailoverDB flag changes the database to read-write, which is typically not desirable. In most cases, therefore, including when you change the async type from Disaster Recovery (DR) to Read-Only Reporting (see Editing or Removing an Async Member), you can leave the FailoverDB flag set on all databases on a read-only reporting async.
When you change an async member’s type from Disaster Recovery (DR) or Read-Only Reporting to Read-Write Reporting, you are offered the option of clearing all the FailoverDB flags. Because the FailoverDB flag on a mirrored database requires it to remain read-only, you will typically want to use this option. If you want to keep one or more mirrored databases read-only on the read-write reporting async, however, you can use the individual Clear Flag links in the Mirrored Databases list to make individual databases read-write and leave the rest as read-only.
Databases added to an async member after you change its type are mounted and flagged according to the member’s new type, as previously described. The Clear FailoverDB Flags button always allows you to clear the flag from all databases at any time on either type of reporting async.
You cannot manually set the FailoverDB flag; this flag is set only when a mirrored database is added to a DR or read-only reporting async.
Removing the Mirrored Database Attribute When Removing a Mirror Member
When you remove a member from a mirror, you are always given the option of removing the mirror attribute from the mirrored databases belonging to the mirror. The consequences are as follows:
-
If you retain the mirror attribute and later restore the Caché instance to the mirror, the databases are automatically added to the mirror but must be activated before they can be caught up and then synchronized (see Activating and Catching Up Mirrored Databases).
However, if you retain the mirror attribute, you cannot delete that databases unless you first do one of the following:
-
Restore the member to the same mirror you removed it from. (If the member was the primary failover member, this is not an option, as the mirror no longer exists.) You can then remove one or more of the databases from the mirror (see Removing Mirrored Databases from a Mirror) and delete them if you wish.
-
Use the Remove one or more mirrored databases option of the ^MIRROR routine (see Using the ^MIRROR Routine) to remove the mirror attribute from one or more databases, then delete them if you wish.
-
-
If you remove the mirror attribute, the databases become permanently unmirrored and can be used like any local database; if you want to return them to the mirror after the instance rejoins as a mirror member, you must use the procedure for adding them to the mirror as existing databases for the first time.
When you remove an individual database from the mirror on a backup or async member, the mirrored database attribute is automatically removed.
Editing or Removing an Async Member
-
Navigate to the Edit Async Configurations page (System Administration > Configuration > Mirror Settings > Edit Async).
-
Use the Remove Mirror Configuration button to remove a DR async from its mirror or a reporting async from all mirrors to which it belongs and remove the instance’s mirror configuration entirely. (To remove a reporting async from a single mirror, use the Leave mirror link described later in this procedure.)
You are given the option of removing the mirror attribute from the mirrored databases on the member; see Removing the Mirrored Database Attribute When Removing a Mirror Member for information about this decision.
You are also given the option of removing the instance’s SSL/TLS configuration (see Securing Mirror Communication with SSL/TLS Security).
After using the Remove Mirror Configuration button to remove the instance’s mirror configuration entirely, you must restart Caché.
Note:The Remove Mirror Configuration option on the Mirror Configuration menu of the ^MIRROR routine (see Using the ^MIRROR Routine) provides an alternative method for removing an async member’s mirror configuration entirely.
-
Use the Join a Mirror button to add a reporting async member to another mirror (it can belong to a maximum of 10); the procedure is the same as that described in Configure Async Mirror Members for adding an async member to its first mirror, except that the member name and async type (read-only or read-write) cannot be changed. This button is not available on a DR async member; to join another mirror, you must first change the Async Member System Type as described in a later step.
-
As described in Clearing the FailoverDB Flag on Reporting Async Mirror Members, you can use the Clear FailoverDB Flags button to clear the FailoverDB flag on all mirrored databases on a read-only reporting async, or after you change the async system type from Disaster Recovery (DR) to Read-Write or Read-Only Reporting.
-
The following settings in the Mirror Member Information section can be modified for the async member you are editing except the mirror member name. After you have changed one or more, click Save.
-
Mirror Member Name — The name provided when the async member joined its first mirror; cannot be changed.
-
Async Member System Type — You can change the type of an async member using this drop down. The following conditions apply:
-
If you change from Disaster Recovery (DR) to Read-Write Reporting, you are prompted to clear the FailoverDB flag for all mirrored databases, as described in Clearing the FailoverDB Flag on Reporting Async Mirror Members.
-
When you change from Read-Write Reporting to Read-Only Reporting or the reverse, the change is made for all mirrors to which the reporting async member belongs.
-
You cannot change from Read-Write or Read-Only Reporting to Disaster Recovery (DR) unless all of the following are true:
-
If journal encryption is in use, the async is using the same journal encryption key as the failover members (see Activating Journal Encryption in a Mirror).
-
The FailoverDB flag is set on all mirrored databases. (Once cleared, this flag cannot be reset. To address this, you can substitute a copy of the database taken from another member on which FailoverDB is set.)
-
The member does not belong to any other mirror.
-
The ISCAgent is running (see Starting and Stopping the ISCAgent).
If a dejournaling filter is set on the async (see Using a Dejournal Filter on a Reporting Async), it is removed when you change the Async Member System Type to Disaster Recovery (DR).
Important:Before converting a reporting async to DR async, ensure that the member is prepared to become a failover member should a disaster occur that calls for it to be promoted (see Promoting a DR Async Member to Failover Member). This includes confirming the following:
-
It has all of the mirrored databases.
-
All other members are able to connect to it (as described in Mirroring Communication and Sample Mirroring Architecture and Network Configurations).
-
It has the resources required to operate as primary.
-
-
-
Mirror Journal File Retention (reporting asyncs only) — Whether mirror journal files are purged immediately after they are dejournaled or according to the instance’s local purge policies. This setting is available for reporting asyncs only. For information about how mirror journal files are purged, see Purging Mirror Journal Files in the “Journaling” chapter of the Caché Data Integrity Guide.
-
SSL/TLS Configuration — If SSL/TLS is required (see Securing Mirror Communication with SSL/TLS Security) the X.509 Distinguished Name (DN) is displayed, as well as the Verify SSL button, which lets you verify the SSL certificates of all current mirror members that can be contacted by the async you are editing. If any certificate is not valid, an informational message is displayed. (Certificates can also be verified using the ^Mirror routine.)
If the mirror does not use SSL/TLS, the SSL/TLS link is available, allowing you to configure SSL/TLS if you intend to add it to the mirror (see Editing or Removing a Failover Member).
Note:The SYS.Mirror.UpdateMirrorSSL()Opens in a new tab mirroring API method and the ^SECURITY routine can also be used to update a mirror’s member’s SSL settings.
-
-
The Mirrors this async member belongs to list shows you all the mirrors the instance belongs to as an async member. Each entry provides three links for changes.
-
Mirror Name — Click the name of the mirror shown in the Name column to open the Edit Mirror dialog, showing the instance directories and network addresses (see Mirror Member Network Addresses) of all members of the mirror.
If the async is currently connected to the mirror, you cannot change any of the network information displayed except the async’s Superserver port; if the async member is disconnected and the network information for the primary has changed, you can update the primary’s information here so that the async can reconnect when desired. See Updating Mirror Member Network Addresses for important information about updating the network addresses of mirror members.
-
Leave Mirror — Removes the async member from the mirror for which you clicked the link, and from that mirror only. (In the case of a DR async, this would be the only mirror it belongs to.)
You are given the option of removing the mirror attribute from the mirrored databases on the async member; see Retaining or Removing the Mirrored Database Attribute for information about this decision.
Note:The Remove This Member From a Mirror option on the Mirror Configuration menu of the ^MIRROR routine (see Using the ^MIRROR Routine) provides an alternative method for removing an async member from a mirror. You can also use the Remove Other Mirror Member button on the Edit Mirror page on a failover member to remove an async member from the mirror.
On any async member, you can temporarily stop mirroring (for an individual mirror if a reporting async belongs to more than one); see Stopping Mirroring on Backup and Async Members for more information.
-
Edit Dejournal Filter (reporting asyncs only) — Lets you set or remove a dejournal filter on the async; see Using a Dejournal Filter on a Reporting Async for more information.
-
-
The Mirrored Databases list shows you all mirrored databases on the async member. If the instance is a DR async member, these should include all mirrored databases on the mirror’s failover members, and the FailoverDB flag should be set on each.
-
In a mirror that uses SSL/TLS, select Authorize Pending DN Updates (if it appears) to authorize pending DN updates from the primary so that the async can continue to communicate with the primary. See Authorizing X.509 DN Updates (SSL/TLS Only) for information about authorizing DN updates.
Editing or Removing a Failover Member
-
Navigate to the Edit Mirror page (System Administration > Configuration > Mirror Settings > Edit Mirror).
-
Use the Remove Mirror Configuration button on the backup failover member to remove it from the mirror and remove the Caché instance’s mirror configuration entirely.
Important:To remove a mirror entirely, begin by removing all async members from the mirror, then remove the backup failover member, and finally remove the primary failover member.
When removing a failover member from the mirror, you are given the option of removing the mirror attribute from the mirrored databases on the member; see Removing the Mirrored Database Attribute When Removing a Mirror Member for information about this decision. This is especially significant when you are removing the primary failover member, thereby permanently deleting the mirror.
On the backup, you are also given the option of removing the instance’s SSL/TLS configuration (see Securing Mirror Communication with SSL/TLS Security).
You can also use the Remove Other Mirror Member button on the primary to remove the backup or an async from the mirror. You can use the Remove Other Mirror Member button on the backup to remove an async from the mirror.
After using the Remove Mirror Configuration button or the Remove Other Mirror Member button to remove an async or backup member’s mirror configuration entirely, you must restart Caché.
Note:The Remove Mirror Configuration option on the Mirror Configuration menu of the ^MIRROR routine (see Using the ^MIRROR Routine) provides an alternative method for removing n failover member’s mirror configuration entirely.
You can temporarily stop mirroring on the backup failover member; see Stopping Mirroring on Backup and Async Members.
-
To remove the primary failover member from the mirror and remove the mirror entirely (which you can do only if the primary is the last member remaining in the mirror), use this procedure:
-
Use the Remove Mirror Configuration button on the Edit Mirror page; a dialog displays that lets you clear the JoinMirror flag from the instance.
-
After clearing the flag, restart the instance.
-
Navigate to the Edit Mirror page and use the Remove Mirror Configuration button again.
-
-
When you add an async member of a Caché version earlier than 2015.2 to a mirror requiring SSL/TLS (see Configure Async Mirror Members), use the Add New Async Member button to authorize the X.509 DN of the new async (see Authorize the Second Failover Member or Async (SSL/TLS only)). The Add Async Member to Mirror wizard displays; enter the superserver address and port of the new async, click Next, and authorize the async member. You can also use the button to update the DN of a pre-2015.2 async on a 2015.2 primary (see Authorizing X.509 DN Updates (SSL/TLS Only))
-
In the Mirror Information section, you cannot edit the Mirror Name; the remaining settings can be modified on the primary failover member only.
-
Use SSL/TLS — If you did not select SSL/TLS security when you created the mirror (see Securing Mirror Communication with SSL/TLS Security), you can add SSL/TLS security to the mirror by following this procedure:
-
On each mirror member, including the primary, the backup, and all asynchs if any, edit the mirror, click the Set Up SSL/TLS link to the right of the Use SSL/TLS checkbox, and follow the instructions in the Creating and Editing SSL/TLS Configurations for a Mirror section of the “Using SSL/TLS with Caché” chapter of the Caché Security Administration Guide to create a mirror SSL/TLS configuration on the member. (If the link is Edit SSL/TLS instead of Set Up SSL/TLS, the configuration already exists and you do not need to create it on that member.)
-
Edit the mirror on the primary and click the Verify SSL button, which lets you verify the SSL certificates of all current mirror members that can be contacted by the failover member you are editing. (Certificates can also be verified using the ^MIRROR routine.) If any certificate is not valid, an informational message is displayed; check the configurations and replace certificates if necessary. Otherwise, proceed to the next step.
-
Select the Use SSL/TLS checkbox and click the Save button.
-
Authorize the backup and any async members as described in Authorize the Second Failover Member or Async Member (SSL/TLS only).
Note:The mirror does not have to be running when you add SSL/TLS security using this procedure.
The SYS.Mirror.UpdateMirrorSSL()Opens in a new tab mirroring API method and the ^SECURITY routine can also be used to update a mirror’s member’s SSL settings.
-
-
Use Arbiter — If you did not configure an arbiter when creating the mirror, you can do so by selecting this setting on the primary and entering the hostname or IP address of the system you want to configure as arbiter and the port used by its ISCAgent process (2188 by default). See Automatic Failover Mechanics, Locating the Arbiter to Optimize Mirror Availability, and Installing the Arbiter for additional information about the arbiter.
-
Use Virtual IP — Change whether or not you want to use a Virtual IP address by selecting or clearing this check box on the primary. If you select Use Virtual IP, you must provide (or can change if already provided) an IP address, Classless Inter-Domain Routing (CIDR) mask, and network interface.
Important:See Configuring a Mirror Virtual IP (VIP) for requirements and important considerations before configuring a VIP.
-
Quality of Service Timeout (msec) — The maximum time, in milliseconds, that a failover member waits for a response from the other failover member before taking action; also applies to the arbiter’s wait for a failover member’s response. See Configuring the Quality of Service (QoS) Timeout Setting for more information. This setting can be changed on the primary failover member only.
-
Compression Mode for Failover Members, Compression Mode for Async Members — Change the settings that specify whether to compress journal data before transmission from the primary to the backup and to async members, respectively; see Journal Data Compression for more information. When you change one or both compression settings, the mirror connections of all affected members (backup and/or asyncs) are restarted so the new compression mode can be used immediately.
-
Allow Parallel Dejournaling — Change the setting that specifies whether to enable parallel dejournaling for the failover members and DR asyncs (the default), all members including reporting asyncs, or the failover members only. Parallel dejournaling increases mirror throughput, but may slightly increase the chances of inconsistent results from queries or reports involving multiple databases; see Configuring Parallel Dejournaling for more information.
-
-
The Mirror Member Information section lists the member name and type, instance directory, and network addresses of each mirror member. On the primary, click a member name to update that member’s network information (except for the member’s Superserver port, which must be updated locally; see Updating Mirror Member Network Addresses).
If the backup is currently connected to the mirror, you cannot change any network information except the backup’s Superserver port; if the backup is disconnected and network information for the primary has changed, you can update the primary’s information here so that the backup can reconnect when desired. See Updating Mirror Member Network Addresses for important information about updating the network addresses of mirror members.
-
On the primary in a mirror that uses SSL/TLS, select the Authorize/Reject Pending New Members link (if it appears) to authorize new members so they can join the mirror, or the Authorize/Reject Pending DN Updates link (if it appears) to authorize DN updates on other members so that mirror communication can continue. On the backup, select Authorize Pending DN Updates (if it appears) to authorize pending DN updates from the primary so that the backup can continue to communicate with the primary. See Authorizing X.509 DN Updates (SSL/TLS Only) for information about authorizing DN updates.
-
Click Save.
Remove Mirrored Databases from a Mirror
You can convert a database from mirrored to unmirrored, local use by removing it from the mirror, which you do through the Mirror Monitor (see Monitoring Mirrors for more information about the Mirror Monitor).
Alternatively, you can remove mirrored databases from a mirror by selecting the Remove mirrored database(s) option from the Mirror Management main menu list of the ^MIRROR routine (see Using the ^MIRROR Routine).
When you remove a database from a mirror on an async, the failover members are unaffected; the database remains a part of the functioning mirror. Once you have removed it from a failover member, however, it must be removed from the other failover member and any async members on which it is mirrored. To entirely remove a database from a mirror, start by removing it from the primary failover member, then the backup failover member, then any async members.
Removing a database from a mirror on the primary is a permanent action. Once a mirrored database is removed on the primary, returning it to the mirror later will require the procedures used for adding an existing database to the mirror for the first time.
To remove a database from a mirror, do the following on either failover system:
-
Navigate to the Mirror Monitor page (System Operation > Mirror Monitor) on the primary failover member.
-
In the Mirrored databases list, click Remove in the row of the database you wish to remove from the mirror.
If you want to remove more than one database at a time, select Remove from the Select an action drop-down and click Go to open a dialog in which you can select multiple mirrored databases and remove all of them at once.
Using Managed Key Encryption in a Mirror
As described in the “Managed Key Encryption” chapter of the Security Administration Guide, you can secure individual Caché databases by encrypting them. You can also activate encryption of journal files on any Caché instance. The following sections explain how to use these features in a mirror:
Encrypting Mirrored Databases
While database encryption on a mirror member requires preparation as on any system, there are no specific mirroring-related requirements for database encryption. For the greatest possible security, however, InterSystems recommends that a mirrored database that is encrypted on the primary also be encrypted on all mirror members. For this reason, when you add a mirrored database that is encrypted on the primary to another member without encrypting it, a security warning is sent to the messages log.
Based on the best practice of coequality of failover members, as described in Mirror Configuration Guidelines, a given database is typically encrypted using the same encryption key on both failover members and on any DR async members that may be promoted to failover.
When at least once encryption key is activated, you have the option of encrypting any new databases you create. Therefore, when using the procedure in Create a Mirrored Database, select the encryption option when you create the database on each mirror members. If you add an existing database to a mirror on the primary, as described in Add an existing database to the mirror, and that database is encrypted, you must either activate the key with which it was encrypted on each member you add it to, or convert the database to a new key using the cvencrypt utility after adding it on the each mirror member. For the procedure for doing the latter, see Converting an Encrypted Database to Use a New Key section of the “Using the cvencrypt Utility” chapter of the Security Administration Guide. (You can also use this procedure to switch one or more existing encrypted mirrored databases to a new encryption key.)
To encrypt one or more unencrypted mirrored databases on the failover members of an existing mirror, use the following procedure:
-
Load and activate the encryption key(s) to be used on both failover members, as described in Managing Keys in Key Files in the “Managed Key Encryption” chapter of the Security Administration Guide.
-
On the backup, do the following
-
Stop mirroring, as described in Stopping Mirroring on Backup and Async Members.
-
Encrypt each database as described in Converting an Unencrypted Database to Be Encrypted in the “Using the cvencrypt Utility” chapter of the Security Administration Guide.
-
Start mirroring.
-
Go to the Mirror Monitor page (System Operation > Mirror Monitor) and wait until the status of all mirrored databases is Dejournaling, as described in Mirrored Database Status, before proceeding.
-
-
Gracefully shut down the primary using the ccontrol stop command (see Controlling Caché Instances in the “Using Multiple Instances of Caché” chapter of the Caché System Administration Guide) so that the mirror fails over and the backup becomes the new primary.
-
Restart the primary; when it becomes backup, follow the steps described for the original backup in an earlier step to encrypt the same databases using the same keys.
-
Shut down the current backup so that the original primary once again becomes primary.
-
Restart the original backup so that it once again becomes backup.
To encrypt mirrored databases on an async member, follow the steps described for the backup in the previous procedure — stop mirroring, encrypt the databases, and start mirroring. Remember that the best practice is to use the key(s) used on the failover members on any DR async that may be promoted to failover.
Activating Journal Encryption in a Mirror
When activating journal encryption on mirror members, bear in mind three important considerations:
-
You cannot activate journal file encryption unless the mirror requires SSL/TLS security.
-
If journal encryption is activated on the primary, it must be activated on any reporting asyncs belonging to the mirror. In addition, it is a best practice to activate journal encryption on the backup and on any DR asyncs as well, so that in the event of failover or DR promotion journal encryption will continue to be in force.
-
Journal encryption among failover members and DR asyncs requires that the encryption key used for journal encryption on one member be activated (although not necessarily used for journal encryption) on others, to be used to decrypt received journal files as needed. Specifically,
-
If journal encryption is activated on the primary, the key used for journal encryption on the primary must be loaded and activated on the backup and all DR asyncs. (If a reporting async that does not have the primary’s journal encryption key activated is changed to DR async, a warning is generated; the async can remain temporarily connected to the mirror, but will not be able to reconnect the next time this is required unless the key has been activated.)
-
If journal encryption is activated on the backup or a DR async, the key used for journal encryption on that member must be loaded and activated on the primary.
Again, as a best practice in preparation for failover or promotion, if any member that is (primary, backup) or may become (DR async) a failover member has a journal encryption key designated, this key should be loaded on all other such members, including multiple DR asyncs.
Note:An Caché instance can have up to four encryption keys activated at any given time, but only one of these keys is specified for journal encryption. Different journal encryption keys can be used on different mirror members, but due to the four key limit, a mirror with multiple DR async members must use the same encryption keys for multiple members when following this best practice.
-
The following procedure describes the steps for activating journal encryption on a mirror consisting of failover members A (current primary) and B (current backup), DR async D, and reporting async R:
-
If the mirror does not currently require SSL/TLS security (see Securing Mirror Communication with SSL/TLS Security), configure it to do so using the procedure described in Editing or Removing a Failover Member.
-
Select the encryption key or keys that will be used to encrypt journal files on A, B, and D. These can all be different if desired.
-
On each of A, B, and D, and optionally on R if it may be converted to a DR async, perform the following steps:
-
Load and activate all keys that will be used to encrypt journal files on A, B, and D (and optionally R), if they are not already activated.
-
Select the desired key for journal encryption on the instance as described in Specifying the Default Database Encryption Key or Journal Encryption Key for an Instance in the “Managed Key Encryption” chapter of the Security Administration Guide.
-
-
If you did not already do so in the previous step, load, activate, and select a journal encryption key on R.
-
On A, B, D, and R, in that order, activate journal encryption as described in Configuring Encryption Startup Settings in the “Managed Key Encryption” chapter of the Security Administration Guide.
When you activate journal encryption on an instance, encryption begins after the instance is restarted or the next journal switch, whichever comes first. To make the change immediate without restarting mirror members, you can manually switch journal files on each member, as described in Switch Journal Files in the “Journaling” chapter of the Data Integrity Guide.
To switch journal encryption keys on an instance, load, activate, and select the new key, which will be used for encryption after the instance is restarted or the next journal switch, whichever comes first.
When adding a DR async to the mirror after journal encryption is activated, ensure that the journal encryption key or keys in use on A, B and D are activated on the new DR async before it is added.
Configuring ECP Connections to a Mirror
When you configure an ECP data server as a mirror connection on an ECP application server, the application server regularly collects updated information about the mirror from the primary, automatically detecting failover and redirecting connections to the new primary as needed.
Use the following procedure to configure a mirror as an ECP data server and configure it as a mirror connection on ECP application servers.
-
On both of the failover members and any DR async members, navigate to the ECP Settings page of the Management Portal (System Administration > Configuration > Connectivity > ECP Settings) and configure the system as an ECP data server; for information see Configuring an ECP Data Server in the “Configuring Distributed Systems” chapter of the Caché Distributed Data Management Guide. You must ensure that both failover members and any DR asyncs are configured this way, all with the same Maximum number of application servers setting.
-
On each ECP application server, navigate to the ECP Setting page, click Add Remote Data Server, and enter the following information:
-
Server Name — Enter the instance name of the primary failover member.
-
Host DNS Name or IP Address — Enter the IP address or host DNS name of the primary failover member. (Do not enter the mirror VIP; see Configuring a Mirror Virtual IP (VIP) for more information.)
-
IP Port — Enter the superserver port number of the primary failover member whose IP address or host DNS name you specified in the Host DNS Name or IP Address text box.
-
Mirror Connection — Select this check box.
-
-
Click Save.
-
Navigate to the Remote Databases page of the Management Portal (System Administration > Configuration > System Configuration > Remote Databases) and select Create New Remote Database to launch the Database Wizard.
-
In the Database Wizard, select the ECP data server from the Remote server drop-down list, then click Next.
-
Select the database you want to access over this ECP channel from the list of remote databases. You can select both mirrored databases (databases listed as :mirror:mirror_name:mirror_DB_name) and nonmirrored databases (databases listed as :ds:DB_name); only mirrored databases remain accessible to the application server in the event of mirror failover. When the data server is a failover member, mirrored databases are added as read-write, and nonmirrored databases are added as read-only, if journaled, or read-write, if not journaled; when the data server is a DR async member, all databases are added as read-only.
Note:A mirrored database path in the format :mirror:mirror_name:mirror_DB_name: can also be used in an implied namespace extended global references (see Extended Global References in the “Global Structure” chapter of Using Caché Globals).
A failover mirror member does not accept ECP connections that are not configured as mirror connections in one of the two ways described in the foregoing; an ECP data server that is not a mirror member does not accept ECP connections that are configured as mirror connections. This means that if you add an existing ECP data server to a mirror, or remove one from a mirror, the data server must be removed as a remote data server on all ECP application servers and added again. using the appropriate procedure: either one of the two that follow, or with the Mirror Connection check box cleared if it is no longer a connection to a failover member.
An ECP application server that is connected to a mirror must be running Caché 2010.2 or later.
After configuring ECP application servers to connect to a mirror, perform redirection tests by gracefully shutting down the current primary to ensure that the application servers connect to the intended mirror member.
You can also identify an ECP data server as a mirror connection while restricting the connection to the designated mirror member specified by the Address and Port properties of the application server’s ECPServer definition. This means that the application server does not redirect connections, even when the designated member is not primary. When you configure the connection in this way, the following rules apply:
-
If the designated member is primary, it accepts the connection from the application server as normal. If the member is a failover member but not primary (as when a former primary is restarted and becomes backup), it accepts the connection when it becomes primary.
-
If the designated member was formerly primary, and is restarted and becomes primary again, the application server’s connection to the member is recovered. If the member is a failover member but not primary, it does not accept the connection until it becomes primary.
-
If the designated member is a DR async, it accepts the connection and provides the application server with read-only access to mirrored databases (and to any other databases configured as remote databases on the application servers).
Restricting the connection to a designated mirror member is useful in certain special configurations when redirecting connections to other members is not desired, such as when this would entail high-latency ECP connections. Two examples of its use are as follows:
-
Suppose your mirror primary is in data center A (DCA) and a backup or DR async is in remote data center B (DCB). Each member has its own bank of application servers configured. Network load balancers direct connections to the correct data center. But if the primary becomes unavailable and the member in DCB becomes primary through failover or promotion, you do not want the application servers in DCA connecting to the member in DCB, which would lead to high-latency connections between DCA and DCB. In this situation, on the application servers in DCA, you would restrict the mirror connection to the primary, so that in the event of failover, so that they do not redirect to DCB and their connections can be recovered when the member in DCA becomes primary again.
-
Suppose your primary and backup are in DCA and a DR async, with its own application servers for use in the event of a disaster, isin remote DCB. On the application servers in DCA, the primary would be configured with a standard mirror connection, since you want the connections to be redirected within DCA in the event of failover. On the application servers in DCB, however, the mirror connection would be restricted to the DR async. That way, you can test the mirror connection on a read-only basis either as part of disaster recovery preparation or before cutting over during an actual disaster. After the DR async is promoted, the application servers in DCA could redirect connections to the new primary in DCB (unless prevented at the network level), but if they are not already down they can be brought down to prevent this.
You cannot restrict the application server’s connection to a designated mirror member using the management portal. Instead, do the following:
-
If you have not already done so, use the procedure described earlier in this section to configure the failover members and any DR asyncs as ECP data servers, and to configure a connection to the data server on the application server.
-
Use the Config.ECPServer class to modify the application server’s MirrorConnection property, giving it a value of -1. You can also edit the application server instance’s cache.cpf file. In the [ECPServers] section of the file, change the third parameter from 0 to -1; see ECPServers in the Caché Parameter File Reference for more information.
Once you have modified the MirrorConnection property in one of these ways, you must not use the management portal to change the setting of the Mirror Connection check box.
Configuring a Mirror Virtual IP (VIP)
As described in Planning a Mirror Virtual IP (VIP), you can configure a mirror virtual address that allows external applications to interact with the mirror using a single address, ensuring continuous access on failover.
After configuring Caché for the mirror VIP and then configuring the mirror VIP, perform failover tests by gracefully shutting down the current primary (as described in Planned Outage Procedures) to ensure that applications can continue to connect to the mirror regardless of which failover member is primary.
If one or more of a mirror’s members is a nonroot Caché instance on a UNIX® or Linux system, as described in Caché Nonroot Installation in the chapter “Installing Caché on UNIX® and Linux” in the Caché Installation Guide, a mirror VIP cannot be used.
See Promoting a DR Async Member to Failover Member for important information about promoting a DR async to primary when a VIP is in use.
Configuring Caché for a Mirror VIP
To ensure that the management portal and Studio can seamlessly access the mirror regardless of which failover member is currently the primary, it is recommended that the failover members be configured to use the same superserver and web server port numbers.
ECP application servers do not use a mirror’s VIP. When adding a mirror as an ECP data server (see Configuring ECP Connections to a Mirror), do not enter the virtual IP address (VIP) of the mirror, but rather the DNS name or IP address of the current primary failover member. Because the application server regularly collects updated information about the mirror from the specified host, it automatically detects a failover and switches to the new primary failover member. For this reason, both failover members and any DR async members must be configured as ECP data servers with the same Maximum number of application servers setting. See Configuring ECP Connections to a Mirror for further ECP considerations.
When configuring one or both failover members as license servers, as described in the “Managing Caché Licensing” chapter of the Caché System Administration Guide, specify the actual hostname or IP address of the system you are configuring as the Hostname/IP Address; do not enter the VIP address.
Configuring a Mirror VIP
To configure a mirror VIP, you must enter the following information:
-
An available IP address to be used as the mirror VIP. It is important to reserve the VIP so that other systems cannot use it; for example, in a Dynamic Host Configuration Protocol (DHCP) network configuration, the VIP should be reserved and removed from the DNS tables so that it is not allocated dynamically to a host joining the network.
-
An appropriate network mask, which you must specify in Classless Inter-Domain Routing (CIDR) notation. The format for CIDR notation isip_address/CIDR_mask, where ip_address is the base IP address of system, and CIDR_mask is platform-dependent, as follows:
-
Mac OS X — must be /32.
-
All other platforms — must match the mask of the IP address assigned to the base interface. For example:
bash-2.05b# uname -a
AIX apis 3 5 00C0B33E4C00
bash-2.05b# ifconfig en1
en1:
flags=5e080863,c0<UP,BROADCAST,NOTRAILERS,RUNNING,SIMPLEX,MULTICAST,
GROUPRT,64BIT,CHECKSUM_OFFLOAD(ACTIVE),PSEG,LARGESEND,CHAIN>
        inet 10.0.2.11 netmask 0xffffff00 broadcast 10.0.2.255
        tcp_sendspace 131072 tcp_recvspace 65536 rfc1323
In this example, the en1 interface has a base address of 10.0.2.11 with a netmask of 0xffffff00, which translates to /24. Therefore, to assign 10.0.2.100 as the VIP to the en1 interface, you specify the network mask as follows (in CIDR notation): 10.0.2.100/24.
-
-
An available network interface on each of the failover members. The interfaces selected on the two systems must be on the same subnet as the VIP.
When selecting a network interface, the following platform-specific rules must be followed to ensure correct behavior:
-
IBM AIX®, Linux (Red Hat and SuSE), Apple Mac OS X, and Windows — An existing physical network interface must be provided during VIP configuration. On these platforms, IP address aliasing is used to bind an IP address (that is, the VIP) to an existing physical network interface. This platform allows a single physical network interface to host multiple IP addresses.
-
Configuring the ISCAgent
The ISCAgent runs securely on a dedicated, configurable port (2188 by default) on each mirror member. When the agent receives an incoming network connection which directs it to a mirrored instance, it executes cuxagent in that instance to escalate to the privileges necessary to administer the mirror member. If the mirror is configured to require SSL/TLS, the incoming connection is authenticated before any actions are performed.
When multiple Caché instances belonging to one or more mirrors are hosted on a single system, they share a single ISCAgent.
This section provides information on managing the ISCAgent in the following ways:
Starting and Stopping the ISCAgent
The ISCAgent, which is installed when you install or upgrade Caché, runs as user iscagent and as a member of the iscagent group by default. To acquire the group privilege, which is necessary to execute the cuxagent utility that provides it with access to a Caché instance (as described in ISCAgent), the ISCAgent must be started automatically during system startup or by a user with root privileges. Once it has assigned itself the needed user and group privileges, the ISCAgent discards all root privileges.
The ISCAgent must be configured to start automatically when the system starts on each failover and DR async mirror member. InterSystems provides platform-specific control scripts that can be added to the initialization process by a system administrator, as described in the following sections. (Consult your operating system documentation for detailed system startup configuration procedures.)
Starting the ISCAgent on UNIX® and Mac OS X Systems
On UNIX® and Mac OS X platforms, run the ISCAgent start/stop script, which is installed in the following locations, depending on the operating system:
-
IBM AIX®: /etc/rc.d/init.d/ISCAgent
-
Mac OS X: /Library/StartupItems/ISCAgent/ISCAgent
For example, to start the ISCAgent on the IBM AIX® platform, run the following command as root: /etc/rc.d/init.d/ISCAgent start; to stop it, run the command /etc/rc.d/init.d/ISCAgent stop.
Additional ISCAgent considerations on UNIX®/Linux platforms include the following:
-
As previously noted, the ISCAgent must be started automatically at system startup on each failover and DR async mirror member. There may also be times at which it is useful to have a user start, stop, or restart the agent. This can be done in the following ways:
-
Directly, by the root user, as described in the preceding.
-
Using the agentctrl executable in the Caché instance’s /bin directory, by any user who is able to start and stop the Caché instance. For example, to start the agent, execute the following command:
/cache/bin$ ./agentctrl start
The command also takes the arguments stop and restart.
-
-
Caché uses the iscagent.status file, located in the directory specified by the CACHESYS environment variable (see Caché Installation Directory in the preface of the Caché Installation Guide) or in /var/run if CACHESYS is not defined, to track the status of the ISCAgent. Because the agent must be able to gain an exclusive lock on this file, if the iscagent.status file is located in /var/run and /var/run is on an NFS-mounted filesystem, the NFS configuration must support fcntl file locking.
-
As described earlier, the ISCAgent obtains the privileges it needs to administer Caché instances using cuxagent. By default, the agent has the privileges required (iscagent user/iscagent group) to execute cuxagent, and under typical configurations, no change is necessary.
Depending on your system’s security configuration, however, instances at your site may require additional privileges to navigate to the /bin directory of the mirrored instance in order to execute cuxagent. If so, you must ensure that the ISCAgent’s privileges are sufficient to execute the command. To do so, you can modify the agent’s privileges using the following procedure:
-
Create the file /etc/iscagent/iscagent.conf, or edit it if it already exists (for example, because you previously created it to customize the ISCAgent port number or interface).
-
To add group privileges, add the following line, specifying one or more groups that are required to execute cuxagent:
privileges.group=iscagent,<groupname>[,<groupname>[,...]]Typically, adding group privileges is sufficient. Under some configurations, however, you may need to run the ISCAgent as a different user. This can also be done in /etc/iscagent/iscagent.conf, as follows:
privileges.user= <username>Note:Because cuxagent requires iscagent group privileges, iscagent must remain in the groups list.
-
-
The ISCAgent writes messages to the Caché system error log; informational messages are logged as priority LOG_INFO, while error messages are logged as priority LOG_ERR. For information about the Caché system error log, see Caché System Error Log in the “Monitoring Caché Using the Management Portal” chapter of the Caché Monitoring Guide .
Starting the ISCAgent on Linux Systems
On Linux systems supporting systemd (such as SUSE Linux Enterprise Server 12, SP1 or later), the /etc/systemd/system/ISCAgent.service file is installed, providing support for management of the ISCAgent using systemd. On any such system, the following commands can be used to start, stop and display the status of the ISCAgent:
systemctl start ISCAgent.service
systemctl stop ISCAgent.service
systemctl status ISCAgent.service
To control whether the ISCAgent starts on system boot on a system that supports systemd, use the following commands:
sudo systemctl enable ISCAgent.service
sudo systemctl disable ISCAgent.service
By default, systemd services are disabled. You can use systemctl to start and stop the service on demand, even when it is disabled.
The ISCAgent.service file does not read the location of the Caché registry and shared support files from the CACHESYS environment variable (see Caché Installation Directory in the preface of the Caché Installation Guide), but instead is installed with /usr/local/etc/cachesys as the location. You can edit ISCAgent.service to specify a different registry directory if required.
On all Linux systems, the ISCAgent start/stop script described in Starting the ISCAgent on UNIX® and Mac OS X Systems is installed in /etc/init.d/ISCAgent. If systemd is not supported, use the commands described in that section to start and stop the ISCAgent.
The remainder of the information provided in Starting the ISCAgent on UNIX® and Mac OS X Systems also applies to Linux systems supporting systemd.
Although it is possible to use either the systemctl commands or the /etc/init.d/ISCAgent script on a Linux system that supports systemd, you must choose one method and use it exclusively, without switching back and forth. The ISCAgent should always be stopped using the method with which it was started.
When you upgrade Caché on such a Linux system, a running ISCAgent is automatically restarted using systemd. If you are using the /etc/init.d/ISCAgent script to manage the ISCAgent, stop the agent before performing the upgrade so that it is not automatically restarted, then restart it using the script after the upgrade.
When changing from using the /etc/init.d/ISCAgent script to using systemctl commands, before starting the agent with systemctl for the first time, do the following as root:
-
Run the command the following command:
systemctl status ISCAgent
-
If the output from the command contains this warning:
Warning: Unit file changed on disk, 'systemctl daemon-reload' recommended.
run the following command:
systemctl daemon-reload
-
When the previous command has completed, run systemctl status ISCAgent again to confirm that the warning does not appear.
Starting the ISCAgent for Nonroot Instances on UNIX®/Linux and Mac OS X Systems
Although Caché is typically installed as root, on UNIX®/Linux and Mac OS X Systems it is possible for an instance to be installed and run by another user. Nonroot installation is described in Caché Nonroot Installation in the “Installing Caché on UNIX® and Linux” chapter of the Caché Installation Guide.
The ISCAgent for a nonroot instance is started by the installing user running the ISCAgentUser script, located in the directory defined by the CACHESYS environment variable, in the background, for example:
nohup <CACHESYS_directory>/ISCAgentUser &
While it may not be possible to configure the ISCAgent to start automatically when the system starts, this remains the first choice if it can be achieved. When the mirror includes two failover members, the best practice is to start the agent as soon as possible after the system boots, even if you don't intend to start Caché; this aids in recovery in certain situations, such as that described in Unplanned Outage of Both Failover Members.
Starting the ISCAgent on Microsoft WindowsSystems
On Microsoft Windows systems, start the ISCAgent process as follows:
-
In the Microsoft Windows Control Panel, select Services from the Administrative Tools drop-down list, and double-click ISCAgent to display the ISCAgent Properties window.
-
On the Extended tab, click Start to start, or Stop to stop ISCAgent.
-
On the Extended tab, select Automatic from the Startup type drop-down list.
Customizing the ISCAgent Port Number
As described in the ISCAgent section of this chapter, the default ISCAgent port is 2188. While this is typically all that is needed, you can change the port number if required, as described in the following subsections:
Customizing the ISCAgent Port Number on UNIX®/Linux Systems
The ISCAgent process, by default, starts on port 2188. To customize the port on a UNIX®/Linux system, do the following:
-
Create the file /etc/iscagent/iscagent.conf, or edit it if it already exists.
-
Add the following line, replacing <port> with the desired port number:
application_server.port=<port>
Customizing the ISCAgent Port Number on Microsoft Windows Systems
The ISCAgent process, by default, starts on port 2188. To customize the port on a Windows system, do the following:
-
Create the file <windir>\system32\iscagent.conf, or edit it if it already exists.
-
Add the following line, replacing <port> with the desired port number:
application_server.port=<port>
Customizing the ISCAgent Interface
The ISCAgent binds to the default (or configured) port on all available interfaces. While this is typically all that is needed, you can change the ISCAgent to bind to the interface serving a specific address if required. The procedure is described in the following subsections:
Customizing the ISCAgent Interface on UNIX®/Linux Systems
The ISCAgent process binds to the default (or configured) port on all available interfaces. To customize the ISCAgent to bind to the interface serving a specific address on a UNIX®/Linux system, do the following:
-
Create the file /etc/iscagent/iscagent.conf, or edit it if it already exists.
-
Add the following line, replacing <ip_address> with the address served by the desired interface:
application_server.interface_address=<ip_address>To explicitly bind to all available interfaces (i.e., the default), specify * as follows: application_server.interface_address=*.
Customizing the ISCAgent Interface on Microsoft Windows Systems
The ISCAgent process binds to the default (or configured) port on all available interfaces. To customize the ISCAgent to bind to the interface serving a specific address on a Windows system, do the following:
-
Create the file named <windir>\system32\iscagent.conf, or edit it if it already exists
-
Add the following line, replacing <ip_address> with the address served by the desired interface:
application_server.interface_address=<ip_address>To explicitly bind to all available interfaces (i.e., the default), specify * as follows: application_server.interface_address=*.
Configuring the Quality of Service (QoS) Timeout Setting
The Quality of Service Timeout (QoS timeout) setting plays an important role in governing failover member and arbiter behavior by defining the range of time, in milliseconds, that a mirror member waits for a response from another mirror member before taking action. The QoS timeout itself represents the maximum waiting time, while the minimum is one half of that. A larger QoS timeout allows the mirror to tolerate a longer period of unresponsiveness from the network or a host without treating it as an outage; decreasing the QoS allows the mirror to respond to outages more quickly. Specifically, the QoS timeout affects the following situations:
-
If the backup failover member does not acknowledge receipt of data from the primary within the range defined by the QoS timeout, the primary disconnects the backup and acts in accord with a possible outage of the backup.
-
If the backup receives no message from the primary within the range defined by the QoS timeout, the backup disconnects and acts in accord with a possible outage of the primary.
-
If the arbiter does not receive a response from a failover member within the range defined by the QoS timeout, it considers its connection with that failover member to be lost.
-
If operations performed on a failover member’s host cause the host to be entirely unresponsive for a period within the range defined by the QoS timeout, unwanted failover or alerts may result. This is a particular concern where virtualization platform operations such as backup or migration are involved; see Mirroring in a Virtualized Environment for more information
See Automatic Failover Mechanics for complete and detailed information about the role the QoS timeout plays in the behavior of the failover members and the arbiter.
The default QoS is 8 seconds (8000 ms) to allow for several seconds of intermittent unresponsiveness that may occur on some hardware configurations. Typically, deployments on physical (non-virtualized) hosts with a dedicated local network can reduce this setting if a faster response to outages is required. A mirror that is upgraded from a Caché version earlier than 2015.2 may retain the previous default of 2000 ms.
The Quality of Service Timeout setting can be adjusted on the Create Mirror page or the primary failover member’s Edit Mirror page.
The QoS timeout can also be adjusted using the Adjust Quality of Service Timeout parameter option on the Mirror Configuration menu of the ^MIRROR routine (see Using the ^MIRROR Routine).
Configuring Parallel Dejournaling
As described in Mirror synchronization, the mirrored databases on the backup failover member and any async members of a mirror are kept synchronized with the primary through dejournaling, which is the application of database updates made on the primary and recorded in the primary’s journal files to the corresponding databases on the other members. If there are sufficient computing and memory resources available, up to four jobs can perform the updates to separate databases in parallel within a single dejournaling operation. Called parallel dejournaling, this feature increases the throughput of mirrors, especially those that have a typically high rate of database updates.
Parallel dejournaling is used only when the host system has at least eight CPUs and the Caché instance involved has enough generic memory available to allocate for this purpose. In practice, parallel dejournaling will not be used on most Caché instances unless generic memory is increased. The number of parallel dejournaling jobs can never exceed the size of the generic memory heap divided by 200; for example, to support four dejournaling jobs running in parallel, the generic heap must be greater than or equal to 800 MB. (Even if you do not have enough memory available to support parallel dejournaling, dejournaling throughput may improve if you increase the size of the generic memory heap from the default.)
To change the size of the generic memory heap or gmheap (sometimes known as the shared memory heap or SMH), navigate to the Advanced Memory Setting page (System Administration > Configuration > Additional Settings > Advanced Memory); see Advanced Memory Settings in the “Caché Additional Configuration Settings” chapter of the Caché Additional Configuration Settings Reference for more information.
Parallel dejournaling is also used during journal restores; for details, see Restore Globals From Journal Files Using ^JRNRESTO in the “Journaling” chapter of the Caché Data Integrity Guide.
Parallel dejournaling is always enabled (when supported by the resources available) for the failover members in a mirror. By default, it is also enabled for DR async members. You can either enable it for reporting asyncs as well (that is, for all members) or restrict it to the failover members only by changing the Allow Parallel Dejournaling setting when configuring the first failover member (see Create a Mirror and Configure the First Failover Member) or editing the mirror on the primary (see Editing or Removing a Failover Member). Regardless of the setting, parallel dejournaling is always used, if supported, when catching up multiple databases in one operation, as described in Activating and Catching Up Mirrored Databases
While enabling parallel dejournaling for reporting asyncs is advantageous for performance, it may increase the occurrence of unexpected results in queries or reports involving multiple databases. This is because databases being updated by separate dejournaling jobs are likely to be at slightly different places in the dejournaling sequence; for example, database A may contain updates made on the primary at 11:45:30 when database B is only up to the updates from 11:45:28. However, the uncertainty introduced by parallel dejournaling is similar to the uncertainty that is always present when running reports or queries against changing data that is in the process of being dejournaled. InterSystems therefore expects most reporting applications to run against mirrored databases for which parallel dejournaling is enabled with neglible impact. It it also important to remember that all updates to a single database are always applied by a single dejournaling job, and correct ordering of updates to a single database is therefore guaranteed.
Using the ^ZMIRROR Routine
The user-defined ^ZMIRROR routine allows you to implement your own custom, configuration-specific logic and mechanisms for specific mirroring events, such as a failover member becoming primary.
The ^ZMIRROR routine contains the following entry points. All provide appropriate defaults if they are omitted.
-
$$CanNodeStartToBecomePrimary^ZMIRROR() — This procedure is called when an instance has determined that
-
The other failover member is not currently acting as primary and cannot become primary without manual intervention.
-
The local member is eligible to become primary and is about to begin the process of taking over.
CanNodeStartToBecomePrimary provides an entry point for logic to block failover members from automatically becoming the primary (either at startup or when connected as the backup) to provide manual control over failover, and is not part of most ^ZMIRROR routines. If this entry point returns 0 (False), the instance enters a retry loop in which it continues to call $$CanNodeStartToBecomePrimary^ZMIRROR() every 30 seconds until
-
The entry point returns 1 (True) and the local member continues the process of becoming primary.
-
The instance detects that the other member has become primary (which must be through manual intervention), at which point the local member becomes backup.
-
-
$$CheckBecomePrimaryOK^ZMIRROR() — This procedure is called after $$CanNodeStartToBecomePrimary^ZMIRROR() returns 1 (True) and as a result the local instance is fully initialized as the primary failover member: all mirrored databases are read/write, ECP sessions have been recovered or rolled back, and local transactions (if any) from the former primary have been rolled back. No new work has been done because users are not allowed to log in, superserver connections are blocked, and ECP is still in a recovery state.
If this procedure exists and returns 1 (True), the mirror resumes operation with the local member as primary; this is the point at which you can start any local processes or do any initialization required to prepare the application environment for users.
As with CanNodeStartToBecomePrimary, if CheckBecomePrimaryOK returns 0 (False), the instance aborts the process of becoming primary and retries CheckBecomePrimaryOK every 30 seconds until
-
The entry point returns 1 (True) and the mirror resumes operation with the local member as primary.
-
The instance detects that the other member has become primary (which must be through manual intervention), at which point the local member becomes backup.
In general CheckBecomePrimaryOK is successful; if there are “common cases” in which a node does not become the primary member, they should be handled by CanNodeStartToBecomePrimary rather than CheckBecomePrimaryOK.
If you move code from existing ^ZSTU or ^ZSTART routines on the primary to ^ZMIRROR so that it is not executed until the mirror is initialized, CheckBecomePrimaryOK is the best location for it.
Note:If CheckBecomePrimaryOK returns False, ECP sessions are reset. When a node succeeds in becoming the primary, the ECP client reconnects and ECP transactions are rolled back (rather than preserved). Client jobs receive <NETWORK> errors until a TRollback command is explicitly executed (see the ECP Rollback Only Guarantee section in the “ECP Recovery Guarantees and Limitations” appendix of the Caché Distributed Data Management Guide).
-
-
NotifyBecomePrimary^ZMIRROR() — This procedure is called for informational purposes at the very end of the process of becoming the primary failover member (that is, after users have been allowed on and ECP sessions, if any, have become active). This entry point does not return a value. You can include code to generate any notifications or enable application logins if desired.
-
NotifyBecomePrimaryFailed^ZMIRROR() — This procedure is called for informational purposes when
-
A failover member starts up and fails to become the primary or backup member.
-
The backup detects that the primary has failed and attempts to become primary but fails.
This entry point is called only once per incident; once it is called, it is not called again until the member either becomes primary or the primary is detected.
-
Converting a Shadow to a Mirror
Mirroring provides a utility that allows you to convert a shadow source and destination and the shadowed databases mapped between them to a mirror with primary failover member, backup failover or async member, and mirrored databases. If the shadow has multiple destinations, they can all be converted to mirror members. To convert a shadowing setup to a mirror, follow this procedure:
-
Prepare to create a mirror, as described in Creating a Mirror.
-
Make the shadow source Caché instance the primary failover member, as described in Create a mirror and configure the first failover member.
-
Add the destination shadow Caché instance to the mirror as backup failover member, as described in Configure the second failover member, or async member, as described in Configure async mirror members.
-
Add the shadowed databases to the mirror on the primary failover member (shadow source), as described in Add an existing database to the mirror.
-
Back up the mirrored databases on the primary, stop shadowing, and restore the mirrored databases on the backup/async; perform the backup and restore as described in Add an existing database to the mirror.
If preferred, you can replace the final step in the preceding procedure with the following steps:
-
Allow the backup or async (shadow destination) to catch up so that its shadow checkpoint is at least to the point of the first mirror journal file and the shadow is not tracking any open transactions started in a non-mirror journal file.
-
Stop shadowing.
-
On the backup or async (shadow destination), open the Terminal, enter zn "%SYS" to switch to the %SYS namespace, and enter ConvertShadowDatabases^MIRROR. The utility does the following
-
Prompts you for the name of the mirror and the name of the shadow (for both prompts, no entry is required when the instance belongs to just one).
-
Prompts you for the list of databases to convert and their mirror database names.
-
Converts the specified databases to mirrored database in the specified mirror.
-
Prompts you to activate and catch up the converted databases (see Activating and Catching up Mirrored Databases).
-
Prompts you to remove the converted databases from the shadow.
-
Managing Mirroring
This section covers topics related to managing and maintaining operational Caché mirrors.
Monitoring Mirrors
You can monitor the operation of an existing mirror using one of two methods:
-
the Mirror Monitor page of the management portal
-
the Status Monitor option of the ^MIRROR routine
Both methods display information about the operating status of a mirror and its members and the incoming journal transfer rate, as well as about mirrored database status. In addition, the Mirror Monitor lets you perform several operations on the mirrored databases.
Monitoring Mirroring Communication Processes describes the mirror communication processes that run on mirror members.
Basic mirror member information, including a link to the Mirror Monitor, also appears in the management portal home page message pane (see Management Portal Message Pane in the “Using the Management Portal” chapter of the Caché System Administration Guide.
Many database and mirror-related actions, such as mounting or dismounting a database and adding a database to or removing it from a mirror, are logged in the console log (see Monitoring Log Files in the “Monitoring Caché Using the Management Portal” chapter of the Caché Monitoring Guide).
Using the Mirror Monitor
To display the Mirror Monitor, navigate to the Mirror Monitor page (System Operation > Mirror Monitor) on any mirror member.
On a failover member, the Mirror Monitor contains the following buttons and sections:
-
The View Mirror Journal Files button lets you view and search through the member’s mirror journal files or non-mirror journal files; see View Journal Files in the “Journaling” chapter of the Caché Data Integrity Guide for more information.
-
The Stop Mirror On This Member button (backup only) temporarily stops mirroring on the backup, as described in Stopping Mirroring on Backup and Async Members.
-
The Demote to DR Member button (backup only) demotes the backup to DR async, leaving the mirror with a single failover member; see Planned Outage Procedures for information about situations in which this is useful.
-
Mirror Failover Member Information lists the member name, superserver address and mirror private address of each failover member (see Mirror member network addresses for information about these addresses).
-
Arbiter Connection Status shows the address (hostname and port) of the arbiter if one is configured, the current failover mode, and the status of the member’s arbiter connection, as follows:
-
Both failover members are connected to the arbiter
-
Only this member is connected to the arbiter
-
This member is not connected to the arbiter (if the connection has been lost or no arbiter is configured)
See Automatic Failover Mechanics for information about the arbiter and the meaning of this connection information.
Note:When a failover member loses contact with the arbiter a severity 2 message is sent to the console log. If the member fails to rebuild the connection to the arbiter, another severity 2 message is logged.
-
-
Mirror Member Status provides the member type and status, journal transfer status, dejournaling status of each mirror member, as described in Mirror Member Journal Transfer and Dejournaling Status. This table also shows the X.509 DNs of members if configured.
-
Mirrored Databases lists information about each mirrored database on the current member, including its name and directory as well as its status and dejournaling status, as described in Mirrored Database Status. Mirrored Databases also lets you perform several operations on one or more databases.
Note:The Mirrored Databases list includes only databases that are included in the mirror on the current member. For example, the databases listed on different reporting async members may be different as they may have different sets of mirrored databases.
On an async member, the Mirror Monitor contains the following buttons and sections:
-
The View Journal Files button (DR asyncs only) lets you view and search through the member’s mirror journal files or non-mirror journal files; see View Journal Files in the “Journaling” chapter of the Caché Data Integrity Guide for more information.
-
The Stop Mirror On This Member button (DR asyncs only) temporarily stops mirroring on the async, as described in Stopping Mirroring on Backup and Async Members.
-
The Promote to Failover Member button (DR asyncs only) promotes a DR async to failover member; see Promoting a DR Async Member to Failover Member for information about this operation and its uses.
-
The section below the buttons displays the member name, async type, and X.509 DN (if configured) of the member.
-
Mirrors this async member belongs to provides information about each mirror a reporting async member belongs to and the member’s status, journal transfer status, and dejournaling status in that mirror, as described in Mirror Member Journal Transfer and Dejournaling Status. Each line includes a Details link to display information about the members of that mirror and a Stop Mirroring On This Member link to cause the async member to stop mirroring for that mirror, as described in Stopping Mirroring on Backup and Async Members
-
Mirror Member Status provides the type, status, journal transfer latency, and dejournal latency of the failover members of the mirror selected in Mirrors this async member belongs to, as well as the current async member (other asyncs are not listed).
If the async member belongs to a single mirror (which is the case with all DR asyncs), that mirror is displayed in this section by default; if the member belongs to more than one mirror, this section and the Mirrored Databases for MIRROR section below it do not appear until you click the Details link for one of the mirrors listed in Mirrors this async member belongs to section.
-
Mirrored Databases for MIRROR section is as described for failover members, with the same operations available. For reporting asyncs, the databases displayed are those in the mirror selected in Mirrors this async member belongs to and displayed in Mirror Member Status.
Mirror Member Journal Transfer and Dejournaling Status
When a Caché instance belongs to a mirror, its member type and status, journal transfer status, and dejournaling status are displayed by the Mirror Monitor and the ^MIRROR routine Status Monitor option, as described in Monitoring Mirrors.
The following table describes the possible types and statuses displayed:
|
Type |
Status |
Description |
|---|---|---|
|
Failover |
Primary |
Current primary. |
|
Backup |
Connected to primary as backup. |
|
|
In Trouble |
As primary, in a trouble state due to lost connection with the backup; see Automatic Failover Mechanics for complete information about the varying circumstances under which the primary can enter a temporary or indefinite trouble state. |
|
|
Disaster Recovery |
Connected |
Connected to primary as async. |
|
Read-Only Reporting |
||
|
Read-Write Reporting |
||
|
(any of the above) |
Transition |
In a transitional state that will soon change when initialization or another operation completes; this status prompts processes querying a member’s status to query again shortly. When there is no operating primary, a failover member can report this status for an extended period while it retrieves and applies journal files in the process of becoming Primary. |
| Synchronizing |
Starting up or reconnecting after being stopped or disconnected, retrieving and applying journal files in order to synchronize the database and journal state before becoming Backup or Connected. |
|
| Waiting |
Unable to complete an action, such as becoming primary or connecting to primary; will retry indefinitely, but user intervention may be required. See console log for details. |
|
|
Stopped |
Mirroring on member stopped indefinitely by user; see console log for details. |
|
|
Crashed |
Mirror no longer running due to unexpected condition; see console log for details. |
|
| Down |
Displayed on other members for a member that is down or inaccessible. |
|
|
Indeterminate |
Not Initialized |
The mirror configuration is not yet loaded or Caché is down. |
The Type and Status fields contain different values for mirror members running versions of Caché prior to 2013.1.
Mirror member type and status can also be obtained using the $SYSTEM.Mirror.GetMemberType()Opens in a new tab and $SYSTEM.Mirror.GetMemberStatus(Opens in a new tab) methods.
For backup and async mirror members, Journal Transfer indicates whether a mirror member has the latest journal data from the primary and, if not, how far behind journal transfer is, while Dejournaling indicates whether all of the journal data received from the primary has been dejournaled (applied to the member’s mirrored databases) and, if not, how, how far behind dejournaling is. The following tables describe the possible statuses for these fields displayed by the Mirror Monitor and ^MIRROR. (These fields are always N/A for the primary.)
|
Journal Transfer |
Description |
|---|---|
|
Active (backup only) |
The backup has received the latest journal data from and is synchronized with the primary. (See in Backup Status and Automatic Failover for more information about Active backup status.) Note that the backup can be Active even if its Dejournaling status is not Caught up; as long as the backup has all the needed journal files, they can be dejournaled even after it has lost its connection to the primary. |
|
Caught up |
On the backup, indicates that the backup has received the latest journal data from the primary, but is not fully synchronized in that the primary is not waiting for it to acknowledge receipt of journal data. This status is often transient, as when the backup reconnects to the mirror. On an async, indicates that the async has received the latest journal data from and is synchronized with the primary. |
| time behind |
The member is a specific amount of time behind the primary, with time representing the amount of time elapsed between the timestamp of the last journal block the member received and the current time. |
|
Disconnected on time |
The member was disconnected from the primary at the specified time. |
As noted, Active in the Journal Transfer field indicates that the backup has received all journal data from and is synchronized with the primary, and is therefore capable of taking over from the primary during failover without contacting the primary’s ISCAgent to obtain additional journal data.
|
Dejournaling |
Description |
|---|---|
|
Caught up |
All journal data received from the primary has been dejournaled (applied to the member’s mirrored databases). |
| time behind |
Some journal data received from the primary has not yet been dejournaled, with time representing the amount of time elapsed between the timestamp of the last dejournaled journal block and the last journal block received from the primary. |
|
Disconnected on time |
The member was disconnected from the primary at the specified time. |
| Warning! Some databases need attention. | At least one mirrored database is not in a normal state; databases should be checked. |
| Warning! Dejournaling is stopped. | Dejournaling has been stopped by an operator or because of an error; see Managing Database Dejournaling. |
Caught Up in the Dejournaling field for an Active backup failover member or Caught Up in both the Dejournaling field and the Journal Transfer field for an async member indicates that the member has received the most recent journal data from the primary and applied the most recent global operations contained in that data. If the member is not caught up, the amount of time elapsed since generation of the most recent journal data or writing of the most recent operation on the primary is displayed instead.
Incoming Journal Transfer Rate
Below the mirror member status list on backup and async members, the rate at which journal data has arrived from the primary since the last time the Mirror Monitor was refreshed is displayed under Incoming Journal Transfer Rate for This Member.
When the Mirror Monitor page is first loaded, this area displays the text --- (will be displayed on refresh). When the page is next refreshed, the information displayed depends on whether the incoming journal data is compressed (see Journal Data Compression), as follows:
-
If the journal data is not compressed, the incoming journal data rate is provided in kilobytes (KB) per second, for example:
42345 KB/s (22s interval)
-
If the incoming journal data is compressed, the display includes the incoming compressed data rate, the incoming journal (uncompressed) data rate, and the ratio of the latter to the former, for example:
14288 KB/s network; 39687 KB/s journal; ratio 2.78:1 (143s interval)
Mirrored Database Status
On backup and DR async members, the Missing Mirrored Databases Report on the Mirror Monitor page alerts you to any mirrored databases that are present on the primary but not on the current member. This is very important, as the backup, or a DR async if promoted to backup, cannot successfully take over in the event of a primary outage if it does not have the full set of mirrored databases. The full mirror database name of each missing database is listed. The Missing Mirrored Databases Report is not displayed if there are no missing databases.
On all members, the Mirrored Databases list on the Mirror Monitor page displays one of the following statuses for each database listed:
|
Status |
Description |
|---|---|
| Normal (primary only) | The mirrored database is writable (if not a read-only database) and global updates are being journaled. |
|
Dejournaling (backup and async) |
The database has been activated and caught up and the mirror is applying journal data to the database. |
| Needs Catchup |
The database has been activated but not caught up yet; the user-initiated Catchup operation is needed. |
| Needs Activation | The database has not been activated yet; the user-initiated Activate and Catchup operations are needed. |
| Catchup Running | The user-initiated Catchup operation is running on the database. |
| Dejournaling Stopped | Dejournaling has been stopped by an operator or an error; see Stopping Mirroring on Backup and Async Members and Managing Database Dejournaling. |
| Database Dismounted | The database is dismounted. |
| Obsolete | The mirrored database is obsolete and should be removed from the mirror. |
On the primary, the Next Record to Dejournal column contains N/A if the status of the database is Normal. Otherwise, the column includes the following:
-
Time is the timestamp at the beginning of the next journal record to be applied to the database, or Current if this matches the primary's current journal position.
-
FileName is the name of the mirror journal file containing the next journal record to be applied.
-
Offset is position within the journal file of the beginning of the next journal record to be applied.
The status of a database and the operations related to it (Activate and Catchup) are discussed in Activating and Catching Up Mirrored Databases; the operations are available in the drop-down below the list. You can also use the dropdown to mount dismounted databases (but not to dismount mounted databases). You can use the Remove link or select Remove from the drop-down to remove a listed database from the mirror; see Remove Mirrored Databases from a Mirror for more information.
Using the ^MIRROR Status Monitor
The ^MIRROR routine provides a character-based mirror status monitor. The ^MIRROR Status Monitor option displays the status of the mirror members including type, status, journal transfer latency and dejournal latency (see Mirror Member Journal Transfer and Dejournaling Status). The monitor can be run on any mirror member, but running it on a failover member provides information about the arbiter configuration and about all connected async members, which running it on an async member does not.
To start the status monitor, open a Terminal window, run the ^MIRROR routine (see Using the ^MIRROR Routine) in the %SYS namespace, and select Status Monitor from the Mirror Status menu. The following is a sample of output from the monitor when run on a failover member:
Status of Mirror MIR25FEB at 17:17:53 on 02/27/2014

Member Name+Type            Status     Journal Transfer  Dejournaling
--------------------------  ---------  ----------------  --------------
MIR25FEB_A
     Failover               Primary    N/A               N/A
MIR25FEB_B
     Failover               Backup     Active            Caught up
MIR25FEB_C
     Disaster Recovery      Connected  Caught up         Caught up
MIR25FEB_D
     Read-Only Reporting    Connected  Caught up         Caught up

Arbiter Connection Status:
     Arbiter Address: 127.0.0.1|2188
     Failover Mode: Arbiter Controlled
     Connection Status: Both failover members are connected to the arbiter

Press RETURN to refresh, D to toggle database display, Q to quit,
 or specify new refresh interval <60>
When you run the status monitor on an async member, only the failover members and that async are listed, and the status of dejournaling on the async (running or stopped) is also shown, for example:
Status of Mirror MIR25FEB at 17:17:53 on 02/27/2014

Member Name+Type            Status     Journal Transfer  Dejournaling
--------------------------  ---------  ----------------  --------------
MIR25FEB_A
     Failover               Primary    N/A               N/A
MIR25FEB_B
     Failover               Backup     Active            Caught up
MIR25FEB_C
     Disaster Recovery      Connected  Caught up         Caught up
 Dejournal Status: running (process id: 12256)

Press RETURN to refresh, D to toggle database display, Q to quit,
 or specify new refresh interval <60>
By default, information about mirrored databases is not displayed. Enter d at the prompt to list information about each database in the mirror, including name, directory, status, and next record to dejournal as described in Using the Mirror Monitor, for example:
Mirror Databases:
                                                                   Last Record
Name           Directory path                          Status      Dejournaled
-------------  -----------------------------------     ----------- -----------
MIR25FEB_DB1   C:\InterSystems\20142209FEB25A\Mgr\MIR25FEB_DB1\
                                                       Active
   Current,c:\intersystems\20142209feb25a\mgr\journal\MIRROR-MIR25FEB-20140227.001,40233316
MIR25FEB_DB2   C:\InterSystems\20142209FEB25A\Mgr\MIR25FEB_DB2\
                                                       Active
   Current,c:\intersystems\20142209feb25a\mgr\journal\MIRROR-MIR25FEB-20140227.001,40233316
Monitoring Mirroring Communication Processes
There are processes that run on each system (primary and backup failover members, and each connected async member) that are responsible for mirror communication and synchronization.
For more information, see the following topics:
Mirroring Processes on the Primary Failover Member
Running the system status routine (^%SS) on the primary failover member reveals the processes listed in the following table.
The CPU, Glob, and Pr columns have been intentionally omitted from the ^%SS output in this section.
| Device | Namespace | Routine | User/Location |
|---|---|---|---|
| /dev/null | %SYS | MIRRORMGR | Mirror Master |
| MDB2 | %SYS | MIRRORCOMM | Mirror Primary* |
| 192.168.1.1 | %SYS | MIRRORCOMM | Mirror Svr:Rd* |
The processes are defined as follows:
-
Mirror Master: This process, which is launched at system startup, is responsible for various mirror control and management tasks.
-
Mirror Primary: This is the outbound data channel; it is a one-way channel. There is one job per connected system (backup failover or async member).
-
Mirror Svr:Rd*: This is the inbound acknowledgment channel; it is a one-way channel. There is one job per connected system (backup failover or async member).
Each connected async member results in a new set of Mirror Master, Mirror Primary, and Mirror Svr:Rd* processes on the primary failover member.
Mirroring Processes on the Backup Failover/Async Member
Running the system status routine (^%SS) on the backup failover/async member reveals the processes listed in the following table.
| Device | Namespace | Routine | User/Location |
|---|---|---|---|
| /dev/null | %SYS | MIRRORMGR | Mirror Master |
| /dev/null |
%SYS |
MIRRORMGR | Mirror Dejour |
| /dev/null |
%SYS |
MIRRORMGR | Mirror Prefet* |
| /dev/null |
%SYS |
MIRRORMGR | Mirror Prefet* |
| MDB1 |
%SYS |
MIRRORMGR | Mirror Backup |
| /dev/null |
%SYS |
MIRRORMGR | Mirror JrnRead |
The processes identified in this table also appear on each connected async member:
-
Mirror Master: This process, which is launched at system startup, is responsible for various mirror control and management tasks.
-
Mirror JrnRead (Mirror Journal Read): This process reads the journal data being generated on the backup into memory and queues up these changes to be dejournaled by the dejournal job.
-
Mirror Dejour (Mirror Dejournal): This is the dejournal job on the backup failover member; it issues the sets and kills from the received journal data to the mirrored databases.
-
Mirror Prefet* (Mirror Prefetch): These processes are responsible for pre-fetching the disk blocks needed by the dejournal job into memory before the dejournal job actually attempts to use them. This is done to speed up the dejournaling process. There are typically multiple Mirror Prefetch jobs configured on the system. Mirror Backup: This process is a two-way channel that writes the journal records received from the primary into the backup’s mirror journal files and returns acknowledgment to the primary.
Updating Mirror Member Network Addresses
When one or more of the network addresses of one or more mirror members (including the primary) must be updated, as described in Editing or Removing a Failover Member, this information is generally changed on the primary. When you save your changes, the primary propagates them to all connected mirror members (and to disconnected members when they reconnect). You cannot change any mirror member network addresses on a connected backup or async member, as mirror members must receive all such information from the primary. There are a few exceptions to the general case, however, as follows:
-
Because the Superserver port of a Caché instance is part of its general configuration, it must be changed locally. Thus the Superserver port of a mirror member is the only mirror network information that is always updated on the member itself. To change the primary’s Superserver port, go to the Edit Mirror page on the primary, to change the backup’s, go to the Edit Mirror page on the backup, and so on.
Note:When you click the Edit Port link for the local member’s Superserver port in the Edit Network Address dialog, a dialog containing the Memory and Startup page of the management portal appears so you can change the port number. Do not, however, go directly to this page to change the Superserver port of a mirror member; always use the Edit Mirror or Edit Async Configurations page and the Edit Network Address dialog to make this change.
-
When a failover member or async member is disconnected and the primary’s network addresses have changed, you must first ensure that all mirror network addresses are correct on the current primary, then update the primary’s network addresses on the disconnected member or members (see Editing or Removing a Failover Member or Editing or Removing an Async Member). It may be necessary to restart a disconnected member after updating the primary’s network information before the member can reconnect to the mirror.
-
In some cases in which neither failover member is operating as primary, you may need to update the network addresses on one of the failover members before it can become primary. Once it becomes primary, it propagates these addresses to other members as they connect. It may be necessary to restart the member after updating the network addresses before the member can become primary.
As described in Configure Async Mirror Members, the Async Member Address you provide when an async member joins a mirror becomes the async’s superserver address and mirror private address (see Mirror Member Network Addresses). If you want these to be different, for example when you want to place a DR async’s mirror private address on the mirror private network while leaving its superserver address on the external network, after adding the async to the mirror you can update its addresses as described here.
Authorizing X.509 DN Updates (SSL/TLS Only)
When you configure a mirror to use SSL/TLS, you must authorize the newly-added second failover member and each new async member on the first failover member before it can join the mirror, as described in Authorize the Second Failover Member or Async Member (SSL/TLS only). For similar reasons, when a member of a mirror using SSL/TLS updates its X.509 certificate and DN, this update must be propagated to and authorized on other members in one of the following ways:
-
An X.509 DN update on the primary is automatically propagated to and authorized on other mirror members that are connected to the primary at the time the update is made.
-
If a backup or async member is not connected to the primary when the primary updates its X.509 DN, the update is added to that member’s Authorize Pending DN Updates list the next time it connects to the primary. To enable the member to continue as part of the mirror, the update must be authorized by clicking the Authorize Pending DN Updates link on the Edit Mirror page (backup) or Edit Async Configurations page (async) of the management portal. A backup or async member cannot reject an X.509 DN update from the primary.
-
An X.509 DN update on a backup or async member appears in the primary’s Authorize/Reject Pending DN Updates list immediately, if the member is connected to the primary, or the next time the member connects to the primary. To enable the member to continue as part of the mirror, the update must be authorized by clicking the Authorize/Reject Pending DN Updates link on the Edit Mirror page on the primary and selecting Authorize.
The Authorize/Reject Pending DN Updates option (primary) or the Authorize Pending DN Updates option (backup or async) on the Mirror Configuration menu of the ^MIRROR routine can be also used to authorize X.509 DN updates.
When a mirror includes one or more async members of Caché versions earlier than 2015.2, X.509 updates cannot be propagated as above, and you must therefore use special procedures, as follows:
-
Avoid the need for the following procedure, if you can, by upgrading the async to 2015.2 before updating its X.509 certificate. If you cannot do this, however, you can update the X.509 DN of a pre-2015.2 async member by following this procedure:
-
Use the Remove Other Mirror Member button on the Edit Mirror page on the primary to remove the async from the primary’s mirror configuration.
-
Update the pre-2015.2 async member’s x.509 certificate.
-
Use the Add New Async Member button on the Edit Mirror page on the primary to add the async back to the mirror; see Editing or Removing a Failover Member for more information. (You can also use the Add Async Member Not In Pending List option on the Mirror Configuration menu of the ^MIRROR routine for this purpose).
-
Activate and catch up the mirrored databases on the async, as described in Activating and Catching Up Mirrored Databases.
-
-
When you update the X.509 DN of a primary of Caché version 2015.2 or later, a pre-2015.2 async member loses its connection to the primary. To avoid this, before updating the primary’s X.509 certificate, upgrade any pre-2015.2 async members to version 2015.2 or later. If you cannot upgrade the pre-2015.2 asyncs, contact the InterSystems Worldwide Response Center (WRC)Opens in a new tab for assistance in using the Config.MapMirrorsOpens in a new tab class to update the primary’s X.509 DN on these asyncs.
Promoting a DR Async Member to Failover Member
A disaster recovery (DR) async mirror member can be promoted to failover member, replacing a current failover member if two are configured or joining the current member if there is only one. For example, when one of the failover members will be down for a significant period due to planned maintenance or following a failure, you can temporarily promote a DR async to take its place (see Temporary Replacement of a Failover Member with a Promoted DR Async). During true disaster recovery, when both failover members have failed, you can promote a DR to allow it to take over production as primary failover member, accepting the risk of some data loss; see Manual Failover to a Promoted DR Async During a Disaster for more information.
When a DR async is promoted to failover member, it is paired, if possible, with the most recent primary as failover partner; when this cannot be done automatically, you are given the option of choosing the failover partner. Following promotion, the promoted member communicates with its failover partner's ISCAgent as any failover member does at startup, first to obtain the most recent journal data, then to become primary if the failover partner is not primary, or to become backup if the failover partner is primary. The promoted member cannot automatically become primary unless it can communicate with its failover partner to obtain the most recent journal data.
When promoting a DR async to failover member, there are several important considerations to bear in mind:
-
Depending on the location of the DR async, network latency between it and the failover partner may be unacceptably high. See Network Latency Considerations for information about latency requirements between the failover members.
-
When the DR async becomes a failover member, the failover member compression setting is applied, rather than the async member compression setting as before the promotion (see Journal Data Compression for information about these settings). Depending on the network configuration, you may need to adjust the failover member compression setting, as described in Editing or Removing a Failover Member, for optimal mirror function.
-
When a mirror private network is used to connect the mirror private addresses of the failover members, as described in Sample Mirroring Architecture and Network Configurations, a DR async that is not connected to this network should be promoted only to function as primary, and this should be done only when no other failover member is in operation. If a DR async is promoted when a primary is in operation but does not have access to the primary’s mirror private address, it cannot become backup; it will, however, be able to obtain journal data from the primary’s agent and become primary with the most recent journal data when the primary is shut down.
-
If a mirror VIP is in use, and the promoted DR async is not on the VIP subnet, some alternative means must be used to redirect user connections to the promoted DR should it become primary; for example, manually updating the DNS name to point to the DR async’s IP instead of the VIP, or configuring one of the mechanisms discussed in Redirecting Application Connections Following Failover.
In some disaster recovery situations, however, the promoted DR async cannot contact any existing failover member’s agent. When this is the case, you have the option of promoting the DR with no failover partner, as described under Promotion With Partner Selected by User in this section. This means that the DR can become primary only, using only the journal data it already has and any more recent journal data that may be available on other connected mirror members, if any. When this happens, the new primary may not have all the journal data that has been generated by the mirror, and some application data may be lost. If you restart a former failover partner while a DR async promoted in this manner is functioning as primary, it may need to be rebuilt; see Rebuilding a Mirror Member for more information. Be sure to see the DR promotion procedure later in this section for details.
When the primary Caché instance is in an indefinite trouble state due to isolation from both the backup and the arbiter in arbiter controlled mode, as described in Automatic Failover Mechanics Detailed, you cannot promote a DR async to failover member.
When possible, the promoted DR async’s failover partner is selected automatically, as follows:
-
When there is a running primary failover member, the primary is automatically selected as failover partner; the promoted member obtains the most recent journal data from it and becomes the backup. If Caché is running on the current backup, that member is simultaneously demoted to DR async; if it is not, the member is demoted to DR async when Caché is restarted.
-
When Caché is not running on any failover member but the ISCAgents on both failover members (or one if there is only one) can be contacted, the most recent primary is automatically selected as failover partner and the promoted member obtains the most recent journal data from it and becomes the primary. When Caché is restarted on the former primary, it automatically becomes the backup; when Caché is restarted on the former backup, it automatically becomes a DR async.
When Caché is not running on any failover member and at least one ISCAgent cannot be contacted, the promotion procedure informs you of which agents cannot be contacted and gives you the option of choosing a failover partner. To avoid the possibility of data loss, you should select the failover member that was last primary, even if its agent cannot be contacted. The results differ depending on the selection you make and ISCAgent availability, as follows:
-
If the agent on the partner you select can be contacted, the promoted DR async obtains the most recent journal data from it and then becomes primary. When Caché is restarted on the partner, it automatically becomes backup.
-
If the agent on the partner you select cannot be contacted, the promoted DR async does not become primary until the partner’s agent can be contacted and the most recent journal data obtained. At any time before the partner’s agent becomes available, however, you can, force the promoted member to become primary (as described in Manual Failover to a Promoted DR Async During a Disaster) without obtaining the most recent journal data; some application data may be lost as a consequence.
-
If you choose no failover partner, the promoted DR async attempts to obtain the most recent available journal data from all other connected async mirror members before becoming primary. Because there may not be any connected members with more recent journal data than the promoted DR async, some application data may be lost.
When you make this choice, you have the option of setting the no failover state on the promoted DR async so that it will prepare to become primary, including obtaining journal data from other connected members, but not become primary until you clear no failover. This allows you to perform any additional verification you wish and to bring additional members online, if possible, to potentially make more journal data available before allowing the promoted DR async to become primary.
Note:Messages about successful and unsuccessful attempts to contact mirror members to review their journal data, as well as successful and unsuccessful attempts to retrieve recent data when it is identified, are posted in the console log.
Caution:Do not restart Caché on a former failover member whose ISCAgent was down when the DR async was promoted until you have set ValidatedMember=0 in the [MirrorMember] section of the Caché Parameter File for the Caché instance, as described in the DR promotion procedure that follows.
When the failover partner is not selected automatically, the following rules apply:
-
Any former failover member that is not selected as partner becomes a DR async member when Caché is restarted.
-
On any former failover member whose agent could not be contacted at the time the DR async was promoted, you must at earliest opportunity and before restarting Caché instance set ValidatedMember=0 in the [MirrorMember] section of the Caché Parameter File for the Caché instance (see [MirrorMember] in the Caché Parameter File Reference). This instructs the Caché instance to obtain its new role in the mirror from the promoted DR async, rather than reconnecting to the mirror in its previous role. The ^MIRROR routine lists the failover member(s) on which this change is required.
If the promoted DR async becomes primary or is forced to become primary without obtaining the most recent journal data, some global update operations may be lost and the other mirror members may need to be rebuilt (as described in Rebuilding a Mirror Member). Under some disaster recovery scenarios, however, you may have no alternative to promoting a DR async to primary without obtaining journal data. If you are uncertain about any aspect of the promotion procedure, InterSystems recommends that you contact the InterSystems Worldwide Response Center (WRC)Opens in a new tab for assistance.
To promote a DR async member to failover member, do the following:
-
On the DR async member that you are promoting to failover member, navigate to the Mirror Monitor page (System Operation > Mirror Monitor) to display the Mirror Monitor.
-
Click the Promote to Failover Member button at the top of the page.
-
Follow the instructions provided by the resulting dialog boxes. In the simplest case, this involves only confirming that you want to proceed with promotion, but it may include selecting a failover partner or no partner, as described earlier in this section.
-
If a VIP is configured for the mirror, the promoted DR async must have a network interface on the VIP’s subnet to be able to acquire the VIP in the event of becoming primary (due to manual failover or to a later outage of the primary while operating as backup).
-
If the DR async has exactly one interface on the VIP’s subnet, the procedure automatically selects this interface.
-
If the DR async has more than one interface on the VIP’s subnet, the procedure asks you to choose an interface.
-
If the DR async does not have an interface on the VIP’s subnet, the promotion procedure warns you that this is the case and asks you to confirm before proceeding. If you go ahead with the procedure and promote the DR async, you will have to make take manual steps to allow users and applications to connect to the new primary, for example updating the DNS name to point to the DR async’s IP instead of the VIP.
-
-
When a former failover member’s agent is available at the time a DR async is promoted, it automatically sets ValidatedMember=0 in the [MirrorMember] section of the Caché Parameter File for the Caché instance (see [MirrorMember] in the Caché Parameter File Reference). This instructs the Caché instance to obtain its new role in the mirror from the promoted DR async, rather than reconnecting to the mirror in its previous role.
If a former failover member’s agent cannot be contacted at the time of promotion, this change cannot be made automatically. Therefore, at the earliest opportunity and before Caché is restarted on any former failover member whose agent could not be contacted at the time of promotion, you must manually set ValidatedMember=0 by editing the Caché Parameter File for the Caché instance. The instructions list the former failover member(s) on which this change must be made.
Caution:Restarting Caché on a mirror member whose agent was down at the time of DR async promotion without first setting ValidatedMember=0 may result in both failover members simultaneously acting as primary.
Rebuilding a Mirror Member
Under some circumstances following an outage or failure, particularly if manual procedures are used to return a mirror to operation, a member’s mirrored databases may no longer be synchronized with the mirror. For example, when a backup that did not automatically take over following a primary outage is forced to become primary without the most recent journal data (see Manual Failover When the Backup Is Not Active), one or more of the mirrored databases on the former primary may be inconsistent with the new primary’s databases.
In some cases the mirror is able to reconcile the inconsistency, but in others it cannot. When a mirror member whose data is irreparably inconsistent with the mirror is restarted and attempts to rejoin the mirror, the process is halted and the following severity 2 message is written to the console log:
This member has detected that its data is inconsistent with the mirror MIRRORNAME. If the primary is
running and has the correct mirrored data, this member, including its mirrored databases, must be
rebuilt.
This message is preceded by a severity 1 message providing detail on the inconsistency.
When this message appears in the console log, take the following steps:
-
Confirm that the functioning mirror has the desired version of the data, and that the member reporting the inconsistency should therefore be rebuilt. This will likely be true, for example, in any case in which this message appears when you are restarting the former primary after having chosen to manually cause another member to become primary without all of the most recent journal data. If this is the case, rebuild the inconsistent member using the steps that follow.
If you conclude instead that the member reporting the inconsistency has the desired version of the data, you can adapt this procedure to rebuild the other members.
If you are not certain which version of the data to use or whether it is desirable to rebuild the inconsistent member, contact the InterSystems Worldwide Response Center (WRC)Opens in a new tab for help in determining the best course of action.
-
Back up the mirrored databases on a member of the functioning mirror. You can also use an existing backup created on a member of the mirror, if you are certain that
-
the backup was created before the outage or failure that led to the data inconsistency.
-
the current primary has all of the journal files going back to when the backup was created.
-
-
Remove the inconsistent member from the mirror as described in Editing or Removing Mirror Configurations, retaining the mirrored DB attribute on the mirrored databases.
-
Add the member to the mirror using the appropriate procedure, as described in Configure the second failover member or Configure async mirror members.
-
Restore the mirrored databases on the member from the backup you created or selected, as described in Add an existing database to the mirror.
Stopping Mirroring on Backup and Async Members
You can temporarily stop mirroring on the backup or an async member. For example, you may want to stop mirroring on the backup member for a short time for maintenance or reconfiguration, or during database maintenance on the primary, and you might temporarily stop mirroring on a reporting async member to reduce network usage. To do so,
-
Navigate to the Mirror Monitor page (System Operation > Mirror Monitor) for the member on which you want to stop mirroring
-
If the member is the backup failover member, click the Stop Mirroring On This Member button.
-
If the member is an async, click the Stop Mirroring On This Member link in the row for the mirror you want the async to stop mirroring. (Stopping mirroring of one mirror does not affect others a reporting async belongs to.)
The operation takes a few seconds. When you refresh the Mirror Monitor, the Stop Mirroring On This Member is replaced by Start Mirroring On This Member, which you can use to resume mirroring.
When you stop mirroring on a member, mirroring remains stopped until you explicitly started it again as described in the preceding. Neither reinitialization of the mirror or a restart of the member starts mirroring on the member.
You can also use the mirroring SYS.Mirror.StopMirror()Opens in a new tab andSYS.Mirror.StartMirror()Opens in a new tab API methods or the ^MIRROR routine (see Using the ^MIRROR Routine) to perform these tasks.
Managing Database Dejournaling
As described in Mirror Synchronization, dejournaling is the process of synchronizing mirrored databases by applying journal data from the primary failover member to the mirrored databases on another mirror member. Although dejournaling is an automatic process during routine mirror operation, under some circumstances you may need or want to manage dejournaling using options provided by the ^MIRROR routine (see Using the ^MIRROR Routine). Because of the differences in purpose between the backup failover member, DR async members, and reporting async members, there are also some differences in dejournaling and dejournaling management, specifically in regard to interruptions in dejournaling, whether deliberate or caused by error. In addition, a user-defined filter can be applied to dejournaling for one or more of the mirrors a reporting async belongs to.
All types of mirror members continue to receive journal data even when dejournaling of one or all mirrored databases is paused.
The SYS.Mirror.AsyncDejournalStatus()Opens in a new tab, SYS.Mirror.AsyncDejournalStart()Opens in a new tab, SYS.Mirror.AsyncDejournalStop()Opens in a new tab, and SYS.Mirror.DejournalPauseDatabase()Opens in a new tab mirroring API methods can also be used to manage dejournaling.
Managing Dejournaling on the Backup or a DR Async
Because mirrored databases on the backup failover member and DR async members should always be as close as possible to caught up to support potential takeover as primary or use in disaster recovery, respectively, dejournaling is paused by error for only the affected mirrored database, while it continues for others.
For example, when there is a database write error such as <FILEFULL> on the backup or a DR async member, dejournaling of the database on which the write error occurred is automatically paused, but dejournaling of other mirrored databases continues. Dismount the database and correct the error, then remount the database and resume dejournaling by selecting the Activate or Catchup mirrored database(s) option from the Mirror Management menu of the ^MIRROR routine or catching up the database using the management portal (see Activating and Catching Up Mirrored Databases).
On a DR async, you also have the option of pausing dejournaling for all mirrored databases on the member using the Manage mirror dejournaling on async member option on the Mirror Management menu of the ^MIRROR routine. (This option is disabled on backup members.) You can use this following a dejournaling error or for maintenance purposes. For example, if you prefer to pause dejournaling for all databases in the mirror when a dejournaling error causes dejournaling to pause for one database only, you can do the following:
-
Select Manage mirror dejournaling on async member option from the Mirror Management menu of the ^MIRROR routine to pause dejournaling for all databases.
-
Dismount the problem database, correct the error, and remount the database.
-
Select Manage mirror dejournaling on async member option from the Mirror Management menu of the ^MIRROR routine to restart dejournaling for all databases. (This option automatically activates the database that had the error and catches it up to the same point as the most up to date database in the mirror.)
When you pause dejournaling on a DR async member using the Manage mirror dejournaling on async member option, dejournaling does not restart until you use the option again to restart it.
Managing Dejournaling on a Reporting Async
As described in Async Mirror Members, a reporting async member can belong to multiple mirrors. For each of these mirrors, you may want dejournaling of the databases to be continuous or you may want dejournaling to be conducted on a regular schedule, depending on the ways in which the databases are being used. For example, for a given mirror you may want to dejournal between midnight and 4:00am, allowing the databases to remain static for stable report generation over the rest of the day.
In addition, you may want different behavior for different mirrors when dismounting a database for maintenance or encountering an error during dejournaling. For one mirror, it may be most important that the database for which dejournaling is paused not fall behind the other databases in the mirror, in which case you will prefer to pause dejournaling for the entire mirror; for another, it may be most important that the databases in the mirror stay as up to date as possible, in which case you will want to pause only the database involved.
When you want to pause dejournaling for one or more mirrors on a reporting async as a one-time operation or on a regular basis, you can select the Manage mirror dejournaling on async member option from the Mirror Management menu of the ^MIRROR routine to pause dejournaling for all databases in any mirror you wish. When you want to restart dejournaling, use the Manage mirror dejournaling on async member option again. (This option is not available on backup members.)
Unlike backup and DR async members, when there is an error during dejournaling of a database on a reporting async member, dejournaling is automatically paused for all databases in that mirror. Depending on your needs and policies, you can either:
-
Dismount the database that encountered the error, select the Manage mirror dejournaling on async member option from the Mirror Management menu of the ^MIRROR routine to restart dejournaling for all other databases in the mirror, correct the error and mount the database, then resume dejournaling for that database by selecting the Activate or Catchup mirrored database(s) option from the Mirror Management menu of the ^MIRROR routine or catching up the database using the management portal (see Activating and Catching Up Mirrored Databases).
-
Allow dejournaling to remain paused for the entire mirror while you correct the error and remount the database, then use the Manage mirror dejournaling on async member option to restart dejournaling for the entire mirror (This option automatically activates the database that had the error and catches it up to the same point as the most up to date database in the mirror.)
When you want to perform maintenance on a mirrored database on a reporting async member, you can simply dismount the database, then mount the database again after maintenance and use the Activate or Catchup mirrored database(s) option or the management portal to catch up the database. (If the maintenance involves several such databases, use the Mirror Monitor to perform the operation on all of them at once, as described in Activating and Catching Up Mirrored Databases. This is more efficient and less time-consuming than catching up the databases individually.)
When dejournaling pauses for a mirror on a reporting async member due to an error, the member attempts to restart dejournaling for the mirror the next time its connection to the primary is rebuilt. When you pause dejournaling for a mirror on an async member using the Manage mirror dejournaling on async member option, dejournaling for the mirror does not restart until you use the option again to restart it.
Using a Dejournal Filter on a Reporting Async
On a reporting async only, you can set a user-defined dejournal filter on a given mirror, letting you execute your own code for each journal record to determine which records are applied to the Read-Write databases in that mirror. Once you have defined a filter, you can set it on as many mirrors as you want, and you can set, change and remove filters at any time.
This functionality is intended only for highly specialized cases and for conversion of shadowing configurations making use of the equivalent functionality of shadowing. Alternatives should be carefully considered. For controlling which globals are replicated to mirror members, global mapping to non-mirrored databases provides a much simpler, lightweight solution. For monitoring updates to application databases, solutions built at the application level are typically more flexible.
A dejournal filter allows a reporting async to skip dejournaling of some of the records in a journal file received from the primary. However, this applies to Read-Write databases only—databases originally added to the mirror on a read-write reporting async, or from which the FailoverDB flag has been cleared since the database was added to the mirror as Read-Only. (See Clearing the FailoverDB Flag on Reporting Async Mirror Members for a detailed explanation of the FailoverDB flag and the mount status of mirrored databases on reporting asyncs.) If the FailoverDB flag is set on a database, which means that the database is mounted as Read-Only, the dejournal filter code still executes, but all records are always dejournaled on that database, regardless of what the filter code returns.
Setting a dejournal filter slows dejournaling for the mirror it is set on; this effect may be significant, depending on the contents of the filter.
To create a dejournal filter, extend the superclass SYS.MirrorDejournalOpens in a new tab to create a mirror dejournal filter class. The class name should begin with Z or z so that it is preserved during a Caché upgrade.
To set a dejournal filter on a mirror on a reporting async, navigate to the Edit Async Configurations page (System Administration > Configuration > Mirror Settings > Edit Async), click the Edit Dejournal Filter link next to the desired mirror in the Mirrors this async member belongs to list, enter the name of a mirror dejournal filter class, and click Save. To remove a filter, do the same but clear the entry box before clicking Save. Whenever you add, change, or remove a journal filter on a mirror, dejournaling is automatically restarted for that mirror so the filter can be applied. However, if you modify and recompile a mirror dejournal filter class, you must manually stop and restart dejournaling on all mirrors it is set on using the Manage mirror dejournaling on async member option on the Mirror Management menu of the ^MIRROR routine.
General Mirroring Considerations
This section provides information to consider, recommendations, and best-practice guidelines for mirroring. It includes the following subsections:
Mirror APIs
The SYS.MirrorOpens in a new tab class provides methods for programmatically calling the mirror operations available through the management portal and the ^MIRROR routine (see Using the ^MIRROR Routine), as well as many queries. For example, the SYS.Mirror.CreateNewMirrorSet()Opens in a new tab method can be used to create a mirror and configure the first failover member, while the SYS.Mirror.MemberStatusList()Opens in a new tab query returns a list of mirror members and the journal latency status of each. See the SYS.MirrorOpens in a new tab class documentation for descriptions of these methods.
If you use an external script to perform backups, you can use the $SYSTEM.Mirror class methods to verify whether a system is part of a mirror and, if so, what its role is:
$System.Mirror.IsMember()
$System.Mirror.IsPrimary()
$System.Mirror.IsBackup()
$System.Mirror.IsAsyncMember()
$System.Mirror.MirrorName()
where $SYSTEM.Mirror.IsMember()Opens in a new tab returns 1 if this system is a failover member, 2 if this is an async mirror member, or 0 if this is not a mirror member; $SYSTEM.Mirror.IsPrimary()Opens in a new tab returns 1 if this system is the primary failover member, or 0 if it is not; $SYSTEM.Mirror.IsBackup()Opens in a new tab returns 1 if this system is the backup failover member, or 0 if it is not; $SYSTEM.Mirror.IsAsyncMember()Opens in a new tab returns 1 if this system is an async member, or 0 if it is not; $SYSTEM.Mirror.MirrorName()Opens in a new tab returns the name of the mirror if the instance is configured as a failover mirror member or NULL if it is not.
You can also use $SYSTEM.Mirror.GetMemberType()Opens in a new tab and $SYSTEM.Mirror.GetMemberStatus(Opens in a new tab) to obtain information about the mirror membership (if any) of the current instance of Caché and its status in that role; see Mirror Member Journal Transfer and Dejournaling Status for more information.
External Backup of Primary Failover Member
When using the Backup.General.ExternalFreeze()Opens in a new tab method to freeze writes to a database on the primary failover member so an external backup can be performed, as described in the “Backup and Restore” chapter of the Caché Data Integrity Guide, ensure that the external freeze does not suspend updates for longer than the specified ExternalFreezeTimeOut parameter of Backup.General.ExternalFreeze()Opens in a new tab. If this happens, the mirror may fail over to the backup failover member, thereby terminating the backup operation in progress.
Upgrading Caché on Mirror Members
See Minimum Downtime Upgrade with Mirroring in the “Upgrading Caché” chapter of the Caché Installation Guide for considerations to take into account when upgrading Caché on a mirror member.
Database Considerations for Mirroring
This section provides information to consider when configuring and managing mirrored databases:
Caché Instance Compatibility
The Caché instances in a mirror must be compatible in several ways, as follows:
-
While mirror member systems can be of different operating systems and/or endianness, the Caché instances on all members of a mirror
-
must have been installed with the same character width, 8-bit or Unicode (see Caché Character Width in the Caché Installation Guide)
-
must use the same locale (see Using the NLS Settings Page of the management portal in the “Configuring Caché” chapter of the Caché System Administration Guide)
Note:The one exception to the character width and locale requirements is that an 8-bit instance using a locale based on the ISO 8859 Latin-1 character set is compatible with a Unicode instance using the corresponding wide character locale. For example, an 8–bit primary instance using the enu8 locale is compatible with a Unicode backup instance using the enuw locale. However, an 8–bit primary instance using the heb8 locale is not compatible with a Unicode backup instance using the hebw locale, as these locales are not based on ISO 8859 Latin-1.
-
-
The failover members must have the same database block sizes enabled (see Large Block Size Considerations in the “Configuring Caché” chapter of the Caché System Administration Guide). Additionally, the sizes enabled on the failover members must be enabled on async members. If the block size of a mirrored database that is added to the primary is not enabled on another member, the database cannot be added to the mirror on that member,
-
The failover members and any DR async member must be of the same Caché version; they can differ only for the duration of one of the upgrade procedures described in Minimum Downtime Upgrade with Mirroring in the “Upgrading Caché” chapter of the Caché Installation Guide. Once an upgraded member becomes primary, you cannot make use of the other failover member and any DR async members (and in particular cannot allow them to become the primary) until the upgrade is completed.
Mirroring does not require reporting async members to be of the same Caché version as the failover members, although application functionality may require it.
See Supported Version Interoperability in Supported Platforms for information about the range of the version difference allowed between failover/DR async members and reporting async member, and allowed between failover and DR async members during an upgrade procedure.
Member Endianness Considerations
-
Mixed endianness is not supported for the members of a mirrored data server in a distributed cache cluster (for example, a mirror set serving as an ECP data server). When the failover members are temporarily mixed — for example, when migrating the server from one endianness to another — ECP sessions do not recover following failover.
-
When creating a mirrored database or adding an existing database to a mirror, if a backup failover member or async member has a different endianness than the primary failover member, you cannot use the backup and restore procedure described in Add an existing database to the mirror; you must instead use the procedure in that section involving copying the database’s CACHE.DAT file. Additionally, when using that procedure, insert the following step after copying the CACHE.DAT file to all non-primary members and before mounting the database on those members:
-
On the backup failover member and each async member, convert the copied CACHE.DAT files as described in the Using cvendian to Convert Between Big-endian and Little-endian Systems section of the “Migration and Conversion Utilities” chapter of Caché Specialized System Tools and Utilities.
Note:If the database you are copying is encrypted on the primary, the key with which it is encrypted must also be activated on the backup (and asyncs, if any), or the database must be converted to use a key that is activated on the destination system using the cvencrypt utility (as described in the Converting an Encrypted Database to Use a New Key section of the “Using the cvencrypt Utility” chapter of the Caché Security Administration Guide).
-
Creating a Mirrored Database Using the ^DATABASE Routine
You can create mirrored databases on mirror members using the ^DATABASE routine. (See ^DATABASE in the “Using Character-based Security Management Routines” chapter of the Caché Security Administration Guide for information about the routine.) You must create the new mirrored database on the primary member before creating it on other mirror members. To create a mirrored database:
-
Run the ^DATABASE routine, and select the 1) Create a database option.
-
Enter the directory path at the Database directory? prompt.
-
Enter yes at the Change default database properties? prompt.
-
Enter 3 (Mirror DB Name:) at the Field number to change? prompt, and enter a mirror name for the mirrored database at the Mirror DB Name? prompt.
Note:If the member on which you are creating the mirrored database is a member of multiple mirrors and you are creating a mirrored database that is in a mirror that is different from the one that is listed by default, Enter (Mirror Set Name:) at the Field number to change? prompt, and choose the correct mirror name from the list. If the member on which you are running the routine is a member of only one mirror, this field cannot be changed.
-
Modify other fields as necessary for your database, then when you have finished making changes, press Enter at the Field number to change? prompt without specifying any option.
-
Enter the dataset name of the database at the Dataset name of this database in the configuration: prompt. This is the name that is displayed in the management portal.
-
Enter responses to the remaining prompts until the mirrored database is created.
When you create the mirrored databases on the backup and async members, they automatically catch up with the database you created on the primary member.
You cannot add an existing non-mirrored database to a mirror using the ^DATABASE routine; see Adding Databases to Mirror for the required procedure.
Recreating an Existing Mirrored Database Using the ^DATABASE Routine
The 10) Recreate a database option of ^DATABASE routine lets you clear the data in an existing database without changing the database’s name or size. (See ^DATABASE in the “Using Character-based Security Management Routines” chapter of the Caché Security Administration Guide for information about the routine.) You can use this option with a mirrored database, but you must use it on every mirror member on which the database appears, and in the same order in which you use the Create a database option to create a new mirrored database—on the primary first, then the backup, then any asyncs on which the database is part of the mirror.
If you use the 10) Recreate a database option to recreate a database on the primary, you must repeat the operation on the backup and any DR asyncs in the mirror; if you do not, the database may become obsolete in the event of failover or disaster recovery. You are strongly encouraged to repeat the recreate operation on reporting asyncs as well.
Mounting/Dismounting Mirrored Databases
Mirrored databases can be mounted/dismounted on either failover member. If dismounted on the backup failover member, however, the database remains in a “stale” state until it is remounted, after which mirroring attempts to catch up the database automatically. If the required journal files are available on the primary failover member, the automatic update should succeed, but if any of the required journal files on the primary member have been purged, you must restore the database from a recent backup on the primary member.
Copying Mirrored Databases to Non-Mirrored Systems
You can copy a mirrored database to a non-mirrored system and mount it read-write on that system by doing the following:
-
Back up the mirrored database on the primary or backup failover member and restore it on the non-mirrored system using the procedure described in Add an Existing Database to the Mirror (omit the step of manually activating and catching up the database following external backup restore or cold backup restore). Once restored, the database is still marked as mirrored and is therefore read-only.
-
On the non-mirrored system, use the ^MIRROR routine (see Using the ^MIRROR Routine) to remove the database from the mirror by selecting Mirror Management and then Remove mirrored database and following the instructions. Following this procedure the database is mounted read-write.
Ensemble Considerations for Mirroring
This section discusses additional considerations that apply to Ensemble, including:
Creating an Ensemble Namespace with Mirrored Data
Because creating an Ensemble namespace requires database writes that enable the use of Ensemble in the new namespace, an Ensemble namespace with mappings from one or more mirrored databases must be created on the current primary mirror member and cannot be created on the backup, where mirrored databases are read-only.
How Ensemble Handles a Namespace with Mirrored Data
Ensemble examines the mappings in a namespace and determines whether that namespace contains any mappings from a mirrored database.
When you start or upgrade Ensemble, it treats the primary mirror member differently from the other mirror members, as follows:.
-
On startup, it starts only productions on the primary mirror member.
-
When you upgrade Ensemble, certain tasks require write access to the database; Ensemble performs those tasks only on the primary mirror member.
-
If a failover occurs and a member becomes the primary mirror member, Ensemble performs any tasks that were skipped when it was upgraded and starts the productions.
Recommended Mirroring Configuration for Ensemble
Mirroring is intended to be a high availability solution and there should thus be minimal extraneous activity on either of the mirror instances. That is, you should mirror all databases on any mirrored instances.
Customers sometimes choose to have “less critical” productions running on either node without having that data mirrored. Such a configuration, however, creates operational complexity that may prove difficult to maintain. Consequently, InterSystems strongly recommends that you avoid such configurations and that you instead mirror all the databases.
How Ensemble Autostart Works in a Mirrored Environment
When a mirror system starts up (at which point no member has yet become the primary failover member):
-
Ensemble does not start any production that accesses mirrored data even if the production is specified in ^Ens.AutoStart. If the member becomes the primary instance, these productions will be started at that time.
-
Ensemble determines if there are any namespaces on the instance that do not access mirrored data. As described previously, InterSystems recommends that only mirrored productions be installed on a mirror member. If you have, however, installed any production with non-mirrored databases, Ensemble starts the production specified in ^Ens.AutoStart. (This logic ensures that if you have installed a non-mirrored namespace on a mirror member, it is started on Ensemble startup.)
Later, when the member becomes the primary failover member, Ensemble finds the namespaces that do reference mirrored data so that it can start the productions in these namespaces. If you follow InterSystems recommendations, no production accessing mirrored data should be running before an instance becomes the primary mirror member. Ensemble first checks to see if a production is already running before starting it, specifically:
-
Ensembles determines whether the production is already running by counting the jobs that are running as the _Ensemble user in the namespace. If there are more than two such jobs, indicating that the production is already running, Ensemble logs a warning to the console log and does not attempt to start the production.
-
If, as expected, the production is not running, Ensemble automatically starts the production specified in ^Ens.AutoStart.
For complete information about starting and stopping Ensemble productions, see the “Starting and Stopping Productions” chapter of Managing Ensemble.
Mirror Outage Procedures
Due either to planned maintenance or to unplanned problems, the Caché instance on one or both of the failover members in a mirror may become unavailable. When the Caché instance is unavailable, the ISCAgent on the member’s host system may continue to be available (if the host system is still operating) or may also be unavailable (as when the host system is down). This section provides procedures for dealing with a variety of planned and unplanned outage scenarios involving instance outages or total outages of one or both failover members.
As noted in Automatic Failover Mechanics, there are two requirements for safe and successful failover from the primary failover member to the backup failover member:
-
Confirmation that the primary instance is actually down, and not isolated by a temporary network problem.
-
Confirmation that the backup has the most recent journal data from the primary, either because it was active when the primary failed (see Mirror Synchronization) or because it has been manually caught up (see Unplanned Outage of Primary Without Automatic Failover).
In reading and using this material, you may want to refer to Automatic Failover Rules to review the rules governing automatic failover.
For information about using the Mirror Monitor to determine whether a backup failover member is active or a DR async is caught up, see Mirror Member Journal Transfer and Dejournaling Status and Monitoring Mirrors.
This section covers the following topics:
Planned Outage Procedures
To perform planned maintenance, you may need to temporarily shut down the Caché instance on one of the failover members, or the entire system hosting it. Situations in which you might do this include the following:
In this section, the term graceful shutdown refers to the use of the ccontrol stop command. For information about ccontrol, see Controlling Caché Instances in the “Using Multiple Instances of Caché” chapter of the Caché System Administration Guide.
In addition to the ccontrol stop command, the SYS.MirrorOpens in a new tab API and the ^MIRROR routine can be used to manually trigger failover.
For information on shutting down the primary without triggering automatic failover, see Avoiding Unwanted Failover During Maintenance of Failover Members.
When there is no backup failover member available due to planned or unplanned failover member outage, you can promote a DR async member to failover member if desired, protecting you from interruptions to database access and potential data loss should a primary failure occur. See Temporary Replacement of a Failover Member with a Promoted DR Async for information about temporarily promoting a DR async member to failover member.
Maintenance of Backup Failover Member
When you need to take down the backup failover member Caché instance, you can perform a graceful shutdown on the backup instance. This has no effect on the functioning of the primary. When the backup instance is restarted it automatically rejoins the mirror as backup.
However, if the primary’s Caché instance is restarted while the backup’s host is shut down and the backup’s ISCAgent therefore cannot be contacted, the primary cannot become primary after the restart, because it has no way of determining whether it was the most recent primary. When you need to shut down the backup’s host system, you can eliminate this risk using the following procedure:
-
On the backup, navigate to the Mirror Monitor page (System Operation > Mirror Monitor) and click the Demote to DR Member button at the top of the page to demote the backup to DR async.
-
Shut down on the former backup instance and its host system, complete the maintenance work, and restart the member as a DR async.
-
Promote the former backup from DR async to failover member, as described in Promoting a DR Async Member to Failover Member, to restore it to its original role.
If the primary is restarted after the backup has been demoted, it automatically becomes primary.
If you do not demote the backup before shutting it down, and find you do need to restart the primary Caché instance while the backup’s agent is unavailable, follow the procedures in Unplanned Outage of Both Failover Members.
Maintenance of Primary Failover Member
When you need to take down the primary failover member Caché instance or host system, you can gracefully fail over to the backup first. When the backup is active (see Mirror Synchronization), perform a graceful shutdown on the primary Caché instance. Automatic failover is triggered, allowing the backup to take over as primary.
When maintenance is complete, restart the former primary Caché instance or host system. When the Caché instance restarts, it automatically joins the mirror as backup. If you want to return the former primary to its original role, you can repeat the procedure—perform a graceful shutdown on the backup Caché instance to trigger failover, then restart it.
Avoiding Unwanted Failover During Maintenance of Failover Members
You may want to gracefully shut down the primary failover member without the backup member taking over as primary, for example when the primary will be down for only a very short time, or prevent the backup from taking over in the event of a primary failure. You can do this in any of three ways:
-
Demote the backup failover member as described in Maintenance of Backup Failover Member.
-
Gracefully shut down the primary Caché instance using the nofailover argument with the ccontrol stop command.
-
Set no failover by clicking Set No Failover at the top of the Mirror Monitor page on either the primary or the backup. When no failover is set, the button says Clear No Failover and theStatus Monitor options of the Mirror Status menu of the ^MIRROR routine indicate that this is the case. (See Monitoring Mirrors for more information about the Status Monitor option.)
Click Clear No Failover on either failover member to clear the no failover state and enable failover, The no failover state is automatically cleared when the primary is restarted.
Upgrade of Caché Instances in a Mirror
To upgrade Caché across a mirror, see the procedures in Minimum Downtime Upgrade with Mirroring in the “Upgrading Caché” chapter of the Caché Installation Guide.
Unplanned Outage Procedures
When a failover member unexpectedly fails, the appropriate procedures depend on which Caché instance has failed, the failover mode the mirror was in (see Automatic Failover Mechanics Detailed), the status of the other failover member instance, the availability of both failover member’s ISCAgents, and the mirror’s settings.
-
Unplanned Outage of Primary Failover Member With Automatic Failover
-
Unplanned Outage of Primary Failover Member When Automatic Failover Does Not Occur
In reading and using this section, you may want to review Mirror Response to Various Outage Scenarios, which discusses the details of the backup’s behavior when the primary becomes unavailable.
Unplanned Outage of Backup Failover Member
When the backup failover member’s Caché instance or its host system fails, the primary continues to operate normally, although some applications may experience a brief pause (see Effect of Backup Outage for details).
When an unplanned outage of the backup occurs, correct the conditions that caused the failure and then restart the backup Caché instance or host system. When the backup Caché instance restarts, it automatically joins the mirror as backup.
If the backup fails in agent controlled mode (see Automatic Failover Rules) and the backup’s ISCAgent cannot be contacted, the primary’s Caché instance cannot become primary after being restarted, because it has no way of determining whether it was the most recent primary. Therefore, if you need for any reason to restart the primary Caché instance while the backup host system is down, you must use the procedure described in Maintenance of Backup Failover Member to do so.
Unplanned Outage of Primary Failover Member With Automatic Failover
As described in Automatic Failover Rules, when the primary Caché instance becomes unavailable, the backup can automatically take over as primary when
-
The backup is active and
-
receives a communication from the primary requesting that it take over.
-
receives information from the arbiter that it has also lost contact with the primary.
-
if the arbiter is unavailable or no arbiter is configured, contacts the primary’s ISCAgent to confirm that the primary instance is down or hung.
-
-
The backup is not active but can contact the primary’s ISCAgent to confirm that the primary instance is down or hung and obtain the primary’s most recent journal data from the ISCAgent.
See Automatic Failover in Response to Primary Outage Scenarios for a detailed discussion of the situations in which automatic failover can take place.
When the backup has automatically taken over following an unplanned primary outage, correct the conditions that caused the outage, then restart the former primary Caché instance or host system. When the Caché instance restarts, it automatically joins the mirror as backup. If you want to return the former primary to its original role, perform a graceful shutdown on the backup Caché instance to trigger failover, then restart it, as described in Maintenance of Primary Failover Member.
Unplanned Outage of Primary Failover Member When Automatic Failover Does Not Occur
As described in Automatic Failover Rules, the backup Caché instance cannot automatically take over from an unresponsive primary instance when the primary’s host system, including its ISCAgent, is unavailable, and any of the following is true:
-
The backup was not active.
-
The backup is prevented from taking over by an error.
-
The backup cannot verify that the primary is down, either because no arbiter is configured or because it lost contact with the arbiter before or at the same time as it lost contact with the primary Caché instance and its ISCAgent.
Under this scenario, there are three possible situations, each of which is listed with possible solutions in the following:
-
The primary host system has failed but can be restarted. You can do either of the following:
-
Restart the primary host system without restarting the primary Caché instance. When the primary’s ISCAgent becomes available, the backup obtains the most recent journal data from it if necessary and becomes primary.
-
Restart the primary host system including the primary Caché instance. The failover members negotiate until one becomes primary, with the other becoming backup.
-
-
The primary host system has failed and cannot be restarted. You can manually force the backup to take over. The procedures for this vary depending on whether or not the backup was active when it lost its connection the primary; there is some risk of data loss, as described in the following sections.
-
The primary host system is running but is network isolated from the arbiter as well as the backup; see Unplanned Isolation of Primary Failover Member for procedures.
Manually Forcing a Failover Member to Become Primary
When a failover member cannot become primary you can force it to do so, but there is a risk of data loss if you do this in any situation in which the last primary could have more recent journal data than the member you are forcing. The following procedures describe how to determine and manage that risk. If you force a member to become the primary when you cannot confirm that it has the most recent journal data, the other mirror members may be unable to rejoin the mirror and need to be rebuilt (as described in Rebuilding a Mirror Member).
Before proceeding, confirm that the primary is down and will remain down during this procedure. If you cannot confirm that, it is best to abort this procedure in order to avoid the risk that the original primary becomes available again, resulting in both members simultaneously acting as primary. If you are uncertain whether this procedure is appropriate, contact the InterSystems Worldwide Response Center (WRC)Opens in a new tab for assistance.
You cannot force a failover member to become primary if the former primary’s ISCAgent is still up and available on the network. For this reason, you may need to shut the original primary’s host down, or stop the ISCAgent, before forcing the other failover member to become primary.
Determining Whether the Backup Was Active Before Manually Failing Over
Assume two failover members called Caché A and Caché B. If the ^MIRROR routine confirms that the backup (Caché B) was active at the time contact with the primary (Caché A) was lost, and therefore has the most recent journal data from Caché A, you can manually fail over using a single procedure. When the connection was lost due to the primary failure, this poses no risk of data loss. However, when multiple failures occur, it is possible that an active backup does not have all of the latest journal data from the primary because the primary continued operating for some period after the connection was lost.
Determine whether the backup was active using this procedure:
-
Confirm that both the Caché instance and the ISCAgent on Caché A are actually down (and ensure that they stay down during the entire manual failover procedure).
-
On Caché B, run the ^MIRROR routine (see Using the ^MIRROR Routine) in the %SYS namespace in the Terminal.
-
Select Mirror Management from the main menu to display the following submenu:
1) Add mirrored database(s) 2) Remove mirrored database(s) 3) Activate or Catchup mirrored database(s) 4) Change No Failover State 5) Try to make this the primary 6) Connect to Mirror 7) Stop mirroring on this member 8) Modify Database Size Field(s) 9) Force this node to become the primary 10) Promote Async DR member to Failover member 11) Demote Backup member to Async DR member 12) Mark an inactive database as caught up 13) Manage mirror dejournaling on async member (disabled) 14) Pause dejournaling for database(s) -
Select the Force this node to become the primary option. If the backup was active at the time contact was lost, a message like the following is displayed:
This instance was an active backup member the last time it was
connected so if the primary has not done any work since that time,
this instance can take over without having to rebuild the mirror
when the primary reconnects. If the primary has done any work
beyond this point (file #98),
     C:\InterSystems\MyCache\mgr\journal\MIRROR-GFS-20140815.009
then the consequence of forcing this instance to become the primary is
that some operations may be lost and the other mirror member may need
to be rebuilt from a backup of this node before it can join as
a backup node again.
Do you want to continue? <No>
If you have access to the primary’s journal files, you can confirm that the cited file is the most recent before proceeding.
If the backup was not active at the time contact with the primary was lost, a message like the following is displayed:
Warning, this action can result in forcing this node to become
the primary when it does not have all of the journal data which
has been generated in the mirror. The consequence of this is that
some operations may be lost and the other mirror member may need
to be rebuilt from a backup of this node before it can join as
a backup node again.
Do you want to continue? <No>
Manual Failover To An Active Backup
If the Force this node to become the primary option of the ^MIRROR routine confirms that the backup was active when it lost its connection to the primary, complete the manual failover procedure as follows:
-
Enter y at the Do you want to continue? prompt to continue with the procedure. The Force this node to become the primary option waits 60 seconds for the mirror member to become the primary. If the operation does not successfully complete within 60 seconds, ^MIRROR reports that the operation may not have succeeded and instructs you to check the console log to determine whether the operation failed or is still in progress.
-
Once the ^MIRROR rountine confirms that the backup has become primary, restart Caché A when you can do so. Caché A joins the mirror as backup when the Caché instance restarts.
Manual Failover When the Backup Is Not Active
Even when the ^MIRROR routine does not confirm that the backup (Caché B) was active at the time it lost its connection with the primary (Caché A), you can still continue the manual failover process using the following procedure, but there is some risk of data loss if you do. This risk can be minimized by copying the most recent mirror journal files from Caché A, if you have access to them, to Caché B before manual failover, as described in this procedure.
-
If you have access to the primary’s mirror journal files, copy the most recent files to Caché B, beginning with the latest journal file on Caché B and including any later files from Caché A. For example, if MIRROR-MIRRORA-20130220.001 is the latest file on Caché B, copy MIRROR-MIRRORA-20130220.001 and any later files from Caché A. Check the files’ permissions and ownership and change them if necessary to match existing journal files.
-
If you accept the risk of data loss, confirm that you want to continue by entering y at the prompt; the backup becomes primary. The Force this node to become the primary option waits 60 seconds for the mirror member to become the primary. If the operation does not successfully complete within 60 seconds, ^MIRROR reports that the operation may not have succeeded and instructs you to check the console log to determine whether the operation failed or is still in progress.
-
Once the ^MIRROR rountine confirms that the backup has become primary, restart Caché A when you can do so.
-
If Caché A joins the mirror as backup when the Caché instance restarts, no further steps are required. Any journal data that was on the failed member but not on the current primary has been discarded.
-
If Caché A cannot join the mirror when the Caché instance restarts, as indicated by the console log message referring to inconsistent data described in Rebuilding a Mirror Member, the most recent database changes on Caché A are later than the most recent journal data present on Caché B when it was forced to become the primary. To resolve this, rebuild Caché A as described in that section.
-
Unplanned Isolation of Primary Failover Member
As described in Automatic Failover Mechanics, when the primary simultaneously loses contact with both the backup and the arbiter, it goes into an indefinite trouble state and can no longer operate as primary. Typically, when this occurs, the backup takes over and becomes primary. When the primary’s connection to the backup is restored, the backup forces the primary down; alternatively, you can force the primary down yourself before restoring the connection.
However, if a network event (or series of network events) causes the failover members and arbiter to all lose contact with each other simultaneously (or nearly simultaneously), there can be no primary because the backup cannot take over and the primary is no longer operating as primary. This situation is shown as the final scenario in the illustration Mirror Responses to Lost Connections in Arbiter Mode in the section Automatic Failover Mechanics Detailed. A similar situation can occur when the primary becomes isolated and the backup cannot take over because of an error.
When these circumstances occur, you have the following options:
-
Restore the connection between the failover members; when the former primary is contacted by the former backup, the members negotiate and one becomes primary, the other backup.
-
Without restoring the connection, if you can open a Terminal window on the primary, do so and run the ^MIRROR routine (see Using the ^MIRROR Routine) on the primary. The routine confirms that the primary instance is in an indefinite trouble state, and gives you two options:
-
If you confirm that the other failover member is down (possibly because you shut it down), that it never became primary, and that it did not create a mirror journal file later than the latest one on the primary, you can force the member to resume operation as primary. Once it has done so, and you restore the connection between the primary and the backup, the backup resumes operation as backup.
-
If you cannot confirm these conditions, you can shut the primary down. You can then manually fail over to the backup using one of the procedures described in Unplanned Outage of Primary Failover Member When Automatic Failover Does Not Occur.
-
-
If you cannot open a Terminal window on the primary, but can confirm that the other failover member is down, that it never became primary, and that it did not create a mirror journal file later than the latest one on the primary, you can restart the primary Caché instance and force it to become primary using the Force this node to become the primary option of the ^MIRROR routine. Alternatively, if you cannot confirm these conditions, you can ensure that the primary Caché instance is down and will stay down, then manually fail over to the backup using one of the procedures described in Unplanned Outage of Primary Failover Member When Automatic Failover Does Not Occur.
If you force the primary to resume operation as primary without confirming the listed conditions, you run the risk of data loss or both failover members simultaneously acting as primary. If you are uncertain whether this procedure is appropriate, contact the InterSystems Worldwide Response Center (WRC)Opens in a new tab for assistance.
Unplanned Outage of Both Failover Members
When both failover members unexpectedly fail, due the same event or different events, the appropriate procedures depends on whether you can restart either or both of the failover members within the limits of your availability requirements. The longer the mirror can be out of operation, the more options you are likely to have.
-
If you can restart both agents and at least one Caché instance, the failover members will negotiate with each other and automatically select which of them is to act as primary, returning the mirror to operation with no risk of data loss.
-
If you know with certainty which of the failover members was the last primary and you can restart it, it will not automatically become primary if it cannot communicate with the other failover member’s Caché instance or agent (because they are down), but you can manually force it to become primary, with no risk of data loss, using the Force this node to become the primary option of the ^MIRROR routine (as described in Unplanned Outage of Primary Failover Member Without Automatic Failover).
-
If you can restart only one of the failover members but don’t know whether it was last primary, you can use the Force this node to become the primary option of the ^MIRROR routine to manually force it to become primary with some risk of data loss.
Caution:If you force a backup that was not active to become the primary, some global update operations may be lost, and the other mirror members may need to be rebuilt (as described in Rebuilding a Mirror Member). If you are uncertain whether this procedure is appropriate, contact the InterSystems Worldwide Response Center (WRC)Opens in a new tab for assistance.
-
If you cannot restart either of the failover members, proceed to Disaster Recovery Procedures.
Disaster Recovery Procedures
As described in Async Mirror Members, a disaster recovery (DR) async member maintains read-only copies of the mirrored databases, making it possible for the DR async to be promoted to failover member should the need arise. The procedure for promoting a DR async is described in Promoting a DR Async Member to Failover Member. This section discusses three scenarios in which you can use DR async promotion:
In the procedures in this section, Caché A is the original primary failover member, Caché B is the original backup, and Caché C is the DR async to be promoted.
Manual Failover to a Promoted DR Async During a Disaster
When the mirror is left without a functioning failover member, you can manually fail over to a promoted DR async. The following procedures covers scenarios under which this is an option:
-
DR Promotion and Manual Failover with No Additional Journal Data
-
DR Promotion and Manual Failover with Journal Data from Primary’s ISCAgent
-
DR Promotion and Manual Failover with Journal Data from Journal Files
If you cannot confirm that the primary failover member Caché instance is really down, and there is a possibility that the instance will become available, do not manually fail over to another mirror member. If you do manually fail over and the original primary becomes available, both failover members will be simultaneously acting as primary.
When the primary Caché instance is in an indefinite trouble state due to isolation from both the backup and the arbiter in arbiter controlled mode, as described in Automatic Failover Mechanics Detailed, you cannot promote a DR async to failover member.
DR Promotion and Manual Failover with No Additional Journal Data
In a true disaster recovery scenario, in which the host systems of both failover members are down and their journal files are inaccessible, you can promote the DR async member to primary without obtaining the most recent journal data from the former primary. This is likely to result in some data loss. If the host systems of the failover members are accessible, use one of the procedures in DR Promotion and Manual Failover with Journal Data from Primary’s ISCAgent or DR Promotion and Manual Failover with Journal Data from Journal Files instead, as these allow the promoted DR async to obtain the most recent journal data before becoming primary, minimizing the risk of data loss.
Once you have promoted a DR async that is not participating in the mirror VIP to primary, you must make any needed changes to redirect users and applications to the new primary (see Redirecting Application Connections Following Failover or Disaster Recovery) before completing the procedures provided in this section.
A promoted DR async does not attempt to become primary unless all databases (mirrored and nonmirrored) marked Mount Required at Startup (see Edit a Local Database’s Properties in the “Managing Caché” chapter of the Caché System Administration Guide) are mounted, and all such mirrored databases are activated and caught up.
Promoting a DR async to primary without the most recent journal data from the former primary is likely to result in the loss of some global update operations, and the other mirror members may need to be rebuilt (as described in Rebuilding a Mirror Member). If you are uncertain whether this procedure is appropriate, contact the InterSystems Worldwide Response Center (WRC)Opens in a new tab for assistance.
To promote a DR async (Caché C) to primary without obtaining the most recent journal data, do the following.
-
Promote Caché C to failover member without choosing a failover partner. Caché C becomes the primary without any additional journal data.
-
When the host systems of the former failover members (Caché A and Caché B) become operational, at earliest opportunity and before restarting Caché, set ValidatedMember=0 in the [MirrorMember] section of the Caché Parameter File for the Caché instance on each member (see [MirrorMember] in the Caché Parameter File Reference). This instructs the Caché instance to obtain its new role in the mirror from the promoted DR async, rather than reconnecting in its previous role. The promotion instructions note that this change is required.
Caution:Failure to set ValidatedMember=0 may result in two mirror members simultaneously acting as primary.
-
Restart Caché on each former failover member.
-
If the member joins the mirror as DR async when Caché restarts, no further steps are required. Any journal data that was on the failed member but not on the current primary has been discarded.
-
If the member cannot join the mirror when Caché restarts, as indicated by the console log message referring to inconsistent data described in Rebuilding a Mirror Member, the most recent database changes on the member are later than the most recent journal data present on Caché C when it became primary. To resolve this, rebuild Caché A as described in that section.
-
-
After Caché A and Caché B have rejoined the mirror, you can use the procedures described in Temporary Replacement of a Failover Member with a Promoted DR Async to return all of the members to their former roles. If either Caché A or Caché B restarted as backup, start with a graceful shutdown of Caché C when the backup is active to fail over to the backup; if Caché A and Caché B both restarted as DR async, promote one of them to backup and then perform the graceful shutdown on Caché C. Promote the other former failover member to backup, then restart Caché C as DR async.
DR Promotion and Manual Failover with Journal Data from Primary’s ISCAgent
If the host system of Caché A is running, but the Caché instance is not and cannot be restarted, you can use the following procedure to update the promoted Caché C with the most recent journal data from Caché A after promotion through Caché A’s ISCAgent.
-
Promote Caché C, choosing the Caché A as failover partner. Caché C is promoted to failover member, obtains the most recent journal data from Caché A’s agent, and becomes primary.
-
Restart the Caché instance on Caché A, which rejoins the mirror as backup.
-
After Caché A has rejoined the mirror and become active, you can use the procedures described in Temporary Replacement of a Failover Member with a Promoted DR Async to return all of the members to their former roles, starting with a graceful shutdown of Caché C, followed by setting ValidatedMember=0 in the [MirrorMember] section of the Caché Parameter File for Caché B (see [MirrorMember] in the Caché Parameter File Reference), restarting Caché B as DR async, promoting Caché B to backup, and restarting Caché C as DR async.
If Caché A’s host system is down, but Caché B’s host system is up although its Caché instance is not running, run the ^MIRROR routine on Caché B as described in Manual Failover To An Active Backup to determine whether Caché B was an active backup at the time of failure. If so, use the preceding procedure but select Caché B as failover partner during promotion, allowing Caché C to obtain the most recent journal data from Caché B’s ISCAgent.
DR Promotion and Manual Failover with Journal Data from Journal Files
If the host systems of both Caché A and Caché B are down but you have access to Caché A’s journal files, or Caché B’s journal files and console log are available, you can update Caché C with the most recent journal data from the primary before promotion, using the following procedure.
-
Update Caché C with the most recent journal files from Caché A or Caché B as follows:
-
If Caché A’s journal files are available, copy the most recent mirror journal files from Caché A to Caché C, beginning with the latest journal file on Caché C and including any later files from Caché A. For example, if MIRROR-MIRRORA-20130220.001 is the latest file on Caché C, copy MIRROR-MIRRORA-20130220.001 and any later files from Caché A.
-
If Caché A’s journal files are not available but Caché B’s journal files and console log are available:
-
Confirm that Caché B was very likely caught up, as follows:
-
Confirm that Caché B disconnected from Caché A at the same time as Caché A and its agent became unavailable. You can check the time that Caché B disconnected by searching for a message similar to the following in its cconsole.log file (see the “Monitoring Caché Using the management portal” chapter of the Caché Monitoring Guide):
MirrorClient: Primary AckDaemon failed to answer status request
-
Confirm that Caché B was an active backup at the time it disconnected by searching for a message similar to the following in its cconsole.log file:
Failed to contact agent on former primary, can't take over
Caution:A message like the following in the cconsole.log file indicates that Caché B was not active when it disconnected:
Non-active Backup is down
Forcing a promoted DR async to become the primary when you cannot confirm that it was caught up may result in its becoming primary without all the journal data that has been generated by the mirror. As a result, some global update operations may be lost and the other mirror members may need to be rebuilt from a backup. If you are uncertain whether this procedure is appropriate, contact the InterSystems Worldwide Response Center (WRC)Opens in a new tab for assistance.
-
-
If you can confirm that Caché B was active, copy the most recent mirror journal files from Caché B to Caché C, beginning with the latest journal file on Caché C and including any later files from Caché B. For example, if MIRROR-MIRRORA-20130220.001 is the latest file on Caché C, copy MIRROR-MIRRORA-20130220.001 and any later files from Caché C. Check the files’ permissions and ownership and change them if necessary to match existing journal files.
-
-
-
Promote Caché C to failover member without choosing a failover partner. Caché C becomes the primary.
-
When the problems with Caché A and Caché B have been fixed, at earliest opportunity and before restarting Caché, set ValidatedMember=0 in the [MirrorMember] section of the Caché Parameter File for the Caché instance on each member (see [MirrorMember] in the Caché Parameter File Reference). The promotion instructions note that this change is required. Once you have done this, restart Caché on each member, beginning with Caché A (the member that was most recently the primary).
-
If the member joins the mirror as backup or DR async when Caché restarts, no further steps are required. Any journal data that was on the failed member but not on the current primary has been discarded.
-
If the member cannot join the mirror when the Caché instance restarts, as indicated by the console log message referring to inconsistent data described in Rebuilding a Mirror Member, the most recent database changes on the member are later than the most recent journal data present on Caché C when it became the primary. To resolve this, rebuild the member as described in that section.
-
-
In most cases, the DR async system is not a suitable permanent host for the primary failover member. After Caché A and Caché B have rejoined the mirror, use the procedures described in Temporary Replacement of a Failover Member with a Promoted DR Async to return all of the members to their former roles. If either Caché A or Caché B restarted as backup, start with a graceful shutdown of Caché C when the backup is active to fail over to the backup; if Caché A or Caché B both restarted as DR async, promote one of them to backup and then perform the graceful shutdown on Caché C. Promote the other former failover member to backup, then restart Caché C as DR async.
Planned Failover to a Promoted DR Async
If you have included one or more DR asyncs in a mirror to provide disaster recovery capability, it is a good idea to regularly test this capability through a planned failover to each DR async. To perform this test, or when you want to fail over to a DR async for any other reason (such as a planned power outage in the data center containing the failover members), use the following procedure:
-
Promote Caché C to failover member; because Caché A is available, you are not asked to choose a failover partner. Caché C becomes backup and Caché B (if it exists) is demoted to DR async.
Note:If the mirror contains only one failover member to start with, the procedure is the same; you are not asked to choose a failover partner, and Caché C becomes backup, so that the mirror now has two failover members.
-
When Caché C becomes active (see Backup Status and Automatic Failover), perform a graceful shutdown on Caché A. Automatic failover is triggered, allowing Caché C to take over as primary.
-
After any testing you might want to perform on Caché C, restart Caché A, which automatically joins the mirror as backup.
-
When Caché A becomes active, perform a graceful shutdown on Caché C to fail over to Caché A.
-
Promote Caché B (if it exists) to failover member; it becomes backup.
-
Restart the Caché instance on Caché C, which automatically joins the mirror in its original role as DR async.
A DR async that does not have network access to the mirror private addresses of the failover members, as described in Sample Mirroring Architecture and Network Configurations, can be promoted only to function as primary, and this should be done only when no other failover member is in operation. When this is the case, therefore, the preceding procedure is not appropriate. Instead, follow this procedure:
-
Perform a graceful shutdown on Caché B, if it exists, so that only Caché A is functioning as failover member (primary).
-
When Caché C is caught up (see Mirror Member Journal Transfer and Dejournaling Status), perform a graceful shutdown on Caché A.
-
Promote Caché C to primary, as described in DR Promotion and Manual Failover with Journal Data from Primary’s ISCAgent. The new primary contacts former primary’s ISCAgent to confirm that it has the most recent journal data during this procedure.
-
After any testing you might want to perform on Caché C, shut it down.
-
Restart Caché A; it automatically becomes primary.
-
Restart Caché B (if it exists); due to Caché C’s promotion, it joins as DR async.
-
Promote Caché B to backup.
-
Restart Caché C, which automatically joins the mirror in its original role as DR async.
In both of the procedures in this section, if Caché B does not exist, that is, the mirror consists of primary and asyncs only, Caché C when restarted becomes backup. Demote it to DR async as described in Maintenance of Backup Failover Member.
Temporary Replacement of a Failover Member with a Promoted DR Async
Some of the procedures described in Planned Outage Procedures and Unplanned Outage Procedures involve temporary operation of the mirror with only one failover member. While it is not necessary to maintain a running backup failover member at all times, it does protect you from interruptions to database access and potential data loss should a primary failure occur. For this reason, when only the primary is available due to planned or unplanned failover member outage, you can consider temporarily promoting a DR async member to backup failover member. Before doing so, however, consider the following:
-
If the DR async is in a separate data center at significant distance from the failover members, there may be substantial network latency between them. When a DR member is promoted and becomes an active failover member, this round-trip latency becomes part of the synchronous data replication between the primary and the backup (see Mirror Synchronization) and can negatively affect the performance of applications accessing the mirror (see Network Latency Considerations).
-
If the DR async does not have network access to the mirror private addresses of the failover members, as described in Sample Mirroring Architecture and Network Configurations, it cannot be used in these procedures, as it can be promoted only to function as primary, and this should be done only when no failover member is in operation.
-
If the mirror uses a VIP for automatic redirection of users and applications (see Redirecting Application Connections Following Failover or Disaster Recovery) and the DR async cannot acquire the mirror VIP because it is on a different subnet, these procedures typically should not be used.
Before using this option, review the discussion of failover partner selection and the requirement to set ValidatedMember=0 on former failover members whose agent cannot be contacted at the time of promotion in Promoting a DR Async Member to Failover Member.
If you need to perform planned maintenance on Caché B, the current backup failover member (see Maintenance of Backup Failover Member), you can do the following:
-
Promote Caché C, a DR async that is caught up (see Mirror Member Journal Transfer and Dejournaling Status). Caché C automatically becomes backup, and Caché B is demoted to DR async.
-
Shut down Caché B’s Caché instance or host system and complete the planned maintenance.
-
Restart Caché B, which joins the mirror as DR async.
-
When Caché B is caught up, promote it to failover member, returning it to its original role as backup. Caché C is automatically demoted to DR async, its original role.
If you need to perform planned maintenance on Caché A, the current primary failover member (see Maintenance of Primary Failover Member), you can do the following:
-
When Caché B is active (see Mirror Synchronization), perform a graceful shutdown on Caché A. Automatic failover is triggered, allowing Caché B to take over as primary.
-
Promote Caché C, a DR async that is caught up. Caché C automatically becomes backup.
-
Complete the planned maintenance on Caché A, shutting down and restarting the host system if required.
-
Restart the Caché instance on Caché A, which joins the mirror as DR async.
-
When Caché A is caught up, promote it to failover member; it becomes backup, and Caché C is automatically demoted, returning it to its original role.
-
When Caché A becomes active, perform a graceful shutdown on Caché B. Automatic failover is triggered, returning Caché A to its original role.
-
Restart the Caché instance on Caché B, which joins the mirror in its original role.
If you have had an unplanned outage of Caché B, or automatically or manually failed over to Caché B due to an unplanned outage of Caché A (see Unplanned Outage Procedures), you can do the following:
-
Promote Caché C, a DR async that is caught up. Caché C automatically becomes backup.
-
Restart the failed failover member. If the failed member’s ISCAgent could not be contacted when the DR async was promoted, you must at earliest opportunity and before restarting Caché set ValidatedMember=0 in the [MirrorMember] section of the Caché Parameter File for the Caché instance (see [MirrorMember] in the Caché Parameter File Reference). The promotion instructions note that this change is required. When you restart the former failover member’s Caché instance, it joins the mirror as DR async.
-
When the restarted failover member is caught up, promote it to failover member; it becomes backup, and Caché C is automatically demoted to DR async, its original role.
-
If you want the failover members to exchange their current roles, when the backup becomes active perform a graceful shutdown on the current primary, triggering automatic failover. Restart the other failover member; it joins the mirror as backup.