Using the Management Portal
Caché lets you perform system administration and management tasks via a web application, the InterSystems Management Portal. An advantage of this approach is that Caché does not have to be installed on the system you use to manage an installation. Remote management of systems over a network, subject to access control established for the site, is now much easier. Cross-release compatibility issues are minimized because both the data and its formatting information come directly from the system being managed.
This chapter describes the following topics:
Starting the Management Portal
You can start the Management Portal in the following ways:
-
On Microsoft Windows platforms, click Management Portal on the Caché Cube menu.
-
In your web browser go directly to the Management Portal URI, in the following form:
http://machine:port/csp/sys/UtilHome.csp
Where machine is the IP address of your system (such as localhost) and port is the port number of the web server installed by Caché. For example, the default location on the local server of a single installation of Caché is http://localhost:57772/csp/sys/UtilHome.cspOpens in a new tab (where 57772 is the default Caché web server port number).
For information about the Management Portal, see Management Portal Overview in this chapter.
Depending on the authentication settings for your system you may have to log in before going to the portal home page. See the Management Portal Login Page subsection for an overview of login requirements. In addition, each functional area requires access to particular resources; see the Management Portal Web Application Structure subsection for more details.
Microsoft Windows 2003 Users Trusted Site Security Setting — The first time you visit the Management Portal, you may receive a warning about the web site being blocked. When prompted, add the site to the trusted sites zone. InterSystems also recommends you allow session cookies for portal procedures to function properly.
Management Portal Login Page
Whether or not you must enter a username and password to use the portal depends on the authentication settings of the Management Portal web application (/csp/sys). There are two conditions:
Neither requires nor accepts a username and password — If the portal accepts only unauthenticated connections (the default setting for Minimal security installs), you do not require a username and password to access the portal; you bypass the Login page when you use the methods in the previous section to start the portal. If navigation does bring you to the login page (by clicking Logout, for example), you see the following message:
You are logged out.
Please click here to login.
Requires a username and password — If your security settings require authentication for the Management Portal web application and you are not already authenticated on the system, the login page displays asking you to enter a User Name and Password. After entering these fields, click Login to display the Management Portal home page.
To change your password, click your name in the Management Portal Title Bar, which displays the change password dialog box.
You can look up the Authentication allowed settings on the Web Applications page (System Administration > Security > Applications > Web Applications) by clicking Edit in the /csp/sys application row.
Management Portal Web Application Structure
The main portal web application is /csp/sys. To provide enforcement of privileges within the Management Portal, the portal is further split into distinct web applications. The Management Portal itself is not responsible for preventing non-privileged users from performing actions: this is handled by the system API methods that the portal calls. The portal does, however, attempt to keep non-privileged users out of restricted pages to prevent <PROTECT> errors.
There are four types of user for the portal, which roughly correspond to predefined resources within Caché:
| User Type | Resource | Web Application | Tasks |
|---|---|---|---|
| Security Manager | %Admin_Secure | /csp/sys/sec | View and edit list of users, roles, and other security tasks. |
| Manager | %Admin_Manage | /csp/sys/mgr | Change system configuration and define backup sets. |
| Operator | %Admin_Operate | /csp/sys/op | View system status pages and perform backups. |
| Explorer (public user) | %Development | /csp/sys/exp | View home page, view classes, routines, and globals, and use SQL pages, provided the user has access to the appropriate resources. |
Management Portal Overview
This section describes the various elements of Management Portal pages, as shown in the following figure.
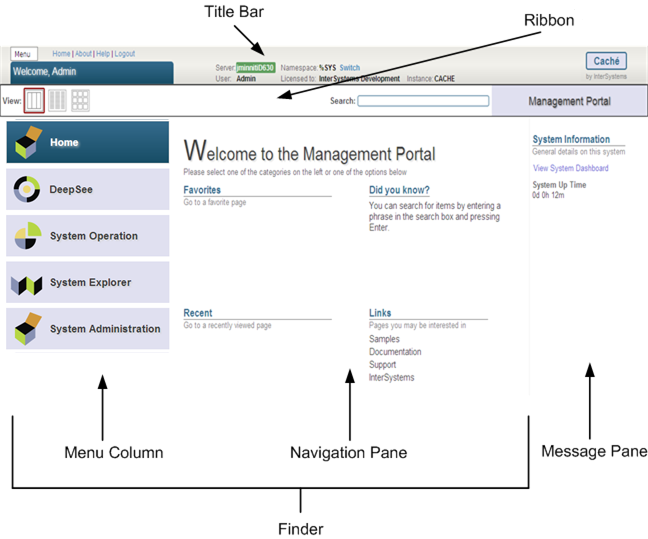
The following sections describe each area of the Management Portal:
Moving your cursor over a menu item displays a description of that item.
Management Portal Title Bar
The left side of the Management Portal title bar displays the following commands:
-
Menu — Displays a list of common tasks based on the roles the user holds.
-
Home — Displays the Management Portal home page.
-
About — Displays system overview information.
-
Help — Displays the online documentation (help) for the page/topic you are viewing.
-
Logout — Logs you out and brings you to the Login page of the Management Portal.
-
Page name tab — Displays the name of the current Management Portal page, for example Local Databases > iKnow Configurations or Task Schedule. When you edit an existing named element, the page name tab reads Edit: element_name; for example, if you are editing the User database, the tab reads Edit: User. When you are creating an element, the tab reads New element, for example New Namespace. When you have made changes to settings or element properties that have not yet been saved, an asterisk is appended to the tab’s contents, for example Journal Settings*. (You are always prompted for confirmation before navigating away from unsaved changes.)
-
Page Locator — Displays all or most of the navigation path to the current page. Each page listed in the path is an active link, which you can use to return to a previously displayed submenu/list. For example, the location bar for the Memory and Startup page contains System > Configuration > Memory and Startup, which provides links to the System Administration menu option and the intervening Configuration menu option.
Note:The locator bar does not list every page in the path. You can always navigate to a page that is not included by clicking Home to return to the Management Portal home page and using the search tool, which is described in the Management Portal Ribbon section of this chapter.
The center part of the Management Portal title bar displays the following information:
-
Server — The name of the server running Caché.
-
User — The name of the user logged into the Management Portal.
-
Namespace — The name of the namespace currently being used.
Note:To change the current namespace, click Switch and select the namespace in which you want to do your work.
-
Licensed to — Customer name that appears in the license key information.
-
Instance — The name of the Caché instance running on the server.
In addition, you can display a predefined System Mode label (for example, This is a Test System); for information, see Memory and Startup Settings in the “Configuring Caché” chapter of the Caché System Administration Guide.
The right side of the Management Portal title bar displays the name of the product you are using.
Management Portal Ribbon
When you are on the home page, the Management Portal ribbon functions as follows:
-
The left side of the ribbon displays buttons that let you specify how you want to display links in the Management Portal navigation pane (view modes); for more information, see the Management Portal Navigation Pane section of this chapter.
-
The center part of the ribbon lets you search for a page in the Management Portal. When you specify a word that appears on one or more pages, and press Enter, a list of all pages containing that word is displayed; then, you can click the destination page you want to display without having to navigate through the submenus/lists/icons.
Search Tool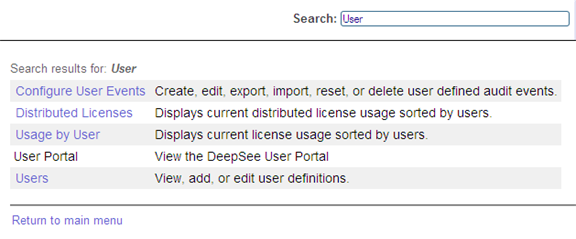
-
The right side of the ribbon reads Management Portal on a blue-gray background.
When you are on a page other than the home page, the Management Portal ribbon (if present) functions as follows:
-
The left side of the ribbon includes buttons used to perform operations on the page, for example Export > Import > Find > Replace > Delete > View > Classes, and Routines on the Globals page. Some pages also include page refresh controls.
-
The right side of the ribbon displays the page name on a background indicating the area of the portal to which it belongs—aquamarine for System Operation, green for System Explorer, or purple for System Administration.
Management Portal Navigation Pane
The Management Portal navigation pane initially displays the following:
-
Home page.
-
View (Navigation modes) — Columns, lists, icons, and search tool that lets you navigate to a specified page.
Note:In addition to using views to navigate the Management Portal, you can go directly to a page via the search tool, which is located in the ribbon; for more information, see the Management Portal Ribbon section in this chapter.
The home page contains the following sections:
-
Favorites — Lists Management Portal pages you have selected as favorites (see Action Pane); you can click each page title to go directly to that page.
-
Did you know? — Displays tips.
-
Recent — Lists the most recent pages you have displayed since the last time Caché was started.
-
Links — Links to pages you might want to visit.
Depending on the navigation mode you select in the Management Portal ribbon, the navigation path is displayed as follows:
-
Columns view — Displays page in columns; this is the default mode.
Note:This is the view you use to select favorites and assign custom resources; for information, see Action Pane.
-
List view — Displays page names in drop-down list.
-
Icon view — Displays page names as labeled icons.
Columns view
The “columns view” displays submenus that you use to reach a destination page. If you click on a title/name in the final submenu, the destination page is displayed; if you click inside the box but not on the title/name itself, the Action Pane is displayed.
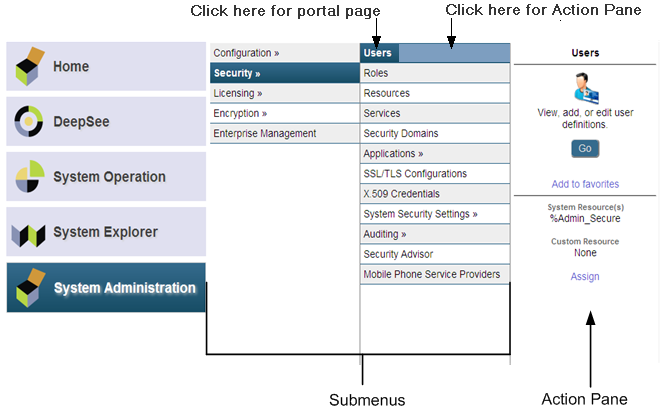
Action Pane
The action pane explains a menu option and lets you perform several actions related to it. To display the action pane, while in Columns view, click inside the box that surrounds an option in the final submenu, but not on the option itself. You can do the following in the action pane:
-
Add the destination page to the Favorites list on the home page, as described in Management Portal Navigation Pane.
-
View the system resource required to load the page and assign a custom resource, as described in Using Custom Resources with the Management Portal in the “Assets and Resources” chapter of the Caché Security Administration Guide.
Note:If the name of a resource is truncated in the action pane, move the pointer over the name to see it in its entirety.
-
Go to the destination page by clicking Go.
The action pane is available only in Columns view. When you navigate to a page using list view, icon view, or the search tool, you cannot add it as a favorite or assign a custom resource.
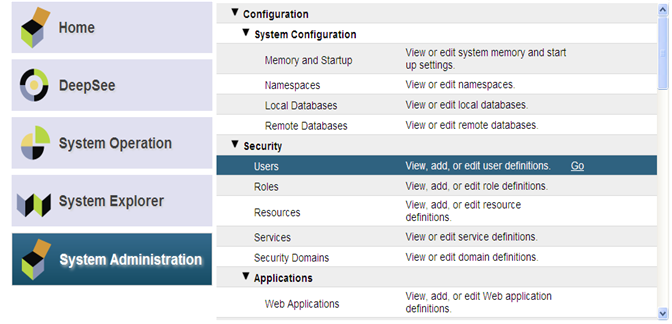
List View
The “list view” displays lists that you use to reach your destination page, but does not let you specify a destination page as a favorite, or assign a custom resource. When you select the page you want to display, click Go.
Icon View
The “icon view” displays icons that you use to reach your destination page, but does not let you specify a destination page as a favorite, or assign a custom resource. To display the next level of icons or the destination page, double-click an icon.
Management Portal Message Pane
The Management Portal message pane displays general system information, and provides a link to the system dashboard. For more information about the dashboard, see the “Monitoring Caché Using the Management Portal” chapter of the Caché Monitoring Guide.
If the instance is a mirror member, the mirror it belongs to, its member type, and its status are also displayed in the message pane, along with a link to the Mirror Monitor (see Monitoring Mirrors in the “Mirroring” chapter of the Caché High Availability Guide).
System Overview Information
When you click About on the title bar of the Management Portal, a table displays with the following information:
-
Version — Specific build information for this instance of Caché including platform, build number, and build date.
-
Configuration — Name and location of the configuration (.cpf) file this instance is using.
-
Database Cache (MB) — Space allocated for databases.
-
Routine Cache (MB) — Space allocated for routines.
-
Journal file — Name and location of current journal file.
-
SuperServer Port — Port number on which the Caché server is running.
-
Web Server Port — Port number on which the private Caché Web server is running.
-
License Server Address/Port — IP address of the Caché License server and port number on which it is running.
-
Licensed to — Customer name that appears in the license key information.
-
Cluster support — Indicates whether or not this instance is part of a cluster.
-
Time System Started — Date and time this instance of Caché last started.
-
Encryption Key Identifier — If encryption is activated, the GUID (global unique ID) of the encryption key.
-
NLS Locale — National Language Support locale. For more information, see the Using System Classes for National Language Support section in the “Customizing the Caché System” chapter of Caché Specialized System Tools and Utilities and the Using the NLS Pages of the Management Portal section in the “Configuring Caché” chapter of this guide.
-
Preferred language for this session — Drop-down list of languages in which the Management Portal has been localized and can be displayed. You can change the display language by selecting a new one from the drop-down. Initially, the preferred language for the browsing session is the one specified for the browser, or English if the browser language is not supported; after you select a preferred language in a particular browser, it is used by the Management Portal in that browser even if the browser language is changed.
Management Portal Functional Overview
The Management Portal is divided into the following functional areas for configuring and managing Caché:
-
System Operations — System operation tasks.
-
System Explorer — Database management tasks.
-
System Administration — System administration tasks.
The details of performing each task is contained in the appropriate Caché documentation. This document provides links to the appropriate section for each topic.
System Operations
The system operator tasks are divided into the categories displayed in the Operations portion of the Management Portal home page.
You can find the descriptions and explanations of these tasks in various places in the Caché documentation. Other chapters in this guide as well as the other guides in the System Administration documentation set describe many of the system operator tasks. The following table displays each major task and lists the most appropriate documentation source for detailed information on the topic.
| Menu Item | Information |
|---|---|
| System Dashboard | “Monitoring Caché Using the Management Portal” chapter of the Caché Monitoring Guide. |
| Backup | Managing Caché Online Backups section in the “Backup and Restore” chapter of Caché Data Integrity Guide. |
| Databases | Maintaining Local Databases section in the “Managing Caché” chapter of this guide. |
| Processes | Controlling Caché Processes section in the “Managing Caché” chapter of this guide. |
| Locks | Monitoring Locks section in the “Monitoring Caché Using the Management Portal” chapter of the Caché Monitoring Guide. |
| Journals | “Journaling” chapter of the Caché Data Integrity Guide. |
| Shadow Servers | “Shadowing” chapter of the Caché Data Integrity Guide. |
| Mirror Monitor | Monitoring Mirrors section of the “Mirroring” chapter of the Caché High Availability Guide. |
| Task Manager | Using the Task Manager section in the “Managing Caché” chapter of this guide. |
| LDAP Configurations | “Using LDAP” chapter of Caché Security Administration Guide. |
| System Logs | Monitoring Log Files section in the “Monitoring Caché Using the Management Portal” chapter of the Caché Monitoring Guide. |
| System Usage | Monitoring System Performance section in the “Monitoring Caché Using the Management Portal” chapter of the Caché Monitoring Guide. |
| License Usage | “Managing Caché Licensing” chapter of this guide. |
| CSP Sessions | “CSP Session Management” chapter of Using Caché Server Pages (CSP). |
| Background Tasks | Background processes include any processes that are started via the Job command, plus any background server processes including CSP, Cache Direct, ODBC, or any of the objects bindings. See the JOB entry in the Caché ObjectScript Reference. |
| Diagnostic Reports | “Using the Caché Diagnostic Report” chapter of the Caché Monitoring Guide. |
System Explorer
The database management tasks are divided into the categories displayed in the Data Management portion of the Management Portal home page. The following table displays each major subcategory and lists the most appropriate documentation source for detailed information on the topic.
| Menu Item | Information |
|---|---|
| Classes | “Caché Classes” chapter of Using Caché Objects |
| SQL | “Introduction to Caché SQL” chapter of Using Caché SQL |
| Routines | “User-Defined Code” chapter of Using Caché ObjectScript |
| Globals | “Global Structure” chapter of Using Caché Globals |
| Tools |
Provides classes that you can use to record, randomize and playback HTTP-based scripts against various applications for the purpose of QA, scalability, and network load testing. See %WebStress in the InterSystems Class Reference for more information. |
System Administration
The system administrator tasks are divided into the categories displayed in the System Administration portion of the Management Portal home page. The following table displays each major subcategory and lists the most appropriate documentation source for detailed information on the topic.
| Menu Item | Information |
|---|---|
| Configuration | “Configuring Caché” chapter of this guide |
| Security | “System Management and Security” chapter of the Caché Security Administration Guide |
| Licensing | “Managing Caché Licensing” chapter of this guide |
| Encryption | “Database Encryption” chapter of the Caché Security Administration Guide |