
Defining Calculated Elements
This page describes how to define calculated elements in Business Intelligence.
These calculated elements can be saved as part of a pivot table definition (and are then usable only in that pivot table) or can be saved in a shared area (and are then usable in any pivot table based on the same cube).
Also see Accessing the BI Samples.
Overview
Often it is convenient to combine existing model elements into new elements. In InterSystems IRIS Business Intelligence, you can add two kinds of calculated elements:
-
You can define a new measure that is based on other measures. For example, you can define a measure via a formula like the following:
Measure 3 = (Measure 1 + Measure 2) / Measure 2)This is not the exact syntax. The following sections provide more detail.
-
You can define a new member that is based on other members. For example, you could create a Primary Colors member that combines the red, yellow, and blue members of the Favorite Color dimension.
The new Primary Colors member refers to all the patients who belong to the red, yellow, or blue members.
In MDX, a measure is considered to be a member, and both kinds of calculated elements are considered to be calculated members. This book uses the phrase calculated measure to refer to a calculated member that is a measure.
Defining a Calculated Measure
To define a measure that is based on other measures:
-
If you intend to define this measure only in a given pivot table, save that pivot table.
-
Click the Calculated Element button
 .
.The system displays the following dialog box (partially shown here):
-
For Member Type, click Measure.
When you do so, the system automatically selects Measures for the Dimension option.
-
Optionally select Shared Storage. The system uses this option as follows:
-
If Shared Storage is not selected, the calculated measure is stored with the pivot table definition and can be used in this pivot table but nowhere else.
-
If Shared Storage is selected, the calculated measure is stored in a shared area and can be used in any pivot table based on the same cube. In this case, the Analyzer displays the calculated measure along with the elements that are defined in the cube itself.
-
-
For Member name, type the name of the new measure.
-
Specify the MDX expression that defines the new member. To do so, you can do either of the following:
-
Type the expression directly into Expression.
-
Use the Expression Builder. This tool is intended to make it easy to obtain the correct MDX identifier for any part of the cube. To access this tool, click the magnifying glass next to Expression. The left area lists the contents of the cube, including all measures and levels. The right area displays the expression that you are creating. To add an item to the expression, drag and drop it from the left area to the expression. The item is added to the end of the expression, and you might need to move it to a different part of the expression.
For an introduction to these expressions, see the first subsection.
-
-
Optionally specify the following additional options:
-
Format — Specify a format string to control how this measure is displayed. See Specifying a Format String.
-
Solve Order — Use this if your pivot table has a calculated measure as a column and a conflicting calculated measure (or other kind of calculated member) as a row. See the second subsection.
-
-
Click OK.
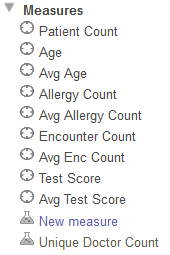
The new member is then displayed within the Measures section in the Model Contents pane:
You can then use this measure in the same way you use any other measure.
Measure Expressions
The measure expression can include the following elements:
-
References to measures. The syntax is as follows:
[MEASURES].[measure name]Or:
MEASURES.[measure name]You can omit the square brackets around the measure name, if the measure name contains only alphanumeric characters, does not start with a number, and is not an MDX reserved word. (MDX statements and functions are reserved words; see the table of contents in the InterSystems MDX Reference.)
The expression is not case-sensitive.
-
Numeric literals. For example: 37
-
Pivot variables. See Defining and Using Pivot Variables.
To refer to a pivot variable, use the syntax $variable.variablename where variablename is the logical variable name. This syntax is not case-sensitive.
-
Mathematical operators. Business Intelligence supports the standard mathematical operators: + (addition), - (subtraction), / (division), and * (multiplication). It also supports the standard unary operators: + (positive) and - (negative).
For example: MEASURES.[%COUNT] / 100
You can also use parentheses to control precedence.
-
MDX functions that return numeric values. Many MDX functions return numeric values, including AVG, MAX, COUNT, and others. See the InterSystems MDX Reference for details.
For other variations and specific recipes, see Defining Calculated Members.
Solve Order
The Solve Order option is useful if your pivot table has a calculated member (either measure or non-measure) as a column and a conflicting calculated member as a row.
This option affects how the system determines the value in the cell and the format applied to the cell. By default:
-
The column determines the Format.
-
If both calculated members are measures, the column determines the cell value. (In other scenarios, the logic is more complex and Solve Order does not apply.)
If you instead want the row to determine the format and the value, ensure that Solve Order is higher for the calculated member used as a row.
With one exception, the calculated member with the higher Solve Order is evaluated last and thus controls the results. The exception is that if a row or column uses the %CELL function, its implicit default Solve Order is 10.
If the row and column both use %CELL and you want the row to determine the value and format string, set the Solve Order to 11 for the row.
If the column and row members have the same Solve Order, the column member controls the results, as in the default case.
For calculated measures that depend on other calculated measures, the system recognizes the dependencies and evaluates the measures in the appropriate order. You do not need to use Solve Order for these measures.
Defining a Calculated Member That Is Not a Measure
To define a calculated member based on other members:
-
If you intend to define this member only in a given pivot table, save that pivot table.
-
Click the Calculated Element button
. -
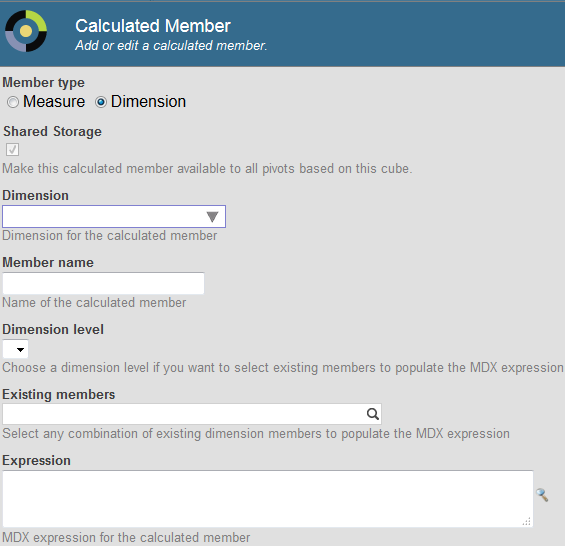
For Member Type, click Dimension.
-
Optionally select Shared Storage. The system uses this option as follows:
-
If Shared Storage is not selected, the calculated measure is stored with the pivot table definition and can be used in this pivot table but nowhere else.
-
If Shared Storage is selected, the calculated measure is stored in a shared area and can be used in any pivot table based on the same cube. In this case, the Analyzer displays the calculated measure along with the elements that are defined in the cube itself.
-
-
For Dimension, either select a dimension or type the name of a new dimension. For example: Calculated
You can specify any dimension, including an existing dimension that includes non-calculated members or a new dimension.
-
For Member, type the name of the new member.
-
Specify the MDX expression that defines the new member. To do so, you can do any of the following:
-
Select a level from Dimension level. You can choose any level from the dimension that you selected in step 3. Then use Existing members to select one or more members of that level.
The system then creates an MDX set expression in the Expression field.
Then edit the expression in the Expression field.
-
Type the expression directly into Expression.
-
Use the Expression Builder. This tool is intended to make it easy to obtain the correct MDX identifier for any part of the cube. To access this tool, click the magnifying glass next to Expression. The left area lists the contents of the cube, including all measures and levels. The right area displays the expression that you are creating. To add an item to the expression, drag and drop it from the left area to the expression. The item is added to the end of the expression, and you might need to move it to a different part of the expression.
These expressions are discussed later in this section.
-
-
Optionally specify the following additional options:
-
Format — Specify a format string to control how numeric values are displayed for this member. See Specifying a Format String.
-
Solve Order — Select a number to specify the relative order in which to evaluate this calculated member, compared to other calculated members that affect the same cell. See Solve Order, earlier in this page.
-
-
Click OK.
The new member is then available in the Dimensions section in the Model Contents pane:
If you added the member to an existing dimension, the system lists it within every level of that dimension. If you added it to a new dimension, that new dimension is displayed at the bottom of this pane. For example, the following shows a new dimension with two calculated members:
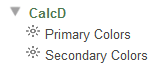
You can then use these members the same way that you use other members.
In a typical case, you define a new member that combines other members. In these cases, use one of the following syntaxes:
-
If the members that you want to combine all belong to the same level, use the %OR function as follows:
%OR({member reference, member reference, ...})For example:
%OR({[colord].[h1].[favorite color].[red],
[colord].[h1].[favorite color].[blue],
[colord].[h1].[favorite color].[yellow]})
The general syntax for a member reference is as follows:
[dimension name].[hierarchy name].[level name].[member name]Or:
[dimension name].[hierarchy name].[level name].&[member key] -
As a special case of the preceding, you can define a member that combines a range of members of a time level. To do so, use the %TIMERANGE function, which enables you to define an open-ended range. For example, the following expression defines a range that starts after the 2009 member:
%TIMERANGE(DateOfSale.YearSold.&[2009],,EXCLUSIVE) -
Otherwise, use the AGGREGATE function as follows:
AGGREGATE({member reference, member reference, ...})
For other variations and specific recipes, see Defining Calculated Members.
Redefining a Calculated Member
To redefine a calculated member:
-
Select the calculated member in the Model Contents pane.
-
Click the Calculated Element button
. -
Make changes as needed.
Deleting a Calculated Member
To delete a calculated member:
-
Select the calculated member in the Model Contents pane.
-
Click the X button.
-
Click OK to confirm this deletion.