
Defining Subject Areas
This page describes how to define Business Intelligence subject areas.
In the current release, you cannot hide relationships in a subject area. To hide, add, or override named sets and calculated members (including calculated measures), use an IDE. See Reference Information for Subject Area Classes.
Also see Defining Compound Cubes.
Also see Accessing the Business Intelligence Samples.
Introduction to Subject Areas in the Architect
This section describes what the Architect displays when you are viewing a subject area rather than a cube.
-
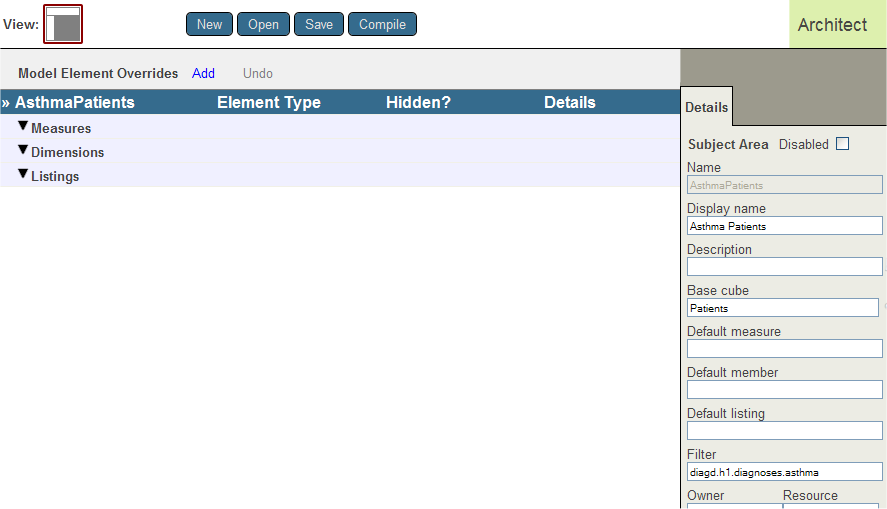
Click Open, click Subject Areas, click AsthmaPatients, and then click OK.
Now the system displays the page similar to what you see for a cube, except that it does not have the Class Viewer on the left:
Model Viewer
The left area is the Model Viewer, and it shows the overrides defined in this subject area. For example:
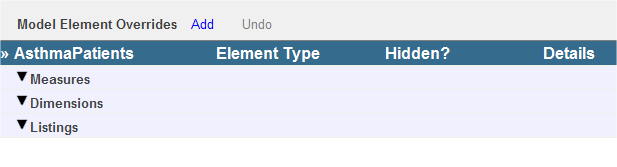
This subject area does not define any overrides or any listings. (Many subject areas include only a filter.)
Here you can add overrides, select existing overrides for editing, and delete overrides.
You can also define new listings.
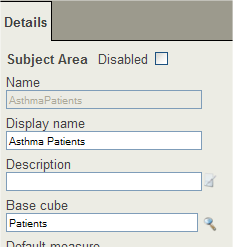
Details Area
The right area is the Details Area, and it shows details for the element that is currently selected in Model Viewer (if any), or for the subject area (if nothing is selected).
For example:
Defining a Subject Area
To define a subject area:
-
In the Architect, click New.
-
Click Subject Area.
-
Enter the following information at a minimum:
-
Subject Area Name — Name of the subject area to use as the default caption and to use in queries.
-
Class name for the Subject Area — Complete package and class name for the subject area class.
-
Base Cube — Logical name of the cube on which to base this subject area.
You can either type the cube name or click Browse and select the cube.
You can also use a comma-separated list of cubes; see Defining Compound Cubes.
The other options are discussed later in this page.
Apart from the class name, you can edit all options after creating the subject area.
-
-
Click OK.
-
Click the subject definition in the Architect to select it. Then edit the Depends On option in the Details Area. For the value, specify the full package and class name of the cube class on which this subject area is based.
The subject area class should always be compiled after the cube class. The Depends On setting helps control this.
-
Optionally save the subject area. To do so:
-
Click Save.
-
Click OK.
The system creates the class.
-
Or manually create the class as described in Reference Information for Subject Area Classes.
Filtering a Subject Area
In most cases, you use subject areas to control access to data. In these cases, you specify the filter for the subject area. You can do this in either or both of the following ways:
-
You can specify a hardcoded filter. To do so, specify a value for the Filter option in the Architect. For this option, specify an MDX filter expression to use as the filter for this subject area.
This section discusses how to create hardcoded filters.
-
You can specify a filter whose value is determined at runtime. To do so, customize the %OnGetFilterSpec() method of the subject area class. This method has access to the hardcoded filter, if any, and can modify that filter.
For information, see Filtering a Cube or Subject Area Dynamically.
The following subsections apply to MDX filters in general, not just to filters of subject areas.
Building a Filter in the Analyzer and Copying It into Your Model
If you are not familiar with MDX, the easiest way to specify a filter expression is as follows:
-
Create a filter by drag and drop as described in Using the Analyzer.
-
Click the Query Text button
 .
.The Analyzer displays a dialog box with text like this:
SELECT FROM [PATIENTS] WHERE [AGED].[H1].[AGE GROUP].&[0 TO 29] -
Ignore all text before WHERE, which might be considerably more complicated depending on what you have done in the Analyzer. Copy all the text that follows WHERE into the system clipboard or other temporary location.
-
Paste the copied text into the Filter option for the subject area.
For example:
[AGED].[H1].[AGE GROUP].&[0 TO 29]
Writing Filter Expressions
This section discusses common forms of filter expressions.
Also see the InterSystems MDX Reference.
Simple Filter
A simple filter refers to a single member:
[AGED].[H1].[AGE GROUP].&[0 TO 29]
This filter accesses only patients in the age range 0 to 29.
The preceding expression is an MDX member expression. Note the following details:
-
[AGED] is a dimension in this sample.
-
[H1] is the hierarchy in this dimension.
-
[AGE GROUP] is a level in this hierarchy.
-
&[0 TO 29] is the key for a member of that level.
The preceding member expression refers to the &[0 TO 29] member of the [AGE GROUP] level of the [H1] hierarchy of the [AGED] dimension.
Also note the following possible timesaving variations:
-
You can specify any of these identifiers in upper case, lower case, or mixed case at your convenience. MDX is not case-sensitive.
-
You can omit the square brackets for any identifier that does not include space characters.
-
You can omit the hierarchy and level names if the resulting expression is not ambiguous.
You must always include the dimension name.
-
You can use the member name instead of the member key. In most cases, this means that you can simply omit the ampersand (&) from the member identifier.
Filter with Set of Members
In other cases, you might need multiple members. For example:
{[aged].[h1].[age group].[0 to 29],[aged].[h1].[age group].[30 to 59]}
The subject area is filtered to include all records of the fact table that belong to any of the elements of the set. This subject area sees patients in the age group 0 to 29 and patients in the age group 30 to 59 — that is, it sees all patients under 60 years of age.
Notice that the list is enclosed by braces; this indicates that the list is an MDX set. A set is a union of elements.
Filter with a Tuple
In some cases, you might need to find only records that meet multiple simultaneous criteria. In this case, you use a tuple expression. For example:
([aged].[h1].[age group].[60+],[diagd].[h1].[diagnoses].[diabetes])
This subject area sees patients who are 60 or older and who also have diabetes.
Notice that the list is enclosed by parentheses; this indicates that the list is an MDX tuple. A tuple is an intersection of elements.
Filter with Multiple Tuples
You can list multiple tuple expressions within a set. For example:
{([aged].[h1].[age group].[60+],[diagd].[h1].[diagnoses].[diabetes]),
([colord.].[h1].[color].[red],[allergd].[h1].[allergy].[soy])}
This subject area sees all patients who meet at least one of the following criteria:
-
They are at least 60 years old and who also have diabetes.
-
They are allergic to soy and their favorite color is red.
Specifying Other Subject Area Options
In addition to the previously described options, you can specify the following additional options for a subject area:
-
Disabled — (Optional) If you select this check box, the override is disabled. When you recompile the subject area, this override is ignored and the system uses the definition given in the cube.
-
Display name — Localizable name of the subject area.
-
Description — (Optional) Comments to add to the subject area class definition. Each line is saved as a separate comment line at the start of the class definition.
-
Default member — (Optional) Default member to use when a query skips an axis. Specify an MDX expression that returns a member that is accessible in this subject area. For information on member expressions, see the InterSystems MDX Reference. If this is not specified, the system uses the default member as defined in the cube.
-
Default listing — (Optional) Logical name of the default listing for this subject area. This listing must be defined in the cube or in the subject area. If this is not specified, the system uses the default listing as defined in the cube.
-
Owner — (Optional) Specify the owner of the cube. Specify an InterSystems IRIS® data platform username.
-
Count measure caption — (Optional) Specify an alternative name for the Count measure.
-
Resource — (Optional) Specify the resource that secures the subject area.
For information on how this is used, see Setting Up Security.
-
Caption— (Optional) Specify the caption to display in the Analyzer and other utilities when working with this cube.
-
Domain— (Optional) Specify the name of the domain to contain the localized strings of this subject area. You might find it convenient to use a single domain for all your cubes and subject areas; in other cases, it might be appropriate to have a separate domain for each cube and subject area. See Performing Localization.
Adding Items to a Subject Area
To add an override or a listing to a subject area, use the following general procedure:
-
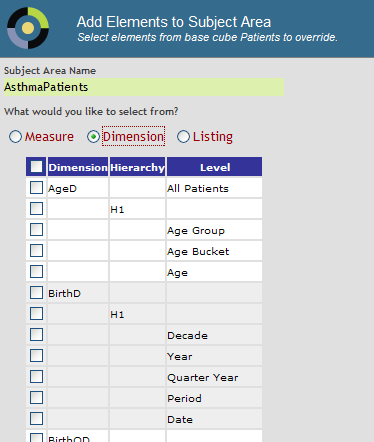
Click Add.
The system displays a dialog box on which you can choose an item from the cube:

If the subject area already defines an override for an item, this dialog box displays a check mark for that item.
-
Click Measure, Dimension, or Listing.
With Measure, you can override any measure defined in the cube.
With Dimension, you can override any dimension, hierarchy, or level defined in the cube.
With Listing, you can override any listing defined in the cube. You can also add listings.
-
Click the item or items to override and then click OK.
The system adds the items, displays them in the Model Viewer, and shows their details in the Details Area.
-
Edit the details in the Details Area.
Defining an Override for a Measure
To define an override for one or more measures:
-
Optionally click a measure name in the Model Viewer, to indicate where the new override is to be added.
If you do so, the new override is added before the measure you clicked.
-
Click Add.
-
Click Measure.
-
Click the measure or measures to override and then click OK.
The system adds the measures and displays them in the Model Viewer.
-
To define the override for a measure, click the measure name in Model Viewer and edit the following options in the Details Area. These are all optional.
-
Hidden — Select this to hide this measure in this subject area. Or clear it to use this measure in this subject area.
-
Display name — Specify a new display name to replace the one defined in the cube.
-
Description — Specify a new description to replace the one defined in the cube.
-
Format string — Specify a new format string to replace the one defined in the cube. See Specifying a Format String.
-
You cannot define overrides for calculated measures this way. A calculated measure is actually a calculated member; to define an override for it, you must use an IDE.
Defining an Override for a Dimension, Hierarchy, or Level
To define an override for one or more dimensions, hierarchies, or levels:
-
Click Add.
-
Click Dimension.
The system displays the dimensions, hierarchies, and levels of the cube as follows:
-
Click the item or items to override and then click OK.
The system adds the items and displays them in the Model Viewer.
You can click any combination of dimensions, hierarchies, and levels. If you click a hierarchy but not its containing dimension, the system always adds the dimension as well (because the dimension is part of the hierarchy definition). Similarly, if you click a level but not its containing hierarchy or dimension, the system always adds the hierarchy and dimension as well.
-
To define the override for an item, click the item name in Model Viewer and edit the following options in the Details Area. These are all optional.
-
Hidden — Select this to hide this item in this subject area. Or clear it to use this item in this subject area.
-
Display name — Specify a new display name to replace the one defined in the cube.
-
Description — Specify a new description to replace the one defined in the cube.
-
Sort (Levels only) — Specify a different sort order for the members of this level.
Note:If you change the sort attribute for a level in a subject area, that change is not in effect until you rebuild the cube.
-
Redefining a Listing or Adding a New Listing
To redefine a listing or define a new listing for the subject area:
-
Optionally click a listing name in the Model Viewer, to indicate where the new override is to be added.
If you do so, the new override is added before the listing you clicked.
-
Click Add.
-
Click Listing.
The system displays the listings of the cube and of the subject area as follows:
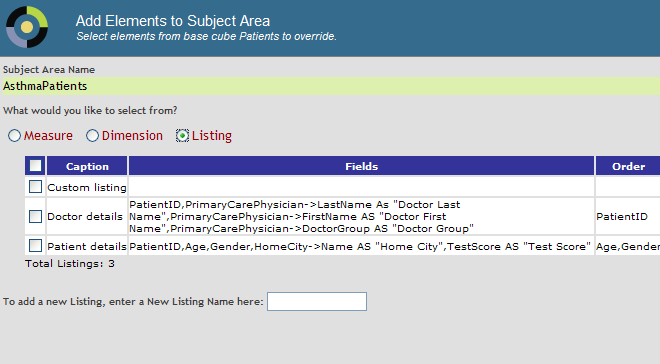
-
Optionally click the listing or listings to redefine.
-
Optionally type the name of a new listing in the box at the bottom.
-
Click OK.
The system adds the listings (with no definitions) and displays them in the Model Viewer.
-
To define a listing, click the listing name in Model Viewer and edit the options in the Details Area.
For details, see Defining Listings.
Compiling a Subject Area
To compile a subject area class in the Architect:
-
Click Compile.
The system displays a dialog box.
-
Click Compile.
The system starts to compile the class and displays progress as it does so.
-
Click OK.
Or open the subject area class in an IDE and compile it in the same way that you compile other classes.
Before you compile a subject area class, you must compile the cube class on which it depends. It is useful, but not required, to use an IDE to edit the subject area class and add the DependsOn keyword to force the classes to be compiled in the correct order. See Requirements for a Subject Area Class in Reference Information for Subject Area Classes.