
Editing a Lookup Table
Editing a Lookup Table
The Lookup Tables portal page allows you to create and configure data tables to support the Lookup() and Exists() utility functions. The Lookup() utility function is provided so that you can easily perform a table lookup from a business rule or DTL data transformation. To avoid possible complications when exporting a lookup table, it is recommended that you avoid using special characters when naming the lookup table. As an exception, it is safe to use periods (.) in the name.
The Lookup() function works only after you have created a lookup table and have populated it with data. You can do this selecting Interoperability, Configure, and Data Lookup Tables. If you click Open, a dialog box lists the lookup tables that are defined in the namespace. Select a lookup table and InterSystems IRIS® displays the following form:
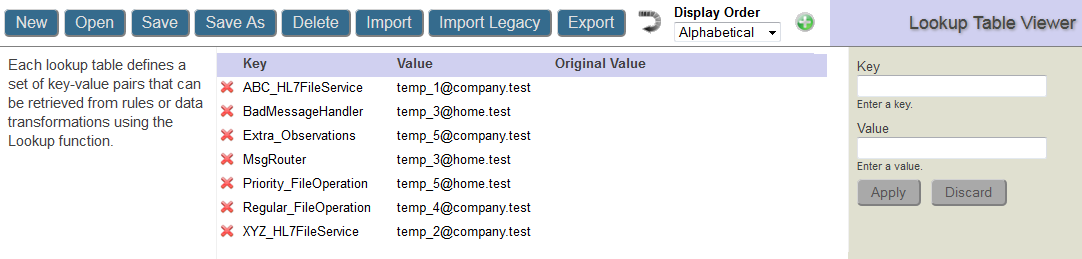
To edit entries in a lookup table, you can:
-
Delete an entry by selecting the red X icon. The entry is deleted when you save the table. Until you have saved the table, you can restore the entry by selecting the green + icon that is displayed to the left of the entry.
-
Update an entry by entering the same key as the entry and a new value in the form on the right and then selecting Apply. After you update the value, the original value is displayed in the Original Value column until you save the lookup table. Selecting an existing entry populates the form on the right with the entry’s current values.
-
Add a new entry by entering a new key and its value in the form on the right and selecting Apply.
-
Undo the previous action by selecting the curved arrow in the menu bar.
Selecting an entry has only one effect: initializing the values in the form on the right. Selecting Apply acts on the entry specified in the Key field not on the selected entry. If the key field matches an existing entry, that entry is updated. If the key field does not match an existing entry, then a new entry is added. Selecting the green + icon on the menu bar or selecting Discard clears the form but does not have any other effect.
You can take an action by selecting one of the following buttons:
-
New—Displays a form so that you can name the lookup table and then displays the empty table. Add entries to the table by entering in key and value pairs and selecting Apply for each pair. You must select Save to make the lookup table permanent.
-
Open—Displays the lookup tables defined in the current namespace and allows you to select one.
-
Save—Saves the current lookup table with any edits that you have applied. Clears the Original Value column and removes deleted records.
-
Save As—Saves the current table entries to a new table. Specify the new table name and select OK. Clears the Original Value column and removes deleted records.
-
Delete—Deletes the current table. If you have made any edits to the table since opening it, InterSystems IRIS asks if you want to leave the page. To delete the table, select Leave Page. If you select Stay on Page, InterSystems IRIS treats the current table as if it were a new table.
-
There are two ways to import lookup tables: Import Legacy and Import . An important difference between them is that when you are importing a lookup table with the same name as an existing lookup table, Import Legacy merges the existing table with the data from the file and Import replaces the existing lookup table with the data from the file.
-
Import Legacy—Imports the lookup tables defined in the file. If an imported lookup table has the same name as an existing table, the values are merged. If a key is defined in the file, it overwrites any existing value of that key in the lookup table.
-
Import—Adds new lookup tables that are defined in an XML file. If any of the new tables have the same name as an existing table, the new table replaces the old one. Select Browse to specify an XML file, then select Open. The form displays the LookUp Table (LUT) document or documents defined in the file. You can select all of the lookup tables or some of the lookup tables listed, then select Import to import the lookup table(s). The Import button can only import the new file format (see following note).
Note:There are two lookup table file formats: a new format and the legacy format. The new format contains additional XML Document tags. Import Legacy can handle both the new and the legacy format, but Import can only handle the new format. The new format is generated by the Export portal button. The old format is exported by the Ens.Util.LookupTable.%Export() method. See Lookup Table File Format for a description of the lookup table file formats.
-
-
Export—Exports the current table to an XML file. Although you can specify the name of the file, the lookup table exported has the same name as the current lookup table and does not use the file name. You can export only using the current XML format; you cannot export the legacy XML format with this release.
If you used special characters when naming the lookup table, you may encounter issues when exporting the table. As a workaround, you can export the entire ^Ens.LookupTable global rather than an individual table. For details, see Exporting Globals. Alternatively, you can export the global subscript that corresponds to the name of a lookup table. For example, to export the lookup table My.Lookup.Table, call:
set st = $SYSTEM.OBJ.Export("Ens.LookupTable(""My.Lookup.Table"").GBL","filename.xml")
You cannot undo the Delete, Import, or Import Legacy operation.
If there is an existing lookup table with the same name, the Import button has a different behavior from the Import Legacy button. The Import button completely replaces the contents of the existing lookup table. In contrast, the Import Legacy button merges the new values with the existing values.
For information on working with lookup tables in programs, see Programmatically Working with Lookup Tables.