

Adding and Selecting Workflow Scenarios
Within a BPL business process that examines a supply chain issue, you can include workflow, and you may need to present different scenarios to present to the users. If so, there are two requirements for the BPL:
-
The BPL must include steps to set up and populate each of the scenarios that the user will evaluate. Each scenario has a name, a description, and various properties such as the time and cost impact. Rather than having to define custom properties within the BPL, you can use the data object SC.Core.Data.Internal.ActionScenario, which already has the necessary properties.
This page describes how to create and populate a scenario object within a workflow.
-
After the user has selected an option, the BPL must inform the system about the status of the workflow action.
Overview of Scenario Setup
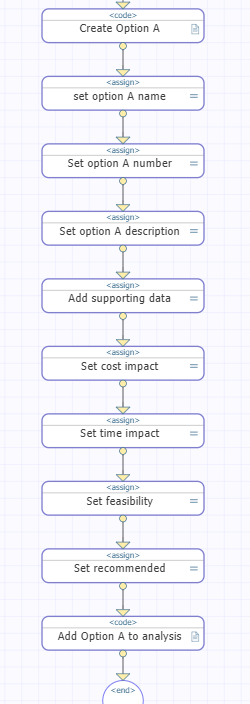
As an overview, here is a screenshot of the relevant part of an example BPL diagram.
Steps to Create a Scenario
Within a BPL business process, use the following procedure to add each scenario to the business process:
-
Add a <code> element to create the scenario object. Specifically, for this element, specify Code as follows:
do context.createNewScenario()This step adds the newScenario property to the context object, so that now you can set properties of context.newScenario.
-
Include a set of <assign> elements, each of which specifies the value of a scenario property. For example, you might assign the optionName property with a step that sets the property context.newScenario.optionName equal to "Option A"
-
Once you have specified all the properties, add a <code> element to create the scenario object. Specifically, for this element, specify Code as follows:
do context.addScenarioToAnalysis()
After the above steps are completed, the same set of steps can be repeated for another scenario.
Please keep in mind that these steps supplement the usual InterSystems IRIS® guidelines to implement the rest of the workflow.
Scenario Properties
Within the BPL, context.newScenario is an instance of the class SC.Core.Data.Internal.ActionScenario, and it has the following properties for you to set as described here:
-
optionNumber — A very short identifier for the option such as a single letter or a single number, for use in presentation to the users. For an example, see Example Issue Analysis.
-
optionName — A user-friendly short name of the option.
-
description — A user-friendly description of the option.
-
supportingData — Supporting data used in the analysis, such as inventory position, labor availability, and so on.
-
feasibility — Describes how feasible the scenario is, on a numeric scale.
-
recommended — Indicates if this is the recommended scenario.
-
costImpact — The financial impact of the option/scenario (numeric).
-
timeImpact — Time impact of the scenario.
For data types and length limits, view SC.Core.Data.Internal.ActionScenario in the local class reference or in your choice of IDE.
Selecting a Workflow Option
After the user has selected an option, the BPL must include a <code> element that informs the system about the status of the workflow action, as follows:
do ##class(SC.Core.Util.IssueUtil).WorkflowActionStatus(issueUid,status)Where:
-
issueUid is the UID of the issue.
-
status is either 1 or 0 depending on whether the workflow action completed successfully or encountered an error.
This method updates the issue status from worikflow action triggered to either closed or workflow action error.
For example:
do ##class(SC.Core.Util.IssueUtil).WorkflowActionStatus(request.issueId,1)
