
Creating DICOM Associations
This page describes how to create DICOM associations, which are required before the production can process DICOM input or output.
Introduction to DICOM Associations
Before you can develop a production that processes DICOM input or output, you require access to the information contained in the manufacturer’s conformance statement for each DICOM device (modality). You use this information to create DICOM associations that the production uses to facilitate communication with a DICOM modality. A DICOM association is the metadata that describes the characteristics of the conversation of such communication.
The unique and most important aspect of productions interfacing with DICOM modalities is creating and testing associations. Before you can create these associations you require the information contained in the Conformance Statement from the manufacturer of the modality. A manufacturer claiming that their equipment or software conforms to the DICOM standard must be able to provide a conformance statement that describes exactly how that device or software conforms to the standard.
An association defines the characteristics of a conversation between modalities. To create an association, use the following information from the Conformance Statement:
-
Information objects recognized by this implementation — In DICOM terms, Application Entity (AE) definitions supported by the modality. Application entities define the end points of an association. One DICOM device can have many AEs.
-
Service classes this implementation supports — Service Object Pair (SOP) classes (or abstract syntax) with their accompanying binary transfer syntax. The list of SOP classes supported is one of the key aspects of the conformance statement. This list describes which service classes and information objects the application provides and accepts.
-
Presentation contexts — Consist of the different options for transfer syntax for each abstract syntax. A DICOM conformance statement lists both presentation contexts that an application proposes during negotiation and those that it accepts.
During negotiation of the association, the production picks one transfer syntax to use. The order in which they are listed is important. The transfer syntaxes at the front of the list are given preference over the transfer syntaxes at the end of the list. You achieve better performance if you know the exact syntax, which is important for compressed images. The production does not convert from one syntax to another.
The conformance statement describes how an activity handles associations (that is, whether the activity initiates associations and accepts multiple associations) for each activity in the model. Some devices, such as the archives in a picture archiving and communication system (PACS), must support multiple associations for acceptable performance. Otherwise, only a single activity (for example, DICOM storage) could be handled at any given time.
The association information you enter is namespace-specific. You must create and run your production in the same namespace where you define and maintain these associations.
See EnsLib.DICOM.Util.AssociationContextOpens in a new tab in the Class Reference for more information.
Importing DICOM Associations
You can add associations to your interoperability-enabled namespace by importing acceptable and proposed presentation contexts from a file containing SOP / transfer syntax pairs by executing the ImportAssociation() method of EnsLib.DICOM.Util.AssociationContextOpens in a new tab.
The ImportAssociation()Opens in a new tab method has the following signature:
classmethod ImportAssociation(pFileName As %String,
                              pCallingAET As %String,
                              pCalledAET As %String,
                              pOverWriteExisting As %Boolean = 0)
The ImportAssociation() method has the following arguments:
The name of a file containing a list of presentation contexts in the form of SOP class UID/transfer syntax UID. The method creates an association between the calling application entity title (AET) and the called AET with a presentation context for each pair in the file.
List the SOP classes (abstract syntaxes) one per line. Specify the transfer syntax by appending it to the line using a \ as the delimiter. If you do not specify any transfer syntaxes, then the import adds the default DICOM transfer syntax (Implicit VR - Little Endian). Use the numeric representation (UID) in the import file.
Identifies the Application Entity (AE) that contains the requestor of the service; it is based on the source DICOM Application Name. The calling Application Entity Title (AET) is usually the Service Class User (SCU).
Identifies the Application Entity that contains the intended acceptor of the service. It is based on the destination DICOM Application Name. The called Application Entity Title is usually the Service Class Provider (SCP).
If an association between the same AET peers exists in the namespace, this argument controls what happens. If True (1), overwrite the association. If False (0), display an error stating the association exists.
See DICOM Transfer Syntax for detailed information. For DICOM abstract syntax, use the Management Portal. Select Interoperability > Interoperate > DICOM > DICOM Abstract Syntax, and then click Go.
Import Association Example
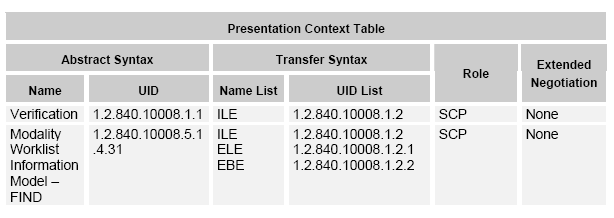
For example, you can add an association to a work list modality using the information from the following sample Presentation Context Table taken from a conformance statement.
Create a file for the association containing a line for each abstract syntax / transfer syntax combination. Use the UIDs for each item. For example, the contents of text file, MyAssociations.txt:
1.2.840.10008.1.1
1.2.840.10008.5.1.4.31\1.2.840.10008.1.2
1.2.840.10008.5.1.4.31\1.2.840.10008.1.2.1
1.2.840.10008.5.1.4.31\1.2.840.10008.1.2.2
If the only acceptable transfer syntax for a SOP class is the default Implicit VR - Little Endian (UID: 1.2.840.10008.1.2), you do not have to include the transfer syntax for that SOP class, as seen in line 1 of the file.
Once you create a file of abstract / transfer syntax pairs, you invoke the following method in the namespace where you are developing your production. For example:
 set $namespace = "mynamespace"

 Do ##class(EnsLib.DICOM.Util.AssociationContext).ImportAssociation
           ("c:\InterSystems\DICOM\MyAssociations.txt",
            "ENS-SCU",
            "MWL-SCP",
             0)
You can view the resulting association information in the Management Portal, as follows:
-
Click Interoperability > Interoperate > DICOM > DICOM Settings.
The system displays a table that list the association information. Each row displays a Calling AET item and the associated Called AET item.
-
For more information on the association, select a row for the association and then click Edit.
The system then displays the Association and Presentation Context tabs.
Creating DICOM Associations
You can also create a superset of associations between the calling and called AET for every known SOP class and a provided list of transfer syntaxes by executing the CreateAssociation() method of EnsLib.DICOM.Util.AssociationContextOpens in a new tab.
The CreateAssociation()Opens in a new tab method has the following signature:
classmethod CreateAssociation(pCallingAET As %String,
                              pCalledAET As %String,
                              pTransferSyntaxes As %List)
The CreateAssociation() method has the following arguments:
Identifies the Application Entity (AE) that contains the requestor of the service; it is based on the source DICOM application name. The calling Application Entity Title (AET) is usually the Service Class User (SCU).
Identifies the Application Entity that contains the intended acceptor of the service. It is based on the destination DICOM application name. The calling Application Entity Title is usually the Service Class Provider (SCP).
A list of transfer syntaxes to pair with every known SOP class to create the presentation context for the association.
(The default list contains the required default Implicit VR Little Endian transfer syntax.)
This method creates an association context instance for the specified calling and called AET that supports all known SOPs.
This association simply defines all SOP classes that are known in the data dictionary. There is a small performance penalty for this and it may be preferable for you to define just the SOP classes you need either using the Management Portal as described in the next section or by using the ImportAssociation() method described in the previous section. A handshake may take longer between the modality and the production if you include unnecessary classes in the association.
For example, a DICOM productions that generates default associations that include all known SOP classes could use the following code.
#; We will be accepting Storage and Query requests from JD-SCU
  Do ##class(EnsLib.DICOM.Util.AssociationContext).CreateAssociation
            ("JD-SCU","ENS-SCP",$ListBuild($$$IMPLICITVRLETRANSFERSYNTAX))

#; We will be sending storage requests to the JD-SCP
  Do ##class(EnsLib.DICOM.Util.AssociationContext).CreateAssociation
            ("ENS-SCU","JD-SCP",$ListBuild($$$IMPLICITVRLETRANSFERSYNTAX))
Transfer Syntax Considerations
Sometimes explicit works better because in many cases, it preserves original type names and provides additional backward compatibility.
Because explicit and implicit value representation (VR) encoding cannot be mixed, the decision regarding which technique to use must be made at the very beginning of any data transfer; DICOM applications negotiate and agree on encoding types before they exchange any data.
Maintaining DICOM Associations
To maintain your associations, use the Interoperability > Interoperate > DICOM > DICOM Settings page of the Management Portal.
This page lists any existing associations for the selected namespace and provides the following functions:
-
Create, edit, or delete associations — InterSystems provides a form to enter or edit association information. You can also delete any existing association from the list. See Creating and Editing DICOM Associations.
-
View Abstract Syntax — InterSystems provides a list of DICOM abstract syntaxes that includes all known SOP class information from the DICOM standard. See Viewing Abstract Syntax.
-
View Dictionary — InterSystems provides a DICOM data dictionary that includes all known data element information from the DICOM standard. See Viewing DICOM Data Dictionary.
Creating and Editing DICOM Associations
The Interoperability > Interoperate > DICOM > DICOM Settings page lists all associations defined in the selected namespace. From this list you can Edit or Delete an existing association or you can choose to Create a New Association. To delete an association, click Delete in the appropriate row and click OK to confirm.
This page has two tabs:
-
The Association tab enables you to create or edit associations. Enter or edit the following information on this tab:
-
Calling AET — Identifies the Application Entity (AE) that contains the requestor of the service; it is based on the source DICOM application name. The calling AET is usually the Service Class User (SCU).
-
Called AET — Identifies the Application Entity (AE) that contains the acceptor of the service; it is based on the destination DICOM application name. The called AET is usually the Service Class Provider (SCP).
-
Name — Optional name of the association up to 64 characters long.
-
Description — Optional description of the association up to 254 characters long.
Click Save to update or create the association. If a required field is missing, its required description appears in red. Click Close to discard your updates and return to the list of existing associations on the DICOM Settings page.
The calling and called application entity titles together create a unique ID for the association. Once you save the association, you cannot modify these fields; you can delete the association and then add a new one.
-
-
The Presentation Context tab enables you to maintain the related presentation context for an association. You can perform the following actions on this tab:
-
Return — Click to go back to the list of associations on the Interoperability > Interoperate > DICOM > DICOM Settings page.
-
Add — Click to add an abstract syntax entry to the list and maintain the list of acceptable or proposed transfer syntax combinations. See Adding Presentation Context.
-
Delete — Highlight an abstract syntax and click Delete. To delete only a specific transfer syntax, click Edit and remove it from the selected list.
-
Edit — Click to add or remove transfer syntax for the selected abstract syntax.
Once you have entered all the pertinent information for the association to a DICOM source, you can use the association information in the configuration of your production.
-
Adding Presentation Context
Each network transfer involving DICOM-specific messages begins with establishing an association handshake, when the two connecting applications exchange information about each other. This information is called the presentation context. The presentation context is the set of DICOM network services used over an association, as negotiated between application entities; it includes abstract syntaxes and transfer syntaxes. the production uses the EnsLib.DICOM.Util.PresentationContextOpens in a new tab class to represent this information. If the two applications can match their contexts, they can connect and start SCU-SCP processing.
To add a presentation context entry:
-
Click Add on the Presentation Context tab.
-
Click an abstract syntax supported by the DICOM device. The tab lists the UID and SOP class name for all known abstract syntax in the DICOM standard. You can only select one Abstract Syntax from the list at a time for which to add transfer syntax.
-
Once you select an abstract syntax, use the > arrow to move the types valid for your device from the Available Transfer Syntax list to the Selected Transfer Syntax list.
-
When you are finished selecting the appropriate transfer syntax for the abstract syntax, click Save to add the new context to the tree. Click Cancel to ignore your edits and return to the existing presentation context tree.
For example, the common SOP Verification class (1.2.840.10008.1.1) appears as an abstract syntax in many conformance statements. A conformance statement usually lists the acceptable presentation context combinations when the modality acts as a provider (SCP) and the proposed presentation context combinations when it acts as a user (SCU). From the previous example Presentation Context Table this class accepts the Implicit VR Little Endian transfer syntax (1.2.840.10008.1.2).
DICOM Transfer Syntax lists the information displayed on this page.
Viewing Abstract Syntax
The Interoperability > Interoperate > DICOM > DICOM Abstract Syntax page displays a table of SOP classes and their unique identifiers from the DICOM PS 3.6 standard. The term abstract syntax is used in part because it is defined in one of the international standards that DICOM references.
To use the Filter feature on the View Abstract Syntax page, enter a partial string and hit the Tab key to reload the table with the filter applied. The search is not case-sensitive and the filter returns results if your entry matches data in any column.
Viewing the DICOM Data Dictionary
The DICOM data dictionary represents the centralized registry which defines the collection of all DICOM data elements available to represent information, along with elements used for media encoding and a list of uniquely identified items that DICOM assigns. The Interoperability > Interoperate > DICOM > DICOM Dictionary page displays a table of elements from the DICOM PS 3.6 standard.
To use the Filter feature on the View Dictionary page, enter a partial string and press the Tab key to reload the table with the filter applied. The search is not case-sensitive and the filter returns results if your entry matches data in any column.
The following table describes the page display.
| Column name | Description |
|---|---|
| Tag | A unique identifier for an element of information composed of an ordered pair of numbers (a group number followed by an element number), which is used to identify attributes and corresponding data elements. |
| Name | Name of the DICOM data dictionary element. |
| VR | Value representation — specifies the data type and format of the value(s) contained in the value field of a data element. (For example, the type of integer or string.) |
| VM | Value multiplicity — specifies the number of values that can be encoded in the value field of that data element. |
| (Code) | Displays a link if the item has code defined. When you click Code, a dialog box displays a list of values valid for this element with the corresponding internal numeric code. You may also filter this table by entering a partial string in the Filter. |
The information is intended for reference only. The production does not enforce the use of these enumerated values as variations may appear in the field. You may use these reference tables when trying to decide what value to put in a particular field. The definitive reference is always the official NEMA DICOM PS 3.6 standard.
Testing DICOM Associations
Once you define your associations, you can test them in a production using the following procedure:
-
Obtain a TCP trace of a working modality before you configure the production.
-
Start either of the demonstration productions.
-
Add a business service.
-
Send an echo message.
-
Debug the connection.
The following is a sample log from a third-party DICOM testing tool showing the establishment of an association, a request and response of an ECHO message and a release of the association connection.
test: #5:ENS-SCP << A-ASSOCIATE-RQ PDU
test: #5:ENS-SCP >> A-ASSOCIATE-AC PDU
test: #5:ENS-SCP << C-ECHO-RQ Verification SOP Class
test: #5:ENS-SCP >> C-ECHO-RSP Verification SOP Class, status #0000H[Success]
test: #5:ENS-SCP << A-RELEASE-RQ PDU
test: #5:ENS-SCP >> A-RELEASE-RP PDU
test: #5:ENS-SCP closing socket