Defining Listings
This page describes how to define listings in a Business Intelligence cube.
In an IDE, you can define formatting for a listing. See <listing> in Reference Information for Cube Classes.
You can also define individual listing fields with which users can create custom listings in the Analyzer.
You can also define listings outside of cube definitions (and without needing access to the Architect). See Defining Listing Groups.
Also see Accessing the Business Intelligence Samples.
Adding a Listing
To add a listing:
-
Click Add Element.
The system displays a dialog box.
-
For Enter New Item Name, type a listing name.
-
Click Listing.
-
Click OK.
-
Select the listing name in the Model Viewer, in the Listings section.
-
Optionally specify the following details:
-
Display name — Localizable name of the listing. If you do not specify this, the user interface instead displays the logical name.
-
Description — Description of the listing.
-
Listing type — Type of the listing. Select table (the default) or map.
If you choose map, see Defining a Map Listing.
-
SQL Select Mode — The %SelectModeOpens in a new tab for the SQL query which is used to retrieve the listing. This determines how some types of data are displayed in the Analyzer or in a Dashboard widget (most notably, dates and times). In addition to the default Display mode, you can choose to display a listing in Logical mode (that is, in the format used for internal storage) or in ODBC mode.
For more information on these options, refer to the corresponding section of the InterSystems SQL Basics page.
-
Resource — Specify the resource that secures the listing.
For information on how this is used, see Setting Up Security.
-
-
Define the listing as described in the following sections.
Defining a Simple Listing
A simple listing uses fields in the source table that is used by the cube. To define a simple listing, add a listing as described earlier in this page and specify the following options:
-
Field list — Specifies a comma-separated list of fields in the source table to display. To specify this option, click the Search button
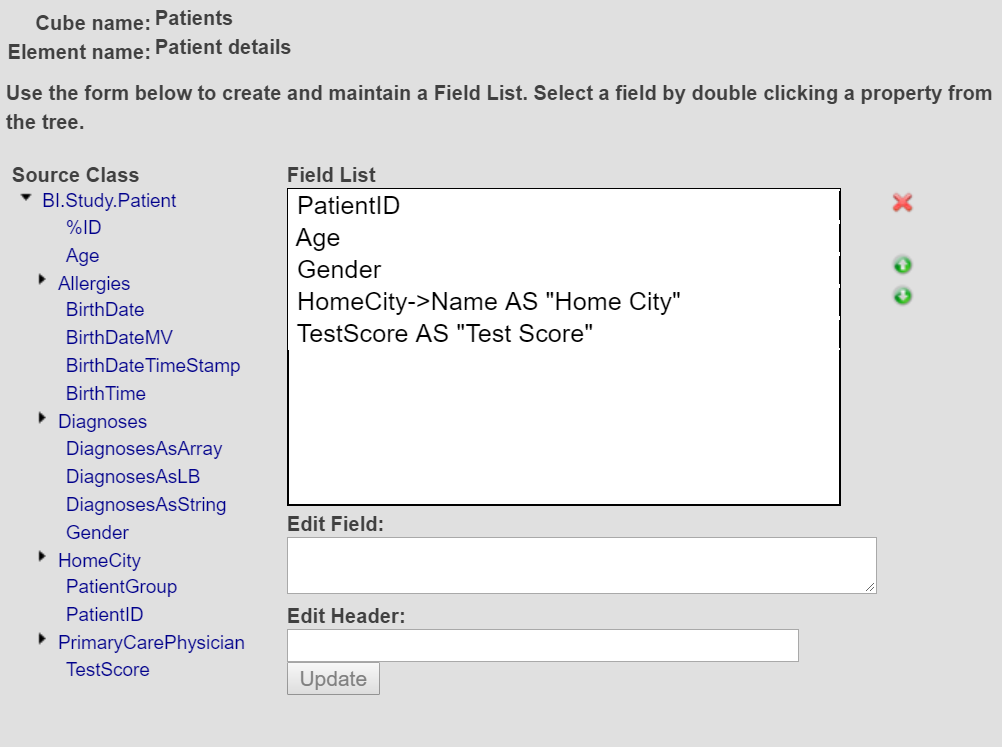
 next to Field list to display a dialog box where you can select the fields. If you do so, the Architect displays the following:
To use this dialog box:
-
If necessary, expand the items in the Source Class tree.
-
To add a property, double-click the property name in the Source Class tree. The property is then added to the end of the list shown in Field List. Properties with a default caption are automatically assigned an alias when added. For more information on the CAPTION property, see Core Property Parameters. Note that the value shown is the SqlFieldName for the property, which might be different from the property name.
-
To move an item up or down, click it in Field List and then click the up or down arrows as needed.
-
To edit an item, click it in Field List, make changes in Edit Field: and then click Update. For example, you can add an SQL alias. See the subsection Additional Options.
-
To delete an item, click it in Field List and then click the X button.
When you are done, click OK.
Or type directly into Field list. For example:
PatientID,Age,Gender,HomeCity->Name AS "Home City",TestScore AS "Test Score"Note that upon use of the Listing — Field List dialog box, any headers will be automatically wrapped with the $$$TEXT token. The cube’s domain will be added using $$$TEXT, such as in the following example:
Product->Name AS "$$$TEXT["Product","HOLEFOODS"]"You can override the cube’s default domain by entering a different domain directly into Field list.
-
-
Order by — Specifies a comma-separated list of fields in the source table by which to sort the listing (these do not need to be included in Field list). The overall sort is controlled by the first field in the list, the secondary sort is controlled by the second field, and so on.
To specify this option, click the Search button
 next to Field list to display a dialog box where you can select the fields. This dialog box is a simpler version of the one for Field list.
Or type directly into Order By. For example:
Age,GenderAfter a field name, you can include the ASC or DESC keyword to sort in ascending or descending order, respectively.
-
Ignore the Data Connector field and the Custom SQL query field.
A listing’s generated SQL query does not reliably return records in any definite order (including %ID order). The query plan chosen by the InterSystems SQL Query Optimizer for a given table is subject to change based on a variety of factors (see “Examine Query Performance” for more information). Therefore, whenever you wish to present records in a consistent order, you must specify the sorting criteria explicitly. You can do this by setting the Order by option in the Architect or by setting the value of the orderBy attribute for the <listing> element in the cube’s class definition.
Additional Options
Note the following points:
-
You can use arrow syntax to refer to a property in another table. See Implicit Joins (Arrow Syntax).
PatientID,HomeCity,PrimaryCarePhysician->DoctorGroup -
You can include aliases.
PatientID,Age,Gender,HomeCity->Name AS "Home City",TestScore AS "Test Score"Or:
PatientID,Age,Gender,HomeCity->Name "Home City",TestScore "Test Score" -
You can localize an alias by providing using the special token $$$TEXT[]. For example:
%ID,DateOfSale As "$$$TEXT["Date Of Sale"]" -
You can use standard SQL and InterSystems SQL functions, if you enclose the function name within parentheses so that it is not interpreted as a field name.
(UCASE(PatientID)),%EXTERNAL(Gender) -
You can use more advanced SQL features if you use source.field_name rather than field_name.
%ID,'$'||source.Sales AS SalesIn this case, the Sales column displays the Sales field, preceded by a dollar sign ($).
Defining a Data Connector Listing
A data connector listing uses fields in a data connector. To define such a listing, add a listing as described earlier in this page and specify the following options:
-
Data Connector — Select the data connector class to use.
-
Field list — Specify the fields to include. These must be fields in the data connector. You cannot include aliases, SQL functions, or arrow syntax.
By default, the listing displays only a property named %ID, if that exists.
-
Order by — Not used.
-
Ignore the Custom SQL query field.
Defining an SQL Custom Listing
An SQL custom listing can use fields from tables other than the source table used by the cube. (Note that it cannot use fields from a data connector.)
The system supports another kind of custom listing — a listing defined by users in the Analyzer. See <listingField> in Reference Information for Cube Classes.
To define an SQL custom listing, add a listing as described earlier in this page and specify the following options:
-
Custom SQL query — Select this.
-
Custom SQL — Specify an SQL SELECT query as described in this section.
Before looking at the details of the Custom SQL query, it is necessary to understand how the system creates listings. For any listing, the system creates a temporary listing table that contains the set of source ID values that correspond to the facts used in the current context (the context in which the user requests the listing). Your custom SQL query selects fields where the records match the source IDs in the temporary listing table. Internally, the overall query might be as follows:
SELECT source.Field1,source.Field2
FROM BI_Study.Patient source,internal-listing-table-name list
WHERE source.%ID=list.sourceID AND list.queryKey='2144874459'
When you specify an SQL custom query, you specify tokens to replace some of these details. Specifically, for Custom SQL, you provide a query with the following basic form:
SELECT list of field names FROM $$$SOURCE, othertable AS alias WHERE $$$RESTRICT AND otherrestriction
Where:
-
The FROM clause specifies multiple tables to query. In this clause, the $$$SOURCE token establishes source as the alias for the source table of the cube, and it establishes list as the alias for the temporary listing table.
Internally $$$SOURCE is replaced by something like the following: BI_Study.Patient source,internal-listing-table-name list
Also, othertable AS alias specifies another table to query, and an alias for this table (if wanted). You can specify additional tables as well.
-
The WHERE clause specifies conditions that join the source table to the listing table and to your additional table (or tables).
The $$$RESTRICT token is replaced by a condition that joins the source table to the temporary listing table; internally this is replaced by something context-dependent like the following: source.%ID=list.sourceID AND list.queryKey='2144874459'
Also otherrestriction specifies another SQL restriction. In the syntax shown above, the restrictions are combined via AND. You could use OR instead or create a more complex WHERE clause if wanted.
-
For list of field names, use a comma-separated list of field names, which can be fields in any of the tables listed in the FROM clause. For a field in the source table of the cube, use a reference of the form source.fieldname. You can include arrow syntax as well.
-
You can include aliases, and you can localize an alias by providing using the special token $$$TEXT[]. For example:
SELECT ID,UnitsSold As "$$$TEXT["Units Solds"]" FROM $$$SOURCE WHERE $$$RESTRICT -
You can also include the ORDER BY clause at the end of the query.
As a simple example (which uses only the source table of the cube):
SELECT source.PatientID,source.Age,source.HomeCity->Name
FROM $$$SOURCE
WHERE $$$RESTRICT
For another example (using data from other tables):
SELECT source.PatientID,FavoriteColor
FROM $$$SOURCE, BI_Study.PatientDetails AS details
WHERE $$$RESTRICT AND source.PatientID=details.PatientID
Defining a Map Listing (Geo Listing)
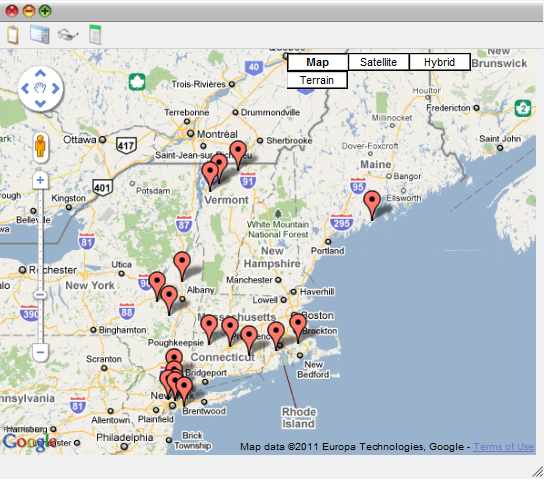
By default, Listing type is table, and the listing displays a table of information. If you have suitable data, you can instead specify Listing type as map. In this case, the listing is a map with markers to indicate geographic locations contained in the listing data. For example, the map could highlight sales locations or customer locations. For example:

A map listing uses the Google Maps API. Be sure that your usage of this API is consistent with the Terms of Use, which you can access via a link displayed in this listing, as shown in the previous picture.
Note that in order to use the Google Maps API, you must obtain an API key. See Specifying Basic Settings for more information.
To define such a listing, use the general instructions earlier in this page and do the following:
-
Specify Listing type as map.
-
Define the listing query so that it contains the fields Latitude and Longitude (case-sensitive). These fields should contain, respectively, the applicable latitude and longitude in decimal format (rather than degree/minute/second format).
For example, SQL Query could be as follows:
EventId, $$$IKSUMMARY as Summary, LocationCoordsLatitude As Latitude, LocationCoordsLongitude As LongitudeThis example is from the Aviation demo; see Using Text Analytics in Cubes.
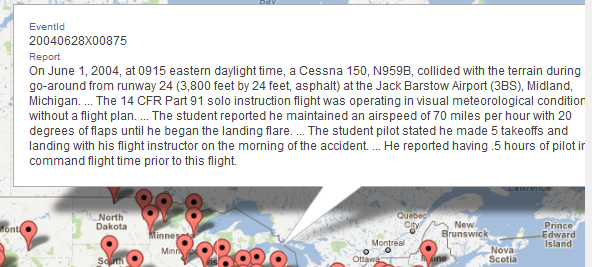
The listing query can also contain other fields. Any additional fields are displayed in a balloon when the user clicks a map position. For example:

This example is from the Aviation demo; see Using Text Analytics in Cubes.