
Defining Computed Dimensions
Computed dimensions are a powerful but advanced InterSystems IRIS Business Intelligence model option that enable you to define members at runtime via queries. This page describes how to define them.
For a comparison of computed dimensions with more basic Business Intelligence model elements, see Summary of Model Options
Computed dimensions do not have any association with calculated members. A computed dimension is specific to Business Intelligence. A calculated member is a standard concept in MDX.
Defining SQL Computed Dimensions
An SQL computed dimension contains members that are determined at runtime by SQL queries. You specify the query for each member.
The null replacement option does not have any effect on computed dimensions.
Example Computed Dimensions
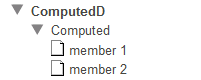
The Patients cube includes the ComputedD dimension, which defines two members (member 1 and member 2); each of these members is defined by an SQL query that retrieves the IDs of specific patients. The following shows these members as seen in the left area of the Analyzer:
You can use this dimension, the Computed level, and the members in the same way that you use other elements of the cube.
Similarly, the HoleFoods cube includes the Comments dimension, which defines two members: Complaints and Compliments. These members are also defined by SQL queries.
Defining a SQL Computed Dimension
You can use the following procedure to define a SQL computed dimension fairly easily:
-
Use the Architect to add a dimension, hierarchy, and level with the names you want.
It does not matter what type of dimension you choose, because you will change that later.
Do not specify a source property or source expression.
When you have completed these changes, select Save.
This step creates a shell that you can easily edit in an IDE. Also, the Architect initializes the display names to be the same as the names, which is convenient.
-
In an IDE, open the cube class.
-
Modify the <dimension> element that corresponds to the computed dimension. Make the following changes:
-
Edit the type attribute to be as follows:
type="computed" -
Add either of the following to the <dimension> element:
dimensionClass="SQL"
dimensionClass="%DeepSee.ComputedDimension.SQL"
The dimensionClass attribute refers to a helper class. If you do not specify a full package and class name, the system assumes that this class is in the package %DeepSee.ComputedDimension. The class %DeepSee.ComputedDimension.SQLOpens in a new tab is the helper class for SQL-based computed dimensions. Other types of computed dimensions are beyond the scope of this documentation.
For example:
<dimension name="New Computed Dimension" displayName="New Computed Dimension"
    disabled="false"
    hasAll="false"
    type="computed"
    dimensionClass="SQL" >
The lines are not broken in this way by default; line breaks are added here to make the example easier to read.
-
-
Find the section that defines the level:
<level name="New Computed Level" displayName="New Computed Level" disabled="false" list="false" useDisplayValue="true"> </level> -
Just before the </level> line, add a line like the following:
<member name="" displayName="" spec="" />Edit this as follows:
Attribute Value name Name of this member. displayName Optional display name of this member. description Optional text to display as a tooltip in the Analyzer, in the left area. spec SQL SELECT query that returns the IDs of one or more records of the fact table used by this cube. To refer to the fact table, you can use either the token $$$TABLE or the full table name. For details on the fact table, see Details for the Fact and Dimension Tables. Also see Variations for spec. For example:
member name="example member 1" displayName="member 1"
spec="select ID from BI_Model_PatientsCube.Fact WHERE MxAge<50 AND DxHomeCity->DxHomeCity='Elm Heights'" />
In any of these attributes, you cannot use XML reserved characters. For substitutions, see XML Reserved Characters.
-
Add other <member> elements as needed.
The order of these elements determines the default sort order of the corresponding members.
-
Save and recompile the class.
As soon as you do so, the new dimension and its members are available for use.
A Closer Look at the Example
In the Patients cube, the ComputedD dimension contains the following members:
-
member 1 is defined by the following SQL query:
select ID from BI_Model_PatientsCube.Fact WHERE MxAge<50 AND DxHomeCity->DxHomeCity='Elm Heights'This query uses the fact table for the cube; for details, see Details for the Fact and Dimension Tables.
-
member 2 is defined by the following SQL query:
select ID from $$$TABLE WHERE MxAge=40 AND DxHomeCity->DxHomeCity='Juniper'This query uses $$$TABLE, which is replaced by the actual name of the fact table. Unlike the previous query, this query is not valid in the Management Portal, which does not have information to convert the $$$TABLE token.
The following pivot table shows these members:
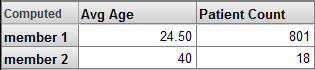
For example, in this case member 1 consists of 801 patients whose average age is 24.50 years.
Variations for spec
The following variations are possible for spec:
-
The query can instead refer to the base class of the cube, if that class has indexes that are appropriate for the query. The IDs for that class are identical to the IDs used in the fact table.
This is helpful in cases when you want a dimension to reflect frequently changing groups and you want to avoid rebuilding or synchronizing the cube.
-
As shorthand, you can use a WHERE clause instead of a SELECT statement. In this case, the system generates a SELECT statement that uses your WHERE clause; this statement selects IDs from the fact table.
For an example, see the members in the By Industry level in the example computed dimension later in this section.
-
As shorthand, you can refer to a field in the fact table via the token $$$FACT. To do so, in the level, specify the factName attribute as the name of that field. For example:
<level name="By Allergy Count" factName="Mx1968652733I" >Then in the SELECT statement (or the WHERE clause), use $$$FACT to refer to this field. Be sure to include spaces around this token so that the system parses it appropriately.
For an example, see the members in the By Allergy Count level in the example computed dimension later in this section.
-
Instead of using a SELECT statement or a WHERE clause, you can a CALL statement that calls a stored procedure. For example:
spec="CALL MyStoredProcedure()"For the stored procedure, be sure to specify both of the method keywords SqlProc and ReturnResultsets as true. For example:
ClassMethod GetPatientIsDiabetic() As %Integer [ ReturnResultsets, SqlProc ]
{
    // Note that %sqlcontext is created when SQLPROC is defined
    Try {
        Set rc = 1

        Set sql = "SELECT f.id id FROM HSAA_PatientCurrentConditionsCube.Fact f, HSAA.Diagnosis d "
                 _" WHERE d.Patient = f.%sourceid and d.Diagnosisgroup in ('249', '250', '253')"
        Set st = ##class(%SQL.Statement).%New()
        Set sc = st.%Prepare(sql)
        If ($$$ISERR(sc)) {
                Set rc = 0
                Quit
        }
        Set rs = st.%Execute()
        Do %sqlcontext.AddResultSet(rs)
    }
    Catch(ex) {
        Set %sqlcontext.%SQLCODE = ex.AsSQLCODE()
        Set %sqlcontext.%Message = ex.SQLMessageString()
        Set rc = 0
    }

    Quit rc
}
The following computed dimension works with the Patients cube. To use it, copy and paste it into the cube class and then recompile that class.
<dimension name="Other Groups" displayName="Groups (Computed Dimension)"
 hasAll="false" type="computed" dimensionClass="SQL">
  <hierarchy name="H1">
   <level name="By Industry"  >
    <member name="Retail Trade"
    spec="WHERE DxIndustry->DxIndustry='Retail Trade'">
    </member>
    <member name="Finance and Insurance"
    spec="select ID from $$$TABLE WHERE DxIndustry->DxIndustry='Finance and Insurance'">
    </member>
   </level>
  </hierarchy>
  <hierarchy name="H2">
   <level name="By Allergy Count" factName="Mx1968652733I" >
    <member name="Highly allergic"
    spec="WHERE $$$FACT > 2">
    </member>
    <member name="Not allergic"
    spec="select ID from $$$TABLE WHERE $$$FACT = 0">
    </member>
   </level>
  </hierarchy>
</dimension>
Defining MDX Computed Dimensions
An MDX computed dimension contains members that are determined at runtime by MDX queries. You specify the query for each member.
The null replacement option does not have any effect on computed dimensions.
Defining an MDX Computed Dimension
You can use the following procedure to define an MDX computed dimension fairly easily:
-
Use the Architect to add a dimension, hierarchy, and level with the names you want.
It does not matter what type of dimension you choose, because you will change that later.
Do not specify a source property or source expression.
This step creates a shell that you can easily edit in an IDE. Also, the Architect initializes the display names to be the same as the names, which is convenient.
-
In an IDE, open the cube class.
-
Modify the <dimension> element that corresponds to the computed dimension. Make the following changes:
-
Edit the type attribute to be as follows:
type="computed" -
Add following to the <dimension> element:
dimensionClass="MDX"The dimensionClass attribute refers to a helper class. If you do not specify a full package and class name, the system assumes that this class is in the package %DeepSee.ComputedDimension.
For example:
<dimension name="AgeBuckets" type="computed" dimensionClass="MDX"> <hierarchy name="H1"> <level name="Years"/> </hierarchy> </dimension> -
-
Define members in either of the following ways:
-
As a child of <level>, add <member> elements as in the following example:
<member name="Boston" spec="[OUTLET].[CITY].[BOSTON]"/>For an example of where to place the <member> element, see Defining a SQL Computed Dimension.
-
Define the %OnGetComputedMembers() callback of the cube class. See the next subsection.
-
-
Save and recompile the cube class.
As soon as you do so, the new dimension and its members are available for use.
%OnGetComputedMembers()
The %OnGetComputedMembers() callback has the following signature:
ClassMethod %OnGetComputedMembers(pDimName As %String,
                                  pHierName As %String,
                                  pLevelName As %String,
                                  ByRef pMemberList,
                                  pRollupKey As %String = "",
                                  ByRef pRange As %String = "") As %Status
Where pDimName, pHierName, and pLevelName are the dimension, hierarchy, and level name, respectively. The method should return, by reference, pMemberList. This is a multidimensional an array of the following form:
| Array Node | Array Value |
| pMemberList(i) where I is an integer | A $LISTBUILD list that defines a member of the given level. This list must contain the following items, in order:
|
The following shows an example:
ClassMethod %OnGetComputedMembers(pDimName As %String, pHierName As %String, pLevelName As %String,
      ByRef pMemberList, pRollupKey As %String = "", ByRef pRange As %String = "") As %Status
{
    If (pDimName="AgeBuckets") {
        If (pLevelName="Years") {
            // $LB(MDX,Name,Key)
            Set pMemberList($I(pMemberList)) =
              $LB("%OR([DateOfSale].[Actual].[DaySold].[NOW-1y-1d]:[NOW])","1 year(s)","1")
            Set pMemberList($I(pMemberList)) =
              $LB("%OR([DateOfSale].[Actual].[DaySold].[NOW-2y-1d]:[NOW-1y])","2 year(s)","2")
            Set pMemberList($I(pMemberList)) =
              $LB("%OR([DateOfSale].[Actual].[DaySold].[NOW-3y-1d]:[NOW-2y])","3 year(s)","3")
            Set pMemberList($I(pMemberList)) =
              $LB("%OR([DateOfSale].[Actual].[DaySold].[NOW-4y-1d]:[NOW-3y])","4 year(s)","4")
            Set pMemberList($I(pMemberList)) =
              $LB("%OR([DateOfSale].[Actual].[DaySold].[NOW-5y-1d]:[NOW-4y])","5 year(s)","5")
            Set pMemberList($I(pMemberList)) =
              $LB("%OR([DateOfSale].[Actual].[DaySold].[NOW-6y-1d]:[NOW-5y])","6 year(s)","6")
            Set pMemberList($I(pMemberList)) =
              $LB("%OR([DateOfSale].[Actual].[DaySold].[NOW-7y-1d]:[NOW-6y])","7 year(s)","7")
        }
    }
    Quit $$$OK
}