
Managing Workflow Roles, Users, and Tasks
This topic describes how to configure workflow users and roles. It also describes (for supervisors) how to manage workflow activity.
Introduction to the Workflow Menu
The Management Portal provides pages for configuring workflow users and roles and for monitoring workflow activity. To access them, select Interoperability > Manage > Workflow.
These pages are primarily meant for supervisors. Supervisors can assign or cancel tasks, but other actions (such as marking tasks complete) are not available here. Instead, users manage their workflow tasks within the InterSystems User Portal, which also displays production-related dashboards. For information, see Using the Portal Features.
Managing Workflow Roles
The Workflow Role Profiles page lists workflow roles currently defined in the namespace. To display this page:
Select Interoperability > Manage > Workflow > Workflow Roles.
On this page, you can do the following:
-
Edit the details of a role. To do so, click a role in the table. Edit the following details on the right:
-
Name — The role name. This is identical to the configured Name of the corresponding workflow operation in the production. See Defining Workflows.
-
Description — A descriptive name for the workflow role.
-
Capacity — The maximum number of active tasks a workflow role is expected to have. This number is used in calculating performance metrics. The default is 100.
Then click Save.
-
-
Add a user to a role. To do so, click a role in the table. Then click Add.
Provide the following details:
-
Username — Select a workflow user. The system lists all the user IDs that have been configured as workflow users; see the next topic.
-
Rank — Optionally select an integer to indicate the ordinal rank of the user within this role. This value can affect task distribution. For example, you could use 1 for the more senior members of the role and 2 for the other members.
-
Title — Optionally specify a string that clarifies the user’s job position. This value can affect task distribution. For example, a user can be designated as the “manager” of a workflow role.
Then click OK.
-
-
Remove a user from a role. To do so, click a role in the table and then click the lower Remove button (next to Add).
Then select a user and click OK.
-
See the users currently in this role. To do so, click a role in the table and then click Users. The system displays a table of users in a dialog box.
-
See the tasks currently associated with or assigned to users in this role. To do so, click a role in the table and then click Tasks. The system displays a table of tasks in a dialog box.
-
Remove a role. To do so, click a role in the table and then click the upper Remove button (next to Save). Click OK to confirm.
Managing Workflow Users
The Interoperability > Manage > Workflow > Workflow Users page lists workflow users currently defined in the namespace.
On this page, you can do the following:
-
Configure an existing user as a workflow user. To do so, click the username from the Name drop-down list. Optionally specify the following additional details:
-
Description — A descriptive name for the user.
-
Active? — Controls whether this user is currently active, as a workflow user.
Then click Save.
-
-
Edit the details of a username. To do so, click a username in the table. Edit the details and then click Save.
-
See the roles to which a user belongs. To do so, click a username in the table and then click Roles. The system displays a table of roles in a dialog box.
-
See the tasks currently associated with or assigned to this user. To do so, click a username in the table and then click Tasks. The system displays a table of tasks in a dialog box.
-
Remove a user definition from this table. To do so, click a user and then click Remove.
This does not remove the user definition.
Managing Workflow Tasks
The Interoperability > Manage > Workflow > Workflow Tasks page lists all tasks that have passed through the production, since the last time messages were purged for this production.
The following shows an example of this page:

The Status column uses the following background colors to indicate the status of the tasks:
-
Yellow — Unassigned. This task is active and appears in the Worklist Inbox of each workflow user.
-
Dark blue — Assigned. This task is active and appears in the Worklist Inbox of the assigned workflow user. This status does not indicate whether or not the user has accepted the task.
-
Gray — Completed. This task is inactive; inactive tasks are not displayed in the Worklist Inbox of any user.
-
Orange — Cancelled (a supervisor cancelled the task before it is completed). This task is inactive.
-
Pink — Discarded (the request timeout period expired before the task was completed). This task is inactive.
On this page, you can do the following:
-
Assign a task to a user. To do so, click the task in the table and then click Assign Task. Specify the following details:
-
Optionally select a different task ID from the first drop-down list.
-
Select a username from the drop-down list.
-
Optionally select a different priority from the Priority drop-down list.
The Priority value indicates the relative priority of the task. 1 is the highest priority. A task has a default priority, but you can change this when assigning a task.
-
Optionally edit the description in the Subject field.
Then click OK.
-
-
Change the priority of a task without assigning it to a specific user. To do so, click the task in the table and then click Assign Task. Then modify the value for Priority and click OK.
-
Cancel a task. To do so, click the task in the table and then click Assign Task. Then select Cancel? and click OK. The task is immediately canceled.
Caution:You cannot undo any of the preceding operations.
-
Display details for a task. To do so, click the task in the table and then click the >> symbol in that row.
-
Hide the task details. To do so, click Hide Details.
Other Details
Because tasks are messages, this page lists all tasks since the last time messages were purged for this production. For details about message purging, see Purging Management Data.
For information on how users access their Worklist Inboxes, see Using the Portal Features.
For reference, the columns in this table have the following meanings:
-
TaskId — The MessageId of the task request message that the business process sends to the workflow operation.
-
RoleName — The name of the workflow operation to which the task request was addressed.
-
Status — Described in the preceding section.
-
Priority — Described in the preceding section.
-
Source — The configuration name of the business process that sent the task request to the workflow operation.
-
AssignedTo — The workflow user to whom this task is assigned, if any.
-
Subject — An optional text string that identifies the purpose of the task. In responses, this string is a copy of the subject value provided in the initial request for the task.
-
TimeCreated — The date and time stamp when the Workflow Engine first received the task request and created the corresponding task response object.
-
TimeCompleted — For inactive tasks (Completed, Discarded, or Cancelled), the date and time stamp when the workflow operation returned the completed task response object to the business process.
-
Duration — For inactive tasks (Completed, Discarded, or Cancelled), this number is the difference, in seconds, between TimeCreated and TimeCompleted. The Duration value represents the amount of time the task spent inside the human workflow (that is, the amount of time during which it was visible in Workflow Inboxes).
Viewing the Assigned Tasks
The Interoperability > Manage > Workflow > Workflow Worklist page lists all assigned tasks (that is, tasks whose status is Assigned) in the production.
The following shows an example of this page:
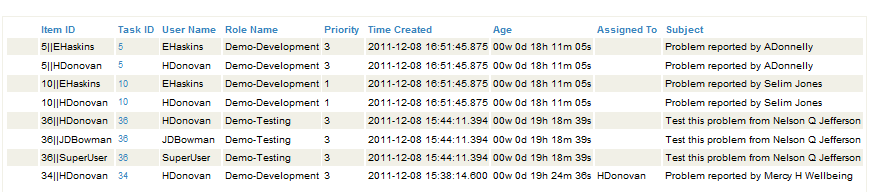
The ItemId column is the internal identifier for the tasks. It consists of the numeric TaskId, the string ||, and the name of the user to which the task has been assigned.
The Age column indicates the elapsed time since the task response object was created. This time indicates the progress of the task towards its timeout. When the Age value exceeds the timeout for the task, the task is discarded. If there is no timeout, the task stays active until a user completes it, and this value simply increments.
The Assigned To column is either of the following:
-
Null (if the assigned user has not yet accepted the task).
-
Username to whom it was assigned (if the user has accepted it).
For information on the other columns, see the details for the Interoperability > Manage > Workflow > Workflow Tasks page, in the preceding section.