
Adding Digital Signatures
This topic describes how to add digital signatures to SOAP messages sent by InterSystems IRIS web services and web clients.
Typically you perform both encryption and signing. This topic describes signing alone, for simplicity. For information on combining encryption and signing, see the topic Combining Encryption and Signing.
The topic Using Derived Key Tokens for Encryption and Signing describes an alternative way to add digital signatures to SOAP messages.
Overview of Digital Signatures
You use digital signatures to detect message alteration or to simply validate that a certain part of a message was really generated by the entity which is listed. As with the traditional manually written signature, a digital signature is an addition to the document that can be created only by the creator of that document and that cannot easily be forged.
InterSystems IRIS support for digital signatures on SOAP messages is based on WS-Security 1.1. In turn, WS-Security follows the XML Signature specification. According to the latter specification, to sign an XML document:
-
You use a digest function to compute the hashed value of one or more parts of the document.
-
You concatenate the digest values.
-
You use your private key to encrypt the concatenated digest. (This is the computation that only you can perform.)
-
You create the <Signature> element, which includes the following information:
-
References to the signed parts (to indicate the parts of the message to which this signature applies).
-
The encrypted digest value.
-
Information to enable the recipient to identify the public key to use to decrypt the encrypted digest value.
This information can be contained within the <Signature> element, or the <Signature> element can include a direct reference to a binary security token that contains an X.509 certificate or a signed SAML assertion. In the latter case, the security token must be added to the message before the <Signature> element is added.
This information also enables the recipient to validate that you are the owner of the public/private key pair.
-
The topic Using Derived Key Tokens for Encryption and Signing describes an alternative way to add digital signatures to SOAP messages. The details of the messages themselves vary, but the general process is the same and follows the XML Signature specification: You generate a digest of the signed parts, encrypt the digest, and include a <Signature> element with information that enables the recipient to validate the signature and decrypt the encrypted digest.
Adding a Digital Signature
To digitally sign a SOAP message, you can use the basic procedure here or the variations described in the following parts of the topic.
First, the following figure summarizes the process:
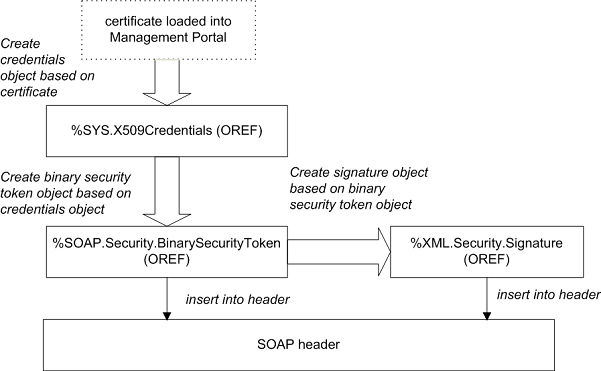
In detail, the process is as follows:
-
Optionally include the %soap.inc include file, which defines macros you might need to use.
-
If you want to sign any security header elements, create those security header elements. For example:
set utoken=##class(%SOAP.Security.UsernameToken).Create("_SYSTEM","SYS") -
Create an instance of %SYS.X509CredentialsOpens in a new tab, as described in Retrieving Credential Sets Programmatically. This InterSystems IRIS credential set must contain your own certificate, and you must provide the private key password, if it has not already been loaded. For example:
Set x509alias = "servercred" Set pwd = "mypassword" Set credset = ##class(%SYS.X509Credentials).GetByAlias(x509alias,mypassword) -
Create a binary security token that contains the certificate associated with that credential set. To do so, call the CreateX509Token() class method of %SOAP.Security.BinarySecurityTokenOpens in a new tab. For example:
set bst=##class(%SOAP.Security.BinarySecurityToken).CreateX509Token(credset)This method returns an instance of %SOAP.Security.BinarySecurityTokenOpens in a new tab that represents the <BinarySecurityToken> header element.
-
Add this token to the WS-Security header element. To do so, call the AddSecurityElement() method of the SecurityOut property of your web client or web service. For the method argument, use the token you just created. For example:
do ..SecurityOut.AddSecurityElement(bst) -
Create the <Signature> element based on the binary security token. To do so, call the CreateX509() class method of %XML.Security.SignatureOpens in a new tab. For example:
set dsig=##class(%XML.Security.Signature).CreateX509(bst)This method returns an instance of %XML.Security.SignatureOpens in a new tab that represents the <Signature> header element. The <Signature> element applies to a default set of parts of the message; you can specify a different set of parts.
Formally, this method has the following signature:
classmethod CreateX509(credentials As %SYS.X509Credentials = "",
                       signatureOptions As %Integer,
                       referenceOption As %Integer,
                       Output status As %Status) as %XML.Security.Signature
Where:
-
credentials is either a %SYS.X509CredentialsOpens in a new tab instance, a %SAML.AssertionOpens in a new tab instance, or a %SOAP.Security.BinarySecurityTokenOpens in a new tab instance.
-
signatureOptions specifies the parts to sign. This option is described in Applying a Digital Signature to Specific Message Parts.
-
referenceOption specifies the type of reference to create. For details, see Reference Options for X.509 Credentials.
-
status indicates whether the method was successful.
-
-
Add the digital signature to the WS-Security header element. To do so, call the AddSecurityElement() method of the SecurityOut property of your web client or web service. For the argument, specify the signature object created in the previous step. For example:
do ..SecurityOut.AddSecurityElement(dsig) -
Send the SOAP message. See the general comments in Adding Security Header Elements.
Example
This example shows a web service that signs its response messages.
To make this example work in your own environment, first do the following:
-
Create a certificate for the server.
-
Load this certificate into InterSystems IRIS on the server side, creating credentials with the name servercred. When you do so, also load the private key file and provide its password (so that the web service does not have to provide that password when it signs its response message.)
The web service refers to an InterSystems IRIS credential set with this exact name.
Class DSig.DivideWS Extends %SOAP.WebService
{

///  Name of the Web service.
Parameter SERVICENAME = "DigitalSignatureDemo";

///  SOAP namespace for the Web service
Parameter NAMESPACE = "http://www.myapp.org";

/// use in documentation
Method Divide(arg1 As %Numeric = 2, arg2 As %Numeric = 8) As %Numeric [ WebMethod ]
{
 Do ..SignResponses()
 Try {
  Set ans=arg1 / arg2
  }Catch{
    Do ..ApplicationError("division error")
  }
 Quit ans
}

/// use in documentation
/// signs and includes a binary security token
Method SignResponses()
{
 //Add timestamp because that's commonly done
 Set ts=##class(%SOAP.Security.Timestamp).Create()
 Do ..SecurityOut.AddSecurityElement(ts)

 //access previously stored server certificate & private key file
 //no need to use private key file password, because that has been saved
 Set x509alias = "servercred"
 Set cred = ##class(%SYS.X509Credentials).GetByAlias(x509alias)
 set bst=##class(%SOAP.Security.BinarySecurityToken).CreateX509Token(cred)
 do ..SecurityOut.AddSecurityElement(bst)

 //Create WS-Security Signature object
 Set signature=##class(%XML.Security.Signature).CreateX509(bst)

 //Add WS-Security Signature object to the outbound message
 Do ..SecurityOut.AddSecurityElement(signature)
 Quit
}


///  Create our own method to produce application specific SOAP faults.
Method ApplicationError(detail As %String)
{
    Set fault=##class(%SOAP.Fault).%New()
    Set fault.faultcode=$$$FAULTServer
    Set fault.detail=detail
    Set fault.faultstring="Application error"
    // ReturnFault must be called to send the fault to the client.
    // ReturnFault will not return here.
    Do ..ReturnFault(fault)
}


}
Other Ways to Use the Certificate with the Signature
In the basic procedure discussed in the previous section, you use a <BinarySecurityToken> contains a certificate in serialized, base-64–encoded format. Instead of including the certificate, you can use information that identifies the certificate. Or you can contain the certificate within a signed SAML assertion. This section discusses these variations.
Variation: Using Information That Identifies the Certificate
Instead of including a certificate in the message, you can include information that identifies the certificate. The recipient uses this information to retrieve the certificate from the appropriate location. To do so, use the steps in the previous section, with the following changes:
-
Skip steps 4 and 5. That is, do not add a <BinarySecurityToken>.
-
In step 6 (creating the signature), use the credential set from step 1 (rather than a binary security token) as the first argument to CreateX509(). For example:
set dsig=##class(%XML.Security.Signature).CreateX509(credset,,referenceOption)For the third argument (referenceOption), you can specify how the <Signature> element uses the certificate.
If you specify a credential set as the first argument (as we are doing in this variation), the default for referenceOption is $$$SOAPWSReferenceThumbprint. Optionally specify a value as described in Reference Options for X.509 Credentials. You can use any value except $$$SOAPWSReferenceDirect.
Example
This example is a variation of the earlier example in this topic.
Method SignResponses()
{
 //Add timestamp because that's commonly done
 Set ts=##class(%SOAP.Security.Timestamp).Create()
 Do ..SecurityOut.AddSecurityElement(ts)

 //access previously stored server certificate & private key file
 //no need to use private key file password, because that has been saved
 Set x509alias = "servercred"
 Set cred = ##class(%SYS.X509Credentials).GetByAlias(x509alias)

 //Create WS-Security Signature object
 Set signature=##class(%XML.Security.Signature).CreateX509(cred)

 //Add WS-Security Signature object to the outbound message
 Do ..SecurityOut.AddSecurityElement(signature)
 Quit
}
In this case, the web service sends response messages like the following:
<?xml version="1.0" encoding="UTF-8" ?>
<SOAP-ENV:Envelope [parts omitted]>
  <SOAP-ENV:Header>
    <Security xmlns="[parts omitted]oasis-200401-wss-wssecurity-secext-1.0.xsd">
      <Timestamp xmlns="[parts omitted]oasis-200401-wss-wssecurity-utility-1.0.xsd"
                 wsu:Id="Timestamp-48CEE53E-E6C3-456C-9214-B7D533B2663F">
        <Created>2010-03-19T14:35:06Z</Created>
        <Expires>2010-03-19T14:40:06Z</Expires>
      </Timestamp>
      <Signature xmlns="http://www.w3.org/2000/09/xmldsig#">
        <SignedInfo>
          <CanonicalizationMethod Algorithm="http://www.w3.org/2001/10/xml-exc-c14n#">
          </CanonicalizationMethod>
            <SignatureMethod Algorithm="http://www.w3.org/2000/09/xmldsig#rsa-sha256"></SignatureMethod>
            <Reference URI="#Timestamp-48CEE53E-E6C3-456C-9214-B7D533B2663F">
              <Transforms>
                <Transform Algorithm="http://www.w3.org/2001/10/xml-exc-c14n#"></Transform>
              </Transforms>
              <DigestMethod Algorithm="http://www.w3.org/2000/09/xmldsig#sha1"></DigestMethod>
                <DigestValue>waSMFeYMruQn9XHx85HqunhMGIA=</DigestValue>
            </Reference>
            <Reference URI="#Body-73F08A5C-0FFD-4FE9-AC15-254423DBA6A2">
              <Transforms>
                <Transform Algorithm="http://www.w3.org/2001/10/xml-exc-c14n#"></Transform>
              </Transforms>
              <DigestMethod Algorithm="http://www.w3.org/2000/09/xmldsig#sha1"></DigestMethod>
                <DigestValue>wDCqAzy5bLKKF+Rt0+YV/gxTQws=</DigestValue>
            </Reference>
          </SignedInfo>
          <SignatureValue>j6vtht/[parts omitted]trCQ==</SignatureValue>
          <KeyInfo>
            <SecurityTokenReference
            xmlns="[parts omitted]oasis-200401-wss-wssecurity-secext-1.0.xsd">
              <KeyIdentifier EncodingType="[parts omitted]#Base64Binary"
                             ValueType="[parts omitted]#ThumbprintSHA1">
                   WeCnU2sMyOXfHH8CHTLjNTQQnGQ=
              </KeyIdentifier>
            </SecurityTokenReference>
          </KeyInfo>
        </Signature>
      </Security>
  </SOAP-ENV:Header>
  <SOAP-ENV:Body wsu:Id="Body-73F08A5C-0FFD-4FE9-AC15-254423DBA6A2">
      [omitted]
  </SOAP-ENV:Body>
</SOAP-ENV:Envelope>
Variation: Using a Signed SAML Assertion
To add a digital signature that uses the certificate in a signed SAML assertion, do the following:
-
Optionally include the %soap.inc include file, which defines macros you might need to use.
-
If you want to sign any security header elements, create those security header elements. For example:
set utoken=##class(%SOAP.Security.UsernameToken).Create("_SYSTEM","SYS") -
Create a signed SAML assertion with a <SubjectConfirmation> element that uses the Holder-of-key method . See Creating and Adding SAML Tokens.
-
Create the <Signature> element. When you do, use the signed SAML assertion as the first argument to the CreateX509() class method. For example:
set signature=##class(%XML.Security.EncryptedKey).CreateX509(signedassertion) -
Add the digital signature to the WS-Security header element. To do so, call the AddSecurityElement() method of the SecurityOut property of your web client or web service. For the argument, specify the signature object created in the previous step. For example:
do ..SecurityOut.AddSecurityElement(dsig) -
Send the SOAP message. See the general comments in Adding Security Header Elements.
Applying a Digital Signature to Specific Message Parts
By default, when you create and add a digital signature to the WS-Security header element, the signature is applied to the SOAP body, the <Timestamp> element in the header (if present), and any WS-Addressing header elements.
To specify the parts to which the signature applies, use any of the procedures described earlier with one variation: When you create the signature, use the second argument (signatureOptions) to specify the message parts to sign. Specify this argument as a binary combination of any of the following macros (which are contained in the %soap.inc file):
-
$$$SOAPWSIncludeNone
-
$$$SOAPWSIncludeDefault (which equals $$$SOAPWSIncludeSoapBody + $$$SOAPWSIncludeTimestamp + $$$SOAPWSIncludeAddressing)
-
$$$SOAPWSIncludeSoapBody
-
$$$SOAPWSIncludeTimestamp
-
$$$SOAPWSIncludeAddressing
-
$$$SOAPWSIncludeAction
-
$$$SOAPWSIncludeFaultTo
-
$$$SOAPWSIncludeFrom
-
$$$SOAPWSIncludeMessageId
-
$$$SOAPWSIncludeRelatesTo
-
$$$SOAPWSIncludeReplyTo
-
$$$SOAPWSIncludeTo
-
$$$SOAPWSIncludeRMHeaders (see Using WS-ReliableMessaging)
To combine macros, use plus (+) and minus (-) signs. For example:
$$$SOAPWSIncludeSoapBody+$$$SOAPWSIncludeTimestamp
These options apply both to the CreateX509() and the Create() methods; the latter is discussed in Using Derived Key Tokens for Encryption and Signing.
For example:
 set ts=##class(%SOAP.Security.Timestamp).Create()
 do ..SecurityOut.AddSecurityElement(ts)
 set x509alias = "servercred"
 set cred = ##class(%SYS.X509Credentials).GetByAlias(x509alias)

 set parts=$$$SOAPWSIncludeSoapBody + $$$SOAPWSIncludeTimestamp
 set signature=##class(%XML.Security.Signature).CreateX509(cred,parts)
Specifying the Digest Method
By default, the digest value for the signature is computed via the SHA-1 algorithm, and the <Signature> element in the security header includes something like this:
   <DigestMethod Algorithm="http://www.w3.org/2000/09/xmldsig#sha1"></DigestMethod>
   <DigestValue>waSMFeYMruQn9XHx85HqunhMGIA=</DigestValue>
You can specify a different digest method for the signature. To do so, call the SetDigestMethod() method of your instance of %XML.Security.SignatureOpens in a new tab. For the argument, use one of the following macros (which are contained in the %soap.inc file):
-
$$$SOAPWSsha1 (the default)
-
$$$SOAPWSsha256
-
$$$SOAPWSsha384
-
$$$SOAPWSsha512
For example:
do sig.SetDigestMethod($$$SOAPWSsha256)
Specifying the Signature Method
By default, the signature value is computed via the RSA-SHA256 algorithm, and the <Signature> element in the security header includes something like this:
   <SignatureMethod Algorithm="http://www.w3.org/2000/09/xmldsig#rsa-sha256"></SignatureMethod>
...
   <SignatureValue>J+gACmdjkJxaq2hJqA[parts omitted]</SignatureValue>
You can specify a different algorithm for the signature method. To do so, call the SetSignatureMethod() method of your instance of %XML.Security.SignatureOpens in a new tab. For the argument, use one of the following macros (which are contained in the %soap.inc file):
-
$$$SOAPWSrsasha1
-
$$$SOAPWSrsasha256 (the default)
-
$$$SOAPWSrsasha384
-
$$$SOAPWSrsasha512
-
$$$SOAPWShmacsha256
-
$$$SOAPWShmacsha384
-
$$$SOAPWShmacsha512
For example:
do sig.SetSignatureMethod($$$SOAPWSrsasha512)
Note that you can modify the default signature algorithm. To do so, access the Management Portal, click System Administration, then Security, then System Security, and then System-wide Security Parameters. The option to specify the default signature algorithm is labeled Default signature hash.
Specifying the Canonicalization Method for <KeyInfo>
By default, the <KeyInfo> element is canonicalized with Exclusive XML Canonicalization, and the <KeyInfo> element includes the following:
<CanonicalizationMethod Algorithm="http://www.w3.org/2001/10/xml-exc-c14n#">
To instead canonicalize this element with Inclusive XML Canonicalization, do the following:
Set sig.SignedInfo.CanonicalizationMethod.Algorithm=$$$SOAPWSc14n
Where sig is the instance of %XML.Security.SignatureOpens in a new tab.
In this case, <KeyInfo> contains the following:
<CanonicalizationMethod Algorithm="http://www.w3.org/TR/2001/REC-xml-c14n-20010315">
Adding Signature Confirmation
The WS-Security 1.1 <SignatureConfirmation> feature enables a web client to ensure that a received SOAP message was generated in response to the original request sent by the web client. The client request is typically signed but does not have to be. In this mechanism, the web service adds a <SignatureConfirmation> element to the security header element, and the web client can check that <SignatureConfirmation> element.
For a web service, to add a <SignatureConfirmation> element to the security header element:
-
Call the WSAddSignatureConfirmation() method of the web service. For the argument, specify the main signature of the security header element. For example:
do ..WSAddSignatureConfirmation(sig) -
Send the SOAP message as usual. See the general comments in Adding Security Header Elements.
This method adds WS-Security 1.1 <SignatureConfirmation> elements to the outbound message. It adds a <SignatureConfirmation> element to the SecurityOut property for each <Signature> received in SecurityIn.
If SecurityIn does not include a signature, then a <SignatureConfirmation> element is added with no Value attribute, as required by WS-Security 1.1.
For information on validating <SignatureConfirmation> elements, see Checking the Signature Confirmation.