
Creating an X12 Data Transformation
Your X12 routing rule may need one or more DTL data transformations.
To integrate the DTL data transformation in the production, enter its full package and class name in the Transform field of a routing rule.
When you create a DTL data transformation for X12 documents:
-
On the Transform tab, Source Class and Target Class should both be EnsLib.EDI.X12.DocumentOpens in a new tab.
-
Source Doc Type should match the schema category name assigned by the business service.
-
Target Doc Type should be the name of the target schema category. This must match a schema category name that you have loaded into InterSystems IRIS.
The Common X12 DTL Use Case
The DTL editor facilitates creation of data transformations for the common X12 usage case where:
-
You can have more than one functional group.
-
Normally, there is only one type of transaction set used within a group.
In general each DTL has a single schema for the input message and a single schema for the output message. This works for messages where a single schema describes the message, but in X12 there are different schemas for the three different levels:
-
Schema for the Interchange Envelope
-
Schema for the Function Group
-
Schema for the Transaction Set
In DTL, you handle this by having a subtransform for each level, but the DTL X12 support allows you to specify a schema for each level in the hierarchy. If you are dealing with a more complex X12 message, such as one with multiple types of transaction sets, you would have to use subtransforms to handle this.
Steps for Creating an X12 DTL
This section describes how to create a data transformation that copies the content of a source X12 document to a target X12 document. The example uses the HIPAA 5010 834 document structure for both the source and target documents. You use similar procedures for other formats.
Because of the hierarchical structure of X12 messages, as described in The Structure of X12 Envelopes, you cannot simply set the value of the Create field on the Transform tab to Copy. Instead, you build a data transformation that copies each level of the message structure. The class Ens.X12.FunctionSetOpens in a new tab, which is a sub class of Ens.Rule.FunctionSetOpens in a new tab, provides the following class methods to help with this task:
-
X12NewFunctionalGroup()
-
X12NewTransactionSet()
-
X12CompleteTrailerAndReturnClear()
-
X12SaveDocumentAndReturnClear()
Creating Source and Target Classes
First, create source and target data transformation classes for the appropriate document type:
-
From the Data Transformation Builder page, click New to open the Data Transformation Wizard.
-
In the Package field, enter the name of the package the new class belongs to, or click the arrow to select a package in the current namespace.
-
In the Name field, enter a name for the new data transformation class.
-
In the Description field, enter a description for the data transformation.
-
Select X12 for both the Source Type and Target Type, this action automatically enters EnsLib.EDI.X12.DocumentOpens in a new tab as Source Class and Target Class.
-
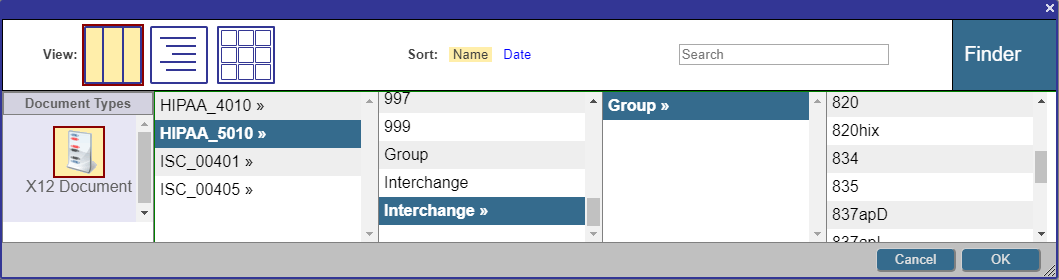
To select a Source Document Type, click on the looking glass icon.
-
In the resulting dialog box, select the appropriate schema category, for example, HIPAA_5010.
-
In the column to the right, select Interchange>> .
-
In the next column to the right, select Group>>. This is the schema for the functional groups.
-
In the next column to the right, select the name representing the document type, in this example, 834. This is the schema for the transaction sets.
-
-
These actions give you a Source Document Type of HIPAA_5010:Interchange:Group:834 and defaults to the same type for Target Document Type.
-
Click OK to create the new source and target classes.
The following image shows the process of selecting the Source Document Type.
Copying the Interchange Control Header
You may want to copy the content of the Interchange Control Header (ISA) from source to target. You can use the drag-and-drop technique described in Copying a Value from a Source Property to a Target Property in Developing DTL Transformations to create the set actions. You may also want to gather these actions together in a group action.
Copying Functional Groups
-
Create a new group action by clicking Add Action and selecting group.
-
Select the FunctionalGroups() node in the diagram.
-
Create a new for each action by clicking Add Action and selecting for each. Having selected FunctionalGroups() provides a default value for the Property field.
-
On the Action tab, the Property field for the new for each action has the default value source.FunctionalGroups(), which instructs the for each to iterate through the functional groups in the source class.
-
The Key field contains the variable used to iterate through the loop. It has the default value k1. Change it to a more memorable variable name, such as fgKey, for functional group key.
-
Create a new set action in the for each loop by clicking Add Action and selecting set. In the Property field, add target.FunctionalGroups(fgKey).
-
To edit the Value field, click on the magnifying glass icon to launch the value editor.
-
In the value editor dialog box, click the arrow to the right of the Function field to open the drop down list. Select the function X12NewFunctionalGroup().
-
In the InterchangeParent field, type target, and in the DocType field, type “Group” and click OK.
-
This action adds ##class(Ens.X12.FunctionSet).X12NewFunctionalGroup(target,"Group") to the Value field. The entire set action uses the X12NewFunctionalGroup() method to create a functional group in the target class.
The next step is to copy the transaction sets.
Copying Transaction Sets
-
Inside the for each action from the previous section, create a new group action by clicking Add Action and selecting group.
-
Select the TransactionSets() node in the diagram.
-
Create a new for each action by clicking Add Action and selecting for each. Having selected TransactionSets() provides a default value for the Property field.
-
On the Action tab, the Property field for the new for each action has the value source.FunctionalGroups(fgKey).TransactionSets(), which instructs the for each to iterate through the transaction sets in the source class.
-
The Key field contains the variable used to iterate through the loop. It has the default value k2. Change it to a more memorable variable name, such as tsKey, for transaction set key.
-
Create a new set action by clicking Add Action and selecting set. In the Property field, add target.FunctionalGroups(fgKey).TransactionSets(tsKey).
-
To edit the Value field, click on the magnifying glass icon to launch the value editor.
-
In the value editor dialog box, click the arrow to the right of the Function field to open the drop down list. Select the function X12NewTransactionSet().
-
In the GroupParent field, type target.FunctionalGroups(fgKey), and in the DocType field, type “834” and click OK.
-
This action adds ##class(Ens.X12.FunctionSet).X12NewTransactionSet(target.FunctionalGroups(fgKey),"834") to the Value field. The entire set action uses the X12NewTransactionSet() method to create a transaction set in the target class.
Complete the Functional Group and Transaction Set Loops
In the preceding two sections, you created two loops, one that iterates over the functional groups in the source and creates a corresponding functional group in the target, and a second nested loop that creates the required transaction sets in each of the functional groups. Now you need to create the trailer segment for each transaction set, and for each of the functional groups that contains them.
To create the transaction set trailer segment:
-
In a location just before the end of the loop that creates the transaction sets, create a new set action by clicking Add Action and selecting set. In the Property field, add target.FunctionalGroups(fgKey).TransactionSets(tsKey).
-
To edit the Value field, click on the magnifying glass icon to launch the value editor.
-
In the value editor dialog box, click the arrow to the right of the Function field to open the drop down list. Select the function X12CompleteTrailerAndReturnClear().
-
In the X12Document field, type target.FunctionalGroups(fgKey).TransactionSets(tsKey), and in the Save field, type 1 and click OK.
-
This action adds ##class(Ens.X12.FunctionSet).X12CompleteTrailerAndReturnClear(target.FunctionalGroups(fgKey).TransactionSets(tsKey),1) to the Value field. The entire set action uses the X12CompleteTrailerAndReturnClear() method to create the transaction set trailer for the current transaction set.
To create the functional group trailer segment:
-
In a location just before the end of the loop that creates the functional groups, create a new set action by clicking Add Action and selecting set. In the Property field, add target.FunctionalGroups(fgKey).
-
To edit the Value field, click on the magnifying glass icon to launch the value editor.
-
In the value editor dialog box, click the arrow to the right of the Function field to open the drop down list. Select the function X12CompleteTrailerAndReturnClear().
-
In the X12Document field, type target.FunctionalGroups(fgKey), and in the Save field, type 1 and click OK.
-
This action adds ##class(Ens.X12.FunctionSet).X12CompleteTrailerAndReturnClear(target.FunctionalGroups(fgKey),1)) to the Value field. The entire set action uses the X12CompleteTrailerAndReturnClear() method to create the functional group trailer for the current functional group.
Finally, create the IEA segment:
-
In a location just after the end of the loop that creates the functional groups, create a new set action by clicking Add Action and selecting set. In the Property field, add temp.
-
To edit the Value field, click on the magnifying glass icon to launch the value editor.
-
In the value editor dialog box, click the arrow to the right of the Function field to open the drop down list. Select the function X12CompleteTrailerAndReturnClear().
-
In the X12Document field, type target, and in the Save field, type 0 and click OK.
-
This action adds ##class(Ens.X12.FunctionSet).X12CompleteTrailerAndReturnClear(target,0)) to the Value field. The entire set action uses the X12CompleteTrailerAndReturnClear() method to create the IEA segment.
Data Transformations for Whole Batch
To transform whole batch documents at the group or transaction set level, you must iterate through each group and each transaction set within each group. To do so, follow the steps below.
Loop over the Groups in each Interchange
-
Create a new for each action by clicking Add Action and selecting for each.
-
Input source.{GroupDocsRef} into the Property field.
-
Input Group into the Key field. Group is the actual group-level document object.
-
Add a subtransformation on each Group. The value passed into the subtransformation should be the Group (the key from the for each) and then the Property is a new Group, which could be named GroupOut.
-
The source and target of the main Transformation are Interchange documents. In this subtransformation, the Group documents are the source and target, thus enabling you to easily manipulate the Group segments through the drag-and-drop capabilities of DTL, and also enabling you to easily loop over the individual Transaction Sets.
Loop over the Transaction Sets in each Group
-
Within the Group subtransformation, create a new for each action by clicking Add Action and selecting for each.
-
Then perform another subtransformation on each of the Transaction Sets. We pass in the Transaction Set object that was the for each Key. The returned property is also a Transaction Set. This subtransformation has Transaction Set DocTypes for its Source and Target, for example HIPAA_5010:834 or HIPAA_5010:837P.
-
If there is some possibility of the batch having Transaction Sets of varying DocTypes, you could add conditions on the DocType to determine which Transaction Set subtransformation to perform. This scenario could be a reason to use this approach rather than that described in the previous section.
In each of the Group transformation and the Interchange transformation, after the subtransformation, but before the close of the ForEach, we need to add the returned child object to the parent target document. Doing so will require a custom function. This custom function can be something like:
/// Adds a child X12 document <var>pChild</var>, (a Transaction Set or a Group)
as the child of a Group or Interchange

/// <var>pParent</var>'s DocsRef segment. <var>pDocsRefSeg</var>
is the segment name for the DocsRef segment

/// ("TransactionSetDocsRef" for a Group or "GroupDocsRef" for an Interchange)
Returns a status code.

ClassMethod AddChildToDocsRef(pChild As EnsLib.EDI.X12.Document,
 pParent As EnsLib.EDI.X12.Document, pDocsRefSeg As %String) As %Status
{
    Set tSC = $$$OK
    Set tSC = pParent.BuildMap() Quit:$$$ISERR(tSC) tSC
    Set index = pParent.GetSegmentIndex(pDocsRefSeg,.tSC) Quit:$$$ISERR(tSC) tSC
    Set tSC = pParent.AddChild(index,pChild) Quit:$$$ISERR(tSC) tSC
    Set tSC = pParent.SetValueAt(1+pParent.GetValueAt((index+1)_":1"),(index+1)_":1")
     Quit:$$$ISERR(tSC) tSC
    Set tSC = pParent.%Save()
    Quit tSC
}
Testing an X12 Data Transformation
The Tools tab in the DTL editor provides a Test button that lets you quickly test a data transformation. Click Test, paste X12 text into the Input Message field, and the Test button in the Test Transform dialog.
You can also use the X12 Document Viewer Page to test your transformations, as described in Available Tools. The document viewer allows you to run a DTL against different X12 data sources.
Be sure your data transformation reflects your Batch Handling settings.