Using the Cube Manager
The InterSystems IRIS® Business Intelligence (BI) Cube Manager allows you to schedule recurring tasks to update your cubes at dates and times that you choose, so that they remain current. It also provides a convenient interface for you to review the update tasks which are currently scheduled and estimate how long they will take to complete.
The Cube Manager creates one task for every namespace in which it is active. These tasks are visible in the Task Manager. InterSystems recommends that you do not modify these tasks in any way.
The Cube Manager collates the schedules for cube updates within the cube registry. Using the registry, you collect one or more cubes which you want to update according the same schedule into a schedule group. Then, you specify an update plan for each schedule group—that is, the frequency at which the group should be built and (when synchronization is enabled) synchronized. An update plan can specify the frequency of updates for a group in relative terms (for example, every two weeks) or in terms of a specific date and time (for example, at 1:00 AM on the fifth day of each month).
At the time specified by the update plan, the InterSystems BI update task updates the cubes in the group in the manner appropriate to each cube. By default, if synchronization is enabled for a cube, the update task synchronizes the cube at the conclusion of the build procedure. If a cube in a schedule group is related to any cubes which depend upon it, Business Intelligence automatically updates those related cubes as well, determining the correct update sequence automatically.
A cube can only belong to one scheduled group. In other words, you can only instruct the Cube Manager to update a cube according to one update plan. However, because BI resolves dependencies between related cubes automatically, the update plans for multiple schedule groups may implicitly result in an update to a cube if related cubes which depend upon it are scheduled separately.
Access the Cube Manager
To access the Cube Manager, do the following in the Management Portal:
-
Switch to the appropriate namespace as follows:
-
Select the name of the current namespace to open the list of available namespaces.
-
From the list, select the appropriate namespace.
-
-
Select Analytics > Admin > Cube Manager.
-
The first time you access the Cube Manager in a namespace, it prompts you for information about the cube registry. In this case, specify the following information:
-
Cube Registry Class Name — Specify a complete class name, including package. This class definition will be the cube registry for this namespace.
-
Registry Description — Optionally, provide a description for this cube registry.
-
Disable — Optionally, select this to disable the registry. If the registry is disabled, the Cube Manager update task for the namespace is suspended.
You can modify all these details later, apart from the class name.
-
-
Select OK to access the Cube Manager.
Get to Know the Cube Manager Interface
The Cube Manager interface offers two views for you to examine and manage scheduled updates for your cubes. You can toggle between these views by selecting the corresponding View icon in the Cube Manager’s toolbar:


The Cube Manager displays the tree view by default.
Tree View
The tree view is divided into three sections: the Cubes list sidebar, the Scheduled Cubes table, and the properties box.
Cubes List Sidebar
The Cubes list sidebar provides a list of every cube in the namespace. For example:
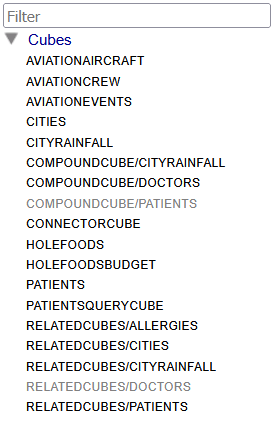
As depicted in the preceding image, the Cubes list sidebar includes a Filter text box, which you can use to search for cubes by name.
The Cubes list sidebar displays a cube name in light gray text when it is currently registered as a member of a schedule group. Otherwise, it displays the cube name in black text. (In the preceding example, COMPOUNDCUBE/PATIENTS and RELATEDCUBES/DOCTORS have been registered as a member of a schedule group. The other cubes have not.)
The Cubes list sidebar only indicates whether a cube has been explicitly registered within a schedule group; it does not indicate when a cube will be automatically updated as a dependent of a cube which is registered. In the preceding example, BI will update RELATEDCUBES/PATIENTS whenever it updates RELATEDCUBES/DOCTORS because the two cubes are related and RELATEDCUBES/PATIENTS depends upon RELATEDCUBES/DOCTORS. However, the Cubes list does not display RELATEDCUBES/PATIENTS in light gray text because it is not itself assigned to a schedule group.
Scheduled Cubes Table
The Scheduled Cubes table contains information about the currently registered schedule groups and the cubes which comprise them. You can expand or collapse groups to show or hide their member cubes. For example:

For each group, the table also identifies any subject areas which will be affected by updates to the cubes within the group, listing the name of the subject area in italic text. In the preceding example, the Nightly Patient Update group lists COMPOUNDCUBE/COMPOUNDCUBE because it will be affected when there is an update to its base cube, COMPOUNDCUBE/PATIENTS.
You cannot specify update plans for subject areas independently from a cube on which it is based. There is no need: updates in a cube are automatically available in any subject area based on that cube.
The Scheduled Cubes table provides the following information:
-
The name of the schedule group or cube. You can edit the name of a schedule group at any time.
-
Status: a brief description of the outcome of the most recent update. This field can have one of the following values: Success, Success with Errors, and Failure.
-
Date/Time: for an individual cube, the date and time when BI completed the cube’s most recent update; for a schedule group, the date and time when BI is next scheduled to begin updating the cubes in the group.
-
Time To Complete: for an individual cube, the length of time which was required to complete the most recent update of the cube, not including the time required to update the cube’s dependents, if any; for a schedule group, the total length of time which was required to complete the most recent update for all the cubes in the group, including dependents.
-
Whether scheduled updates are enabled or disabled for a group or a cube within a group, as indicated by the background color of the corresponding row:
-
A white or blue background indicates that scheduled updates are enabled.
-
A gray background indicates that scheduled updates are disabled.
In the example at the beginning of this section, the table indicates that scheduled updates are enabled for the Weekly Doctor Update group, which contains the RELATEDCUBES/DOCTORS cube. Scheduled updates are disabled for the Nightly Patient Update group, which contains the COMPOUNDCUBE/PATIENTS cube.
-
-
The item which is currently selected. This is indicated by white text. Selecting an item in the table allows you to view and edit its properties within the properties box.
The table provides buttons which allow you to change the order in which groups are displayed: select the Move this group up button  or the Move this group down button
  in the row which corresponds to a group to shift the position of the group in the table upward or downward, respectively. The row for each group and each cube also features a corresponding Remove this item button
  . Select this button to for a cube to remove it from a schedule group; for a schedule group, select this button to remove it from the registry entirely, including the cubes within them.
When the Cube Manager is in tree view, you can expand or collapse the display of all registered groups in the table using the toolbar’s Expand All or Collapse All buttons (respectively).
Properties Box
The properties box contains two tabs: Details and Tools.
The Details tab allows you to view information about the item which is currently selected in the Scheduled Cubes table and edit its update settings. Using the Details tab, you can also initiate on-demand updates for an individual cube, a schedule group, or the entire registry (depending on the current selection).
The Tools tab provides links which allow you to inspect your cubes using other BI tools.
To provide flexibility, you can hide or show the properties box using the Hide or show the properties box toggle.
Table View
The table view contains two sections. One section is the properties box, which operates in largely the same way as it does in tree view.
The rest of the table view consists of a table where the Cube Manager lists all the cubes in the current namespace, and provides details about their current update plans. For example:
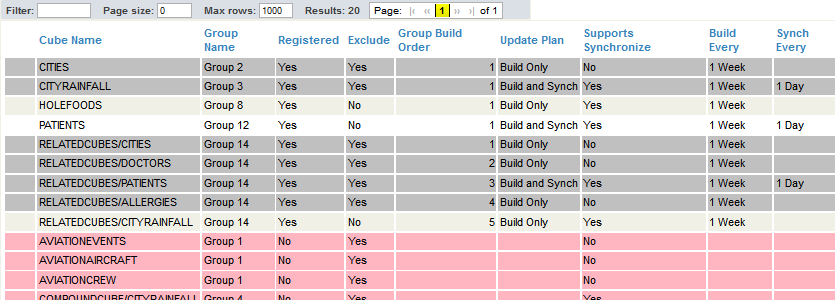
As pictured, the table provides a navigation bar which you can use to navigate the table and filter its contents based on cube name. To sort the table based on a column’s value, select the column heading; selecting the column heading multiple times allows you to toggle between ascending and descending order.
This table provides the following information:
-
Cube Name: the name of the cube.
-
Disabled: whether scheduled updates have been disabled for the cube.
-
Schedule Name: the name of the schedule group of which the cube is a member, if any.
-
Scheduled: whether the cube is registered to any existing schedule group.
Tip:For convenience, the table is also color-coded to indicate the status of a cube: if a cube’s row has a pink background, the cube is not registered as a member of any schedule group; if a cube’s row has a white background, the cube is a member of a schedule group and scheduled updates are enabled; if a cube’s row has a gray background, the cube is part of a schedule group, but scheduled updates are disabled.
-
# Dependents: the number of related cubes which depend upon this cube. When the Cube Manager task updates this cube, these dependent cubes will be updated as well. The Maintenance section in Details tab of the properties box identifies these dependents.
-
Fact Count: the number of facts in the cube’s fact table.
-
Supports Synchronize: whether synchronization is enabled for the cube. If synchronization is enabled for a cube, the Cube Manager update task will synchronize the cube upon conclusion of the build procedure.
-
Update Plan: a short string indicating the type of update plan which is currently configured for the cube. You may view or edit the update plan within the Details tab of the properties box.
-
Last Update: the date and time when the most recent attempt to update the cube occurred.
-
Next Update: the date and time of the next scheduled attempt to update the cube.
-
Last Status: a brief description of the outcome of the most recent update. This field can have one of the following values: Success, Success with Errors, and Failure.
Create a New Schedule Group for a Cube
To schedule updates for a cube as part of a new schedule group with a new update plan, perform the following steps:
-
In tree view:
-
Locate the name of the cube that you want to register in the Cubes list sidebar.
-
Select and hold the name of the cube.
-
Drag it into the empty area below the Scheduled Cubes table, and drop it there.
-
-
In table view:
-
Locate and select the name of the cube in the table.
-
In the Details tab of the properties box, select the Schedule Cube button.
-
In tree view, you can also use the preceding procedure to move a cube which is already a member of an existing schedule group to a new group. (The Cube Manager removes the cube from the previous group automatically.) No equivalent procedure exists in table view.
Upon completion of these steps, the Cube Manager creates a new schedule group and assigns the cube to it. By default, a new group has the following configuration when it is first created:
-
A new group has a name of the form New GroupN, where N is a numerical index.
-
A new group has an Every 1 Week update plan.
-
A new group is disabled.
You can configure this configuration using the properties box for the group.
Assign a Cube to an Existing Schedule Group
To add an unscheduled cube to an existing schedule group or to move a scheduled cube from one group to another, perform the following steps:
-
In tree view:
-
Locate the name of the cube that you want to register in the Cubes list sidebar.
-
Select and hold the name of the cube.
-
Drag it over any of the rows of the Scheduled Cubes table which represent the destination schedule group or its current member cubes, and drop it there. You can only assign a cube to one schedule group; if the cube was already registered as member of a different schedule group, the Cube Manager removes the cube from the previous schedule group and adds it to the group you have selected.
-
-
In table view:
-
Locate and select the name of the cube in the table.
-
If the group is not currently a member of any schedule group, you must temporarily add it to the registry as part of a new group first, by selecting the Schedule Cube button in the Details tab of the properties box. Then, proceed to the next step to move the cube to the desired schedule group.
-
Select the Merge to another group box from the Details tab of the properties box.
-
Select the name of the destination schedule group from the Which Group? drop-down menu.
-
Select Merge.
-
Configure a Schedule Group
To configure the update plan (and other properties) for a schedule group, perform the following steps:
-
Navigate to the tree view.
-
In the Scheduled Cubes table, select the row which corresponds to the schedule group.
-
In the properties box, navigate to the Details tab.
-
If you have not already done so, specify a unique name for the group using the Name field in the Registered Cube section.
-
Use the input fields in the Update Plan section to specify the frequency and timing of updates for the schedule group. The Cube Manager provides the following options:
-
Every — The Cube Manager updates the cubes in the schedule group at a regular interval that you specify. The Cube Manager measures the specified interval relative to the date and time of the most recent edit to the schedule group’s update plan. In other words: if you modify a group’s update plan on Tuesday at 9:30 AM so that the group updates Every 1 Week, the next scheduled update will begin next Tuesday at 9:30 AM.
-
Hourly at — The Cube Manager updates the cubes in the schedule group every hour, beginning at the minute that you specify. For example, if you specify Minute 45, updates will occur at 12:45 AM, 1:45 AM, 2:45 AM, and so on.
-
Daily at — The Cube Manager updates the cubes in the schedule group every day, at the time that you specify.
-
Weekly on — The Cube Manager updates the cubes in the schedule group every week, at the day of the week and time of day that you specify.
-
Monthly on — The Cube Manager updates the cubes in the schedule group on the day of the month and time of day that you specify. For example, if you specify Day of Month 21 at 1:00 AM, updates will occur at 1:00 AM on January 21, February 21, March 21, and so on.
-
-
As needed, disable or enable updates for the group by selecting or clearing the Disabled checkbox.
-
Optionally, you can perform additional configuration regarding how the Cube Manager updates individual cubes within a group. To do so, select a cube within this group using the Scheduled Cubes table and navigate to the Details tab of the properties box. Then, edit the available fields in the Build Section, as desired. The following options are available:
-
Post-Build Code — Specify a single line of ObjectScript to be executed immediately after building this cube. For example:
do ##class(MyApp.Utils).MyPostBuildMethod("transactionscube") -
Build Cube Synchronously — Select this option to build the cube using a single process (rather than using multiple agents in parallel).
-
Pre-Synchronize Code — Specify a single line of ObjectScript to be executed immediately before synchronizing this cube. For example:
do ##class(MyApp.Utils).MyPresynchMethod("transactionscube")If needed, to abort the synchronization, do the following in your code:
set $$$ABORTSYNCH=1 -
Post-Synchronize Code — Specify a single line of ObjectScript to be executed immediately after synchronizing this cube. For example:
do ##class(MyApp.Utils).MyPostsynchMethod("transactionscube")
In all cases, you can specify your own methods to perform any necessary processing.
-
The Cube Manager saves your configuration changes to the cube registry automatically when you navigate elsewhere within the interface. If the Task Manager does not yet include the necessary task to perform updates for this schedule group, the Cube Manager creates it.
Enable or Disable Scheduled Updates
As noted previously, you can selectively disable or enable scheduled updates for specific schedule groups or specific cubes within a schedule group. To do so, perform the following steps:
When necessary, you can also disable updates across the entire registry. Refer to Modify the Registry Details for details.
-
If you want to disable updates for a schedule group, navigate to the Cube Manager’s tree view. (You cannot access Details for a schedule group in the table view.)
-
Select the item that you want to enable or disable updates for from the view’s table.
-
Navigate to the Details tab of the properties box for the selected item.
-
Select the Disabled checkbox to disable updates for the item. Clear the checkbox to enable updates.
Remove a Cube from a Schedule Group
To remove a cube from a schedule group entirely (instead of merely disabling scheduled updates for it), perform the following steps:
Previous sections describe procedures which allow you to assign a cube to a new schedule group or to an existing one, removing the cube from its current schedule group in the process; in those cases, it is not necessary to remove the cube from the group manually using the separate procedure described in this section.
-
Navigate to the tree view.
-
Locate the row which corresponds to the cube in the Scheduled Cubes table. (You may need to expand the schedule group of which the cube is a member first.)
-
Select the Remove this item button
for the cube’s row.
Upon completion of this procedure, the cube is no longer explicitly targeted for updates as part of the schedule group. However, the cube will still be affected by update plans for schedule groups that contain related cubes upon which it depends.
Unregister a Schedule Group
To remove a schedule group from the registry, perform the following steps.
-
Navigate to the Cube Manager in the tree view.
-
In the Scheduled Cubes table, select the Remove this item button
in the row which corresponds to the cube group. -
Select OK to remove the schedule group from the cube registry.
-
When you remove a schedule group from the registry, the cubes which were members of that group are no longer explicitly targeted for updates. (However, they will still be affected by scheduled updates to related cubes upon which they depend.) As needed, define new update schedules for these cubes by creating new schedule groups for them or by adding them to existing schedule groups.
Perform On-Demand Updates
The Cube Manager also provides options to update scheduled cubes on demand—that is, ignoring the schedule. You can perform on-demand updates for an individual cube, a schedule group, or the entire registry (in other words, all cubes in all schedule groups).
As with scheduled updates, when you initiate an on-demand update for a cube, Business Intelligence automatically updates any related cubes which depend upon it as well. If synchronization is supported for a cube, BI synchronizes the cube upon conclusion of the build procedure.
To perform an on-demand update:
-
To update a schedule group or the entire registry, navigate to the tree view. (The table view only provides access to Details for individual cubes.)
-
Select the item that you want to update from the view’s table. To access the registry, select the Scheduled Cubes heading.
-
Within the Details tab of the properties box, select Build Dependency List (for individual cubes), Build This Group (for schedule groups), or Build All Scheduled Groups (for the entire registry).
The Cube Manager then displays the build dialog box.
Note:When updates are disabled for a cube or schedule group, the Build button is unavailable; enable updates to continue.
-
Select Build List.
The dialog box displays progress of the build.
-
Select OK.
Alternatively, the %DeepSee.CubeManager.UtilsOpens in a new tab class provides utility methods which you can use to initiate on-demand updates for schedule groups programmatically: use BuildOneRegisteredGroup() to update a schedule group and BuildAllRegisteredGroups() to update all the scheduled cubes in the registry. To update a single cube (with its dependents), use the %BuildCube() method provided by the %DeepSee.UtilsOpens in a new tab class. These methods ignore the schedule specified in the registry but use the build order specified in the registry.
Restrict Access to the Cube Manager
You may want to manage the cube update schedule without allowing users to change that schedule through the Cube Registry page. To restrict access to the Cube Registry page, set the UserUpdatesLocked attribute to "true" in either the RegistryMap or RegistryMapGroup objects within your saved cube registry. For example:
<RegistryMap Disabled="false" UserUpdatesLocked="true">
When UserUpdatesLocked is set to "true" for a RegistryMap:
-
The registry’s Disable checkbox cannot be changed through the Details tab. For information on accessing this tab, see Modifying the Registry Details.
When UserUpdatesLocked is set to "true" for a RegistryMapGroup:
-
Each schedule group’s Disable checkbox is displayed but disabled.
-
Each scheduled cube’s Disable checkbox is hidden.
-
Each schedule group’s Update Plan is hidden.
-
Each scheduled cube’s Update Plan is hidden.
-
Remove this item button
button is not displayed. -
The Build Dependency List button is available for cubes, but the Build This Group button is disabled for schedule groups.
Modify the Registry Details
When you first access the Cube Manager, it prompts you for initial information. To modify these details later (other than the registry class name, which cannot be changed):
-
Display the Cube Manager in the tree view.
-
In the Scheduled Cubes table, select the Scheduled Cubes heading.
-
Edit the information as desired within the Details tab of the properties box.
For information on the options, refer to Access the Cube Manager.
The Cube Manager saves your configuration changes to the cube registry automatically when you navigate elsewhere within the interface.
Migrating a Cube Registry to a New Environment
To apply a namespace’s schedule groups and update plan assignments to BI cubes in another namespace (either on the same instance or on a different one), migrate the cube registry class between them as follows:
Cube registries which were created using InterSystems IRIS 2025.2 or later cannot be deployed to a version of InterSystems IRIS earlier than 2025.2.
-
Export or download the cube registry class from its original namespace. You can do this using a supported IDE such as VS CodeOpens in a new tab, using the Management Portal’s Classes page, or by invoking the Export()Opens in a new tab or ExportUDL()Opens in a new tab methods of the %SYSTEM.OBJOpens in a new tab class.
Note:If you have forgotten the name that you issued to the cube registry class, you can find it listed among the cube registry Details, in the Storage Class field.
-
Import and compile the cube registry within the destination namespace. As with exporting, you can do this using, using the Management Portal, or by invoking the Import()Opens in a new tab method of the %SYSTEM.OBJOpens in a new tab class.
-
Begin a Terminal session and switch to the destination namespace.
-
Issue the following command, replacing <CubeRegistry.Name> with the name of your registry class:
do ##class(%DeepSee.CubeManager.Utils).SetActiveRegistryOpens in a new tab(<CubeRegistry.Name>)This command sets the specified cube registry as the active registry for the Cube Manager in the namespace.