
Packaging Business Intelligence Elements into Classes
While implementing Business Intelligence, you typically develop your application elements on a test system and then copy them to a production system. This page describes how to package the InterSystems IRIS® data platform Business Intelligence elements and copy them to another system.
This page assumes that you are familiar with the process of exporting from and importing into your IDE.
Also see Other Export/Import Options.
Overview
Your Business Intelligence implementation may include some or all of the following elements:
-
Cube class definitions
-
Subject area class definitions
-
KPI class definitions
-
Business Intelligence folder items, which include all the items that are not defined as classes. These include pivot tables, dashboards, pivot variables, and so on.
To move all these items to another system (here called the target system), do the following:
-
Export all the folder items to one or more Business Intelligence container classes, as described in the next section.
A Business Intelligence container class contains an XML representation of any number of Business Intelligence folder items.
-
Export the cube, subject area, and KPI class definitions.
You can create a project that contains all your Business Intelligence class definitions and folder items. Then you can export this project from InterSystems IRIS® data platform and import it into another InterSystems IRIS instance, where needed. You can use your IDE export/import options or you can use the usual class methods in %SYSTEM.OBJOpens in a new tab.
-
Examine the exported folder item definitions to make edits for portability.
-
Import all the class definitions to the target system.
When you compile the container classes, the system iterates over all the folder items contained in those classes and creates or overwrites each of those items in the target system.
Exporting Folder Items to a Container Class
To export Business Intelligence folder items to container classes, you use a method that generates a file that defines a container class that includes the items. The method is %ExportContainer(), which is in the class %DeepSee.UserLibrary.UtilsOpens in a new tab. This method is as follows:
classmethod %ExportContainer(ByRef pItemList As %String,
                             pFileName As %String,
                             pContainerClassName As %String = "") as %Status
Where:
-
pItemList is a multidimensional array that has nodes of the following form:
Node Node Value pItemList(itemidentifier) "" For each itemidentifier, use one of the following strings:
-
dashboardname.dashboard where dashboardname is the name of a dashboard. You can use the wildcard * to represent all dashboards; you can use the wildcard with the other types of items as well.
-
pivotname.pivot where pivotname is the name of a pivot table (or use *).
Note that the %ExportContainer() method identifies all the pivot tables used by any dashboard you export. The only pivot tables you need to export explicitly are the pivot tables that are not used by any dashboard.
-
namedfiltername.namedFilter where namedfiltername is the name of a named filter (or use *).
-
sharedcalcmembername.sharedCalcMember where sharedcalcmembername is the name of a shared calculated member (or use *).
-
listinggroupname.listingGroup where listinggroupname is the name of a listing group (or use *).
-
pivotvarname.pivotVariable where pivotvarname is the name of a pivot variable (or use *).
-
settingname.userSetting where settingname is the name of a user setting (or use *).
-
termlistname.termList where termlistname is the name of a term list (or use *).
-
themename.theme where themename is the name of a dashboard theme (or use *).
-
widgettemplatename.widgetTemplate where widgettemplatename is the name of a widget template (or use *).
-
linkname.link where linkname is the name of a dashboard link (or use *).
-
reportname.report where reportname is the name of a dashboard report (or use *).
-
-
pFileName is the name of the file to generate.
-
pContainerClassName is the full name of the container class to generate, including package.
Editing the Business Intelligence Folder Items for Portability
If you intend to copy a Business Intelligence folder item to another system, it is worthwhile to examine the exported XML and make any necessary edits, discussed in the following subsections.
Also note the following points:
-
When you export a dashboard, the system does not automatically export any pivot tables that it uses. It is your responsibility to identify and export the pivot tables as well.
-
References between Business Intelligence elements (such as from a dashboard to any pivot tables) are made by name.
Removing <filterState> Elements
If it was saved in a previous release, a folder item definition might contain <filterState> elements, which are no longer supported. If so, you should remove these — that is, remove both the starting tag <filterState> and the matching ending tag </filterState>.
Stripping Out Local Data
A folder item definition might also contain information that is local to your system and not available on another system (depending on what elements you package and share between systems). Check the XML for the following items:
Where found: <widget> elements in exported dashboards.
This attribute contains any local overrides performed in the Mini Analyzer. You should always clear this when you use the exported XML in another system. For example, change this:
localDataSource="$LOCAL/Basic Dashboard Demo/SamSmith/590125613.pivot"
To this:
localDataSource=""
Or remove the localDataSource attribute.
Where found: All folder items.
This element contains the name of the user who owns this item. If the given user does not exist on the target system, edit this attribute. You can set the attribute to null. For example, change this:
owner="DevUser"
To this:
owner=""
Or you can remove the attribute.
Where found: All folder items.
This element contains the name of the resource used to secure this item, if any. If this resource does not exist on the target system, edit this attribute. You can set the attribute to null or even remove the attribute.
Where found: All folder items.
This element contains the name of the user who created this item. You can set the attribute to null or even remove the attribute. If you do so, when the XML is imported (or the container class is compiled), createdBy is set to the current user.
Where found: All folder items.
This element contains the date and time (UTC) when this item was created. You can set the attribute to null or even remove the attribute. If you do so, when the XML is imported (or the container class is compiled), timeCreated is set to the current time stamp.
Where found: All folder items.
This element contains the date and time (UTC) when this item was last accessed by a user. You can set the attribute to null or even remove the attribute. If you do so, when the XML is imported (or the container class is compiled), timeCreated is set to the current time stamp.
Importing an Exported Container Class
To import an exported container class, use the %ImportContainer() method, which is in the class %DeepSee.UserLibrary.UtilsOpens in a new tab. This method is as follows:
ClassMethod %ImportContainer(pFileName As %String = "", pReplace As %Boolean = 1) As %Status
Where:
-
pFileName is the name of the file to generate.
-
pReplace specifies whether to replace the existing class.
Note that %ImportContainer() automatically calls the %OnLoad() method if it is defined in the container class.
Using the Folder Manager
This section describes how to use the Folder Manager to see the dependencies of an item, export items, and import items. You can also export and import these items programmatically.
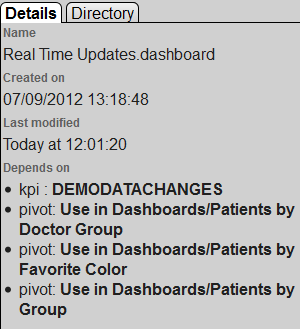
Seeing the Dependencies of a Folder Item
If you click the check box for a single item, the left area of the Folder Manager displays details for that item, including a list of the items that it depends on:
Exporting Business Intelligence Folder Items to the Server
To export Business Intelligence folder items to files on the server:
-
Click the InterSystems Launcher and then click Management Portal.
Depending on your security, you may be prompted to log in with an InterSystems IRIS username and password.
-
Switch to the appropriate namespace as follows:
-
Click the name of the current namespace to open the list of available namespaces.
-
From the list, click the appropriate namespace.
-
-
Select Analytics > Admin > Folder Manager.
-
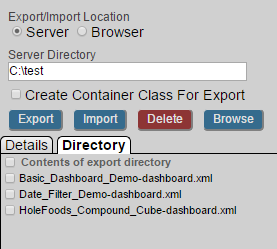
Select Server.
-
For Server Directory, type the full path of the directory in which to export the items. Or type the name of a directory relative to the directory that contains the default database for this namespace. Or use the Browse button.
The directory must already exist.
-
Click the check box next to each item that you want to export.
Or to select all items, click the check box at the top of the column of check boxes.
-
Click Export.
-
Optionally click the Directory tab, which shows the files in the given directory.
Variation: Exporting a Container Class
To instead export a single file that consists of a container class that contains the given folder items, do the following:
-
Specify Server and Server Directory as in the preceding steps.
-
Select the items to export.
-
Select the option Create Container Class For Export.
-
Optionally select Export Related Supporting Items to export all supporting items that might be needed to deploy the selected folder items. Examples of supporting items include pivot variables, named filters, and shared calculated members.
-
For Container Class Name, optionally specify a fully qualified class name (package and class). If no Container Class Name is specified, both the container class and the export file will use generated names.
-
Click Export.
For information on container classes, see Packaging Business Intelligence Folder Items into Classes.
Exporting Business Intelligence Folder Items to the Browser
To export Business Intelligence folder items to the browser’s download directory:
-
Click the InterSystems Launcher and then click Management Portal.
Depending on your security, you may be prompted to log in with an InterSystems IRIS username and password.
-
Switch to the appropriate namespace as follows:
-
Click the name of the current namespace to open the list of available namespaces.
-
From the list, click the appropriate namespace.
-
-
Select Analytics > Admin > Folder Manager.
-
Select Browser.
-
Select the items to export.
-
Optionally select Export Related Supporting Items.
-
For Container Class Name, optionally specify a fully qualified class name (package and class). If no Container Class Name is specified, both the container class and the export file will use generated names.
-
Click Export.
Importing Business Intelligence Folder Items
To import a folder item that has previously been exported:
-
Click Analytics, Admin, and then click Folder Manager.
-
For Server Directory, type the full path of the directory that contains the exported items. Or type the name of a directory relative to the directory that contains the default database for this namespace.
-
Click the Directory tab, which shows the filenames for items in the given directory.
-
Click the check box next to each file that you want to import.
Or to select all items, click the check box at the top of the column of check boxes.
-
Click Import.
-
Click OK at the prompt to continue. Or click Cancel.
For the items created when you import the files, the owner is the username under which the InterSystems service runs, for example _SYSTEM.
Variation: Importing Local Files to the Server
To import a local file to the server:
-
Click Analytics, Admin, and then click Folder Manager.
-
Select Browser.
-
Click the Directory tab, and then click Choose File.
-
Select the file that you want to import.
-
Click Import.
-
Click Ok at the prompt to continue. Or click Cancel.