
Adding Advanced Filters
Adding Advanced Filters
To see the filter definition for an advanced filter, click the Advanced Options button  next to that filter. The system then displays a dialog box with information like the following:
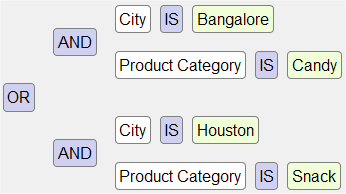
This represents the logic of the filter, but not its literal syntax. This filter selects only products that are either of the following:
-
Candy products sold in Bangalore
-
Snack products sold in Houston
The Advanced Filter Editor enables you to easily add, modify, and remove parts of a filter expression, while seeing the resulting expression with every change. This book does not describe this tool in detail, but instead provides a brief demonstration.
-
Click the Advanced Options button
 in the Filters box. The system displays a dialog box like the following:
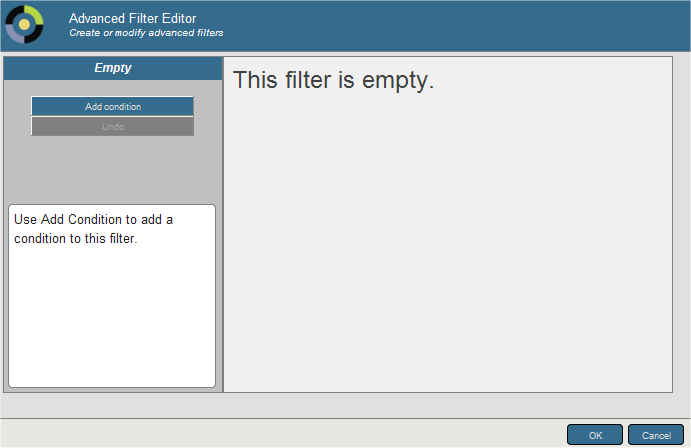
-
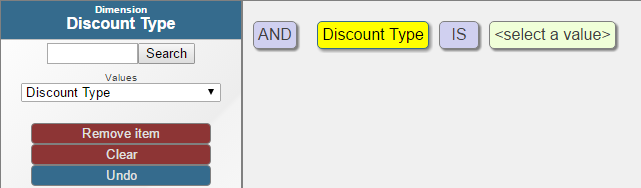
Click Add Condition.
The dialog box now looks something like this:

Initially, the advanced filter editor uses the first level (considering alphabetic order) defined in your subject area.
-
If you want to use a different level:
-
Click YearSold, which enables you to edit this part of the expression.
-
Optionally type a string into the search box and then click Search. This is useful if the cube has a large number of levels.
-
Select a level from the drop-down list on the left. As soon as you do, the expression is updated. For example:
The end of the drop-down list may include measures; if so, see Filtering the Data by Measure Value, later in this page.
-
-
If you want to change the operator from IS to IS NOT:
-
Click IS, which enables you to edit this part of the expression.
-
In the left area, click IS NOT. As soon as you do, the expression is updated.
-
-
To specify a member of the level:
-
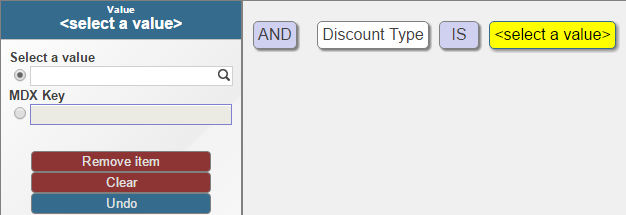
Click <select a value>, which enables you to edit this part of the expression. The left area might look like the following:
-
In the left area, click the Search button
 under Select a value to display a dialog.
 -
The resulting dialog displays a set of members and options. Optionally type text into the search box and press Enter; this restricts the set of members listed in the dialog.
The list of values also includes all searchable measures (see the next section) and all pivot variables (see Defining and Using Pivot Variables).
-
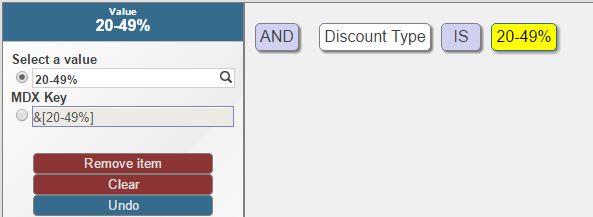
Select members and options by selecting their check boxes.
-
Click the check mark button in the upper right hand corner of the dialog. As soon as you do, the expression is updated.
For example:
-
Alternatively, you may enter an MDX key by selecting the MDX Key option.
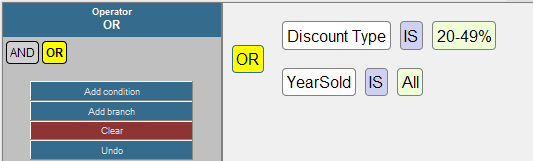
This advanced filter is equivalent to a simple filter. Typically you would now add another condition or a branch that contains other conditions.
-
-
To add another condition:
-
Click AND, so that you can edit this item.
-
Optionally, in the left area, click OR. As soon as you do, the expression is updated.
-
Click Add condition.
You might now see the following:
-
Edit this condition in the same way that you edited the first one.
-
-
Click OK to close the dialog box.
Or add another condition or a branch that contains other conditions.
Note that you can undo any change. To do so, click Undo.