
Defining Replacements
Defining Replacements
In this part of the tutorial, we use options that transform the original values for levels into other values. Here we will use the Age property of the patient. We will define levels that place patients into buckets that are larger than one year.
The Age Group level will have the following members:
-
The 0 to 29 member consists of the patients who are less than 30 years old.
-
The 30 to 59 member consists of the patients who are between 30 and 59, inclusive.
-
The 60+ member consists of the patients who are older than 60 years.
Similarly, the Age Bucket level will have the members 0 to 9, 10 to 19, and so on.
-
Access the Architect.
-
Add another level to the AgeD dimension as follows. To do so:
-
Click the Age level. This ensures that the new level, which is less granular, will be added before the Age level.
-
Click Add Element.
-
For Enter New Element Name, type Age Group.
-
Click Level.
-
Click OK.
-
-
Redefine the new Age Group level to have a range expression, as follows:
-
Click the new Age Group level.
-
For Property, type Age.
-
Click the search button next to Range Expression.
The system displays a dialog box where you specify a set of replacements. Originally, this dialog box looks like this:
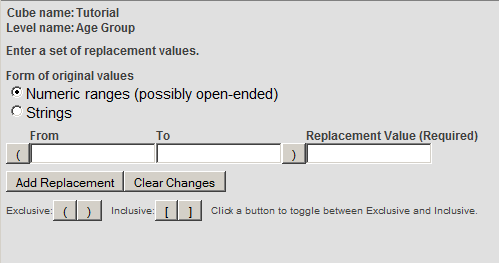
For numeric data, for each replacement, you specify a range of original values, as well as a new value to use instead.
-
Type 29 into To.
The button to the right of To is initially as follows:

-
Click this button to change it to this:

-
Type 0 to 29 into Replacement Value. The result is as follows:

It does not matter which button is next to From, because no value is specified for the lower end of this range.
-
Click Add Replacement.
-
In the new row, click the toggle buttons next to From and To.
-
Type 30 into From and type 59 into To.
-
Type 30 to 59 into Replacement Value.
-
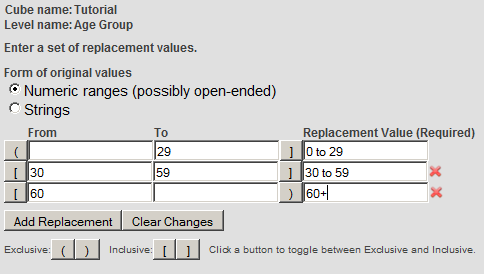
Click Add Replacement and add the final row so that the result is as follows:
-
Click OK.
The system closes the dialog box and displays a value in the Range expression field as follows:

This value shows the syntax that the system uses internally to represent the replacements that you specified.
-
For Field name in fact table, specify DxAgeGroup
This will make it easier for us to see how the level definition affects the generated tables.
-
-
Save the cube.
For the Age Bucket level, we could use the same technique. Instead, however, we will use an alternative: a source expression that converts an age in years into a string that corresponds to the appropriate ten-year bucket.
-
In an IDE, open the class BI.Model.PatientsCube.
-
Look at the definition of the method GetAgeBucket(), which is as follows:
ClassMethod GetAgeBucket(age As %Numeric) As %String
{
    If (age="") {Set return=""}
    ElseIf (age<10) {Set return="0 to 9"}
    ElseIf (age<20) {Set return="10 to 19"}
    ElseIf (age<30) {Set return="20 to 29"}
    ElseIf (age<40) {Set return="30 to 39"}
    ElseIf (age<50) {Set return="40 to 49"}
    ElseIf (age<60) {Set return="50 to 59"}
    ElseIf (age<70) {Set return="60 to 69"}
    ElseIf (age<80) {Set return="70 to 79"}
    ElseIf (age>=80) {Set return="80+"}
    Else {Set return=""}
    Quit return
}
Notice that the input to this method is just a number, rather than a patient identifier.
-
In the Architect, add another level to AgeD as follows:
-
Click the Age level. This ensures that the new level, which is less granular, will be added before the Age level.
-
Click Add Element.
-
For Enter New Element Name, type Age Bucket.
-
Click Level.
-
Click OK.
The new level is added just before Age, but after Age Group.
-
For Expression, enter the following:
##class(BI.Model.PatientsCube).GetAgeBucket(%source.Age) -
For Field name in fact table, specify DxAgeBucket
This will make it easier for us to see how the level definition affects the generated tables.
Note:In practice, you are more likely to include utility methods in a central location such as the cube class that uses them (rather than some other cube as in this case). One point of this exercise is to demonstrate that you can invoke any class method that is accessible in this namespace. Similarly, you can invoke any routine or system function.
-
-
Save the cube.
Because you have edited the class in an IDE, the Architect displays a dialog box that asks whether you want to override the stored definition. Click OK. The Architect overrides only the parts of the class definition that you can edit in the Architect; that is, it does not override any methods you have added to the class.
-
Compile the cube.
-
Rebuild the cube.
-
Access the Analyzer.
(If this is open on another browser tab, switch to that tab and click the Analytics > Analyzer link to refresh with the most current model.)
-
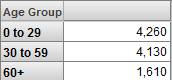
Display the new Age Group level as rows. You should now see something like the following:
-
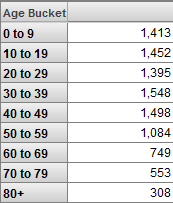
Display the new Age Bucket level as rows. You should now see something like the following:
-
Examine one of the new level tables to understand what the system has done:
-
Access the Management Portal and go to the namespace into which you installed the samples, as described earlier.
-
Click System Explorer > SQL.
-
In the left area, navigate to and open the table Tutorial_Cube.Fact.
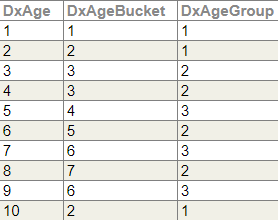
This table now has three fields to store the values for the levels of the AgeD hierarchy:
-
Navigate to and open the table Tutorial_Cube.DxAgeGroup.
The system displays something like the following:
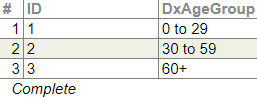
The system used your range expression to create this data.
-
Open the table Tutorial_Cube.DxAgeBucket.
The system displays something like the following:
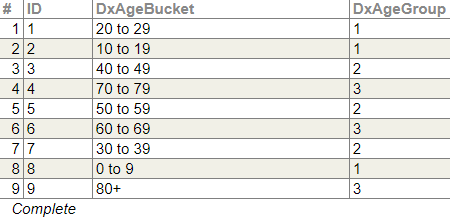
Because this level is not at the top of the hierarchy, it contains a reference, for each element, to the its parent member in the Age Group level; see the DxAgeGroup column.
The system used the GetAgeBucket() method to create this data.
-
These two levels are defined in an equivalent fashion. That is, using the Range Expression option is equivalent to executing your own method to provide a conversion. A method can include logic that is much more complex than simple replacements. Consider the following method:
ClassMethod GetClassification(ID As %Numeric) As %String
{
    //get customer rating data & call duration from source record
    set customer=##class(MyPackage.MyClass).%OpenId(ID,0)
    set detail1=customer.Detail1
    set detail2=customer.Detail2
    set detail3=customer.Detail3
    ...

    If ...
        //logic to use these details and return a string, either "A", "B", or "C"
    Quit classification
}
You could use a method like this to populate a level that groups customers based on an algorithm that uses multiple pieces of information about the customers.