

Filtering Messages
The Message Viewer provides filter options that enable you to find a specific message more easily.
Introduction
To filter the messages shown in the Interoperability > View > Messages page, use the following process:
-
Specify the filter criteria. In general, you can do this in two different ways:
-
Use the Basic Criteria and Extended Criteria areas to specify filter criteria.
-
Use the Saved Searches area to retrieve a previously saved set of filter criteria. To do so, select a value from the drop-down list and then click the check mark.
-
-
Click Search. The page is redisplayed with a list of messages that match your filter criteria. If the search has not yet completed, you can interrupt it by clicking Cancel.
Or click Reset to restore the default criteria.
-
If more matches are found than can be displayed, the Next button is active, and you can use that. Or, to display more data, select a larger value for Page Size and click Search again. Or adjust your filter criteria to narrow the search.
-
Optionally click Save or Save As to save the search criteria for later reuse. InterSystems IRIS then displays a field in which you provide a name for the search criteria. Enter a value and click the check mark.
This operation overwrites any previously saved criteria with the same name.
To delete a saved search, click its name in the Saved Searches list and then click the red X.
Timed Out—When searching through an especially large message bank, it is possible that the search will time out before returning results. You can avoid this time out by increasing the Server Response Timeout parameter of the Web Gateway. For more information about increasing the Server Response Timeout parameter, see Configuring Default Parameters. The default value of the parameter is 60 seconds.
Filtering with Basic Criteria
To filter the messages shown in the Interoperability > View > Messages page, specify some or all of the following fields in the Basic Criteria area:
-
Status—Select a value from the drop-down list. See Message Status.
-
Type—Select a value from the drop-down list: Session Start, Request, Response, or All (the default).
-
Start Time—Enter the earliest desired message creation time stamp. See Invocation Style and Message Time Stamps.
-
Start Id—Enter the lowest desired message ID.
-
End Time—Enter the latest desired message creation time stamp.
-
End Id—Enter the highest desired message ID.
-
Source—The business host that sent the message. Choose from the list.
-
Target—The business host that is the target of the message. Choose from the list.
If you are using the Message Bank Viewer, there is an additional filter that restricts the search to a single Message Bank client. See Using the Enterprise Message Bank.
Filtering with Extended Criteria
The Extended Criteria area enables you to filter the displayed messages by extremely specific criteria. An advanced filter consists of one or more conditions, combined with the logical operators AND and OR. Each condition can use any information contained in the messages, comparison operators from a rich set, and your arbitrary expressions. Only messages that meet all the combined conditions are displayed.
To use this area, click the triangle next to Extended Criteria. Then do either of the following:
-
To add a criterion, click Add Criterion. See the first subsection.
-
To add an OR, click Add OR. By default, the criteria are combined with AND. Use this option to combine adjacent criteria instead with OR. See How Criteria Are Combined.
After you add these items, the Extended Criteria list displays your selections. For example:
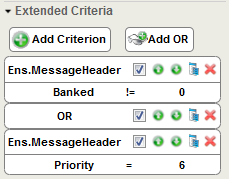
When you are satisfied with your selections, click Search. The Message Viewer page displays the list of messages that match all your filter criteria.
Adding a Criterion
To add a criterion, click Add Criterion. InterSystems IRIS displays a wizard as follows:
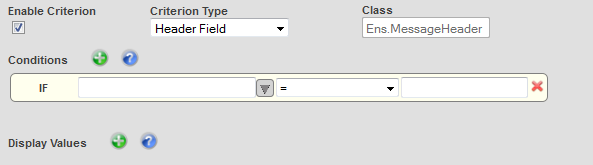
Specify the following values:
-
Enable Criterion—Select to enable this search.
-
Criterion Type—Choose a value from the list. See the next subsection.
-
Class—Click a class name from the list. See the Class subsection.
-
Conditions—Allows you to specify fields and values for your logical statement. See the Conditions subsection.
-
Display Values—Allows you to specify additional values to display in the table. Your chosen values are displayed on the right side of the table.
Click OK to save this criterion and add it to the Extended Criteria list.
Criterion Type
For Criterion Type, select a value from the drop-down list, if applicable. The following table lists the choices and how they affect your subsequent choices in the Class and Conditions fields.
| Type | Class and Conditions refer to... |
|---|---|
| Body Property | Properties of a standard production message body object. |
| Header Field | Fields in a standard production message header object. |
| OR | (used to logical OR two filter terms) |
| SearchTable Field | Entries in a search table class that you have defined in this namespace. A search table class is a specialized tool that you create to work with virtual documents. |
| VDoc Segment Field | Fields in a virtual document message segment. Identify the standard and the segment of interest. InterSystems IRIS then prompts you to choose from a list of fields in that segment. |
| VDoc Property Path | Fields in a virtual document message segment. Identify the standard and then enter a virtual property path that identifies a message segment and field that is valid for that standard. |
For background information about the VDoc fields in the Extended Criteria interface, see Using Virtual Documents in Productions. You do not need to use these fields unless your production routes some type of virtual document.
Class
For Class, select a value from the drop-down list, if applicable. InterSystems IRIS lists all the classes appropriate for the selected Criterion Type. For example:
| Type | Class Name |
|---|---|
| Body Property | Choose from all the message classes in this namespace. |
| Header Field | — |
| OR | — |
| SearchTable Field | Choose from all the search table classes in this namespace. |
| VDoc Segment Field | Choose from all the virtual document classes in this namespace. |
| VDoc Property Path | Choose from all the virtual document classes in this namespace. |
Filter Conditions
For Conditions, specify fields and values for your logical statement, from left to right, as follows:
-
For the first cell, select a value from the drop-down list, which includes all choices appropriate for this context. For further instructions, see the first table below.
-
For the second cell, select a comparison operator from the drop-down list. See the second table below.
-
In the third cell, type the literal string that you intend to match using the selected operator.
Do not use double quotes around the string.
Choices in the Conditions panel vary according to your choice of Type. The following table describes the choices.
| Type | Conditions |
|---|---|
| Body Property | Choose from all the properties in the Class Name message class. |
| Header Field | — |
| OR | — |
| SearchTable Field | Choose from all the search table entries defined in the Class Name search table class. |
| VDoc Segment Field | Select a value for Segment Type and then select a value for Field Name. (Or type values, if you know the applicable values.)
For some schemas, you can type a numeric references if you prefer them to names, for example [5], [18.1], or 2.3.1:[3().1]. You may edit out the category reference and colon prefix, but keep the square brackets and their contents intact. Square brackets differ from curly brackets in that square brackets enclose a segment:field combination that does not require you to identify its containing message structure. |
| VDoc Property Path | Select a value for Doc Type and then select a value for Property Path. (Or type values, if you know the applicable values.)
Instead of selecting options to fill the left-hand Conditions field, you can type a virtual property path into the field, as long as you are careful to use the correct syntax. Curly bracket syntax requires a specific message structure to be identified. |
The comparison operator between the two values in a Conditions statement can be any one of the following.
| Operator | The condition is true when the value at left is... |
|---|---|
| = | Equal to the value on the right. |
| != | Not equal to the value on the right. |
| > | Greater than the value to the right of the operator. |
| >= | Greater than or equal to the value to the right. |
| < | Less than the value to the right. |
| <= |
Less than or equal to the value to the right. If a condition >, >=, <, or <= involves strings, they are sorted alphabetically to determine the result. Symbols and numbers sort before alphabetic characters. |
| Contains |
A string that contains the substring to the right. The Contains operator is case-sensitive (except possibly within search table fields). If the value at left is Hollywood, California and the value at right is od, Ca, there is a match, but a value of Wood does not match. The Contains operator might or might not be case-sensitive in search table fields, depending on the implementation of a particular search table class. |
| DoesNotContain | A string that does not contain the substring at right. |
| DoesNotMatch | A string that does not match the pattern in the string specified to the right, which uses syntax suitable for the ? pattern matching operator in ObjectScript. For details, see the Pattern Match Operator reference page. |
| In | Identical to one of the items in the comma-delimited string at right. |
| NotIn | Identical to none of the items in the comma-delimited string at right. |
| StartsWith | A string that starts with the substring at right. |
| DoesNotStartWith | A string that does not start with the substring at right. |
| Like |
A string that matches the pattern in the substring specified to the right, according to the rules for the LIKE predicate in SQL. Matching for the Like and NotLike condition may be summarized as follows: The character _ matches any single character, and the character % matches any sequence of zero or more characters. Thus, if the value at left contains the pattern %Com_ and the selected operator is Like, values of TransCom1 and UltraCom2 match, but values of UltraCom17 and Foxcom8 do not match. |
| Matches |
A string that matches the pattern in the string specified to the right, which uses syntax suitable for the ? pattern matching operator in ObjectScript. For details, see the Pattern Matching reference page. |
| NotLike | A string that does not match the pattern in the substring specified to the right, according to the rules for the LIKE predicate in SQL. |
| InFile | Found in the text file whose full pathname is specified to the right. |
| NotInFile | Not found in the text file whose full pathname is specified to the right. |
When InterSystems IRIS indexes virtual documents (thus adding to the search tables), it replaces any vertical bar (|) with a plus sign (+). Take this into consideration when you use the search table to search for content. For example, to search for a message that contains my|string, use my+string as the search criterion.
Rearranging and Modifying Criteria
If you have multiple items in the Extended Criteria section, you can click the up-arrow and down-arrow icons to adjust their order.
To edit an item, click the edit button  for that item.
To delete an item, click X.
How Criteria Are Combined
If Extended Criteria displays contains multiple criteria, they are implicitly joined by AND. For example, suppose that you have three statements visible:
Logical Statement 1
Logical Statement 2
Logical Statement 3
In this case, your filter actually works like this:
Logical Statement 1
AND
Logical Statement 2
AND
Logical Statement 3
To modify this logic, use Add OR and reposition the OR as needed. Suppose you added an OR row and a fourth logical statement to the list shown above. The Extended Criteria panel now looks like this:
Logical Statement 1
Logical Statement 2
Logical Statement 3
OR
Logical Statement 4
And the resulting logic is now:
Logical Statement 1
AND
Logical Statement 2
AND
Logical Statement 3
OR
Logical Statement 4
The operator AND binds more tightly than OR, so the effect of the above sequence is actually:
(1 AND 2 AND 3) OR 4
Viewing Message Details
For each message, InterSystems IRIS provides details about how the message was created and sent. You can display the relevant information in multiple ways. For example:
-
Access the Interoperability > View > Messages page.
-
Select a message.
The right pane then displays the following tabs:
-
Header—Displays the fields in the message header.
-
Body—Displays the fields in the message body.
-
Contents—Displays the contents of the message body in an appropriate format.
-
Trace—Displays a small visual trace of the message and related messages through the production. To see the larger version, click View Full Trace; see the next section.
Note:On a backup mirror member, it may not be possible to view message body data.
-
The Visual Trace page displays the same information, arranged differently; it displays the message trace on the left and the Header, Body, and Contents tabs on the right. In this case, the Header tab includes the Resend button. If you click Resend, the system displays the Resend Messages page, filtered to display only the message you had selected.
Message Header Fields
The Header tab displays the standard fields in any production message header:
-
<ObjectId>—The ID of the message header (and also the message ID; see Message Basics).
-
TargetConfigName— The name of the business host that is intended to receive the message.
-
Type—The message type, Request or Response.
-
Invocation—Indicates how the message was sent. See Invocation Style and Message Time Stamps.
-
CorrespondingMessageId—For a request message, this field contains the message ID of the corresponding response (if any) or it is blank. For a response message, this field contains the message ID of the corresponding request.
-
SessionId—The ID of the session associated with this message. See Sessions.
-
SourceConfigName—The business host that sent the message.
-
SourceBusinessType—BusinessService, BusinessProcess, BusinessOperation, or Unknown.
-
TargetBusinessType—BusinessService, BusinessProcess, BusinessOperation, or Unknown.
-
BusinessProcessId—Every business process that gets executed has an instance and this is the object ID of that instance. If the message is a request, this field identifies the business process in whose context the message was created (sender). If the message is a response, this field identifies the business process to which it is being returned (receiver). This field is empty in various circumstances, for example if an error occurred.
-
TargetQueueName—The destination “address” for the message, this indicates where it is going:
-
If this is a name, it identifies a public queue, such as Ens.ActorOpens in a new tab.
-
If this is a number, it identifies the job ID associated with the private queue of a business host.
-
-
ReturnQueueName—The return “address” for the message, this indicates where it came from:
-
If this is a name, it identifies a public queue, such as Ens.ActorOpens in a new tab.
-
If this is a number, it identifies the job ID associated with the private queue of a business host.
The ReturnQueueId value is listed even if there is no response expected or needed for a particular request message type.
-
-
MessageBodyClassName—The class name for the message body.
-
MessageBodyId—The ID for the message body. This field matches the <ObjectId> field in the Message Body table.
-
Description—A text description of the message. The InterSystems IRIS Business Process Language (BPL) provides text in this field automatically, based on the type of BPL activity that generated the message.
-
SuperSession—The ID for messages sent via HTTP from one production to another. For details, see SendSuperSession.
-
Resent—Indicates whether this is a resent message.
-
Priority—The priority of the message relative to others in the queue, as assigned by the InterSystems IRIS messaging engine. See Message Priority.
-
TimeCreated—The message creation time stamp. See Invocation Style and Message Time Stamps.
-
TimeProcessed—The message usage time stamp. InterSystems IRIS sets this field when the message is taken off of the queue but then resets it to the current time while the message is being processed. Typically, for a completed message, it represents the time that the message processing was completed.
-
Status—Indicates the status of the message. See Message Status.
-
IsError?—The value 1 means that the message encountered an error. The value 0 means the message did not encounter any errors.
-
ErrorStatus—If IsError? is 1, then this is the text associated with the error. When IsError? is 0, ErrorStatus is the string “OK”.
-
Banked—Indicates whether or not this message is part of a message bank.
Message Body Fields
The Body tab displays the message body information. Fields include:
-
The message body class name above the list of fields.
-
If the message body is a standard production message body object, a table displays the following information:
-
<ObjectId>—The object identifier for the message body. This field matches the MessageBodyId field in the Header tab.
-
The name and value of each property in the Message Type class.
If the message body is any other type, there are no additional fields in the display.
-
Message Contents
The Contents tab displays formatted contents of the message body.
The standard production message body appears in colorized XML format, as shown in the following example:
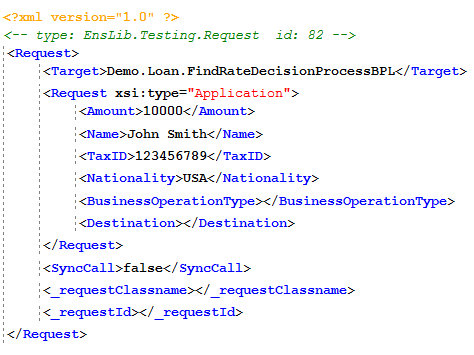
A virtual document appears in segments, with one segment per line.
To view all the contents of large virtual document, it may be necessary to drag the bottom scroll bar far to the right. To view the message in a wider display, click the View Full Contents link or the View Raw Contents link. View Full Contents displays the message formatted by fields and View Raw Contents displays the unprocessed message contents, which can easily be copied and pasted into a text editor. For background information, see Using Virtual Documents in Productions.
Changing the Character Limit for XML Messages in the Contents Tab
When you select a message in the Messages page and then click the Contents tab, the Management Portal displays only the first 20000 characters of the message by default. This character limit prevents the Management Portal from becoming unresponsive while rendering very large messages such as batch files parsed with a record map. However, InterSystems IRIS enables you to modify the character limit by setting either of the following global nodes:
^EnsPortal.Settings("All","MessageContents","OutputSizeLimit")
^EnsPortal.Settings("All","MessageContents","OutputSizeLimit",<MessageBodyClassname>)
<MessageBodyClassname> is an optional node that specifies the class name of the message bodies to which the limit applies. If you set both nodes, the value in the <MessageBodyClassname> node is used.
You can set the nodes to a value of 0 or greater, where 0 indicates no limit and a positive value indicates the number of characters to display in the Contents tab. For example, to increase the character limit for the Contents tab to 30000 characters for the Demo.Loan.Msg.CreditRatingResponse sample message body class, you can issue the following command in the Terminal:
set ^EnsPortal.Settings("All","MessageContents","OutputSizeLimit","Demo.Loan.Msg.CreditRatingResponse") = 30000
The OutputSizeLimit nodes do not affect the behavior of the View Full Contents or View Raw Contents pages. If you click the View Full Contents or View Raw Contents links in the Contents tab for a message, InterSystems IRIS attempts to display the complete message. To set a character limit for either page, you can append &LIMITSIZE=limit to the page URL, where limit indicates the maximum number of characters to display. For example, to set the character limit for the View Raw Contents page to 30000, you might modify the URL, using the <baseURL> for your instance:
http://<baseURL>/csp/proddemo/EnsPortal.MessageContents.zen?HeaderClass=Ens.MessageHeader&HeaderID=3&RAW=1&LIMITSIZE=30000
Viewing the SQL Query Used by the Message Viewer
For debugging purposes, you might want to view the SQL query currently used by the Message Viewer. To do so:
-
Open the Terminal, change to your working namespace, and enter the following command:
Set ^Ens.Debug("UtilEnsMessages","sql")=1This command sets a flag in a debugging global.
-
Access the Interoperability > View > Messages page.
Notice that this page now includes the Show Query button; this button is shown only if the previously mentioned global is set.
-
Select Show Query.

