
Creating and Editing a Record Map
Creating and Editing a Record Map
This section describes how to create and edit a record map. It contains the following sections:
Introduction
You can create a record map using the Record Mapper page of the Management Portal. If your file is a delimited file, you can also use the CSV Record Wizard to further automate the process. As you develop your record map, you can view how a sample file displays in the record map.
Regenerating record maps (including CSVRecord maps) discards manual modifications to generated code. To help guide this principle, the generated parser class methods (GetObject, PutObject, GetRecord, PutRecord) are clearly marked with “DO NOT EDIT” comments.
The Record Mapper page includes a visual representation of the record map structure, and a simple interface which allows you to enter and manipulate the more detailed settings available for the record map components. It also allows you to reposition sibling elements (elements at the same level). One of the more important features of the user interface is that if you have a sample input file, a sample parse of the file will be attempted when the current record map is saved. You can address small issues in your record map directly from the Management Portal.
You can also create a record map directly using XML and the model classes.
Getting Started
To start the Record Mapper, select Interoperability > Build > Record Mapper. From here, you have the following commands:
-
Open—Displays the finder dialog box for you to choose an existing record map to open for editing.
-
New—Initializes the page for you to enter a new record map structure.
-
Save—Saves your record map structure as a class in the namespace in which you are working. Once saved, the object appears in the list of record maps.
-
Save As—Saves your record map structure as a new class in the namespace in which you are working. Once saved, the object appears in the list of record maps.
-
Generate—Generates the record map parser code and the related persistent message record class object.
To generate an object manually use the GenerateObject()Opens in a new tab class method in EnsLib.RecordMap.GeneratorOpens in a new tab. It permits a number of options regarding the persistent structure of the generated objects, as noted in the comments for the method.
-
Delete—Deletes the current record map. You can optionally delete the related persistent message record class and all stored instances of the classes.
-
CSV Wizard—Opens the CSV Record Wizard to help automate the process of creating a record map from a sample file that contains comma separated values (CSV).
The Save operation only writes the current record map to disk. In contrast, the Generate operation generates the parser code and the persistent object structure for the underlying objects.
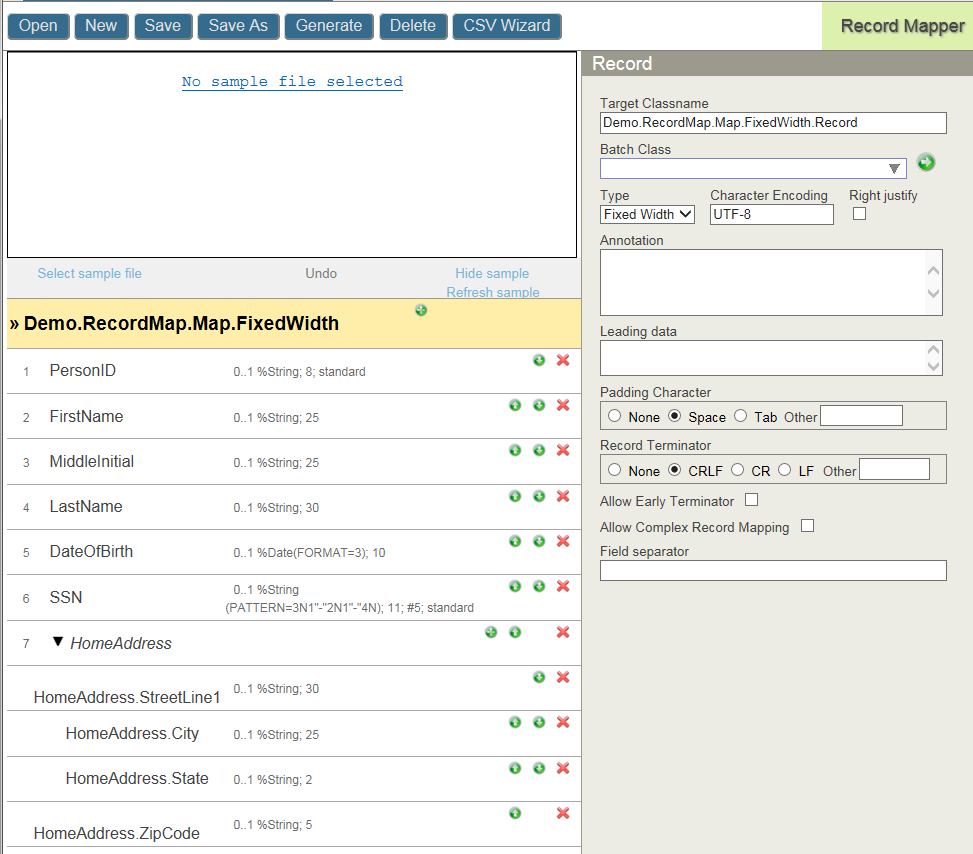
When you select the name of the record map on the left side of the page, you see the record settings on the right, where you can edit the properties of the record map itself. Before you can save a record map, you must add at least one field to your record map. The following sections describe these processes:
Once you have created a new Record Map or opened an existing one, the Record Mapper displays a summary of the fields defined in the Record Map on the left panel and, on the right panel, allows you to set the properties of the Record Map or of the selected field. If you have specified a sample data file, it is displayed above the left panel. For example, the following shows the Record Mapper with the Record Map properties in the right panel:
To export, import, or delete a Record Map, click Interoperability, List, and Record Maps to display the Record Map Lists page.
Common Control Characters
Within a record map, you can use literal control characters as well as printable characters in several places. For example, you can specify a tab character, which is a common control character as well as a comma, which is a printable character, as a separator. You can also specify control characters as a padding character or as one of the record terminator characters. To specify a control character in one of these contexts, you must specify the hexadecimal escape sequence for the character. If you select the space or tab character as the padding character, or CRLF (carriage return followed by a line feed), CR, or LF as the record terminator character in the Record Mapper, the Management Portal automatically generates the hexadecimal representation. If you are specifying another control character as the padding character or in the record terminator or any control character as a separator, you must enter the hexadecimal representation in the corresponding form field. The following table lists the hexadecimal escape sequence for commonly used control characters:
| Character | Hexadecimal representation |
|---|---|
| Tab | \x09 |
| Line feed | \x0A |
| Carriage return | \x0D |
| Space | \x20 |
For additional characters, see https://en.wikipedia.org/wiki/C0_and_C1_control_codesOpens in a new tab or other resources.
If you specify a record terminator in the RecordMap, the incoming message must match the record terminator exactly. For example, if you specify CRLF (\x0D\x0A), then the incoming message record must match that sequence.
Editing the Record Map Properties
Whether you are entering properties for a new record map, starting from the wizard-generated map, or editing an existing map, the process is the same. For the record itself, enter or update values in the following fields:
Name of the record map. You should qualify the record map name with the package name. If you do not provide a package name and specify an unqualified record map name, the record map class is saved in the User package by default.
Name of the class to represent the record. By default, the Record Mapper sets the target class name to a qualified name equal to the record map name followed by “.Record”, but you can change the target class name. You should qualify the target class name with the package name. If you do not provide a package name and specify an unqualified target class name, the target class is saved in the User package by default.
Name of the batch class (if any) which should be associated with this record map.
The type of record; options include the following:
-
Delimited
-
Fixed Width
Character encoding for imported data records.
Flag that specifies that padding characters should appear left of data in fields.
Text that documents the purpose and use of the record map.
Static characters which appear before any data of the actual record contents. If you are using the record map in a complex record map, you must identify the record with leading data.
Character used to pad the value. The padding character is removed by business services from the incoming message and used by business operations to pad the field value to fill fields in fixed-width record maps.
-
None
-
Space
-
Tab
-
Other
Character or characters used to terminate the record.
-
None
-
CRLF
-
CR
-
LF
-
Other
Flag that specifies whether records can be terminated before the end. If allowed, record is treated as if it was padded with the padding character.
Flag that specifies whether record map can be used in a complex record map.
Optional single character used to separate fixed-width fields in records. If specified, input messages must contain this character between fields and business operations write this character between fields.
A list of field separator characters. The first separator delimits the top-level fields in the record. The next separator delimits fields within a top-level composite field. Additional separators delimit fields within nested composite fields.
A single separator character that is used in all repeating fields.
Radio button that specifies there is no quote-style escaping.
Radio button that enables quote-style escaping to allow a separator character to occur in a field value. Any input field can be quoted with the quote character. The field is considered all the characters between the start quote and end quote. Any separator character that appear within the quotes is treated as a literal character, not a separator. On output, any field that contains a separator in its value is quoted with the quote character.
Radio button that enables quote-style escaping to allow a separator character to occur in a field value. This has the same effect as Quote Escaping except that on output all fields are quoted whether they contain a separator character or not.
Character used to quote field contents. This field is displayed if you select the Quote Escaping or the Quote All radio button. If you are using a control character as a quote, you must enter it in hexadecimal; see Common Control Characters.
Determines what happens when the Record Mapper encounters the Record Terminator within a quoted field. If selected, the Record Mapper escapes the Record Terminator, treating it as part of the field data rather than considering it as the end of the record.
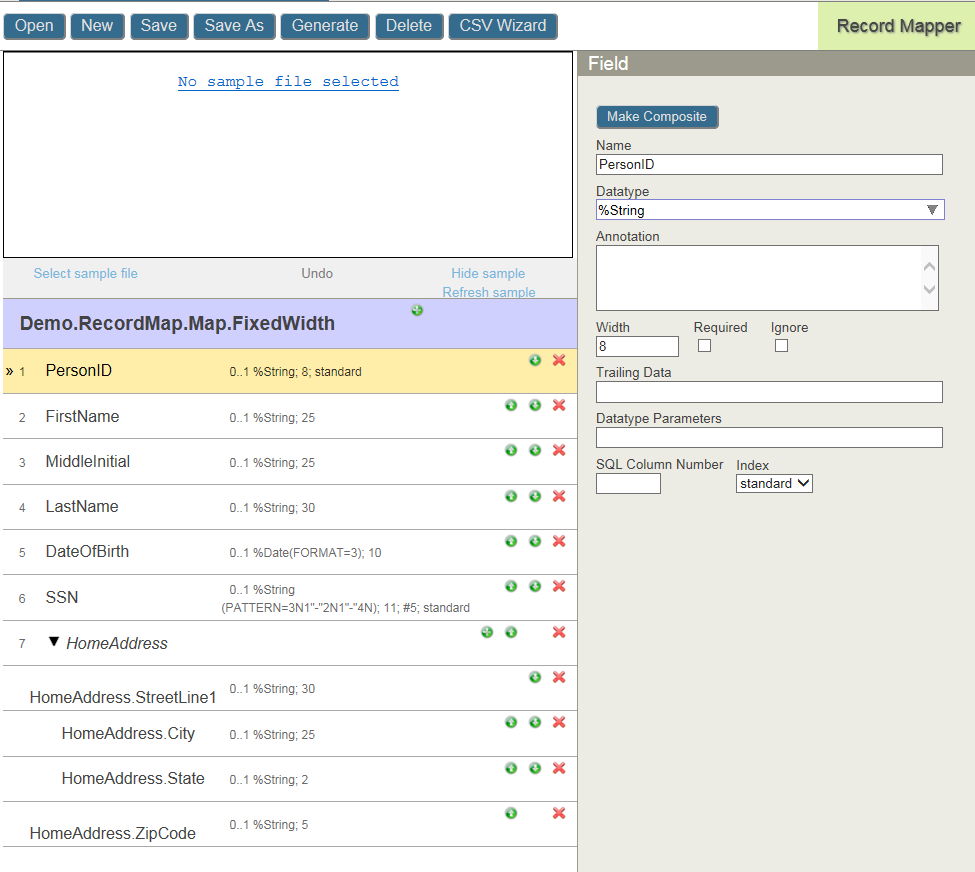
Editing the Record Map Fields and Composites
The Record Mapper left panel displays a summary of the fields defined in the Record Map. If you select a field, the right panel accesses the field properties. For example:
Record maps consist of a sequence of fields and composites. Each composite consists of a series of fields and composites. The Make Composite and Make Field buttons switch between a composite and a data field. For composite fields, you only specify the name and the flag indicating the field is required. Click the green plus sign icon on the record map to add a field or composite to the top level. Clicking on the plus sign of a composite allows you to add a field or composite to it.
While you are adding fields to your record map, you can open a sample file to see how its data maps to the record you are creating.
For delimited record maps, fields within composite fields have different separators. For example, in a record, the top-level field are delimited by commas, but within a composite the fields are delimited by semicolons. For fixed-width record maps, composite fields help organize the data conceptually, but do not impact the processing of the input message.
When you create a composite field in the Record Mapper, composite fields set the default name as a qualified name that matches the composite structure. The qualified field names determine the structure of fields within the generated record class. If you modify the field names to have different qualified names, the level of composite fields in the record map is independent from the structure of the fields in the generated record class.
For each data field you enter the following properties:
Name of the field.
Data type of the field. Select from the following list or enter a custom datatype:
-
%Boolean
-
%Date
-
%Decimal
-
%Double
-
%Integer
-
%Numeric
-
%String
-
%Time
-
%Timestamp
Documents the purpose and use of the field in the record map.
Width of the field.
Flag that specifies that the field is required.
Flag that specifies that the field may contain repeated values using the record map’s repeat separator character.
Flag that specifies the field is ignored on input and not included in the stored record. Using the Ignore property saves storage space for the stored records. On output, InterSystems IRIS outputs an empty value for ignored fields—for fixed-width records, it fills the field with spaces, and for delimited records, it writes two consecutive separators for the empty field.
Characters that must follow this field. Control characters must be entered in hexadecimal; see Common Control Characters.
Parameters (with their values) to apply to the data type. If you specify more than one parameter, separate them with a semicolon. For example:
DISPLAYLIST=,a,b,c;VALUELIST=,1,2,3;MAXLEN=''
For available parameters, see Common Property Parameters.
The SQL column number of the field. This value must either omitted or be between 2 and 4096 (inclusive) as per the values for the SqlColumnNumber property keyword. The column number is of particular use when importing data from CSV files or similar data dumps, as the SQL representation can be replicated easily.
Enumerated value that controls whether the property should be indexed; select one of the following:
-
(blank)—do not index
-
1
-
bitmap
-
idkey
-
unique
The left panel of the Record Mapper is a table with a summary of the field definitions. The columns specify:
-
Top-level field number.
-
Field name.
-
Summary of the properties of the field. The summary contains the following information, separated by ; (semicolon):
-
ignored—present if the Ignore check box is selected.
-
0..1 or 1..1 followed by the datatype and datatype parameter—for optional or required fields, respectively.
-
Field width for fixed-width Record Maps.
-
#nnn—for SQL Column Number, if specified.
-
standard, bitmap, idkey, or unique—type of index, if specified.
For example, an SSN field in a fixed-width Record Map could have a summary 0..1 %String(PATTERN=3N1"-"2N1"-"4N); 11; #5; standard. This means it is an optional field, with a datatype and datatype parameters %String(PATTERN=3N1"-"2N1"-"4N), has a field width of 11, has an SQL column number of 5, and has a standard index.
-
-
Icons that allow you to move the field up or down or to delete the field. For composite fields, the plus icon allows you to add a new subfield.