
Encrypting the SOAP Body
Encrypting the SOAP Body
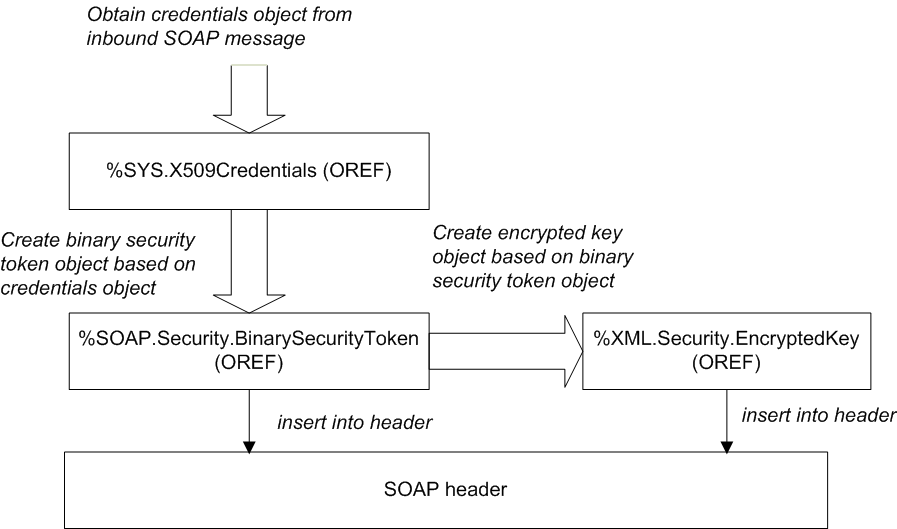
To encrypt the body of SOAP messages, you can use the basic procedure here or the variations described in the subsections. First, the following figure summarizes the process:
In detail, the process is as follows:
-
Optionally include the %soap.inc include file, which defines macros you might need to use.
-
Obtain a credential set that contains the public key of the entity that will receive the SOAP messages, typically from the inbound message that you have received. See Retrieving Credential Sets Programmatically.
For example:
set credset=..SecurityIn.Signature.X509CredentialsBe sure to check the type of the returned object to see if it is an instance of %SYS.X509CredentialsOpens in a new tab, as discussed in Retrieving Credential Sets Programmatically.
-
Create a binary security token that contains the certificate associated with that credential set. To do so, call the CreateX509Token() class method of %SOAP.Security.BinarySecurityTokenOpens in a new tab. For example:
set bst=##class(%SOAP.Security.BinarySecurityToken).CreateX509Token(credset)This method returns an instance of %SOAP.Security.BinarySecurityTokenOpens in a new tab that represents the <BinarySecurityToken> header element.
-
Add this token to the WS-Security header element. To do so, call the AddSecurityElement() method of the SecurityOut property of your web client or web service. For the method argument, use the token you just created. For example:
do ..SecurityOut.AddSecurityElement(bst) -
Create the encrypted key based on the binary security token. To do so, call the CreateX509() class method of %XML.Security.EncryptedKeyOpens in a new tab. For example:
set enckey=##class(%XML.Security.EncryptedKey).CreateX509(bst)This method generates a symmetric key, uses it to encrypt the SOAP body, and returns an instance of %XML.Security.EncryptedKeyOpens in a new tab which represents the <EncryptedKey> header element. This header element contains the symmetric key, encrypted by the public key contained in the given binary security token.
-
Optionally modify the encrypted key instance to use different algorithms. See Specifying the Block Encryption Algorithm and Specifying the Key Transport Algorithm.
-
Add the <EncryptedKey> element to the WS-Security header element. To do so, call the AddSecurityElement() method of the SecurityOut property of your web client or web service. For the element to add, specify your instance of %XML.Security.EncryptedKeyOpens in a new tab.
For example:
do ..SecurityOut.AddSecurityElement(enckey)This step also adds an <EncryptedData> element as the child of the <Body> element.
-
Send the SOAP message. The SOAP body is encrypted and the WS-Security header is included.
The WS-Security header includes the <BinarySecurityToken> and <EncryptedKey> elements.
See the general comments in Adding Security Header Elements.
Variation: Using Information That Identifies the Certificate
A <BinarySecurityToken> contains a certificate in serialized, base-64–encoded format. You can omit this token and instead use information that identifies the certificate; the recipient uses this information to retrieve the certificate from the appropriate location. To do so, use the preceding steps, with the following changes:
-
Skip steps 3 and 4. That is, do not add a <BinarySecurityToken>.
-
In step 5 (creating the encrypted key), use the credential set from step 1 (rather than a binary security token) as the first argument to CreateX509(). For example:
set enckey=##class(%XML.Security.EncryptedKey).CreateX509(credset,,referenceOption)For the third argument (referenceOption), you can specify how the <Signature> element uses the certificate.
If you specify a credential set as the first argument (as we are doing in this variation), the default for referenceOption is $$$SOAPWSReferenceThumbprint. Optionally specify a value as described in the subsection. You can use any value except $$$SOAPWSReferenceDirect.
Reference Options for X.509 Certificates
The section A Brief Look at the WS-Security Header shows one way in which certificates are used in SOAP messages. In the example there, the digital signature consists of two header elements:
-
A <BinarySecurityToken> element, which carries the certificate in serialized, base-64–encoded form.
-
A <Signature> element, which carries the signature and which includes a direct reference to the binary security token.
There are other possible forms of reference. For example, the <Signature> could instead include a thumbprint of the certificate, and the <BinarySecurityToken> is not needed in the message in this case.
When you create an encrypted key, digital signature, or SAML assertion, you can specify the referenceOption argument, which controls how the newly created element uses the certificate (or more, specifically, the key material) contained in the credentials.
For reference, this argument can have any of the following values. These values are macros defined in the %soap.inc include file:
The element includes a direct reference to the binary security token. Specifically, a <KeyInfo> element is created with a <SecurityTokenReference> subelement with a <Reference> subelement whose URI attribute is a local reference to the <BinarySecurityToken>. In order to use this option, you must be sure to also add the security token to the WS-Security header; details are given in the relevant sections.
The element includes the SHA-1 thumbprint of the X.509 certificate.
The element includes the SubjectKeyIdentifier of the X.509 certificate.
The element includes a <KeyInfo> element with a <SecurityTokenReference> child with an <X509Data> child that contains an <X509IssuerSerial> element.
The element includes a <KeyInfo> element with an <X509Data> child that contains an <X509Certificate> element. This usage is not recommended by the WS-Security specification for the <Signature> and <EncryptedKey> elements, but may be used for the <Assertion> element.
The element includes a <KeyInfo> element with an <X509Data> child that contains an <X509IssuerSerial> element. This usage is not recommended by the WS-Security specification for the <Signature> and <EncryptedKey> elements, but may be used for the <Assertion> element.
The element includes a <KeyInfo> element with an X509Data> child that contains an <X509SKI> element. This usage is not recommended by the WS-Security specification for the <Signature> and <EncryptedKey> elements, but may be used for the <Assertion> element.
The element includes a <KeyInfo> element with an <X509Data> child that contains an <X509SubjectName> element. This usage is not recommended by the WS-Security specification for the <Signature> and <EncryptedKey> elements, but may be used for the <Assertion> element.
The element includes a <KeyInfo> element with a <KeyValue> child that contains an <RSAKeyValue> element. This usage is not recommended by the WS-Security specification for the <Signature> and <EncryptedKey> elements, but may be used for the <Assertion> element.
Variation: Using a Signed SAML Assertion
To encrypt using the public key contained in the certificate in a signed SAML assertion, do the following:
-
Skip steps 1–4 in the preceding steps.
-
Create a signed SAML assertion with a <SubjectConfirmation> element that uses the Holder-of-key method . See Creating and Adding SAML Tokens.
-
Create the <EncryptedKey> element. When you do so, use the signed SAML assertion as the first argument to the CreateX509() class method. For example:
set enckey=##class(%XML.Security.EncryptedKey).CreateX509(signedassertion) -
Continue with step 5 in the preceding steps.